Looking Through Water
Underwater Fog and Refraction
- Make water transparent.
- Sample depth and grab what's rendered.
- Add underwater fog.
- Create fake refractions.
This is the fourth tutorial in a series about creating the appearance of flowing materials. In it, we will make a water surface transparent, adding underwater fog and refraction.
This tutorial is made with Unity 2017.4.4f1.
Transparent Water
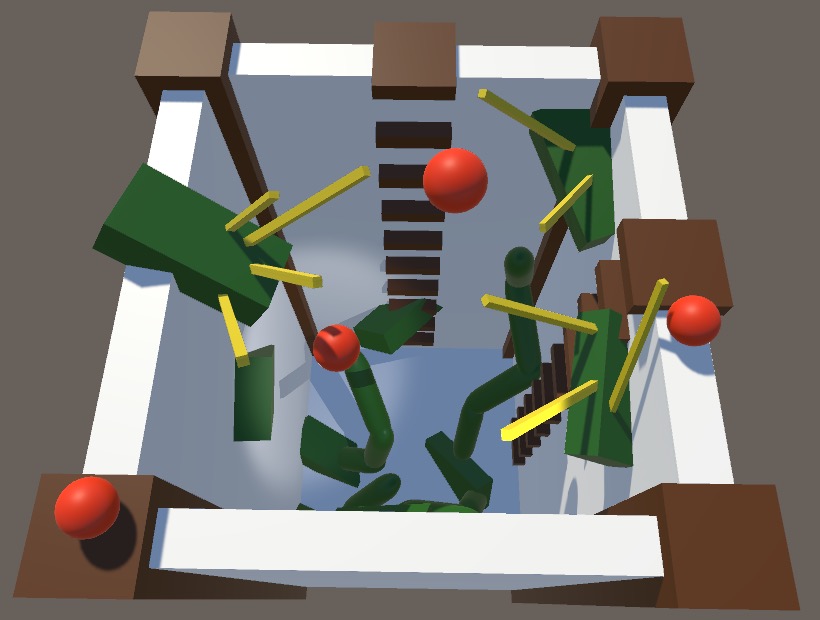
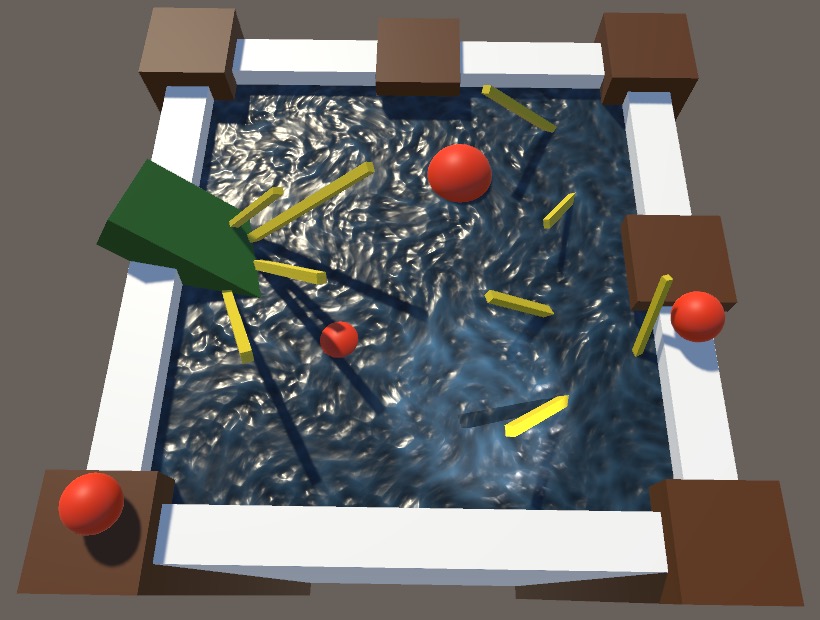
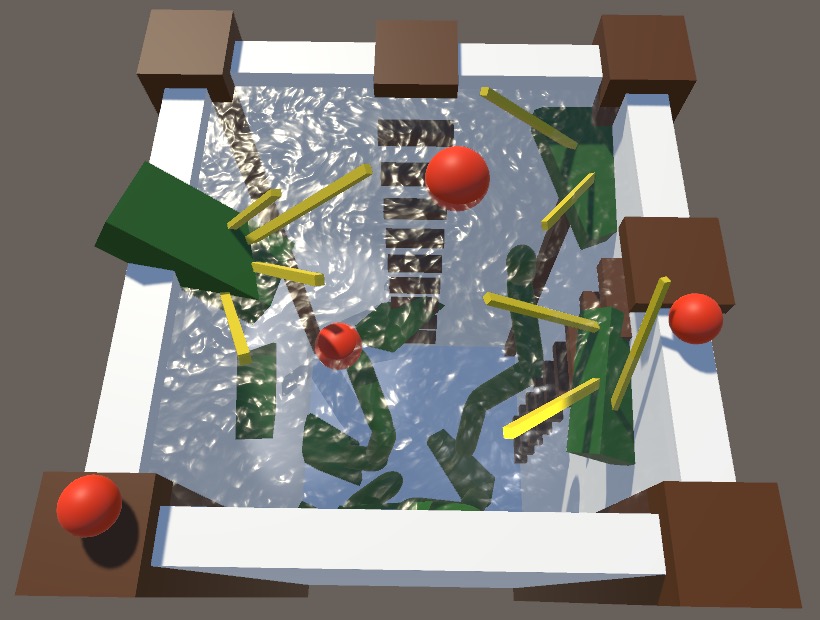
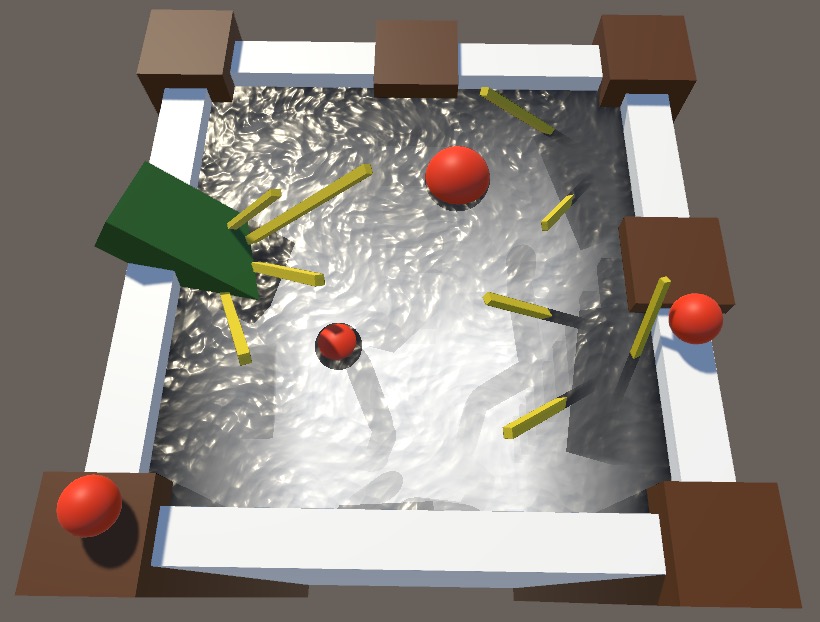
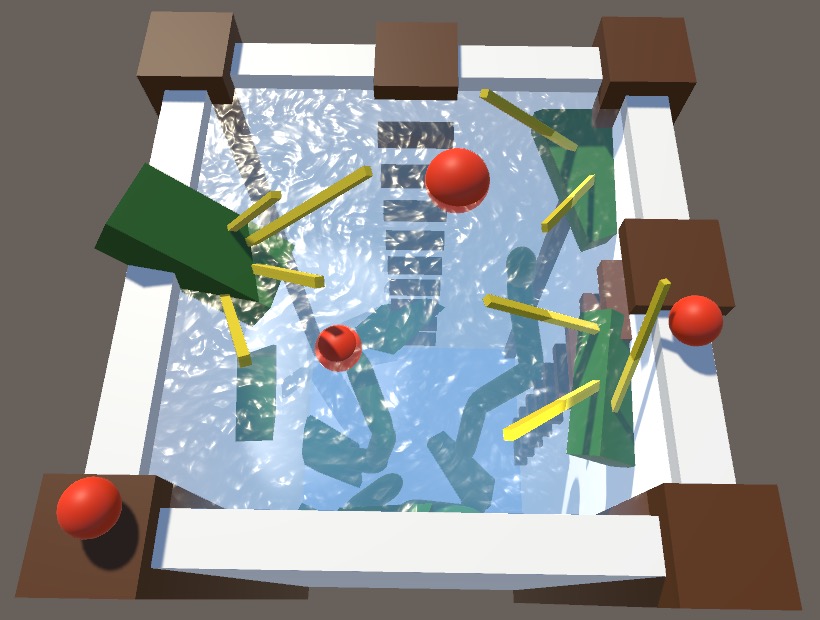
The water effects that we have created thus far are fully opaque. This works for water or other liquids that are very murky, or are covered with a layer of debris, foam, plants, or something else that blocks light. But clear water is transparent, which requires a transparent shader. So we're going to adjust our surface shaders to work with transparency. We're only going to concern ourselves with looking into the water. An underwater camera requires a different approach.
Underwater Scenery
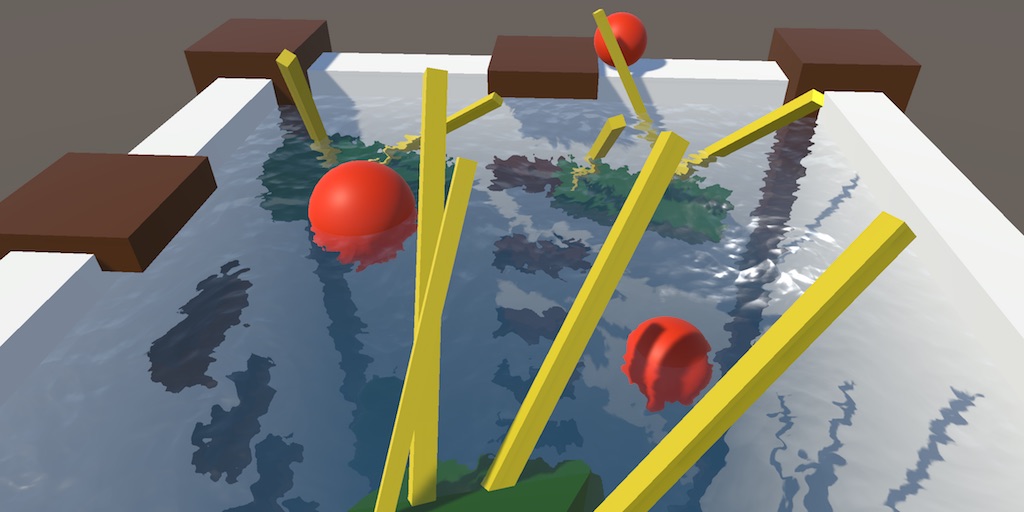
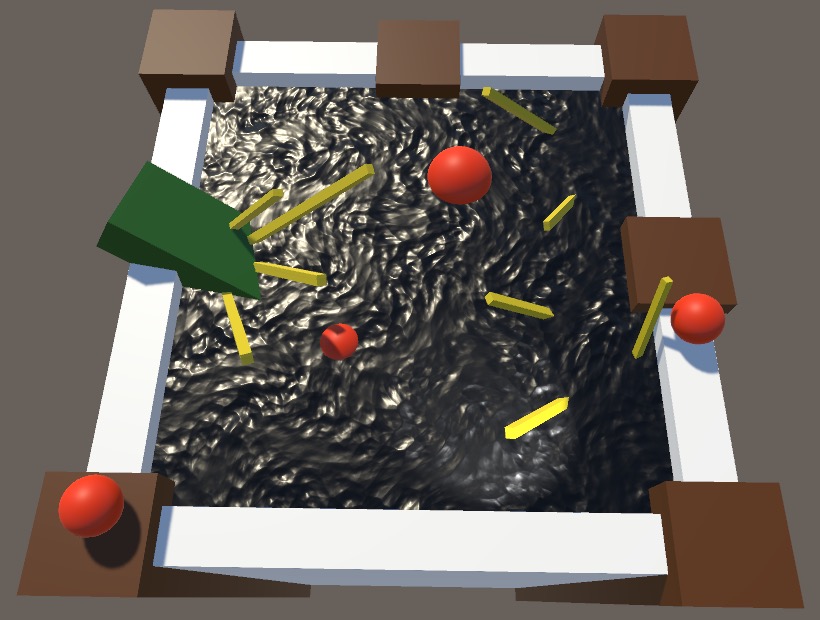
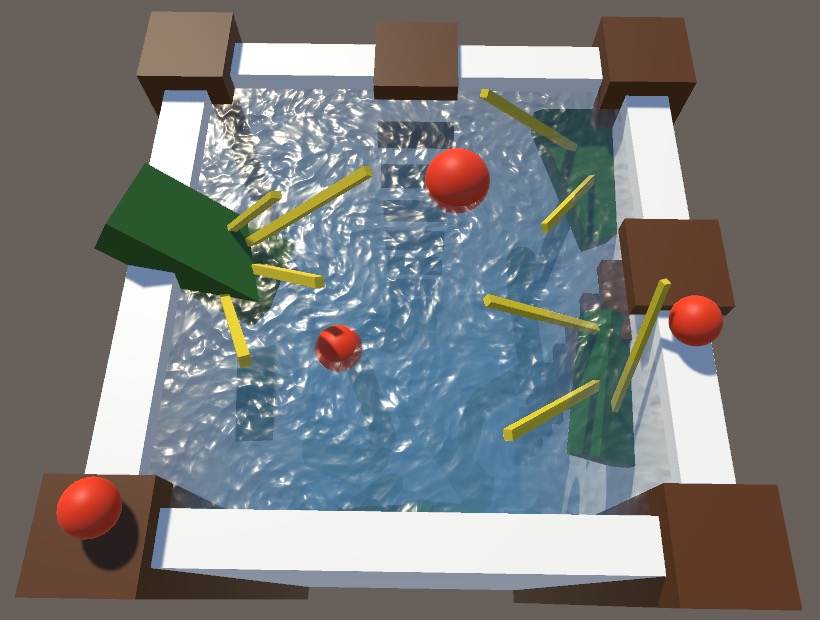
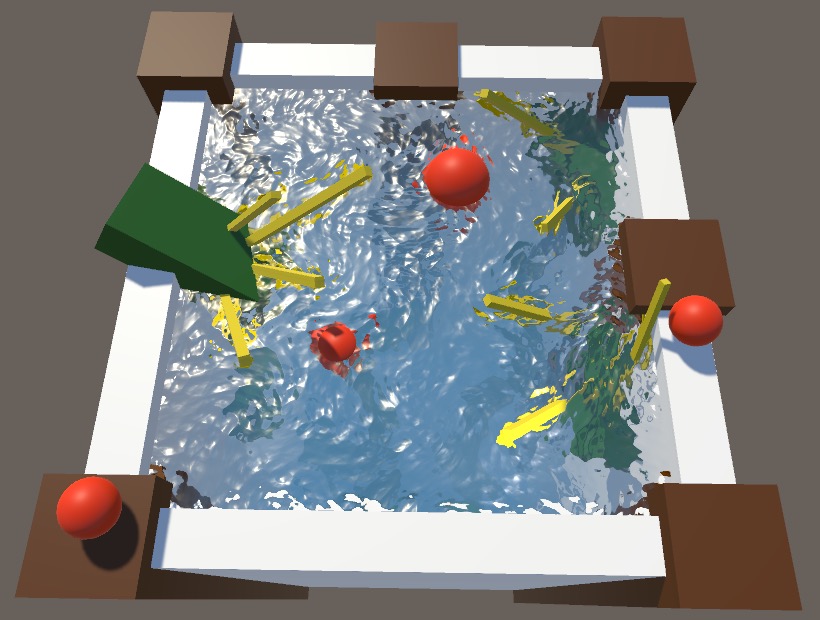
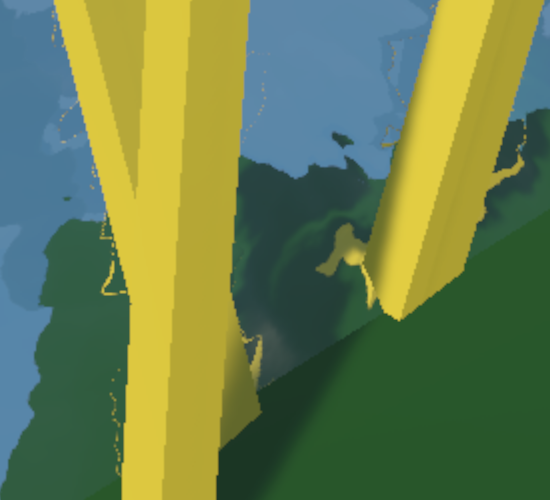
First, create some underwater scenery so that there is something interesting below the water surface. I have created a deep pit with some objects that suggest plant growth, both deep below and at the surface. I also added two spheres that float on the water. To brighten the bottom part of the pit, I added an intense spotlight that shines from above the water. Both this light and the main directional light have shadows enabled.
We're going to work with the Distortion Flow effect, so add a quad with that material to the scene, representing the water surface. It is still fully opaque, so it will hide everything that is underwater.
Transparent Surface Shader
To make the Distortion Flow shader support transparency, change its RenderType tag to Transparent and give it a Queue tag set to Transparent as well. That makes it work with any replacement shaders that you might have and moves the shader to the transparent rendering queue, now being drawn after all opaque geometry has been rendered.
Tags { "RenderType"="Transparent" "Queue"="Transparent" }
We also have to instruct Unity to generate transparent shaders from our surface shader code, which is done by adding the alpha keyword to the surface pragma directive.
#pragma surface surf Standard alpha fullforwardshadows
Because we're using the standard physically-based lighting function, our shader will use Unity's transparent rendering mode by default, which keep highlights and reflections on top of its otherwise transparent surface. The alternative would be the fade mode, which fades out everything equally, which is not realistic.
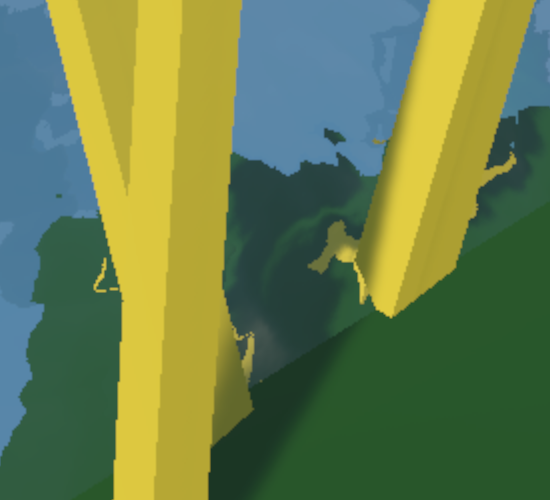
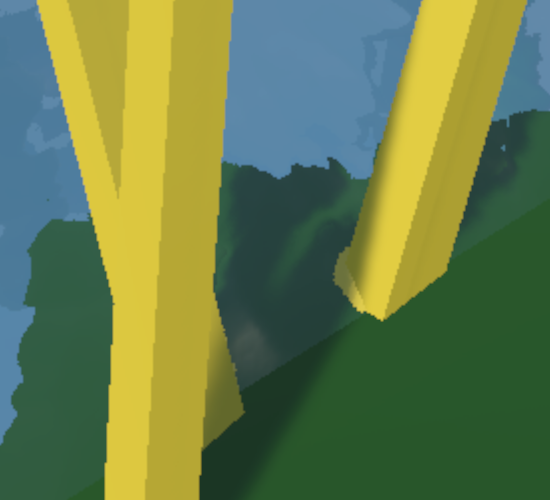
We can now control the water transparency by adjusting the alpha component of our material's albedo.
Removing Water Shadows
The water no longer receives shadows, even when its alpha is set back to 1. That's because it is now put in the transparent rendering queue. Because of the way that these objects are rendered, they cannot receive shadows. While you could somewhat work around this limitation, that's not possible with a simple surface shader.
However, our water does still cast shadows, which removes all the direct lighting underwater. We don't want this, because it makes the underwater scenery too dark. First, we can remove the fillforwardshadows keyword, because we no longer need to support any shadow type.
#pragma surface surf Standard alpha//fullforwardshadows
This does not yet remove the shadows of the main directional light. Those are still added by the default diffuse shadow caster pass, which we've inherited from the diffuse fallback shader. To eliminate the shadows, remove the fallback.
//FallBack "Diffuse"
Underwater Fog
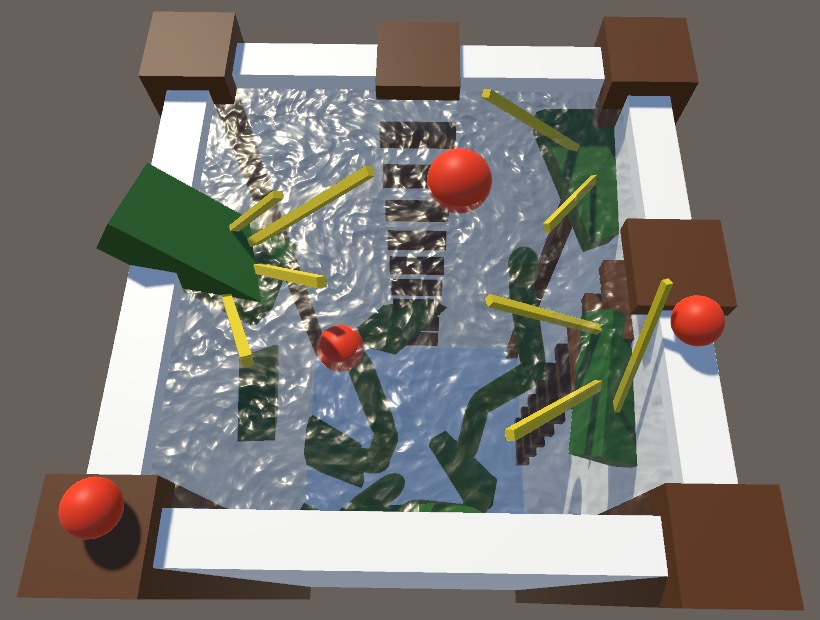
Water isn't perfectly transparent. It absorbs part of the light that travels through it, and scatters some of it as well. This happens in any medium, but it is more noticeable in water than in air. Clear water absorbs a little bit of light, but different frequencies are absorbed at different rates. Blue light is absorbed the least, which is why things turn blue the deeper you go. This isn't the same as a partially-transparent water surface, because that doesn't change the underwater color based on depth.
The underwater light absorption and scattering behaves somewhat like fog. Although a fog effect is a poor approximation of what really goes on, it is a cheap and easy-to-control way of having underwater depth affect the color of what we see. So we'll use the same approach as described in Rendering 18, Fog, except only underwater.
There are two ways that we could add underwater fog to our scene. The first is to use a global fog and apply it to everything that gets rendered before the water surface. This can work fine when you have a single uniform water level. The other approach is to apply the fog while rendering a water surface. That makes the fog specific to each surface, which allows water at different levels—and even at different orientations—without affecting anything that's not underwater. We'll use the second approach.
Finding the Depth
Because we're going to change the color of whatever is below the water surface, we can no longer rely on the default transparent blending of the standard shader. When rendering the fragment of a water surface, we have to somehow determine what the final color behind the water surface should be. Let's create a ColorBelowWater function for that, and put it in a separate LookingThroughWater.cging include file. Initially, it just returns black.
#if !defined(LOOKING_THROUGH_WATER_INCLUDED)
#define LOOKING_THROUGH_WATER_INCLUDED

float3 ColorBelowWater () {
	return 0;
}

#endif
To test this color, we'll directly use it for our water's albedo, temporarily overriding its true surface albedo. Also set alpha to 1, so we're not distracted by regular transparency.
		#include "Flow.cginc"
		#include "LookingThroughWater.cginc"

		…

		void surf (Input IN, inout SurfaceOutputStandard o) {
			…

			fixed4 c = (texA + texB) * _Color;
			o.Albedo = c.rgb;
			o.Metallic = _Metallic;
			o.Smoothness = _Glossiness;
			o.Alpha = c.a;

			o.Albedo = ColorBelowWater();
			o.Alpha = 1;
		}
To figure out how far light has traveled underwater, we have to know how far away whatever lies below the water is. Because the water is transparent, it doesn't write to the depth buffer. All opaque objects have already been rendered, so the depth buffer contains the information that we need.
Unity makes the depth buffer globally available via the _CameraDepthTexture variable, so add it to our LookingThroughWater include file.
sampler2D _CameraDepthTexture;
To sample the depth texture, we need the screen-space coordinates of the current fragment. We can retrieve those by adding a float4 screenPos field to our surface shader's input structure, then pass it to ColorBelowWater.
		struct Input {
			float2 uv_MainTex;
			float4 screenPos;
		};

		…

		void surf (Input IN, inout SurfaceOutputStandard o) {
			…

			o.Albedo = ColorBelowWater(IN.screenPos);
			o.Alpha = 1;
		}
The screen position is simply the clip space position, with the range of its XY components changed from −1–1 to 0–1. Besides that, the orientation of the Y component might be changed, depending on the target platform. It is a four-component vector because we're dealing with homogeneous coordinates. As explained in Rendering 7, Shadows, we have to divide XY by W to get the final depth texture coordinates. Do this in ColorBelowWater.
float3 ColorBelowWater (float4 screenPos) {
	float2 uv = screenPos.xy / screenPos.w;
	return 0;
}
Now we can sample the background depth via the SAMPLE_DEPTH_TEXTURE macro, and then convert the raw value to the linear depth via the LinearEyeDepth function.
	float2 uv = screenPos.xy / screenPos.w;
	float backgroundDepth =
		LinearEyeDepth(SAMPLE_DEPTH_TEXTURE(_CameraDepthTexture, uv));
This is the depth relative to the screen, not the water surface. So we need to know the distance between the water and the screen as well. We find it by taking the Z component of screenPos—which is the interpolated clip space depth—and converting it to linear depth via the UNITY_Z_0_FAR_FROM_CLIPSPACE macro.
	float backgroundDepth =
		LinearEyeDepth(SAMPLE_DEPTH_TEXTURE(_CameraDepthTexture, uv));
	float surfaceDepth = UNITY_Z_0_FAR_FROM_CLIPSPACE(screenPos.z);
The underwater depth is found by subtracting the surface depth from the background depth. Let's use that as our final color to see whether it is correct, scaled down so at least part of the gradient is visible.
	float surfaceDepth = UNITY_Z_0_FAR_FROM_CLIPSPACE(screenPos.z);
	float depthDifference = backgroundDepth - surfaceDepth;

	return depthDifference / 20;
You could get an upside-down result at this point. To guard against that, check whether the texel size of the camera depth texture is negative in the V dimension. If so, invert the V coordinate. We only have to check this on platforms that work with top-to-bottom coordinates. In those cases, UNITY_UV_STARTS_AT_TOP is defined as 1.
sampler2D _CameraDepthTexture, _WaterBackground;
float4 _CameraDepthTexture_TexelSize;

float3 ColorBelowWater (float4 screenPos) {
	float2 uv = screenPos.xy / screenPos.w;
	#if UNITY_UV_STARTS_AT_TOP
		if (_CameraDepthTexture_TexelSize.y < 0) {
			uv.y = 1 - uv.y;
		}
	#endif
	…
}
Grabbing the Background
To adjust the color of the background, we have to retrieve it somehow. The only way that's possible with a surface shader is by adding a grab pass. This is done by adding GrabPass {} before the CGPROGRAM block in our shader.
	SubShader {
		Tags { "RenderType"="Transparent" "Queue"="Transparent" }
		LOD 200

		GrabPass {}

		CGPROGRAM
		…
		ENDCG
	}
Unity will now add an extra step in the rendering pipeline. Just before the water gets drawn, what's rendered up to this points gets copied to a grab-pass texture. This happens each time something that uses our water shader gets rendered. We can reduce this to a single extra draw by giving the grabbed texture an explicit name. That is done by putting a string with the texture's name inside the otherwise empty block of the grab pass. Then all water surfaces will use the same texture, which gets grabbed right before the first water gets drawn. Let's name the texture _WaterBackground.
GrabPass { "_WaterBackground" }
Add a variable for this texture, then sample it using the same UV coordinates that we used to sample the depth texture. Using that as the result of ColorBelowWater should produce the same image as the fully-transparent water earlier.
sampler2D _CameraDepthTexture, _WaterBackground;

float3 ColorBelowWater (float4 screenPos) {
	…

	float3 backgroundColor = tex2D(_WaterBackground, uv).rgb;
	return backgroundColor;
}
Applying Fog
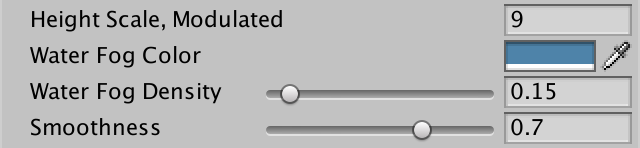
Besides the depth and the original color, we also need settings to control the fog. We'll use simple exponential fog, so we need to add a color and a density property to our shader.
	Properties {
		…
		_WaterFogColor ("Water Fog Color", Color) = (0, 0, 0, 0)
		_WaterFogDensity ("Water Fog Density", Range(0, 2)) = 0.1
		_Glossiness ("Smoothness", Range(0,1)) = 0.5
		_Metallic ("Metallic", Range(0,1)) = 0.0
	}
I made the fog color the same as the water's albedo, which has hex code 4E83A9FF. I set the density to 0.15.
Add the corresponding variables to the include file, then use them to compute the fog factor and interpolate the color.
float3 _WaterFogColor;
float _WaterFogDensity;

float3 ColorBelowWater (float4 screenPos) {
	…

	float3 backgroundColor = tex2D(_WaterBackground, uv).rgb;
	float fogFactor = exp2(-_WaterFogDensity * depthDifference);
	return lerp(_WaterFogColor, backgroundColor, fogFactor);
}
Custom Blending
The underwater fog works, but we're currently using it as the albedo of the water surface. This is incorrect, because the albedo is affected by lighting. Instead, we must add the underwater color to the surface lighting, which we can do by using it as the emissive color. But we must modulate this by the water's albedo. The more opaque it is, the less we see of the background. Also, we have to restore the original alpha, because that affects how the water surface gets lit.
fixed4 c = (texA + texB) * _Color; o.Albedo = c.rgb; o.Metallic = _Metallic; o.Smoothness = _Glossiness; o.Alpha = c.a; o.Emission = ColorBelowWater(IN.screenPos) * (1 - c.a);//o.Alpha = 1;
This is almost correct, except that the final alpha value is used to blend with what was already rendered, so we end up with the original background showing through. We're already blending with the background, it shouldn't happen twice. We have to disable the default blending by setting alpha back to 1 after the final fragment color has been calculated. This can be done by adding a function to adjust the final color of the surface shader. Add finalcolor:ResetAlpha to the pragma directive of the surface shader.
#pragma surface surf Standard alpha finalcolor:ResetAlpha
Then add a void ResetAlpha function. This function has the original input, the surface output, and an inout color as parameters. All we need to do is set that color's alpha component to 1.
 		void ResetAlpha (Input IN, SurfaceOutputStandard o, inout fixed4 color) {
			color.a = 1;
		}
Fake Refraction
When light passes through the boundary between media with different density, it changes direction. It's like a reflection, but instead of bouncing off it goes through at a different angle. The change of direction depends on the angle at which the light crossed the boundary. The shallower the angle, the stronger the refraction.
Just like with reflections, accurate refractions would require us to trace rays into the scene, but we'll settle for an approximation. Reflections are made either with reflection probes, screen-space reflections, or planar reflections with a separate rendering from a different point of view. The same techniques can be used for refraction.
Because we already use screen-space data to create the underwater fog, we'll reuse it for screen-space refractions. This allows us to add a refraction effect with little extra effort, although the result won't be realistic. That's fine, because most of the time having the underwater scenery wiggle a bit in sync with the surface motion is enough to create a convincing illusion of refraction, especially for shallow water.
Jittering the Background Sample
We'll create fake refractions by jittering the UV coordinates that we use to sample the background. Let's see what that looks like when we apply a constant diagonal offset, by adding 1 to both coordinates. Do this before the perspective division, so perspective applies to the offset as well.
	float2 uvOffset = 1;
	float2 uv = (screenPos.xy + uvOffset) / screenPos.w;
We get a diagonal offset, but it is not symmetrical. The vertical offset is less than the horizontal. At least, that's the case when the image is wider than it is tall. To equalize the offsets, we have to multiply the V offset by the image width divided by its height. We can use the size information of the depth texture for this. Its Z component contains the width in pixels and its W component contains the height in pixels. However, we can also use its Y component, which contains reciprocal of the width, using a multiplication instead of a division.
	float2 uvOffset = 1;
	uvOffset.y *=
		_CameraDepthTexture_TexelSize.z * _CameraDepthTexture_TexelSize.y;
	float2 uv = (screenPos.xy + uvOffset) / screenPos.w;
But Y can be negative, to signal an inverted V coordinate. So we should take its absolute, which doesn't require additional work.
	uvOffset.y *=
		_CameraDepthTexture_TexelSize.z * abs(_CameraDepthTexture_TexelSize.y);
Note that this means that the effect does not depend on the resolution of the image, but is affected by its aspect ratio.
Using the Normal Vector
To make the offset wiggle, we'll use the XY coordinates of the tangent-space normal vector as the offset. That makes no physical sense, but is synchronized with the apparent motion of the surface. Add a property for this to ColorBelowWater.
float3 ColorBelowWater (float4 screenPos, float3 tangentSpaceNormal) {
	float2 uvOffset = tangentSpaceNormal.xy;
	…
}
And pass it the final tangent-space normal of the water surface.
o.Emission = ColorBelowWater(IN.screenPos, o.Normal) * (1 - c.a);
The X and Y components of the normal vector work because they lie in the tangent plane. For a flat surface, they are both zero, which produces no offset. The higher the water ripples get, the greater the offset becomes and the stronger the refraction effect gets. We can control the overall strength of the effect via a shader property. A range of 0–1 will do.
		_WaterFogDensity ("Water Fog Density", Range(0, 2)) = 0.1
		_RefractionStrength ("Refraction Strength", Range(0, 1)) = 0.25
Add the corresponding variable to our include file and use it to modulate the offset.
float _RefractionStrength;

float3 ColorBelowWater (float4 screenPos, float3 tangentSpaceNormal) {
	float2 uvOffset = tangentSpaceNormal.xy * _RefractionStrength;
	…
}
Full-strength refraction is rather strong. I've reduced it to 0.25.

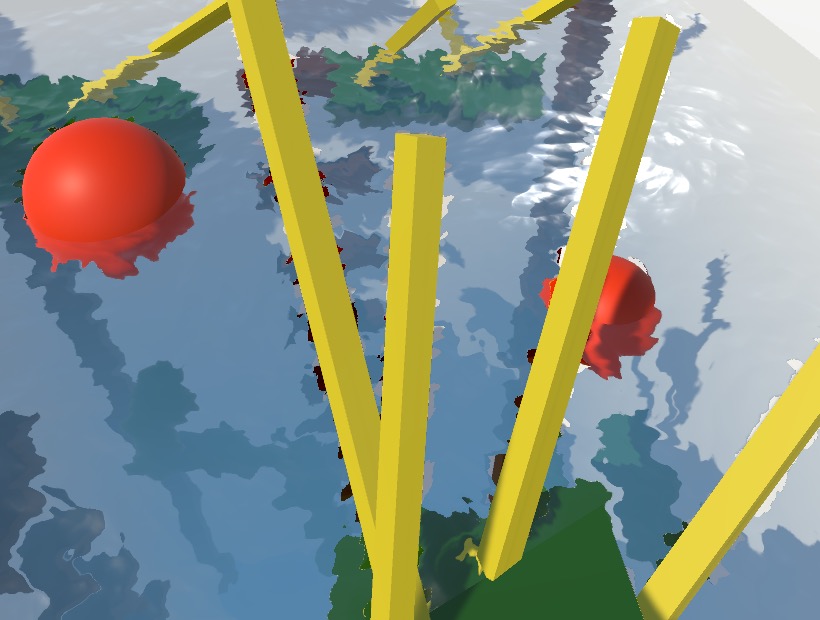
Only Refract Underwater
We now have a nice fake refraction effect, but it also includes things that are not underwater. That happens because the UV coordinates can end up with an offset that places the final sample inside something that sits in front of the water.
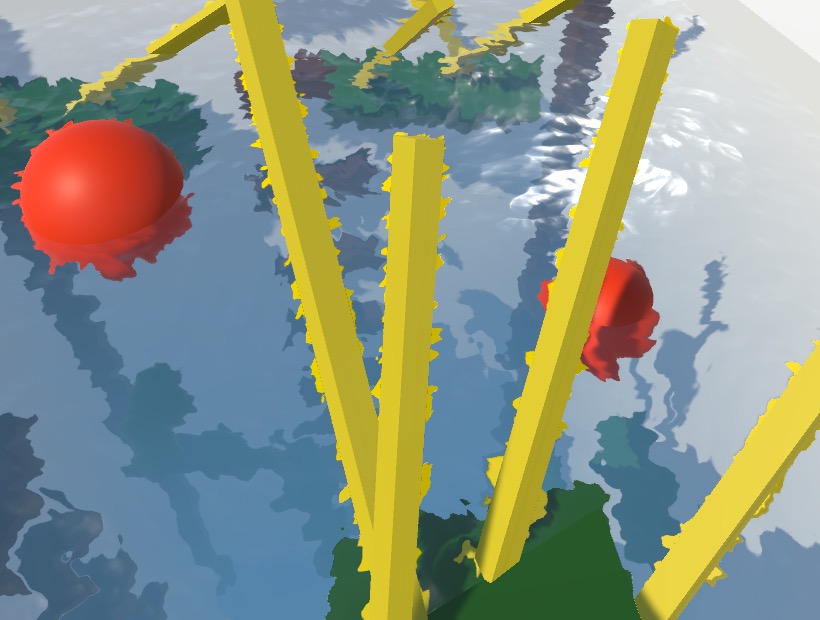
This is a very obvious mistake that we have to eliminate. We can detect whether we've hit the foreground by checking whether the depth difference that we use for the fog is negative. If so, we've sampled a fragment that's in front of the water. As we don't know what's behind that point, we cannot produce a meaningful refraction. So let's just eliminate the offset and use the original UV for the final color sample.
	float depthDifference = backgroundDepth - surfaceDepth;

	if (depthDifference < 0) {
		uv = screenPos.xy / screenPos.w;
		#if UNITY_UV_STARTS_AT_TOP
			if (_CameraDepthTexture_TexelSize.y < 0) {
				uv.y = 1 - uv.y;
			}
		#endif
	}

	float3 backgroundColor = tex2D(_WaterBackground, uv).rgb;
That removes most mistaken color samples, but doesn't fix the fog yet. We also have to sample the depth again, with the reset UV, before determining the fog factor.
	if (depthDifference < 0) {
		uv = screenPos.xy / screenPos.w;
		#if UNITY_UV_STARTS_AT_TOP
			…
		#endif
		backgroundDepth =
			LinearEyeDepth(SAMPLE_DEPTH_TEXTURE(_CameraDepthTexture, uv));
		depthDifference = backgroundDepth - surfaceDepth;
	}
That fixed the fog as well, but we're still getting a thin line of artifacts around the edge of the refractions that we eliminated. It can be hard to spot sometimes, but can be very obvious too, especially when the water animates.
These artifacts exist because of blending when sampling the grabbed texture. That could be fixed by using point filtering, but we cannot control the filtering mode of the grab texture via a surface shader. We'll do it the hard way, by multiplying the UV by the texture size, discarding the fractions, offsetting to the texel center, and then dividing by the texture size. Let's create an AlignWithGrabTexel function for this, which can also take care of the coordinate flipping. Then use that function to find the final UV coordinates.
float2 AlignWithGrabTexel (float2 uv) {
	#if UNITY_UV_STARTS_AT_TOP
		if (_CameraDepthTexture_TexelSize.y < 0) {
			uv.y = 1 - uv.y;
		}
	#endif

	return
		(floor(uv * _CameraDepthTexture_TexelSize.zw) + 0.5) *
		abs(_CameraDepthTexture_TexelSize.xy);
}

float3 ColorBelowWater (float4 screenPos, float3 tangentSpaceNormal) {
	…
	float2 uv = AlignWithGrabTexel((screenPos.xy + uvOffset) / screenPos.w);

	…

	if (depthDifference < 0) {
		uv = AlignWithGrabTexel(screenPos.xy / screenPos.w);
		//#if UNITY_UV_STARTS_AT_TOP
		//	…
		//#endif
		…
	}

	…
}
That should remove the artifact lines, but not always. Because we rely on the depth buffer, MSAA must be disabled as well. So either use forward rendering without MSAA, or use deferred rendering. Even then, the artifacts can still appear in the scene or game window, depending on whether their size is even or odd. To verify that they are indeed gone, you have to make a build and play that.
While we got rid of most of the incorrect refractions, we still get some weirdness close to the water surface. This is where refractions can suddenly get eliminated. We can smooth that out by scaling down the final offset based on the depth difference. Instead of only discarding negative refractions, multiply the offset by the saturated depth difference. That reduces refractions up to a depth difference of 1.
//if (depthDifference < 0) {uvOffset *= saturate(depthDifference); uv = AlignWithGrabTexel((screenPos.xy + uvOffset) / screenPos.w); backgroundDepth = LinearEyeDepth(SAMPLE_DEPTH_TEXTURE(_CameraDepthTexture, uv)); depthDifference = backgroundDepth - surfaceDepth;//}
It is still possible to get weird results where refractions are eliminated, but in most cases it is no longer obvious.
Directional Flow
Our Distortion Flow shader is now complete. We can give the Directional Flow shader the same treatment, with just a few changes.
Shader "Custom/DirectionalFlow" {
	Properties {
		…
		_WaterFogColor ("Water Fog Color", Color) = (0, 0, 0, 0)
		_WaterFogDensity ("Water Fog Density", Range(0, 2)) = 0.1
		_RefractionStrength ("Refraction Strength", Range(0, 1)) = 0.25
		_Glossiness ("Smoothness", Range(0,1)) = 0.5
		_Metallic ("Metallic", Range(0,1)) = 0.0
	}
	SubShader {
		Tags { "RenderType"="Opaque" }
		LOD 200

		GrabPass { "_WaterBackground" }

		CGPROGRAM
		#pragma surface surf Standard alpha finalcolor:ResetAlpha
		#pragma target 3.0

		#pragma shader_feature _DUAL_GRID

		#include "Flow.cginc"
		#include "LookingThroughWater.cginc"

		…

		struct Input {
			float2 uv_MainTex;
			float4 screenPos;
		};

		…

		void surf (Input IN, inout SurfaceOutputStandard o) {
			…
			fixed4 c = dh.z * dh.z * _Color;
			c.a = _Color.a;
			o.Albedo = c.rgb;
			o.Normal = normalize(float3(-dh.xy, 1));
			o.Metallic = _Metallic;
			o.Smoothness = _Glossiness;
			o.Alpha = c.a;

			o.Emission = ColorBelowWater(IN.screenPos, o.Normal) * (1 - c.a);
		}

		void ResetAlpha (Input IN, SurfaceOutputStandard o, inout fixed4 color) {
			color.a = 1;
		}

		ENDCG
	}
	//FallBack "Diffuse"
}
The fake refractions don't work for the Waves shader, which displaces vertices and doesn't use tangent-space normals. Underwater fog could work though, if you limit the wave height so you never see through multiple waves at the same time. You could also use Waves as a basis on which to apply smaller tangent-space ripples, to which you can then add fake refractions.