Physics
Pushing a Sphere Around
- Control the velocity of a rigidbody sphere.
- Support vertical movement via jumping.
- Detect the ground and its angle.
- Use a ProBuilder to create test scenes.
- Move along slopes.
This is the second installment of a tutorial series about controlling the movement of a character. This time we'll use the physics engine to create more realistic motion and support more complex environments.
This tutorial is made with Unity 2019.2.11f1. It also uses the ProBuilder package.
Rigidbody
In the previous tutorial we constrained our sphere to remain inside a rectangular area. It made sense to explicitly program such a restriction because it's simple. But if we want our sphere to move around a complex 3D environment then we have to support interaction with arbitrary geometry. Rather than implement that ourselves we'll make use of Unity's existing physics engine, which is NVIDIA's PhysX.
There are two general ways to approach controlling a character in combination with a physics engine. First is the rigidbody approach, which is to have the character behave like a regular physics object while indirectly controlling it, either by applying forces or changing its velocity. Second is the kinematic approach, which is to have direct control while only querying the physics engine to perform custom collision detection.
Rigidbody Component
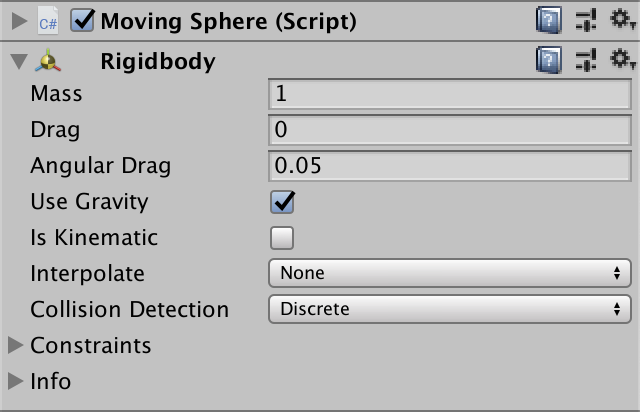
We'll use the first approach to control the sphere, which means that we have to add a Rigidbody component to it. We can use the default configuration of the rigidbody.
Adding the component is enough to turn our sphere into a physics object, provided that it still has its SphereCollider component as well. We defer to the physics engine for collisions from now on, so remove the area code from Update.
Vector3 newPosition = transform.localPosition + displacement;//if (newPosition.x < allowedArea.xMin) {// newPosition.x = allowedArea.xMin;// velocity.x = -velocity.x * bounciness;//}//…transform.localPosition = newPosition;
With our own constraints removed the sphere is again free to move past the edges of the plane, at which point it plummets due to gravity. This happens because we never override the sphere's Y position.
We no longer need the configuration options for the allowed area. Our custom bounciness is also no longer necessary.
//[SerializeField, Range(0f, 1f)]//float bounciness = 0.5f;//[SerializeField]//Rect allowedArea = new Rect(-5f, -5f, 10f, 10f);
If we still want to constrain the sphere to remain on the plane we can do that by adding other objects to block its path. For example create four cubes, scaling and positioning them so they form a wall around the plane. That will prevent the sphere from falling, although it behaves weird when colliding with the walls. Because we have 3D geometry at this point it's also a good idea to enable shadows again, to get a better sense of depth.
When trying to move into a corner the sphere becomes jittery, as the physics engine and our own code fight to position the sphere. We move it into the wall, then PhysX resolves the collision by pushing it back out. If we stop forcing it into the wall then PhysX will keep the sphere moving due to momentum.
Controlling Rigidbody Velocity
If we want to use the physics engine then we should let it control the position of our sphere. Adjusting the position directly would effectively be teleporting, which is not what we want. Instead, we have to indirectly control the sphere, either by applying forces to it or by adjusting its velocity.
We already have this indirect control over position, as we influence velocity instead. All we have to do is change our code so it overrides the velocity of the Rigidbody component instead of adjusting the position ourselves. We need to access the component for that, so keep track of it via a body field that gets initialized in an Awake method.
	Rigidbody body;

	void Awake () {
		body = GetComponent<Rigidbody>();
	}
Remove the displacement code from Update and instead assign our velocity to the body's.
//Vector3 displacement = velocity * Time.deltaTime;//Vector3 newPosition = transform.localPosition + displacement;//transform.localPosition = newPosition;body.velocity = velocity;
But physics collisions and such also affect velocity, so retrieve it from the body before adjusting it to match the desired velocity.
		velocity = body.velocity;
		float maxSpeedChange = maxAcceleration * Time.deltaTime;
		velocity.x =
			Mathf.MoveTowards(velocity.x, desiredVelocity.x, maxSpeedChange);
		velocity.z =
			Mathf.MoveTowards(velocity.z, desiredVelocity.z, maxSpeedChange);
		body.velocity = velocity;
Frictionless Movement
We now adjust the velocity of the sphere, which PhysX uses to move it. Then collision are resolved, which can adjust the velocity, which we then adjust again, and so on. The resulting motion looks like what we had before, although the sphere is more sluggish and doesn't reach its max speed. That's because PhysX applies friction. While that is more realistic it makes it harder to configure our sphere, so let's eliminate friction and also bounciness. That's done by creating a new physics material via Asset / Create / Physic Material—yes it's spelled Physic in the menu—and setting all values to zero and the Combine modes to Minimum.
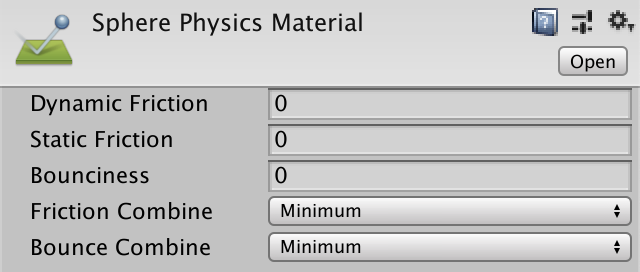
Assign this physics material to the sphere's collider.

Now it is no longer subject to any friction nor any bounciness.
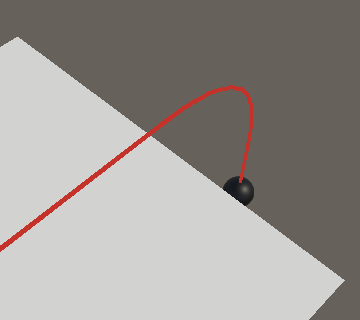
It might appear that the sphere still bounces a tiny bit when colliding with a wall. That happens because PhysX doesn't prevent collisions, it instead detects them after they happened and then moves rigidbodies so they're no longer intersecting. In the case of fast movement this might take more than one physics simulation step, so we can see this depenetration happen.
If movement is really fast then the sphere might end up passing through the wall entirely or get depenetrated toward the other side, which is more likely with a thin wall. You can prevent this by changing the Collision Detection mode of the Rigidbody, but that's usually only needed when moving really fast.
Also, the sphere now slides instead of rolls, so we might as well freeze its rotation in all dimensions, which we can do via the Constraints checkboxes of the Rigidbody component.

Fixed Update
The physics engine uses a fixed time step, regardless of the frame rate. Although we already have given control over the sphere to PhysX we still influence its velocity. For best results we should adjust velocity in lockstep with the fixed time step. We do that by splitting our Update method in two parts. The part where we check for input and set the desired velocity can remain in Update, while the adjustment of the velocity should move to a new FixedUpdate method. To make that work we have to store the desired velocity in a field.
Vector3 velocity, desiredVelocity;
	void Update () {
		Vector2 playerInput;
		playerInput.x = Input.GetAxis("Horizontal");
		playerInput.y = Input.GetAxis("Vertical");
		playerInput = Vector2.ClampMagnitude(playerInput, 1f);

		//Vector3 desiredVelocity =
		desiredVelocity =
			new Vector3(playerInput.x, 0f, playerInput.y) * maxSpeed;
	}

	void FixedUpdate () {
		velocity = body.velocity;
		float maxSpeedChange = maxAcceleration * Time.deltaTime;
		velocity.x =
			Mathf.MoveTowards(velocity.x, desiredVelocity.x, maxSpeedChange);
		velocity.z =
			Mathf.MoveTowards(velocity.z, desiredVelocity.z, maxSpeedChange);
		body.velocity = velocity;
	}
The FixedUpdate method gets invoked at the start of each physics simulation step. How often that happens depends on the time step, which is 0.02—fifty times per second—by default, but you can change it via the Time project settings or via Time.fixedDeltaTime.
Depending on your frame rate FixedUpdate can get invoked zero, one, or multiple times per invocation of Update. Each frame a sequence of FixedUpdate invocations happen, then Update gets invoked, then the frame gets rendered. This can make the discrete nature of the physics simulation obvious when the physics time step is too large relative to the frame time.
You can solve that by either decreasing the fixed time step or by enabling the Interpolate mode of a Rigidbody. Setting it to Interpolate makes it linearly interpolate between its last and current position, so it will lag a bit behind its actual position according to PhysX. The other option is Extrapolate, which interpolates to its guessed position according to its velocity, which is only really acceptable for objects that have a mostly constant velocity.
Note that increasing the time step means the sphere covers more distance per physics update, which can result in it tunneling through the walls when using discrete collision detection.
Jumping
As our sphere can now navigate a 3D physics world let's give it the ability to jump.
Jumping on Command
We can use Input.GetButtonDown("Jump") to detect whether the player pressed a jump button for this frame, which is the space key by default. We do this in Update, but just like adjusting the velocity we'll delay the actual jump until the next invocation of FixedUpdate. So keep track of whether a jump is desired via a boolean desiredJump field.
	bool desiredJump;

	…

	void Update () {
		…

		desiredJump = Input.GetButtonDown("Jump");
	}
But we might end up not invoking FixedUpdate next frame, in which case desiredJump is set back to false and the desire to jump will be forgotten. We can prevent that by combining the check with its previous value via the boolean OR operation, or the OR assignment. That way it remains true once enabled until we explicitly set it back to false.
desiredJump |= Input.GetButtonDown("Jump");
Check whether a jump is desired after adjusting the velocity and before applying it in FixedUpdate. If so, reset desiredJump and invoke a new Jump method, which initially simply adds 5 to the velocity's Y component, simulating a sudden upward acceleration.
	void FixedUpdate () {
		…

		if (desiredJump) {
			desiredJump = false;
			Jump();
		}
		body.velocity = velocity;
	}

	void Jump() {
		velocity.y += 5f;
	}
This will make the sphere move upward until it inevitably falls back down due to gravity.
Jump Height
Let's make it configurable how high our sphere can jump. We could do that by directly controlling the jump velocity, but that's not intuitive as the relationship between initial jump velocity and jump height isn't trivial. It's more convenient to control the jump height directly, so let's do that.
	[SerializeField, Range(0f, 10f)]
	float jumpHeight = 2f;

Jumping requires overcoming gravity, so the vertical speed needed depends on it. Specifically, `v_y=sqrt(-2gh)` where `g` is gravity and `h` is the desired height. The minus sign is in there because `g` is assumed to be negative. We can retrieve it via Physics.gravity.y, which can also be configured via the Physics project settings. We're using the default gravity vector, which is 9.81 straight down, matching Earth's average gravity.
	void Jump () {
		velocity.y += Mathf.Sqrt(-2f * Physics.gravity.y * jumpHeight);
	}
Note that we most likely fall a bit short of the desired height due to the discrete nature of the physics simulation. The maximum would be reached somewhere in between time steps.
Jumping While on the Ground
Currently we can jump at any moment, even while already in the air, which makes it possible to remain airborne forever. A proper jump can only be initiated while the sphere is on the ground. We cannot directly ask the Rigidbody whether it is currently touching the ground, but we can get notified when it collided with something, so we'll use that.
If MovingSphere has an OnCollisionEnter method then it will get invoked after PhysX detected a new collision. A collision remains alive as long as the objects stay in contact with another. After that an OnCollisionExit method gets invoked, if it exists. Add both methods to MovingSphere, setting a new onGround boolean field to true in the first and to false in the latter.
	bool onGround;

	…

	void OnCollisionEnter () {
		onGround = true;
	}

	void OnCollisionExit () {
		onGround = false;
	}
Now we can jump only when we're on the ground, which for now we assume to be the case when we're touching something. If we're not in contact with anything then a desired jump should be ignored.
	void Jump () {
		if (onGround) {
			velocity.y += Mathf.Sqrt(-2f * Physics.gravity.y * jumpHeight);
		}
	}
This works when the sphere is only touching the ground plane, but if it also briefly touches a wall then jumping will become impossible. That happens because OnCollisionExit got invoked for the wall, while we're still in contact with the ground. The solution is to not rely on OnCollisionExit but instead add an OnCollisionStay method, which gets invoked each physics step as long as the collision remains alive. Set onGround to true in this method as well.
//void OnCollisionExit () {// onGround = false;//}void OnCollisionStay () { onGround = true; }
Each physics step begins with invoking all FixedUpdate methods, after which PhysX does its thing, and at the end the collision methods get invoked. So when FixedUpdate gets invoked onGround will have been set to true during the last step if there were any active collisions. All we have to do to keep onGround valid is to set it back to false at the end of FixedUpdate.
	void FixedUpdate () {
		…
		onGround = false;
	}
Now we can jump as long as we're in contact with something.
No Wall Jumping
Allowing a jump when touching anything means that we could also jump when in the air but touching a wall instead of the ground. If we want to prevent that we have to be able to distinguish between the ground and something else.
It makes sense to define the ground as a mostly horizontal plane. We could check whether what we're colliding with satisfied this criteria by inspecting the normal vector of the contact points of the collision.
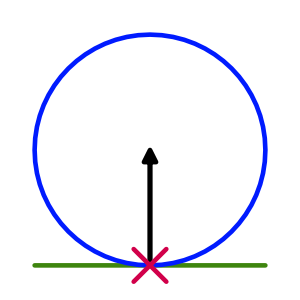
A simple collision has a single point where both shapes touch, for example when our sphere touches the ground plane. Usually the sphere penetrated the plane a bit, which PhysX resolved by pushing the sphere directly away from the plane. The direction of the push is the normal vector of the contact point. Because we're using a sphere this vector always points from the contact point on the sphere's surface to its center.
In reality it can get more messy than that because there can be multiple collisions and penetration might persist for more than one simulation step, but we don't really need to worry about that at this point. What we do need to realize is that a single collision can consist of multiple contacts. That's not possible for a plane-sphere collision, but is possible when a concave mesh collider is involved.
We can get the collision information by adding a Collision parameter to both OnCollisionEnter and OnCollisionStay. Instead of directly setting onGround to true we'll forward that responsibility to a new EvaluateCollision method, passing it the data.
	void OnCollisionEnter (Collision collision) {
		//onGround = true;
		EvaluateCollision(collision);
	}

	void OnCollisionStay (Collision collision) {
		//onGround = true;
		EvaluateCollision(collision);
	}

	void EvaluateCollision (Collision collision) {}
The amount of contact points can by found via the contactCount property of Collision. We can use that to loop through all points via the GetContact method, passing it an index. Then we can access the point's normal property.
	void EvaluateCollision (Collision collision) {
		for (int i = 0; i < collision.contactCount; i++) {
			Vector3 normal = collision.GetContact(i).normal;
		}
	}
The normal is the direction that the sphere should be pushed, which is directly away from the collision surface. Assuming that it is a plane, the vector matches the plane's normal vector. If the plane were horizontal then its normal would point straight up, so its Y component should be exactly 1. If this is the case then we're touching the ground. But let's be lenient and accept Y components that are 0.9 or greater.
			Vector3 normal = collision.GetContact(i).normal;
			onGround |= normal.y >= 0.9f;
Air Jumps
At this point we can only jump while on the ground, but games often allow double or even triple jumps while in the air. Let's support that and make it configurable how many air jumps are allowed.
	[SerializeField, Range(0, 5)]
	int maxAirJumps = 0;

We now have to keep track of the jump phase so we know whether another jump is allowed. We can do that via an integer field that we set to zero at the start of FixedUpdate if we're on the ground. But let's move that code along with the velocity retrieval to a separate UpdateState method, to keep FixedUpdate short.
	int jumpPhase;

	…

	void FixedUpdate () {
		//velocity = body.velocity;
		UpdateState();
		…
	}

	void UpdateState () {
		velocity = body.velocity;
		if (onGround) {
			jumpPhase = 0;
		}
	}
From now on we increment the jump phase each time we jump. And we are allowed to jump either when on the ground or while we haven't reached the maximum allowed air jumps yet.
	void Jump () {
		if (onGround || jumpPhase < maxAirJumps) {
			jumpPhase += 1;
			velocity.y += Mathf.Sqrt(-2f * Physics.gravity.y * jumpHeight);
		}
	}
Limiting Upward Velocity
Air jumping in quick succession makes it possible to achieve an upward speed that is much higher than that of a single jump. We're going to change that so we cannot exceed the jump speed needed to achieve the desired height with a single jump. The first step is to isolate the calculated jump speed in Jump.
			jumpPhase += 1;
			float jumpSpeed = Mathf.Sqrt(-2f * Physics.gravity.y * jumpHeight);
			velocity.y += jumpSpeed;
If we already have an upward speed then subtract it from the jump speed before adding it to the velocity's Y component. That way we'll never exceed the jump speed.
			float jumpSpeed = Mathf.Sqrt(-2f * Physics.gravity.y * jumpHeight);
			if (velocity.y > 0f) {
				jumpSpeed = jumpSpeed - velocity.y;
			}
			velocity.y += jumpSpeed;
But if we're already going faster than the jump speed then we do not want a jump to slow us down. We can prevent that by ensuring that the modified jump speed never goes negative. That's done by taking the maximum of the modified jump speed and zero.
			if (velocity.y > 0f) {
				jumpSpeed = Mathf.Max(jumpSpeed - velocity.y, 0f);
			}
Air Movement
We currently do not care whether the sphere is on the ground or in the air when controlling it, but it might make sense that an airborne sphere is harder to control. The amount of control can vary between none and total. It depends on the game. So let's make it configurable, by adding a separate max air acceleration, set to 1 by default. That drastically reduces the control while in the air but doesn't entirely remove it.
	[SerializeField, Range(0f, 100f)]
	float maxAcceleration = 10f, maxAirAcceleration = 1f;

Which acceleration we use when calculating the max speed change in FixedUpdate now depends on whether we're on the ground or not.
		float acceleration = onGround ? maxAcceleration : maxAirAcceleration;
		float maxSpeedChange = acceleration * Time.deltaTime;
Slopes
We're using physics to move our sphere on a small flat plane, collide with walls, and jump around. This all works fine, so it's time to consider more complex environments. In the rest of this tutorial we'll investigate basic movement when slopes are involved.
ProBuilder Test Scene
You can create a slope by rotating a plane or cube, but that's an inconvenient way to create a level. So we'll import the ProBuilder package and use that to create some slopes. The ProGrids package is also handy for grid snapping, though it's not needed in Unity 2019.3 if you happen to use that. ProBuilder is fairly straightforward to use, but might take some time to get comfortable with. I won't explain how to use it, just keep in mind that it's primarily about faces, with edges and vertices being secondary.
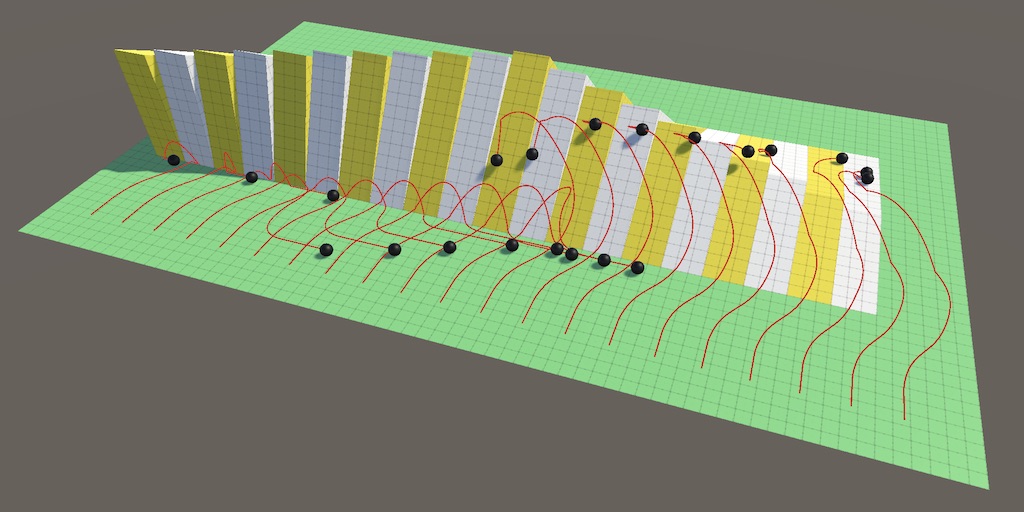
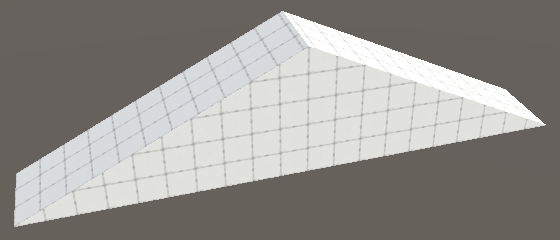
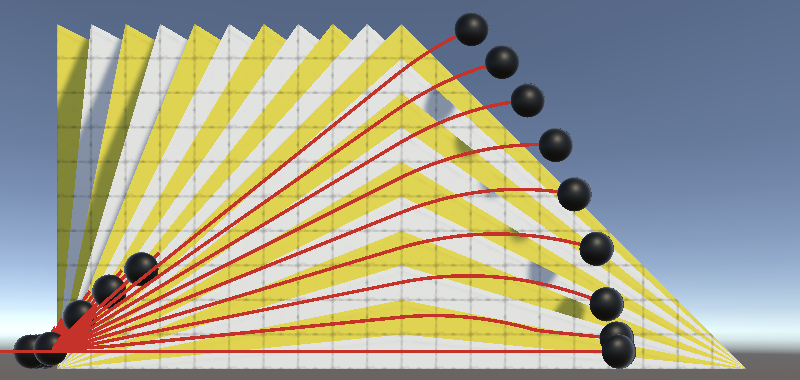
I created a slope by starting with a ProBuilder cube, stretching it to 10×5×3, extruding it another 10 units in the X dimension, and collapsing the X faces to their bottom edges. That produces a triangular double ramp with slopes on both sides that are ten units long and 5 units high.
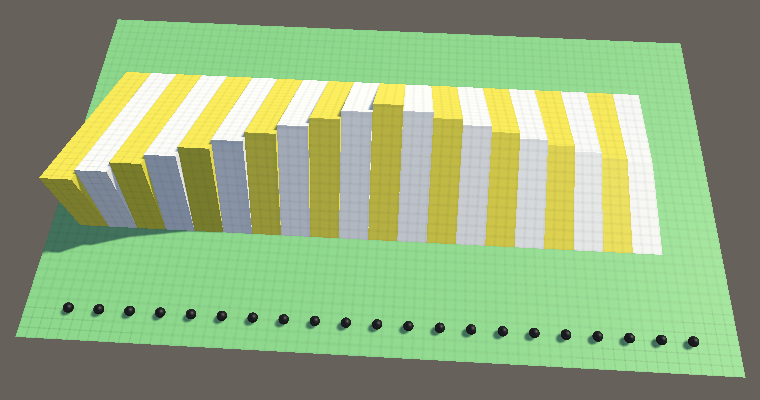
I placed ten of those next to each other on a plane, varying their height from one to ten units. Including the flat ground, that gives us slopes with angles that are roughly 0.0°, 5.7°, 11.3°, 16.7°, 21.8°, 26.6°, 31.0°, 35.0°, 38.7°, 42.0°, and 45.0°.
After that I placed another ten slopes, this time starting with the 45° version and pulling the tip to the left one unit per slope until I ended up with a vertical wall. That gives us angles that are roughly 48.0°, 51.3°, 55.0°, 59.0°, 63.4°, 68.2°, 73.3°, 78.7°, 84.3°, and 90.0°.
I finished the test scene by turning our sphere into a prefab and adding 21 instances, one per slope, from fully horizontal to fully vertical.
If you don't want to design the level yourself you can grab it from this tutorial's repository.
Slope Testing
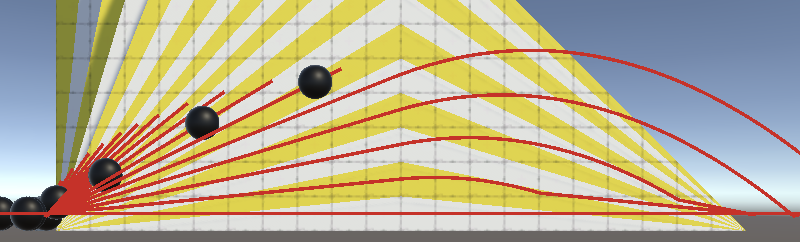
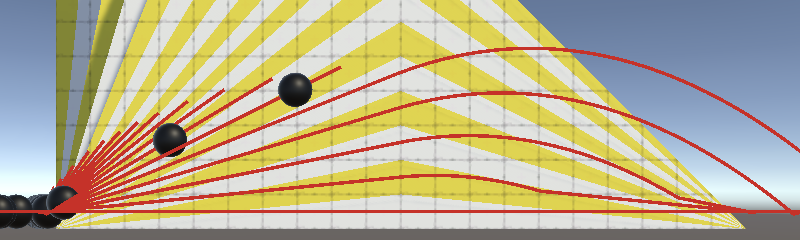
Because all sphere instances respond to user input we can control them all at the same time. This makes it possible to test the behavior of the sphere when interacting with many slope angles at once. For most of these tests I'll enter play mode and then continually press right.
With the default sphere configuration we see that the first five spheres move at almost exactly the same horizontal speed regardless of the slope angle. The sixth barely makes it across a bit later while the rest roll back or are fully blocked by the steep slopes.
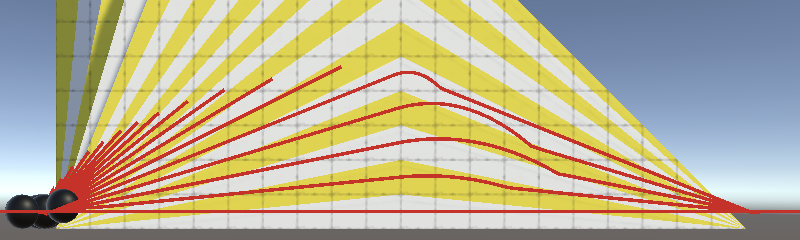
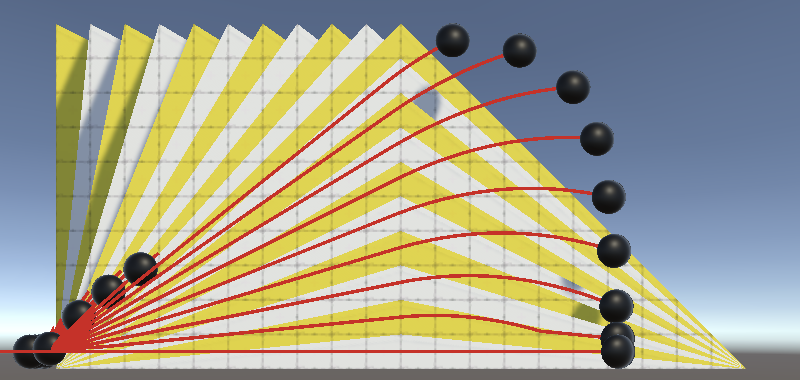
Because most spheres end up effectively in the air let's set the max air acceleration to zero. That way we only take acceleration while grounded into consideration.
The difference between one and zero air acceleration doesn't matter much for the spheres that go flying because they launch themselves off the ramp. But the sixth sphere now no longer makes it to the other side and the other spheres are also stopped earlier by gravity. That happened because their slopes are too steep to keep sufficient momentum. In the case of the sixth sphere its air acceleration was just enough to push it over the top.
Ground Angle
Currently we use 0.9 as the threshold to classify something as ground or not, but that is arbitrary. We could use any threshold in the 0–1 range. Trying both extremes produces very different results.
Let's make the threshold configurable, by controlling a max ground angle as that's more intuitive than the Y component of the slope's normal vector. Let's use 25° as the default.
	[SerializeField, Range(0f, 90f)]
	float maxGroundAngle = 25f;

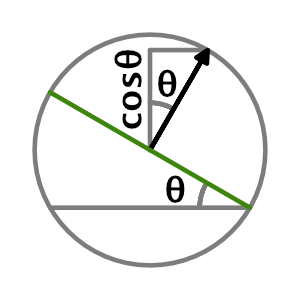
When a surface is horizontal the Y component of its normal vector is 1. For a perfectly vertical wall the Y component is zero. The Y component varies between those extremes based on the slope angle: it's the cosine of the angle. We're dealing with the unit circle here, where Y is the vertical axis and the horizontal axis lies somewhere in the XZ plane. Another way to say this is that we're looking at the dot product of the up vector and the surface normal.
The configured angle defines the minimum result that still counts as ground. Let's store the threshold in a field and compute it via Mathf.Cos in an OnValidate method. That way it remains synchronized with the angle when we change it via the inspector while in play mode. Also invoke it in Awake so it gets calculated in builds.
	float minGroundDotProduct;

	void OnValidate () {
		minGroundDotProduct = Mathf.Cos(maxGroundAngle);
	}

	void Awake () {
		body = GetComponent<Rigidbody>();
		OnValidate();
	}
We specify the angle in degrees, but Mathf.Cos expects it to be expressed as radians. We can convert it by multiplying with Mathf.Deg2Rad.
minGroundDotProduct = Mathf.Cos(maxGroundAngle * Mathf.Deg2Rad);
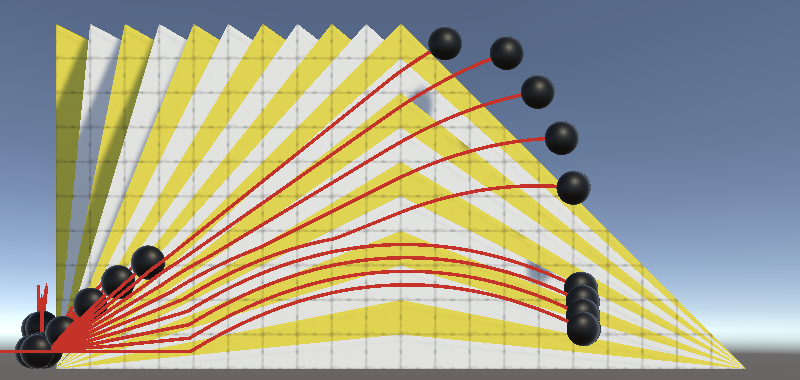
Now we can adjust the max ground angle and see how that influences the movement of the spheres. I'll set the angle to 40° from now on.
	void EvaluateCollision (Collision collision) {
		for (int i = 0; i < collision.contactCount; i++) {
			Vector3 normal = collision.GetContact(i).normal;
			onGround |= normal.y >= minGroundDotProduct;
		}
	}
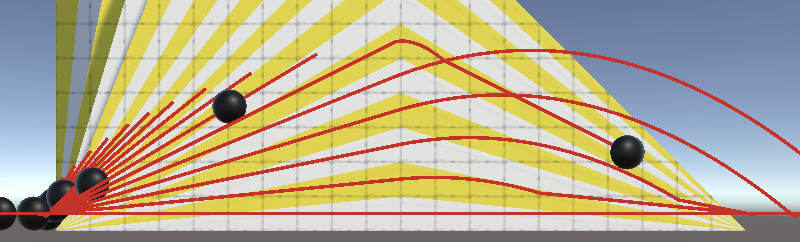
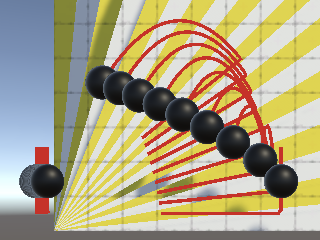
Jumping While on a Slope
Our sphere always jumps straight up, no matter the angle of the ground it's currently on.
Another approach is to jump away from the ground surface, in the direction of its normal vector. That will produce different jumps per slope test lane, so let's do that.
We need to keep track of the current contact normal in a field and store it whenever we encounter a ground contact in EvaluateCollision.
	Vector3 contactNormal;

	…

	void EvaluateCollision (Collision collision) {
		for (int i = 0; i < collision.contactCount; i++) {
			Vector3 normal = collision.GetContact(i).normal;
			//onGround |= normal.y >= minGroundDotProduct;
			if (normal.y >= minGroundDotProduct) {
				onGround = true;
				contactNormal = normal;
			}
		}
	}
But we might end up not touching the ground. In that case we'll use the up vector for the contact normal, so air jumps still go straight up. Set it in UpdateState if needed.
	void UpdateState () {
		velocity = body.velocity;
		if (onGround) {
			jumpPhase = 0;
		}
		else {
			contactNormal = Vector3.up;
		}
	}
Now we have to add the jump contact normal scaled by the jump speed to the velocity when jumping, instead of always only increasing the Y component. This means that the jump height is an indication of how far up we jump when on flat ground or in the air only. Jumps while on a slope won't reach as high but will affect horizontal velocity.
	void Jump () {
		if (onGround || jumpPhase < maxAirJumps) {
			…
			//velocity.y += jumpSpeed;
			velocity += contactNormal * jumpSpeed;
		}
	}
But this means that the check for a positive vertical speed is also no longer correct. It has to become a check for the speed aligned with the contact normal. We can find that speed by projecting the velocity on the contact normal, by calculating their dot product via Vector3.Dot.
			float jumpSpeed = Mathf.Sqrt(-2f * Physics.gravity.y * jumpHeight);
			float alignedSpeed = Vector3.Dot(velocity, contactNormal);
			if (alignedSpeed > 0f) {
				jumpSpeed = Mathf.Max(jumpSpeed - alignedSpeed, 0f);
			}
			velocity += contactNormal * jumpSpeed;
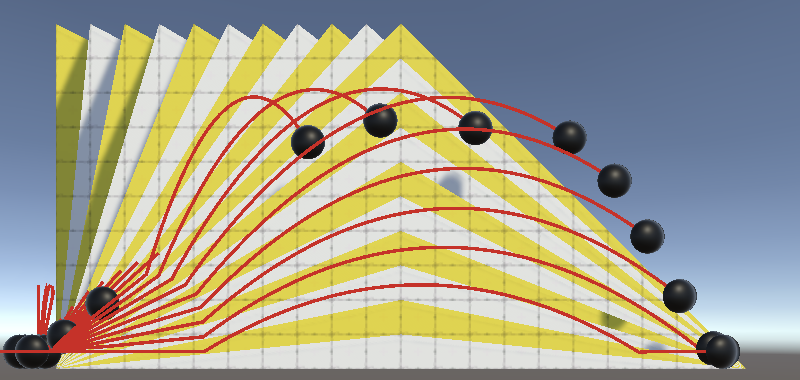
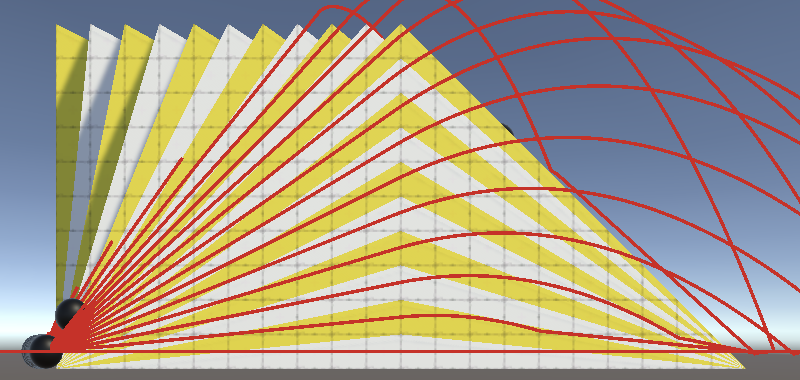
Now that the jumps are aligned with the slopes each sphere in our test scene gets a unique jump trajectory. Spheres on steeper slopes no longer jump straight into their slopes but do get slowed down as the jump pushes them in the opposite direction that they're moving. You can see that more clearly on all slopes by trying it with a drastically reduced max speed.
Moving Along Slopes
So far we've always defined the desired velocity in the horizontal XZ plane, no matter the ground angle. If a sphere is going up a slope it's because PhysX pushes it upward to resolve the collision that happened because we gave it a horizontal velocity that points into the slope. That can work fine while going up slopes, but when going down a slope spheres move away from the ground and can end up falling when their acceleration is high enough. The result is bouncy movement that is hard to control. You can clearly see this when reversing direction while going up the slopes, especially when setting max acceleration to a high value.
We can avoid this by aligning our desired velocity with the ground. It works similar to how we projected the velocity on a normal to get a jump speed, only now we have to project the velocity on a plane to get a new velocity. We do that by taking the dot product of the vector and normal as before, and then subtracting the normal scaled by that from the original velocity vector. Let's create a ProjectOnContactPlane method for that which does it with an arbitrary vector parameter.
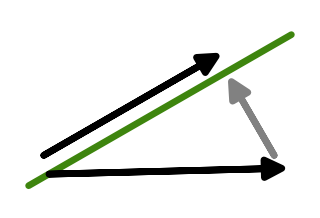
	Vector3 ProjectOnContactPlane (Vector3 vector) {
		return vector - contactNormal * Vector3.Dot(vector, contactNormal);
	}
Let's create a new AdjustVelocity method to take care of adjusting the velocity. Begin with determining the projected X and Z axes by projecting the right and forward vectors on the contact plane.
	void AdjustVelocity () {
		Vector3 xAxis = ProjectOnContactPlane(Vector3.right);
		Vector3 zAxis = ProjectOnContactPlane(Vector3.forward);
	}
That gives us vectors aligned with the ground, but they are only of unit length when the ground is perfectly flat. In general we have to normalize the vectors to get proper directions.
		Vector3 xAxis = ProjectOnContactPlane(Vector3.right).normalized;
		Vector3 zAxis = ProjectOnContactPlane(Vector3.forward).normalized;
Now we can project the current velocity on both vectors to get the relative X and Z speeds.
		Vector3 xAxis = ProjectOnContactPlane(Vector3.right).normalized;
		Vector3 zAxis = ProjectOnContactPlane(Vector3.forward).normalized;

		float currentX = Vector3.Dot(velocity, xAxis);
		float currentZ = Vector3.Dot(velocity, zAxis);
We can use those to calculate new X and Z speeds as before, but now relative to the ground.
		float currentX = Vector3.Dot(velocity, xAxis);
		float currentZ = Vector3.Dot(velocity, zAxis);

		float acceleration = onGround ? maxAcceleration : maxAirAcceleration;
		float maxSpeedChange = acceleration * Time.deltaTime;

		float newX =
			Mathf.MoveTowards(currentX, desiredVelocity.x, maxSpeedChange);
		float newZ =
			Mathf.MoveTowards(currentZ, desiredVelocity.z, maxSpeedChange);
Finally, adjust the velocity by adding the differences between the new and old speeds along the relative axes.
		float newX =
			Mathf.MoveTowards(currentX, desiredVelocity.x, maxSpeedChange);
		float newZ =
			Mathf.MoveTowards(currentZ, desiredVelocity.z, maxSpeedChange);

		velocity += xAxis * (newX - currentX) + zAxis * (newZ - currentZ);
Invoke this new method in FixedUpdate in place of the old velocity adjustment code.
	void FixedUpdate () {
		UpdateState();
		AdjustVelocity();
		//float acceleration = onGround ? maxAcceleration : maxAirAcceleration;
		//float maxSpeedChange = acceleration * Time.deltaTime;

		//velocity.x =
		//	Mathf.MoveTowards(velocity.x, desiredVelocity.x, maxSpeedChange);
		//velocity.z =
		//	Mathf.MoveTowards(velocity.z, desiredVelocity.z, maxSpeedChange);

		if (desiredJump) {
			desiredJump = false;
			Jump();
		}
		body.velocity = velocity;
		onGround = false;
	}
With our new velocity adjustment approach the spheres no longer lose contact with the ground when suddenly reversing direction while moving up a slope. Besides that, because the desired velocity adjusts its direction to match the slope the absolute desired horizontal speed now varies per lane.
Note that if the slope isn't aligned with either the X or Z axis the angle between the relative projected axes will not be 90°. This isn't really noticeable unless the slopes are quite steep. You could still move in all directions, but it would be harder to precisely steer in some directions than others. That somewhat mimics the awkwardness of trying to walk across but not aligned with a steep slope.
Multiple Ground Normals
Using the contact normal to adjust the desired velocity and jump direction works fine when there is only a single ground contact point, but the behavior can become weird and unpredictable when multiple ground contacts exist at the same time. To illustrate this I created another test scene with some depressions in the ground, allowing for up to four contact points at once.
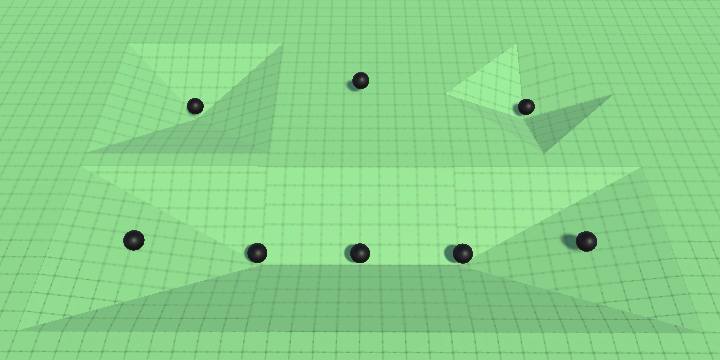
When jumping, in which directions will the spheres go? In my case, those with four contacts tend to prefer one direction but can end up going in four different directions. Likewise, the sphere with two contacts arbitrarily picks between two directions. And the spheres with three contacts consistently jump the same way to match the nearby spheres that touch only a single slope.
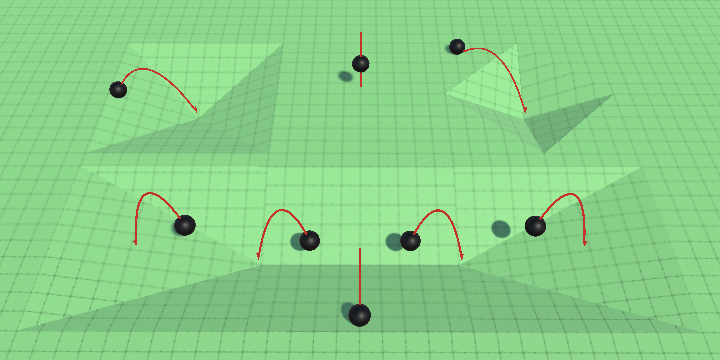
This behavior manifests because we set the normal in EvaluateCollision whenever we find a ground contact. So if we find multiple then the last one wins. The order is either arbitrary due to movement or always the same due to the order in which PhysX evaluates collisions.
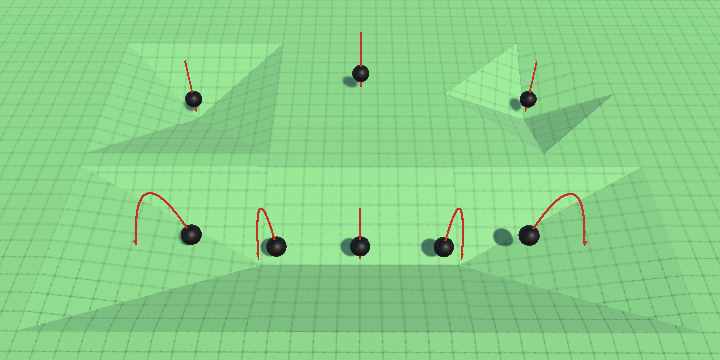
Which direction is the best? There isn't one. It makes most sense to combine them all into a single normal that represents an average ground plane. To do that we have to accumulate the normal vectors. That requires us to set the contact normal to zero at the end of FixedUpdate. Let's put the code for that along with resetting onGround in a new ClearState method.
	void FixedUpdate () {
		…
		body.velocity = velocity;
		//onGround = false;
		ClearState();
	}

	void ClearState () {
		onGround = false;
		contactNormal = Vector3.zero;
	}
Now accumulate normals in EvaluateCollision instead of overriding the previous one.
	void EvaluateCollision (Collision collision) {
		for (int i = 0; i < collision.contactCount; i++) {
			Vector3 normal = collision.GetContact(i).normal;
			if (normal.y >= minGroundDotProduct) {
				onGround = true;
				contactNormal += normal;
			}
		}
	}
Finally, normalize the contact normal in UpdateState when on the ground to make it a proper normal vector.
	void UpdateState () {
		velocity = body.velocity;
		if (onGround) {
			jumpPhase = 0;
			contactNormal.Normalize();
		}
		else {
			contactNormal = Vector3.up;
		}
	}
Counting Ground Contacts
While not essential, we could count how many ground contact points we have instead of just tracking whether there is at least one. We do that by replacing the boolean field with an integer. We then introduce a boolean OnGround readonly property—note the capitalization—that checks whether the count is greater that zero, replacing the onGround field.
//bool onGround;int groundContactCount; bool OnGround => groundContactCount > 0;
ClearState now has to set the count to zero.
	void ClearState () {
		//onGround = false;
		groundContactCount = 0;
		contactNormal = Vector3.zero;
	}
And UpdateState has to rely on the property instead of the field. Besides that we can also optimize it a little bit by only bothering to normalize the contact normal if it's an aggregate, as it's already unit-length otherwise.
	void UpdateState () {
		velocity = body.velocity;
		if (OnGround) {
			jumpPhase = 0;
			if (groundContactCount > 1) {
				contactNormal.Normalize();
			}
		}
		…
	}
Also increment the count in Evaluate when appropriate.
	void EvaluateCollision (Collision collision) {
		for (int i = 0; i < collision.contactCount; i++) {
			Vector3 normal = collision.GetContact(i).normal;
			if (normal.y >= minGroundDotProduct) {
				//onGround = true;
				groundContactCount += 1;
				contactNormal += normal;
			}
		}
	}
Finally, replace onGround with OnGround in AdjustVelocity and Jump.
Besides the optimization in UpdateState the ground contact count could also be useful for debugging. You could for example either log the count or adjust the sphere's color based on the count to get a better idea of its state.

The next tutorial is Surface Contact.