Reusing Objects
Object Pools
- Destroy shapes.
- Automate creation and destruction.
- Build a simple GUI.
- Track memory allocations with the profiler.
- Use objects pools to recycle shapes.
This is the third tutorial in a series about Object Management. It adds the ability to destroy shapes, followed by a way to reuse them.
This tutorial is made with Unity 2017.4.4f1.
Destroying Objects
If we can only create shapes, then their numbers can only increase, until we begin a new game. But nearly always when something gets created in a game, it can also be destroyed. So let's make it possible to destroy shapes.
A Key for Destruction
There is already a key to create a shape, so it makes sense to also add a key to destroy one. Add a key variable for that to Game. While D might seem like a reasonable default, it's part of the common WASD key configuration for movement. Let's use X instead, which is a common symbol for cancellation or termination and sits next to C on most keyboards.
	public KeyCode createKey = KeyCode.C;
	public KeyCode destroyKey = KeyCode.X;

Destroying a Random Shape
Add a DestroyShape method to Game to take care of the destruction of a shape. Like we create random shapes, we also destroy random shapes. This is done by picking a random index for the shape list and destroying the corresponding object, by using the Destroy method.
	void DestroyShape () {
		int index = Random.Range(0, shapes.Count);
		Destroy(shapes[index]);
	}
But this is only valid if there currently are shapes. That might not be the case, either because none have been created or loaded yet, or all existing ones have already been destroyed. So we can only destroy a shape when the list contains at least one. If not, the destroy command will simply do nothing.
	void DestroyShape () {
		if (shapes.Count > 0) {
			int index = Random.Range(0, shapes.Count);
			Destroy(shapes[index]);
		}
	}
Destroy works on either a game object, a component, or an asset. To get rid of the entire shape object and not just its Shape component, we have to explicitly destroy the game object that the component is a part of. We can access it via the component's gameObject property.
Destroy(shapes[index].gameObject);
Now that our DestroyShape method is functional, invoke it in Update when the destroy key is pressed by the player.
	void Update () {
		if (Input.GetKeyDown(createKey)) {
			CreateShape();
		}
		else if (Input.GetKeyDown(destroyKey)) {
			DestroyShape();
		}
		…
	}
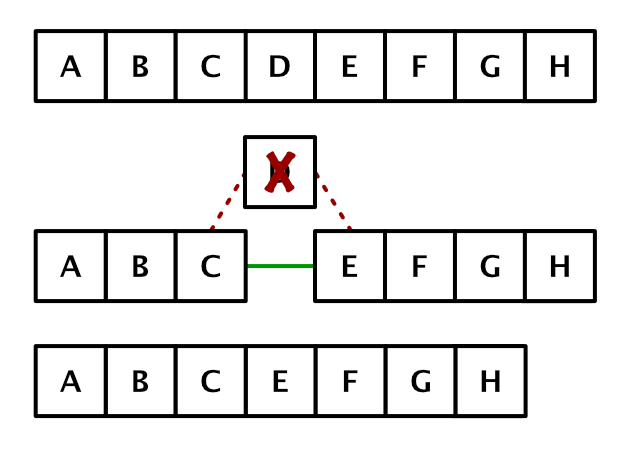
Keeping the List Correct
We're now able to both create and destroy objects. However, when trying to destroy multiple shapes you're likely to get an error. MissingReferenceException: The object of type 'Shape' has been destroyed but you are still trying to access it.
The error occurs because although we have destroyed a shape, we haven't removed it from the shapes list. Thus, the list still contains references to the components of the destroyed game objects. They still exist in memory, in a zombie-like state. When trying to destroy such an object a second time, Unity reports an error.
The solution is to properly get rid of the references to the shape that we just destroyed. So after destroying a shape, remove it from the list. This can be done by invoking the list's RemoveAt method, with the index of the element to be removed as a parameter.
	void DestroyShape () {
		if (shapes.Count > 0) {
			int index = Random.Range(0, shapes.Count);
			Destroy(shapes[index].gameObject);
			shapes.RemoveAt(index);
		}
	}
Efficient Removal
While this approach works, it is not the most efficient way to remove an element from the list. Because lists are ordered, removing one element leaves a gap in the list. Conceptually, this gap is easy to get rid of. The neighboring elements of the removed element simply become neighbors of each other.
However, the List class is implemented with arrays, so the neighbor relationship cannot be manipulated directly. Instead, the gap is eliminated by shifting the next element into this gap, so it comes directly after the element before the one that was removed. This moves the gap one step towards the end of the list. This process is repeated until the gap falls off the end of the list.
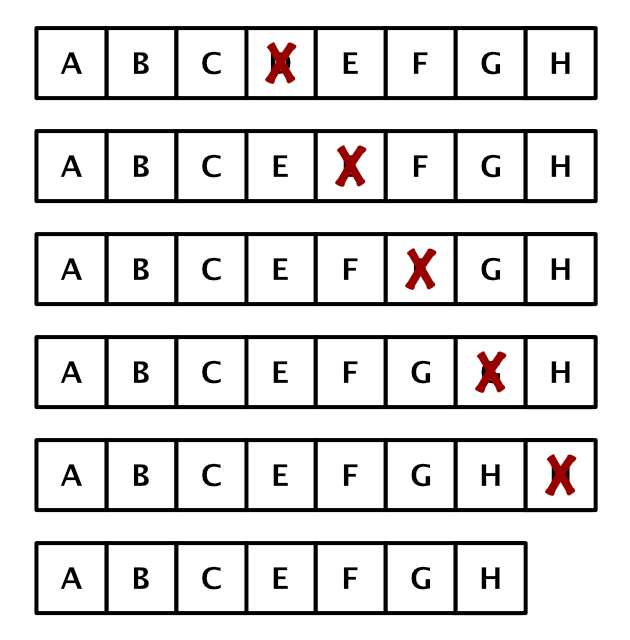
But we don't care about the order of the shapes that we keep track of. So all this shifting of elements is not needed. While we cannot technically avoid it, we can skip nearly all the work by manually grabbing the last element and putting that in the place of the destroyed element, effectively teleporting the gap to the end of the list. Then we remove the last element.
	void DestroyShape () {
		if (shapes.Count > 0) {
			int index = Random.Range(0, shapes.Count);
			Destroy(shapes[index].gameObject);
			int lastIndex = shapes.Count - 1;
			shapes[index] = shapes[lastIndex];
			shapes.RemoveAt(lastIndex);
		}
	}
Continuous Creation and Destruction
Creating and destroying shapes one at a time isn't a quick way to populate or depopulate the game. What if we'd want to continuously create and destroy them? We could do that by rapidly pressing the keys again and again, but that will get tiresome quickly. So let's automate it.
At what speed should shapes be created? We'll make that configurable. And this time we're not going to control that via the inspector. Instead, we'll make it part of the game itself, so the player can vary the speed as they like.
GUI
To control the creation speed, we'll add a graphical user interface—a GUI—to the scene. A GUI needs a canvas, which can be created via GameObject / UI / Canvas. That adds two new game objects to the scene. First the canvas itself, followed by an event system that makes it possible to interact with it.

Both objects have multiple components, but we don't need to bother with their details. We can use them as they are, without changing anything. By default, the canvas act as an overlay, getting rendered on top of the scene in the game window, in screen space.
Although the screen-space canvas logically doesn't exist in 3D space, it still shows up in the scene window. This allows us to edit it, but that's hard to do while the scene window is in 3D mode. The GUI isn't aligned with the scene camera, and its scale is one unit per pixel, so it ends up like an enormous plane somewhere in the scene. When editing the GUI, you typically switch the scene window to 2D mode, which you can toggle via the 2D button on the left side of its toolbar.

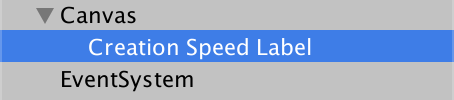
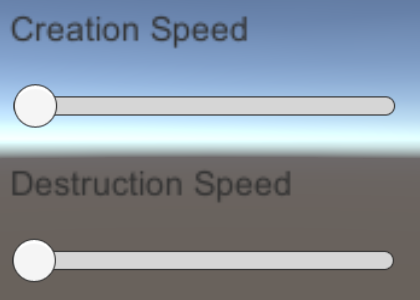
Creation Speed Label
Before adding controls for the creation speed, we'll add a label that tells the player what it's about. We do this by adding a text object, via GameObject / UI / Text and naming it Creation Speed Label. It automatically becomes a child of the canvas. In fact, if we didn't have a canvas, one would have been created automatically when we made the text object.
GUI objects function like all other game objects, except that they have a Rect Transform component, which extends the regular Transform component. It controls not only the object's position, rotation, and scale, but also its rectangular size, pivot point, and anchors.
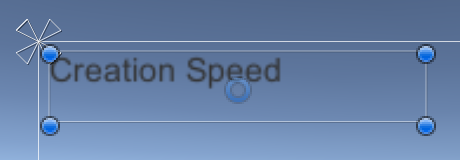
The anchors control how the GUI object is positioned relative to its parent container, and how it reacts to size changes of its parent. Let's put the label at the top left of the game window. To keep it there no matter what window size we end up with, set its anchors to top left. You can do this by clicking the Anchor square and selecting the appropriate option that pops up. Also change the displayed text to Creation Speed.

Position the label in the top left corner of the canvas, leaving a little margin between it and the edge of the game window.
Creation Speed Slider
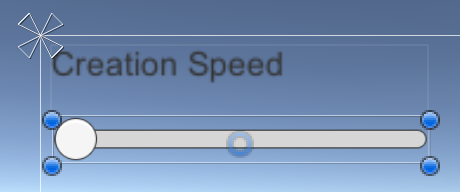
We'll use a slider to control the creation speed. Add one via GameObject / UI / Slider. This creates a hierarchy of multiple objects that together form a GUI slider widget. Name its local root object Creation Speed Slider.

Position the slider directly below the label. By default, they have the same width, and the label has plenty of empty space below the text. So you can drag the slider up to the label's bottom edge and it will snap adjacent to it.
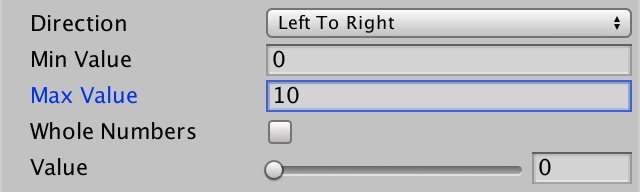
The Slider component of the slider's local root object has a bunch of settings that we'll leave at their default values. The only thing that we'll change is its Max Value, which defines the maximum creation speed, expressed in shapes created per second. let's set it to 10.
Setting the Creation Speed
The slider already works, you can adjust it while in play mode. But it doesn't affect anything yet. We have to add a creation speed to Game first, so there's something to change. We'll give it a default public CreationSpeed property.
public float CreationSpeed { get; set; }
The slider's inspector has an On Value Changed (Single) box at its bottom. This represents a list of methods or properties that get invoked after the slider's value has changed. The (Single) behind On Value Changed indicates that the value that got changed is a float. Currently the list is empty. Change that by clicking the + button at the bottom of the box.
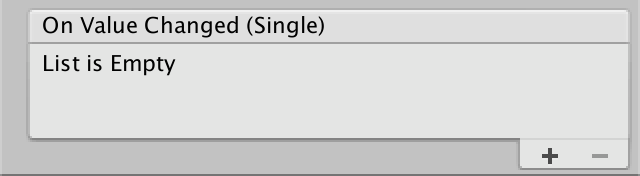
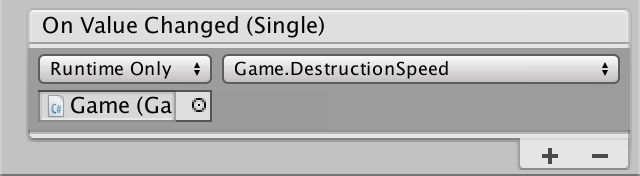
The event list now contains a single entry. It has three configuration options. The first setting controls when this entry should be activated. It's set to Runtime Only by default, which is what we want. Underneath that is a field to set the game object that should be targeted. Drag a reference to our Game object onto it. That allows us to select a method or property of a component attached to the targeted object. Now we can use the third dropdown list, select Game, then CreationSpeed at the top, under the Dynamic float header.

Continuous Shape Creation
To make continuous creation possible, we have to keep track of the creation progress. Add a float field to Game for this. When this value reaches 1, a new shape should be created.
float creationProgress;
The progress is increased in Update, by adding the time that elapses since the last frame, which is available via Time.deltaTime. How quickly progress is made is controlled by multiplying the time delta by the creation speed.
	void Update () {
		…

		creationProgress += Time.deltaTime * CreationSpeed;
	}
Each time creationProgress reaches 1, we must reset it to zero and create a shape.
		creationProgress += Time.deltaTime * CreationSpeed;
		if (creationProgress == 1f) {
			creationProgress = 0f;
			CreateShape();
		}
But it is very unlikely that we end up with a progress value of exactly 1. Instead, we'll overshoot by some amount. So we should check whether we have at least 1 instead. Then we reduce the progress by 1, saving the extra progress. So the timing isn't exact, but we don't discard the extra progress.
		creationProgress += Time.deltaTime * CreationSpeed;
		if (creationProgress >= 1f) {
			creationProgress -= 1f;
			CreateShape();
		}
However, it might be possible that so much progress was made since the last frame that we end up with a value that's 2, 3, or even more. This could happen during a frame rate dip, in combination with a high creation speed. To make sure that we catch up as quickly as possible, change the if statement into a while statement.
		creationProgress += Time.deltaTime * CreationSpeed;
		while (creationProgress >= 1f) {
			creationProgress -= 1f;
			CreateShape();
		}
You can now have the game create a regular stream of new shapes, at a desired speed up to ten shapes per second. If you want to turn off the automatic creation process, simply set the slider back to zero.
Continuous Shape Destruction
Next, repeat all the work that we did for the creation slider, but now for a destruction slider. Create another label and slider, which is quickest to do by duplicating the existing ones, moving them down, and renaming them.
Then add a DestructionSpeed property and connect the destruction slider to it. If you duplicated the creation slider, you only have to change which property it targets.
public float DestructionSpeed { get; set; }
Finally, add the code for keeping track of the destruction progress.
	float creationProgress, destructionProgress;

	…

	void Update () {
		…

		creationProgress += Time.deltaTime * CreationSpeed;
		while (creationProgress >= 1f) {
			creationProgress -= 1f;
			CreateShape();
		}

		destructionProgress += Time.deltaTime * DestructionSpeed;
		while (destructionProgress >= 1f) {
			destructionProgress -= 1f;
			DestroyShape();
		}
	}
The game is now able to both automatically create and destroy shapes at the same time. If both are set to the same speed, the amount of shapes remains roughly constant. To get creation and destruction synchronized in a pleasing way, you can tweak the speed of one a bit until their progress aligns or alternates.
Object Pools
Each time an object gets instantiated, memory has to be allocated. And each time that an object gets destroyed, the memory that it used has to be reclaimed. But the reclamation doesn't happen immediately. There is a garbage collection process that occasionally runs to clean everything up. This is an expensive process, because it has to figure out which objects are truly no longer effectively alive, based on whether anything still holds a reference to it. So the amount of used memory grows for a while, until it is deemed to much, then the unreachable memory is identified and made available again. If there are many chunks of memory involved, this can cause a significant frame rate dip in the game.
While reusing low-level memory is hard, it is much easier to reuse objects at a higher level. If we were to never destroy game objects, but instead recycle them, then the garbage collection process never needs to run.
Profiling
To get an idea of how much memory allocation happens and when, you can use Unity's profiler window, which you can open via Window / Profiler or Window / Analysis / Profiler depending on the Unity version. It can record a lot of information while in play mode, including CPU and memory usage.
Let the game run for a while at maximum creation and destruction speed, after accumulating a few shapes. Then select a point on the profiler's data graph, which will pause the game. When the CPU section is selected, all high-level invocations of the selected frame are shown beneath the graphs. You can sort the invocations by memory allocation, which are shown in the GC Alloc column.
In most frames, the total allocation is zero. But when a shape was instantiated during that frame, you'll see an entry at the top that allocates memory. You can expand that entry to see the invocation of Game.Update that is responsible for the instantiation.
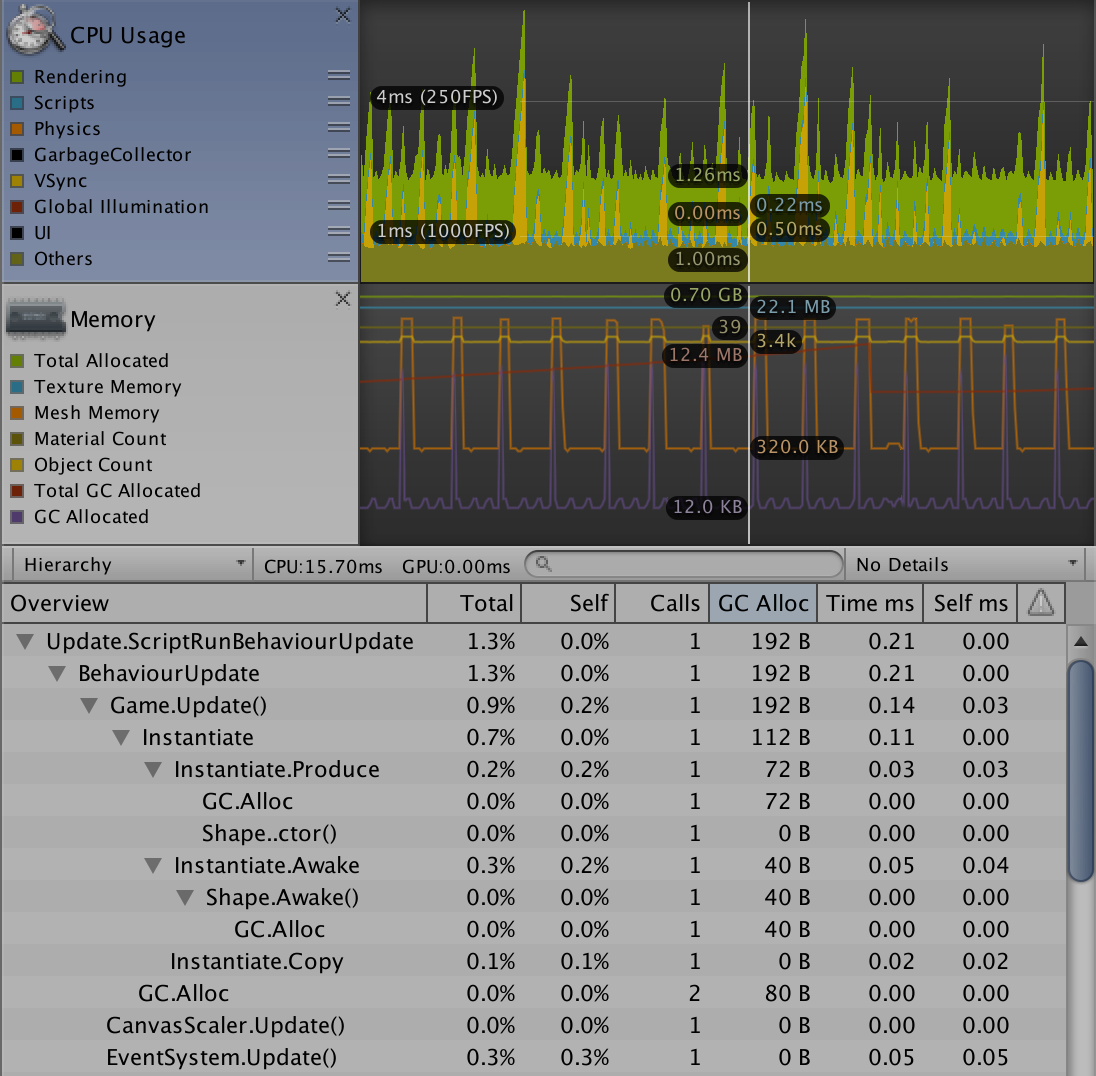
How many bytes get allocated can vary in the editor between runs. The game isn't optimized like a standalone build would be, and the editor itself affects the profiling too. Better data can be obtained by creating a standalone development build, and having it automatically connect to the editor for profiling.
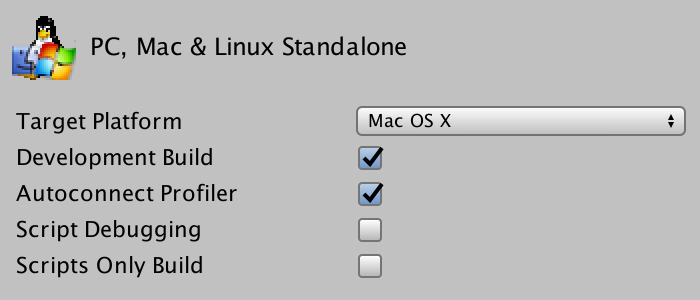
Create the build, run it for a while, and then check the profiler data in the editor.

This profiling data isn't affected by the editor, though we're still working with a development build that has to collect and send the profiling data.
Recycling
Because our shapes are simple game objects, they don't require much memory. Still, a constant stream of new instantiations will eventually trigger the garbage collection process. To prevent this, we have to reuse shapes instead of destroying them. So each time that the game would destroy a shape, instead we should return them to the factory for recycling.
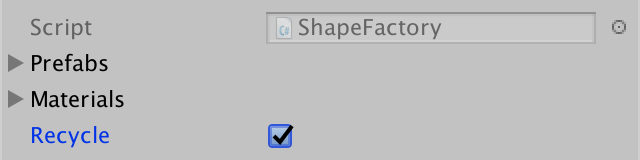
Recycling shapes is feasible because they don't get altered much while they are in use. They get a random transformation, material, and color. If more complex adjustments were made—like adding or removing components, or adding child objects—then recycling wouldn't be feasible. To support both situations, let's add a toggle to ShapeFactory to control whether it recycles or not. Recycling is possible for our current game, so enable it via the inspector.
	[SerializeField]
	bool recycle;
Pooling Shapes
When a shape is recycled, we put it in a reserve pool. Then when asked for a new shape, we can grab an existing one from this pool, instead of creating a new shape by default. Only when the pool is empty do we have to instantiate a new shape. We need a separate pool for each shape type that the factory can produce, so give it an array of shape lists.
using System.Collections.Generic;
using UnityEngine;

[CreateAssetMenu]
public class ShapeFactory : ScriptableObject {

	…

	List<Shape>[] pools;

	…
}
Add a method that creates the pools, simply one empty list for each entry in the prefabs array.
	void CreatePools () {
		pools = new List<Shape>[prefabs.Length];
		for (int i = 0; i < pools.Length; i++) {
			pools[i] = new List<Shape>();
		}
	}
At the start of the Get method, check whether recycling is enabled. If so, check whether the pools exist. If not, then create the pools at this point.
	public Shape Get (int shapeId = 0, int materialId = 0) {
		if (recycle) {
			if (pools == null) {
				CreatePools();
			}
		}
		Shape instance = Instantiate(prefabs[shapeId]);
		instance.ShapeId = shapeId;
		instance.SetMaterial(materials[materialId], materialId);
		return instance;
	}
Retrieving an Object from a Pool
The existing code that instantiates a shape and sets its ID should now only be used when we are not recycling. Otherwise, the instance should be retrieved from a pool. To make this possible, the instance variable must be declared before the decision how to get the instance.
		Shape instance;
		if (recycle) {
			if (pools == null) {
				CreatePools();
			}
		}
		else {
			instance = Instantiate(prefabs[shapeId]);
			instance.ShapeId = shapeId;
		}

		instance.SetMaterial(materials[materialId], materialId);
When recycling is enabled, we have to extract an instance from the correct pool. We can use the shape ID as the pool index. Then grab an element from that pool, and activate it. This is done by invoking the SetActive method on its game object, with true as an argument. Then remove it from the pool. As we don't care about the order of the elements in the pool, we can just grab the last element, which is most efficient.
		Shape instance;
		if (recycle) {
			if (pools == null) {
				CreatePools();
			}
			List<Shape> pool = pools[shapeId];
			int lastIndex = pool.Count - 1;
			instance = pool[lastIndex];
			instance.gameObject.SetActive(true);
			pool.RemoveAt(lastIndex);
		}
		else {
			instance = Instantiate(prefabs[shapeId]);
		}
But this is only possible when there is something in the pool, so check for that.
			List<Shape> pool = pools[shapeId];
			int lastIndex = pool.Count - 1;
			if (lastIndex >= 0) {
				instance = pool[lastIndex];
				instance.gameObject.SetActive(true);
				pool.RemoveAt(lastIndex);
			}
If not, we have no choice but to create a new shape instance anyway.
			if (lastIndex >= 0) {
				instance = pool[lastIndex];
				instance.gameObject.SetActive(true);
				pool.RemoveAt(lastIndex);
			}
			else {
				instance = Instantiate(prefabs[shapeId]);
				instance.ShapeId = shapeId;
			}
Reclaiming an Object
To make use of the pools, there must be a way for the factory to reclaim shapes that are no longer needed. This is done by adding a public Reclaim method with a shape parameter. This method should also begin by checking whether recycling is enabled, and if so make sure that the pools exist before doing anything else.
	public void Reclaim (Shape shapeToRecycle) {
		if (recycle) {
			if (pools == null) {
				CreatePools();
			}
		}
	}
Now that we're sure that the pools exist, the recycled shape can be added to the correct pool, by using its shape ID as the pool index.
	public void Reclaim (Shape shapeToRecycle) {
		if (recycle) {
			if (pools == null) {
				CreatePools();
			}
			pools[shapeToRecycle.ShapeId].Add(shapeToRecycle);
		}
	}
Also, the recycled shape has to be deactivated, which now represents destruction.
			pools[shapeToRecycle.ShapeId].Add(shapeToRecycle);
			shapeToRecycle.gameObject.SetActive(false);
But when recycling isn't enabled, the shape should be destroyed for real instead.
		if (recycle) {
			…
		}
		else {
			Destroy(shapeToRecycle.gameObject);
		}
Recycling Instead of Destroying
The factory cannot enforce that shapes are returned to it. It's up to Game to make recycling possible, by invoking Reclaim instead of Destroy in DestroyShape.
	void DestroyShape () {
		if (shapes.Count > 0) {
			int index = Random.Range(0, shapes.Count);
			//Destroy(shapes[index].gameObject);
			shapeFactory.Reclaim(shapes[index]);
			int lastIndex = shapes.Count - 1;
			shapes[index] = shapes[lastIndex];
			shapes.RemoveAt(lastIndex);
		}
	}
And also when beginning a new game.
	void BeginNewGame () {
		for (int i = 0; i < shapes.Count; i++) {
			//Destroy(shapes[i].gameObject);
			shapeFactory.Reclaim(shapes[i]);
		}
		shapes.Clear();
	}
Make sure that Game plays nice and doesn't still destroy the shape after giving it back. That would lead to errors. So it is not a fool-proof technique, the programmer has to behave. Only shapes that are gotten from a factory should be returned to it, without significantly altering them. And while it is possible to destroy the shapes, that would make recycling impossible.
Recycling in Action
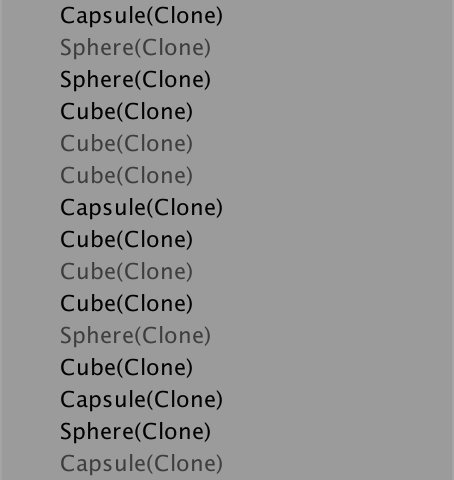
While the game still plays the same whether recycling is enabled or not, you can see the difference by observing the hierarchy window. When both creation and destruction is happening at the same speed, you'll see that shapes will become active and inactive instead of getting created and destroyed. The total amount of game objects will become stable after a while. Only when a specific shape type's pool is empty will a new instance get created. This happens less frequent the longer the game runs, unless the creation speed is higher than the destruction speed.
You can also use the profiler to verify that memory allocations happen far less frequently. They haven't been eliminated entirely, because sometimes new shapes still have to be created. Also, sometimes memory is allocated when an object is reclaimed. This can happen because of two reasons. First, the pool lists sometimes need to grow. Second, to deactivate an object we have to access the gameObject property. This allocates a little bit of memory the first time the property retrieves a reference to the game object. So that happens only the first time that each shape gets recycled.
The next tutorial is Multiple Scenes.