Scenarios
Waves of Enemies
- Support small, medium, and large enemies.
- Create game scenarios with multiple enemy waves.
- Separate asset configuration and gameplay state.
- Begin, pause, win, lose, and speed up games.
- Make scenarios repeat and go on forever.
This is the fifth installment of a tutorial series about creating a simple tower defense game. It makes it possible to create gameplay scenarios that spawn waves of varied enemies.
This tutorial is made with Unity 2018.4.6f1.
More Enemies
Always spawning the same blue cube enemy isn't very interesting. The first step of creating more interesting gameplay scenarios is to support more than one kind of enemy.
Enemy Configurations
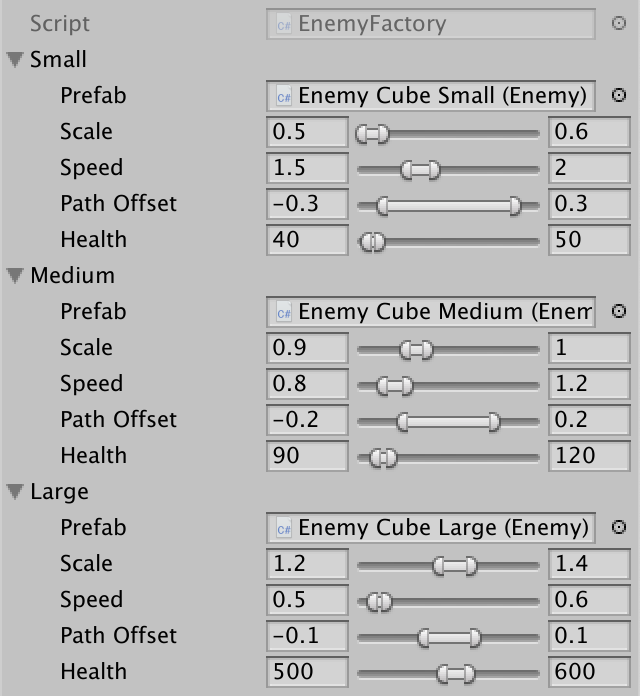
There are many ways that we could make enemies unique, but we'll keep it very simple: we classify them as either small, medium, or large. Create an EnemyType enum to indicate this.
public enum EnemyType {
	Small, Medium, Large
}
Adjust EnemyFactory so it supports these three enemy types instead of a single one. All three enemies require the same configuration fields, so add a nested EnemyConfig class that contains them all, then add three configuration fields of that type to the factory. As this class is solely for configuration and we won't use it anywhere else we can simply make its fields public so the factory can access them. EnemyConfig doesn't have to be public itself.
public class EnemyFactory : GameObjectFactory {

	[System.Serializable]
	class EnemyConfig {

		public Enemy prefab = default;

		[FloatRangeSlider(0.5f, 2f)]
		public FloatRange scale = new FloatRange(1f);

		[FloatRangeSlider(0.2f, 5f)]
		public FloatRange speed = new FloatRange(1f);

		[FloatRangeSlider(-0.4f, 0.4f)]
		public FloatRange pathOffset = new FloatRange(0f);
	}

	//[SerializeField]
	//Enemy prefab = default;

	//…

	//[SerializeField, FloatRangeSlider(-0.4f, 0.4f)]
	//FloatRange pathOffset = new FloatRange(0f);

	[SerializeField]
	EnemyConfig small = default, medium = default, large = default;

	…
}
Let's also make health configurable per enemy, as it makes sense for larger enemies to have more than smaller ones.
		[FloatRangeSlider(10f, 1000f)]
		public FloatRange health = new FloatRange(100f);
Add a type parameter to Get so it becomes possible to get a specific type of enemy, with medium as the default. Use the type to get the correct configuration—for which a separate method is convenient—and then create and initialize the enemy as before, with an added health argument.
	EnemyConfig GetConfig (EnemyType type) {
		switch (type) {
			case EnemyType.Small: return small;
			case EnemyType.Medium: return medium;
			case EnemyType.Large: return large;
		}
		Debug.Assert(false, "Unsupported enemy type!");
		return null;
	}

	public Enemy Get (EnemyType type = EnemyType.Medium) {
		EnemyConfig config = GetConfig(type);
		Enemy instance = CreateGameObjectInstance(config.prefab);
		instance.OriginFactory = this;
		instance.Initialize(
			config.scale.RandomValueInRange,
			config.speed.RandomValueInRange,
			config.pathOffset.RandomValueInRange,
			config.health.RandomValueInRange
		);
		return instance;
	}
Add the required health parameter to Enemy.Initialize and use that to set its health, instead of deriving it from the size.
	public void Initialize (
		float scale, float speed, float pathOffset, float health
	) {
		…
		Health = health;
	}
Designing Different Enemies
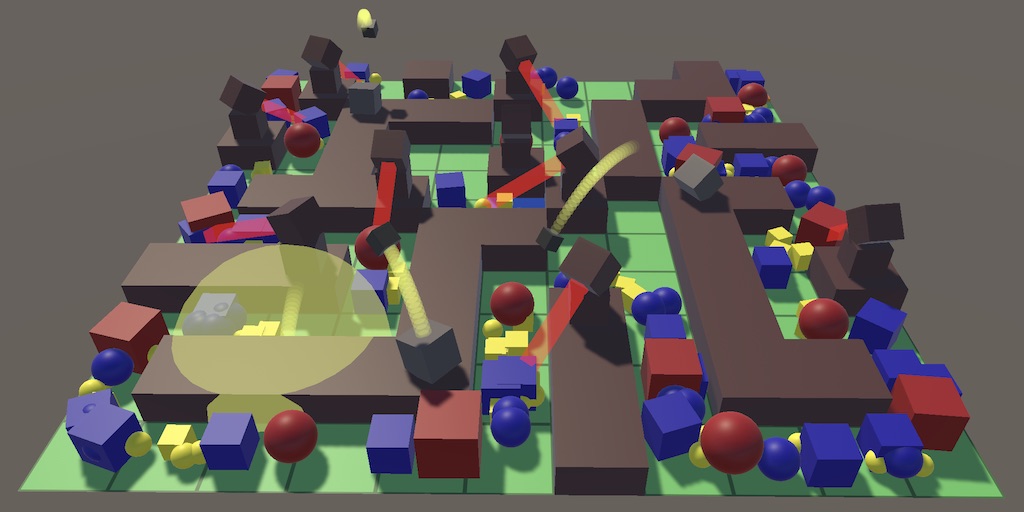
How you design the three enemy types is up to you, but for this tutorial I kept is as simple as possible. I duplicated the original enemy prefab and used it for all three sizes, only changing their material: yellow for small, blue for medium, and red for large. I didn't change the scale of the cube prefab, I instead used the scale configuration of the factory to size them. I also gave them increasing health and decreasing speed, respectively.
The quickest way to make all types appear in the game is to change Game.SpawnEnemy so it gets a random enemy type instead of always a medium one.
	void SpawnEnemy () {
		GameTile spawnPoint =
			board.GetSpawnPoint(Random.Range(0, board.SpawnPointCount));
		Enemy enemy = enemyFactory.Get((EnemyType)(Random.Range(0, 3)));
		enemy.SpawnOn(spawnPoint);
		enemies.Add(enemy);
	}
Multiple Factories
The enemy factory now defines a set of three enemies. Our current factory produces cubes at three sizes, but there's nothing stopping us from creating another factory that produces something else, like spheres at three sizes. We can change which enemies get spawned by assigning a different factory to the game, thereby switching to a different theme.
Enemy Waves
The second step of creating gameplay scenarios is to no longer spawn enemies at a fixed frequency. Instead, enemies should be spawned in successive waves until the scenario is completed or the game is lost.
Spawn Sequences
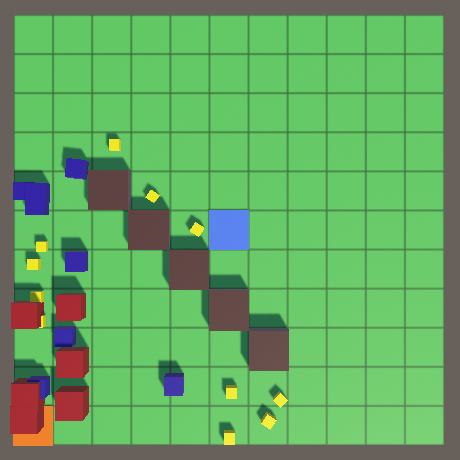
A single enemy wave consists of a group of enemies that are spawned one after the other, until the wave is complete. A wave can contain a mix of enemies and the delay between successive spawns can vary. To keep this simple to implement we start with a basic enemy spawn sequence that produces the same enemy type at a fixed frequency. A wave is then simply an list of such spawn sequences.
Create an EnemySpawnSequence class to configure one such sequence. As it is fairly complex put it in its own file. The sequence needs to know which factory to use, which type of enemy to spawn, how many, and how quickly. To make configuration easy we'll represent the last option with a cooldown, expressing how much time must pass before the next enemy gets spawned. Note that this approach makes it possible to mix enemy factories in a wave.
using UnityEngine;

[System.Serializable]
public class EnemySpawnSequence {

	[SerializeField]
	EnemyFactory factory = default;

	[SerializeField]
	EnemyType type = EnemyType.Medium;

	[SerializeField, Range(1, 100)]
	int amount = 1;

	[SerializeField, Range(0.1f, 10f)]
	float cooldown = 1f;
}
Waves
A wave is just an array of spawn sequences. Create an EnemyWave asset type for it, which starts with a single default sequence.
using UnityEngine;

[CreateAssetMenu]
public class EnemyWave : ScriptableObject {

	[SerializeField]
	EnemySpawnSequence[] spawnSequences = {
		new EnemySpawnSequence()
	};
}
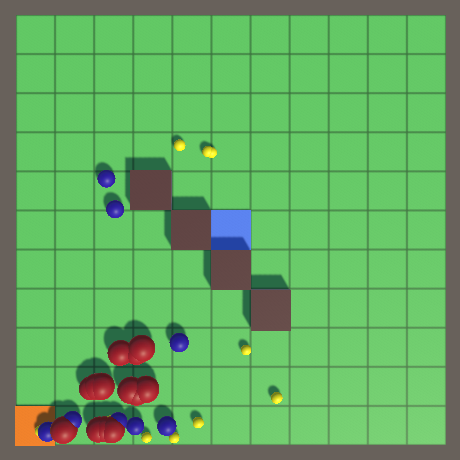
Now we can design enemy waves. For example, I created a wave that spawns a bunch of cube enemies, starting with ten small ones at two per second, followed by five medium once per second, and finally a single large with a five-second cooldown.

Scenarios
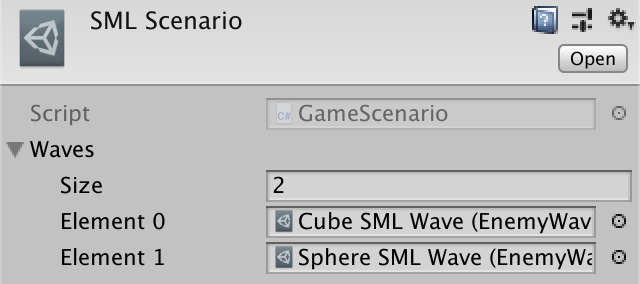
A gameplay scenario is created from a sequence of waves. Create a GameScenario asset type for that, with a single wave array, then use it to design a scenario.
using UnityEngine;

[CreateAssetMenu]
public class GameScenario : ScriptableObject {

	[SerializeField]
	EnemyWave[] waves = {};
}
For example, I created a scenario with two small-medium-large waves, first with cubes and then with spheres.
Progressing Through a Sequence
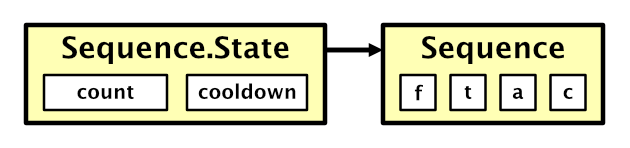
The asset types are used to design scenarios, but as assets they're meant to contain data that doesn't change while the game is playing. But to progress through a scenario we have to keep track of its state somehow. One way to do this would be to duplicate the asset when used in play and have the duplicate keep track of its state. But we don't need to duplicate the entire asset, all we need is the state and a reference to the asset. So let's create a separate State class, first for EnemySpawnSequence. As it applies to the sequence only, make it a nested class. It's only valid when it has a reference to its sequence, so give it a constructor method with a sequence parameter.

public class EnemySpawnSequence {

	…

	public class State {

		EnemySpawnSequence sequence;

		public State (EnemySpawnSequence sequence) {
			this.sequence = sequence;
		}
	}
}
Whenever we want to begin progressing through a sequence, we need to get a new state instance for it. Add a Begin method to the sequence that constructs the state and returns it. That makes it the responsibility of whoever invoked Begin to hold on to the state, while the sequence itself remains stateless. It would even be possible to progress through the same sequence multiple times in parallel.
public class EnemySpawnSequence {

	…

	public State Begin () => new State(this);

	public class State { … }
}
To make the state survive hot reloads in the editor it needs to be serializable.
	[System.Serializable]
	public class State { … }
A downside of this approach is that we need to create a new state object each time a sequence is started. We can avoid memory allocations by making it as a struct instead of a class. This is fine as long as the state remains small. Just be aware that the state is a value type. Passing it around will copy it, so keep track of it in a single place.
	[System.Serializable]
	public struct State { … }
The state of a sequence consists of just two things: the spawned enemy count and the cooldown progression. Add a Progress method that increases the cooldown by the time delta and then drops it back down if it reached the configured value, just like the spawn progression in Game.Update. Increment the count each time that happens. Also, the cooldown must start at its maximum value so the sequence spawns without initial delay.
		int count;

		float cooldown;

		public State (EnemySpawnSequence sequence) {
			this.sequence = sequence;
			count = 0;
			cooldown = sequence.cooldown;
		}

		public void Progress () {
			cooldown += Time.deltaTime;
			while (cooldown >= sequence.cooldown) {
				cooldown -= sequence.cooldown;
				count += 1;
			}
		}
Progression should continue until the desired amount of enemies have been spawned and the cooldown is complete. At that moment Progress should indicate completion, but it's likely that we end up overshooting the cooldown a bit. Thus we must return the extra time at that point, to be used to progress the next sequence. To make that work we have to turn the time delta into a parameter. We also have to indicate that we're not yet finished, which we can do by returning a negative value.
		public float Progress (float deltaTime) {
			cooldown += deltaTime;
			while (cooldown >= sequence.cooldown) {
				cooldown -= sequence.cooldown;
				if (count >= sequence.amount) {
					return cooldown;
				}
				count += 1;
			}
			return -1f;
		}
Spawning Enemies Anywhere
To make it possible for sequences to spawn enemies we'll convert Game.SpawnEnemy into another public static method.
	public static void SpawnEnemy (EnemyFactory factory, EnemyType type) {
		GameTile spawnPoint = instance.board.GetSpawnPoint(
			Random.Range(0, instance.board.SpawnPointCount)
		);
		Enemy enemy = factory.Get(type);
		enemy.SpawnOn(spawnPoint);
		instance.enemies.Add(enemy);
	}
As Game will no longer spawn enemies itself we can remove its enemy factory, spawn speed, spawn progress, and the spawning code from Update.
//[SerializeField]//EnemyFactory enemyFactory = default;…//[SerializeField, Range(0.1f, 10f)]//float spawnSpeed = 1f;//float spawnProgress;… void Update () { …//spawnProgress += spawnSpeed * Time.deltaTime;//while (spawnProgress >= 1f) {// spawnProgress -= 1f;// SpawnEnemy();//}… }
Invoke Game.SpawnEnemy in EnemySpawnSequence.State.Progress after increasing its count.
		public float Progress (float deltaTime) {
			cooldown += deltaTime;
			while (cooldown >= sequence.cooldown) {
				…
				count += 1;
				Game.SpawnEnemy(sequence.factory, sequence.type);
			}
			return -1f;
		}
Progressing Through a Wave
We use the same approach for progressing through a sequence to progress through an entire wave. Give EnemyWave its own Begin method that returns a new instance of a nested State struct. In this case the state contains the wave index and the state of the active sequence, which we initialize by beginning the first sequence.
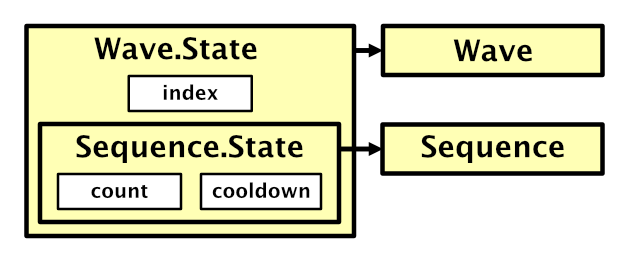
public class EnemyWave : ScriptableObject {

	[SerializeField]
	EnemySpawnSequence[] spawnSequences = {
		new EnemySpawnSequence()
	};

	public State Begin() => new State(this);

	[System.Serializable]
	public struct State {

		EnemyWave wave;

		int index;

		EnemySpawnSequence.State sequence;

		public State (EnemyWave wave) {
			this.wave = wave;
			index = 0;
			Debug.Assert(wave.spawnSequences.Length > 0, "Empty wave!");
			sequence = wave.spawnSequences[0].Begin();
		}
	}
}
Give EnemyWave.State a Progress method as well, using the same approach as before, with a few changes. Start with progressing the active sequence and replacing the time delta with the result of that invocation. As long as there is time remaining, move on to the next sequence if available and progress it. If no sequences remain then return the remaining time, otherwise return a negative value.
		public float Progress (float deltaTime) {
			deltaTime = sequence.Progress(deltaTime);
			while (deltaTime >= 0f) {
				if (++index >= wave.spawnSequences.Length) {
					return deltaTime;
				}
				sequence = wave.spawnSequences[index].Begin();
				deltaTime = sequence.Progress(deltaTime);
			}
			return -1f;
		}
Progressing Through a Scenario
Give GameScenario the same treatment. In this case the state contains the wave index and the active wave state.
public class GameScenario : ScriptableObject {

	[SerializeField]
	EnemyWave[] waves = {};

	public State Begin () => new State(this);

	[System.Serializable]
	public struct State {

		GameScenario scenario;

		int index;

		EnemyWave.State wave;

		public State (GameScenario scenario) {
			this.scenario = scenario;
			index = 0;
			Debug.Assert(scenario.waves.Length > 0, "Empty scenario!");
			wave = scenario.waves[0].Begin();
		}
	}
}
As we're at the top level, the Progress method doesn't require a parameter and we can directly use Time.deltaTime. We don't need to return any remaining time, but do need to indicate whether the scenario is finished or not. Return false when we've finished the final wave and true otherwise to indicate that the scenario is still active.
		public bool Progress () {
			float deltaTime = wave.Progress(Time.deltaTime);
			while (deltaTime >= 0f) {
				if (++index >= scenario.waves.Length) {
					return false;
				}
				wave = scenario.waves[index].Begin();
				deltaTime = wave.Progress(deltaTime);
			}
			return true;
		}
Playing a Scenario
Finally, to play a scenario Game needs a configuration field for a scenario and keep track of the its state. We'll simply begin the scenario when we awake and progress it in Update before updating the other game state.
	[SerializeField]
	GameScenario scenario = default;

	GameScenario.State activeScenario;

	…

	void Awake () {
		board.Initialize(boardSize, tileContentFactory);
		board.ShowGrid = true;
		activeScenario = scenario.Begin();
	}

	…

	void Update () {
		…

		activeScenario.Progress();

		enemies.GameUpdate();
		Physics.SyncTransforms();
		board.GameUpdate();
		nonEnemies.GameUpdate();
	}
From now on the configured scenario runs as soon as the game begins. It will progress until completion and then do nothing.
Beginning and Ending Games
We can play a single scenario, but once it is finished no more enemies will appear. To keep the game going we'll have to make it possible to begin a new scenario, either manually or because the player won or lost the game. You could also make it possible to select from multiple scenarios, but that won't be part of the tutorial.
Beginning a New Game
Ideally we could begin a new game at any moment. This requires cleaning up the current state of the entire game, which means that we have to clear multiple objects. First, add a Clear method to GameBehaviorCollection that recycles all its behaviors.
	public void Clear () {
		for (int i = 0; i < behaviors.Count; i++) {
			behaviors[i].Recycle();
		}
		behaviors.Clear();
	}
That assumes that all behaviors can be recycled, which is currently not the case. To make this work, add an abstract Recycle method to GameBehavior.
public abstract void Recycle ();
The Recycle method of WarEntity must now explicitly override it.
	public override void Recycle () {
		originFactory.Reclaim(this);
	}
Enemy doesn't have a Recycle method yet, so give it one. All it needs to do is have the factory reclaim it. Then invoke Recycle everywhere we currently directly access the factory.
	public override bool GameUpdate () {
		if (Health <= 0f) {
			//OriginFactory.Reclaim(this);
			Recycle();
			return false;
		}

		progress += Time.deltaTime * progressFactor;
		while (progress >= 1f) {
			if (tileTo == null) {
				//OriginFactory.Reclaim(this);
				Recycle();
				return false;
			}
			…
		}
		…
	}

	public override void Recycle () {
		OriginFactory.Reclaim(this);
	}
GameBoard needs to be cleared as well, so give it a Clear method that empties all tiles, clears the spawn points and updating content, and sets the default destination and spawn point. We can then invoke Clear at the end of Initialize instead of repeating code.
	public void Initialize (
		Vector2Int size, GameTileContentFactory contentFactory
	) {
		…
		for (int i = 0, y = 0; y < size.y; y++) {
			for (int x = 0; x < size.x; x++, i++) {
				…

				//tile.Content = contentFactory.Get(GameTileContentType.Empty);
			}
		}

		//ToggleDestination(tiles[tiles.Length / 2]);
		//ToggleSpawnPoint(tiles[0]);
		Clear();
	}

	public void Clear () {
		foreach (GameTile tile in tiles) {
			tile.Content = contentFactory.Get(GameTileContentType.Empty);
		}
		spawnPoints.Clear();
		updatingContent.Clear();
		ToggleDestination(tiles[tiles.Length / 2]);
		ToggleSpawnPoint(tiles[0]);
	}
Now we can add a BeginNewGame method to Game that clears the enemies, non-enemies, and board, and then begins a new scenario.
	void BeginNewGame () {
		enemies.Clear();
		nonEnemies.Clear();
		board.Clear();
		activeScenario = scenario.Begin();
	}
Invoke this method in Update if the B key is pressed, before progressing the scenario.
	void Update () {
		…

		if (Input.GetKeyDown(KeyCode.B)) {
			BeginNewGame();
		}

		activeScenario.Progress();

		…
	}
Losing the Game
The goal of the game is to defeat all enemies before too many have reached their destination. How many enemies need to succeed to trigger defeat depends on the starting health of the player, for which we'll add a configuration field to Game. As we're counting enemies we use an integer, not a float.
	[SerializeField, Range(0, 100)]
	int startingPlayerHealth = 10;

When awaking or beginning a new game, set the player's current health to the starting value.
	int playerHealth;

	…

	void Awake () {
		playerHealth = startingPlayerHealth;
		…
	}

	void BeginNewGame () {
		playerHealth = startingPlayerHealth;
		…
	}
Add a public static EnemyReachedDestination method so enemies can inform Game that they reached their destination. When that happens decrement the player's health.
	public static void EnemyReachedDestination () {
		instance.playerHealth -= 1;
	}
Invoke the method in Enemy.GameUpdate at the appropriate moment.
			if (tileTo == null) {
				Game.EnemyReachedDestination();
				Recycle();
				return false;
			}
We can now check for defeat in Game.Update. If the player's health is zero or less, trigger defeat. We'll simply log this fact and immediately begin a new game, before progressing the scenario. But only do this if the starting health is positive. That allows us to use zero for starting health, which makes defeat impossible, which is handy for scenario testing.
		if (playerHealth <= 0 && startingPlayerHealth > 0) {
			Debug.Log("Defeat!");
			BeginNewGame();
		}

		activeScenario.Progress();
Winning the Game
The alternative to defeat is victory, which is achieved when the scenario is finished while the player is still alive. So when the result of GameScenario.Progess is false log victory, begin a new game, and immediately progress it.
		if (playerHealth <= 0) {
			Debug.Log("Defeat!");
			BeginNewGame();
		}

		if (!activeScenario.Progress()) {
			Debug.Log("Victory!");
			BeginNewGame();
			activeScenario.Progress();
		}
However, that will result in victory after the last cooldown has completed, even if there are still enemies on the board. We should delay victory until all enemies are gone, which we could do by also checking whether the enemy collection is empty, assuming it has an IsEmpty property.
		if (!activeScenario.Progress() && enemies.IsEmpty) {
			Debug.Log("Victory!");
			BeginNewGame();
			activeScenario.Progress();
		}
Add the required property to GameBehaviorCollection.
public bool IsEmpty => behaviors.Count == 0;
Controlling Time
Let's also make it possible to manipulate time, which aids both testing and is also often a gameplay feature. First, make Game.Update check whether the space bar was pressed and use that to pause or unpause the game. That can be done by toggling Time.timeScale between zero and 1. This doesn't alter the game logic but freezes everything in place. Alternatively, you could use a very low value like 0.01 instead of zero for an extreme slow motion.
	const float pausedTimeScale = 0f;

	…

	void Update () {
		…

		if (Input.GetKeyDown(KeyCode.Space)) {
			Time.timeScale =
				Time.timeScale > pausedTimeScale ? pausedTimeScale : 1f;
		}

		if (Input.GetKeyDown(KeyCode.B)) {
			BeginNewGame();
		}
		…
	}
Second, add a play speed configuration slider to Game so we can speed up time.
	[SerializeField, Range(1f, 10f)]
	float playSpeed = 1f;

If pause isn't toggled and the time scale isn't set to the paused value, make it equal to the play speed. Also, use the play speed instead of 1 when unpausing.
		if (Input.GetKeyDown(KeyCode.Space)) {
			Time.timeScale =
				Time.timeScale > pausedTimeScale ? pausedTimeScale : playSpeed;
		}
		else if (Time.timeScale > pausedTimeScale) {
			Time.timeScale = playSpeed;
		}
Cyclic Scenarios
For some scenarios you might want to progress through all waves more than once. We can support that by making it possible for scenarios to repeat, cycling through all waves multiple times. You could further refine this to for example only repeat the last wave, but in this tutorial we'll simply repeat the entire scenario.
Cycling through Waves
Add a configuration slider for the amount of cycles to GameScenario, set to 1 by default. Set the minimum to zero, which will make the scenario repeat without end. That would create a survival scenario that cannot be won, the point being to see how long the player can last.
	[SerializeField, Range(0, 10)]
	int cycles = 1;

GameScenario.State now has to keep track of its cycle number.
		int cycle, index;

		EnemyWave.State wave;

		public State (GameScenario scenario) {
			this.scenario = scenario;
			cycle = 0;
			index = 0;
			wave = scenario.waves[0].Begin();
		}
In Progress, when all waves have finished increment the cycle and only return false if we've gone through enough cycles. Otherwise set the wave index back to zero and keep going.
		public bool Progress () {
			float deltaTime = wave.Progress(Time.deltaTime);
			while (deltaTime >= 0f) {
				if (++index >= scenario.waves.Length) {
					if (++cycle >= scenario.cycles && scenario.cycles > 0) {
						return false;
					}
					index = 0;
				}
				wave = scenario.waves[index].Begin();
				deltaTime = wave.Progress(deltaTime);
			}
			return true;
		}
Speeding Up
If the player managed to beat a cycle once they should be able to beat it again without issue. We have to increase the difficulty to keep the scenario challenging. The simplest way to do that is by reducing all cooldowns in successive cycles. That makes enemies appear quicker and will inevitably overwhelm the player in a survival scenario.
Add a configuration slider to GameScenario to control the speed-up per cycle. This value gets added to the time scale after each cycle for the purpose of advancing cooldown only. For example, with a speed-up of 0.5 the first cycle has cooldown speed ×1, the second cycle has speed ×1.5, the third ×2, the fourth ×2.5, and so on.
	[SerializeField, Range(0f, 1f)]
	float cycleSpeedUp = 0.5f;
We now have to add the time scale to GameScenario.State as well. It always starts at 1 and is increased by the configured speed-up after each cycle. Use it to scale Time.deltaTime before progressing the wave.
		float timeScale;

		EnemyWave.State wave;

		public State (GameScenario scenario) {
			this.scenario = scenario;
			cycle = 0;
			index = 0;
			timeScale = 1f;
			wave = scenario.waves[0].Begin();
		}

		public bool Progress () {
			float deltaTime = wave.Progress(timeScale * Time.deltaTime);
			while (deltaTime >= 0f) {
				if (++index >= scenario.waves.Length) {
					if (++cycle >= scenario.cycles && scenario.cycles > 0) {
						return false;
					}
					index = 0;
					timeScale += scenario.cycleSpeedUp;
				}
				wave = scenario.waves[index].Begin();
				deltaTime = wave.Progress(deltaTime);
			}
			return true;
		}
The next tutorial is Animation.