Player Character
This is the second tutorial in a series that covers the creation of a simple true top-down 2D game with pixel graphics, using the Godot Engine, version 4. It follows Tile Map and adds a player character to it.
This tutorial uses Godot 4.3, the regular version, but you could also use the .NET version.
Upgrading from Godot 4.2.2
The tutorial was originally written for Godot 4.2.2 but is now updated to 4.3. Since Godot 4.3 the TileMap node is superseded by the TileMapLayer node. To upgrade an old tutorial project go to the TileMap bottom panel with the map selected, click the rightmost toolbar button that looks like a shovel and wrench, then pick the option to extract the layers as nodes. There is only a single layer, so you end up with a single node. You can then make the layer node a child of the scene root and remove the old TileMap node.
Player Character Scene
In a true top-down 2D game everything including the player character is viewed from above. So there isn't much to see in case of a small or humanlike character. In this series we keep things simple and use a weird glowing ball for the player character.
We design the player character in its own scene. So create a new scene with a CharacterBody2D for its root node, named PlayerCharacter
. Save the scene as player_character.tscn
.
Collision Shape
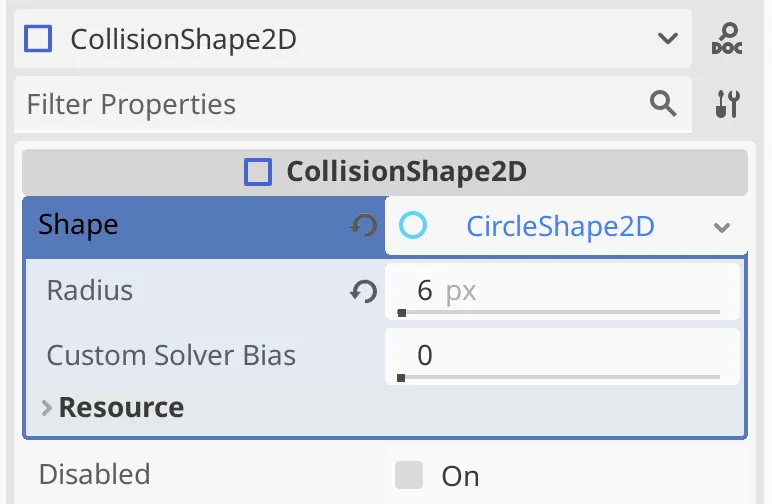
A CharacterBody2D node can be used to control a character in a 2D game. It supports physical interaction with its environment, but requires a CollisionShape2D child node to determine its own shape. Give it such a child node and select a new CircleShape2D for its Shape property, with its Radius set to six pixels. That makes our character twelve pixels wide, four pixels less than the width of a tile so it has room to maneuver.
Sprite
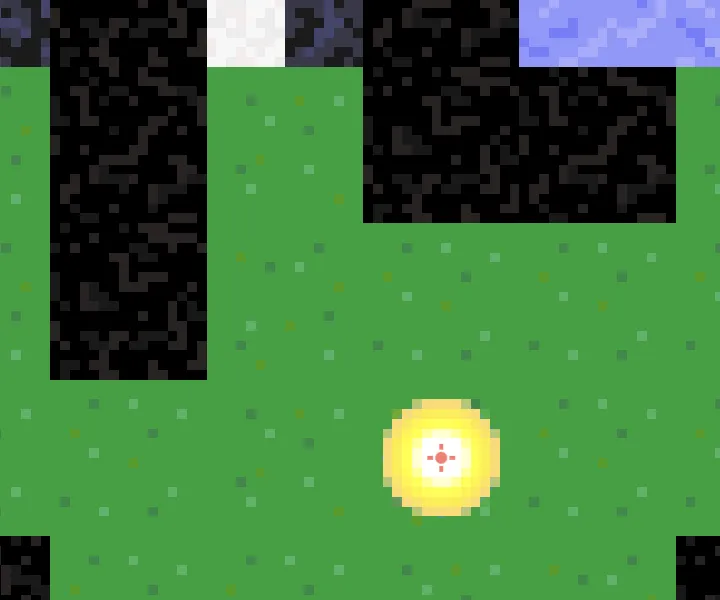
To visualize the character also give it a Sprite2D child node. Create a new GradientTexture2D resource for its Texture. Set its Fill to Radial, from the center at (0.5, 0.5) to the middle right at (1, 0.5). Our character is twelve pixels wide but we'll set the width and height to fourteen so there's a one-pixel border around it, which will remain transparent.
Our character is a glowing ball so I made it white at its center, transitioning to yellow and fading to orange near its edge. This can be done with five gradient offsets: 0, 0.35, 0.58, 0.9, and 1. Their colors are ffffff, ffffff, ffff00, ffd674, and ffd67400. You can either do this roughly via the gradient editor or insert the exact values in the Raw Data.
Texture Filtering
When we look at our character in its scene we discover that it appears fuzzy when we zoom in. This is caused by how the texture is filtered when the sprite gets rendered.
A texture consists of a grid of color data points that don't have an inherent shape. To visualize this data it has to be filtered using some kernel shape. The default method is to perform bilinear filtering, which linearly blends between adjacent colors in both dimensions. The result looks like the sprite is composed of fuzzy overlapping squares. This is fine for high-resolution images that need to appear smooth, but we want a low-resolution pixel-art look. The solution is to use non-overlapping solid square kernels instead. We can achieve this by setting the sprite's CanvasItem › Texture › Filter to Nearest, like we did for the tile map in the previous tutorial.
Now when sampling the texture simply the nearest color is used, so there is no blending. This produces solid square areas because the 2D color data is arranged in a square grid.
What is Inherit filtering?
When set to Inherit the sprite uses the same settings that its parent CanvasItem node uses. A root node inherits from the General › Rendering › Textures › Default Texture Filter project setting, which is set to Linear by default. We could change the default to Nearest, but we'll also use linear filtering so instead explicitly set it to nearest when needed.
Now we can add the player character to the map. Switch to the map
scene and drag player_character.tscn
to someplace on the map. I set its position to (136, 88). Make sure that it is a child of the root Map
node, below TileMap
and not a child of it.
Movement
A player character needs to be able to move, so we implement that functionality next. Switch back to the player_character
scene.
Motion Mode
The default CharacterBody2D node is configured for a side-scrolling 2D platformer game. We have to change it so it works correctly for a top-down game. We do this by settings its Motion Mode to Floating.
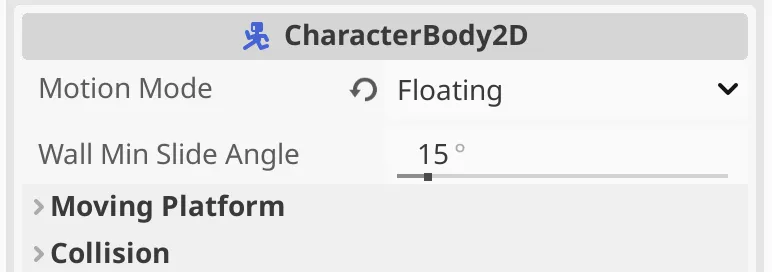
This changes the visible configuration options. We get a Wall Min Slide Angle, which controls how the character reacts to being moved against a wall. If the movement direction angle is at least the indicated amount of degrees away from the wall the character will slide along it, otherwise it will stop moving. We keep the default of 15°.
Player Script
CharacterBody2D doesn't move on its own, we need to control it via a script. Add a new GDScript to the PlayerCharacter
root node and save it as player_character.gd
.
The script extends CharacterBody2D and we give it a configurable speed, set to sixty pixels per second by default.
extends CharacterBody2D

## Speed in pixels per second.
@export_range(0, 1000) var speed := 60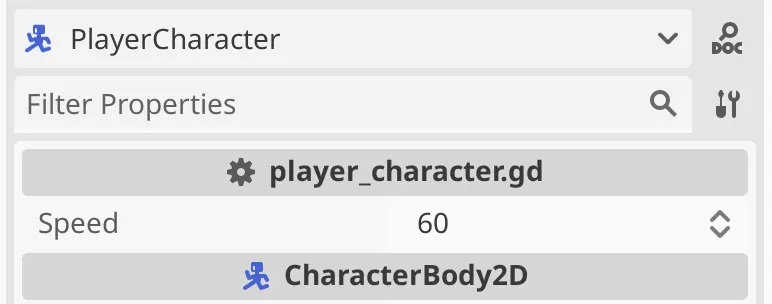
The movement code needs to be put in a func _physics_process. Let's start with a placeholder one that does nothing but pass. We won't need to use the required delta parameter, so prepend it with an underscore to avoid the unused-parameter warning.
@export_range(0, 1000) var speed := 60


func _physics_process(_delta: float) -> void:
	pass
Instructing the CharacterBody2D can be done by calling mode_and_slide() instead of passing. This is the simplest way to control the character, which is sufficient for us.
func _physics_process(_delta: float) -> void:
	move_and_slide()
However, this won't make our character move yet because we do not know where it should move. We have to retrieve the player's input to know that. Introduce a new func get_player_input() to do this and call it before move_and_slide().
func _physics_process(_delta: float) -> void:
	get_player_input()
	move_and_slide()


func get_player_input() -> void:
	pass
Should we get player input in _physics_process()?
If physics runs faster than the frame rate then doing it this way we could end up needlessly checking the input more than once per frame. The physics time step is configured via the General › Physics › Common › Physics Ticks Per Second project setting and is set to 60 by default. We're targeting 60 frames per second as well, which should be doable for our graphically-light game. So retrieving input during physics processing is fine.
We retrieve the player's input as a 2D vector by calling Input.get_vector(). We simply use the default user-interface configuration for going left, right, up, and down, by passing those as string arguments with ui_
prepended to them. You could also create your own configuration, but this works fine.
func get_player_input() -> void:
	var vector := Input.get_vector("ui_left", "ui_right", "ui_up", "ui_down")
To apply the input vector multiply it with our speed and then assign it to the velocity€ that we inherited from CharacterBody2D.
func get_player_input() -> void:
	var vector := Input.get_vector("ui_left", "ui_right", "ui_up", "ui_down")
	velocity€ = vector * speed
We can now move the player character when we run our game by pressing the arrow keys. Diagonal movement is possible by pressing two keys at once.
When using the arrows keys movement is always at the configured speed, also when moving diagonally. It is also possible to use a controller stick to move, which gives us finer control over the player character's speed.
Even though we configured our speed as an integer and set it to 60 per second this does not mean that our player character moves exactly one pixel per physics step. When using the arrow keys moving diagonally would move √½ pixels in both dimension, and when using a controller the final speed depends on how far we push the stick. However, our player character still gets rendered as if it always aligns with the pixel grid. That's because we use a low render resolution and the spite uses nearest filtering.
What about the Snap 2D Transforms to Pixels project setting?
That setting can also be used to force correct pixel alignment, but in this case we do not need to use it. The one-pixel border of our sprite will always contain the visible pixels.
Note that due to the visual pixel alignment movement can appear jittery, especially when moving diagonally. This is an inherent trait of low-resolution pixel graphics. We could smooth it out by switching back to linear texture filtering, but then the sprite would appear to slightly morph during movement if it ends up not perfectly aligned with the pixel grid. It's a stylistic choice.
Hitting Walls
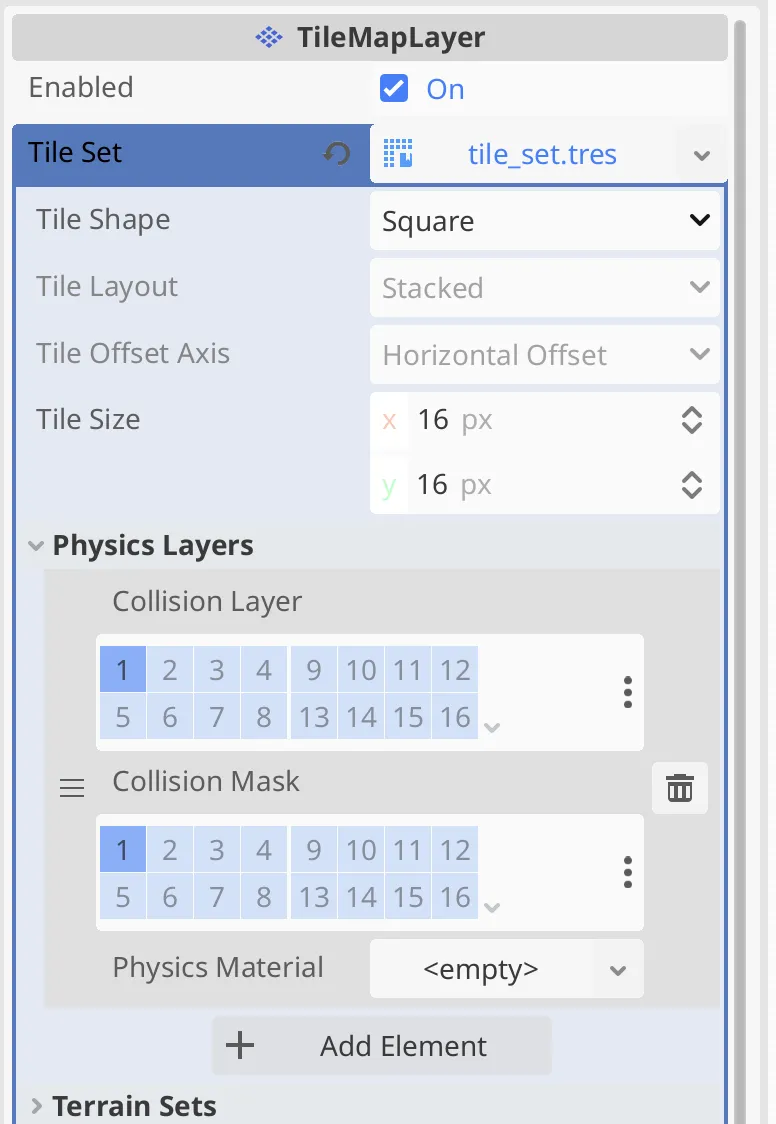
Currently the player character can move everywhere, ignoring the map. To stop it from moving through wall tiles we have to add support for physics to the tiles. Select TileMap
in our map
scene, expand the tile set resource, open its Physics Layers section, and click the Add Element button. That adds a standard physics layer to the tile map.
Go to the TileSet editor panel, switch to Select mode and pick one of the black wall tiles. Open its Physics › Physics Layer 0 section. Here we can create a collider polygon for the tile. As we use solid tiles we can simply use the Reset to default tile shape option from the vertical dots menu, or press f, to fill the tile with a square collider. The collider polygon appears as a red overlay.
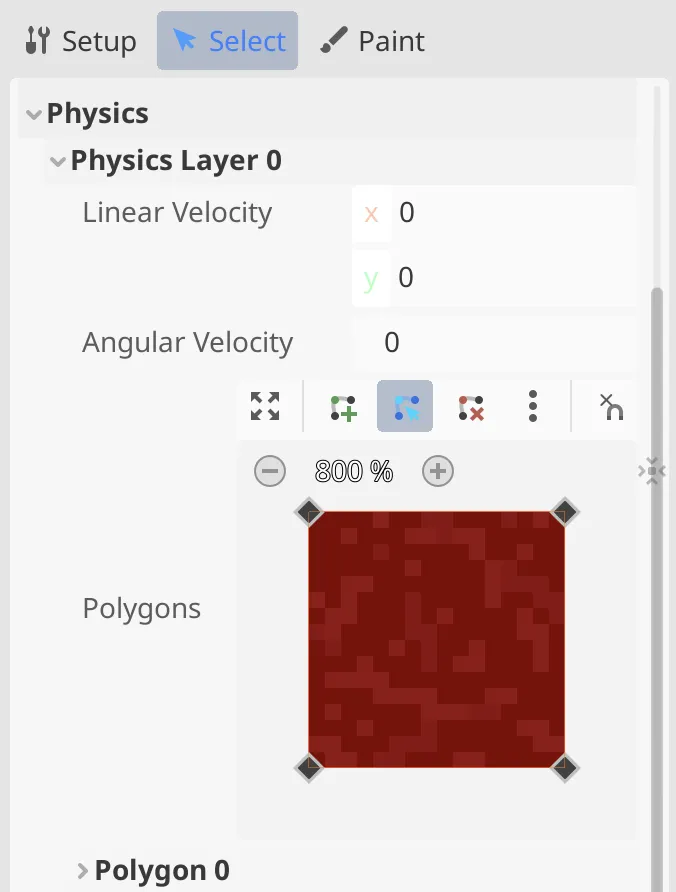
Do this for all three wall tiles and also the two water tiles, as we don't want our player to move onto the water either. You can select multiple tiles and create the collider for all of them at once.
Now the player character can no longer move through walls nor across water. It will instead come to a stop or slide along them.
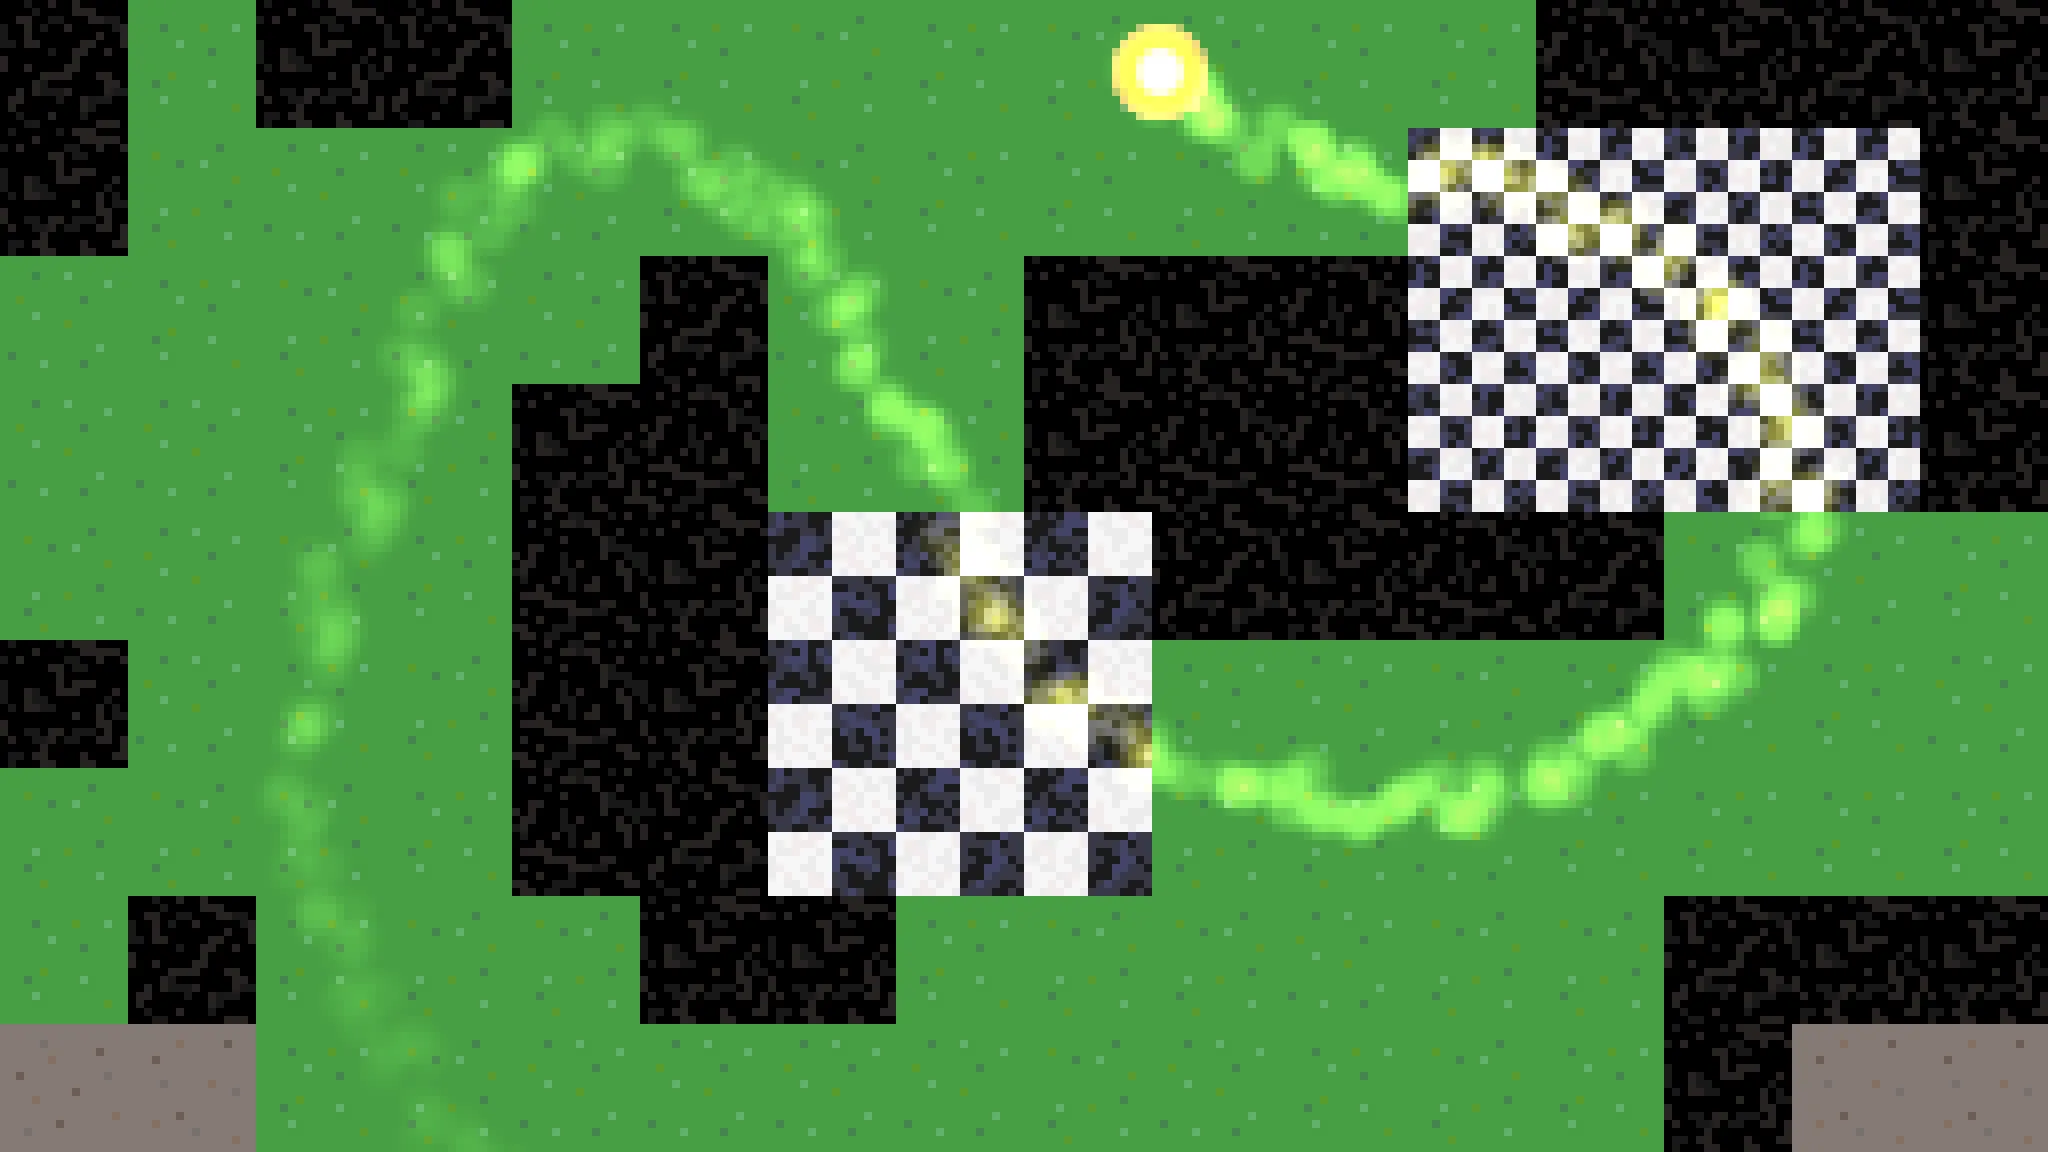
Glowing Trail
We have a glowing ball and it moves. Let's give it a glowing trail to make it look more interesting. We'll do this by adding a particle system to the player character.
Particle System
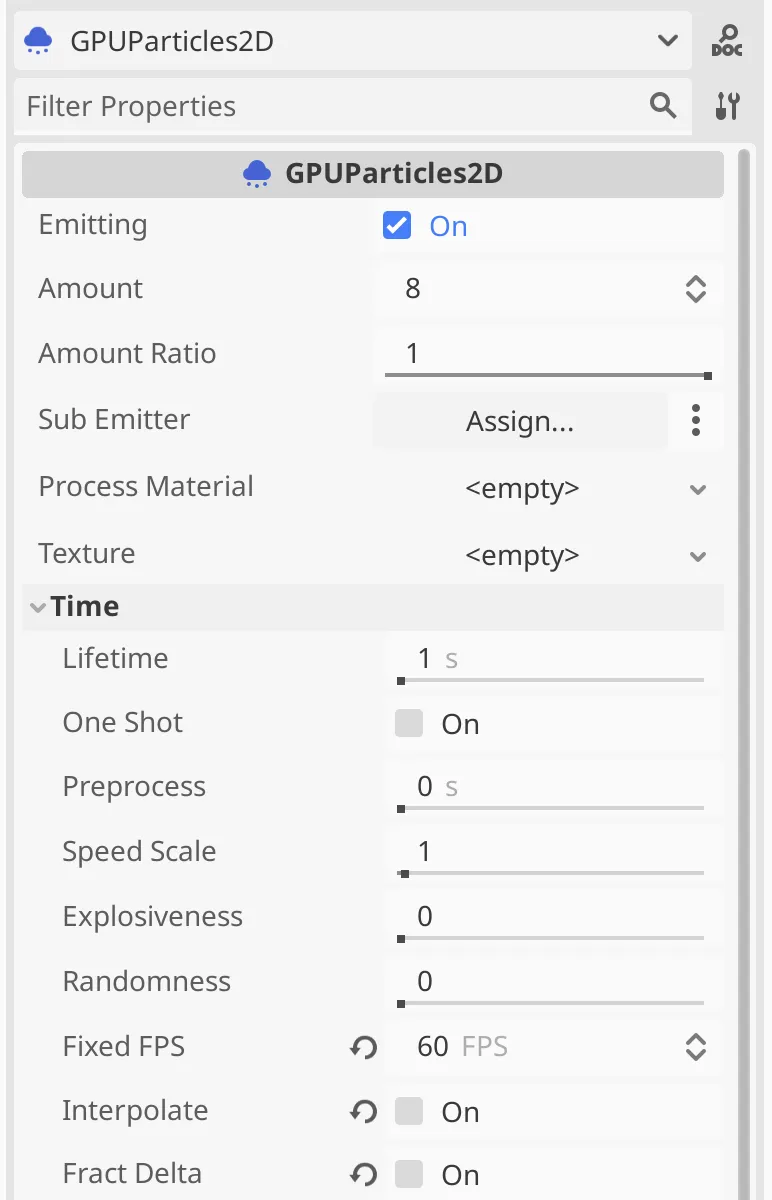
Switch to the player_character
scene and add a GPUParticles2D node to it. This creates a particle system that runs on the GPU.
Why not use CPUParticles2D?
As a rule of thumb, prefer GPU particles unless there is a good reason to use CPU particles. The GPU version performs better, unless your app is heavily GPU-bound, which is not the case for our simple game.
We keep most of the default settings but increase Time › Fixed FPS to 60, matching our target frame rate. We can also disable Interpolate and Fract Delta, assuming that the system runs in sync with the frame rate.
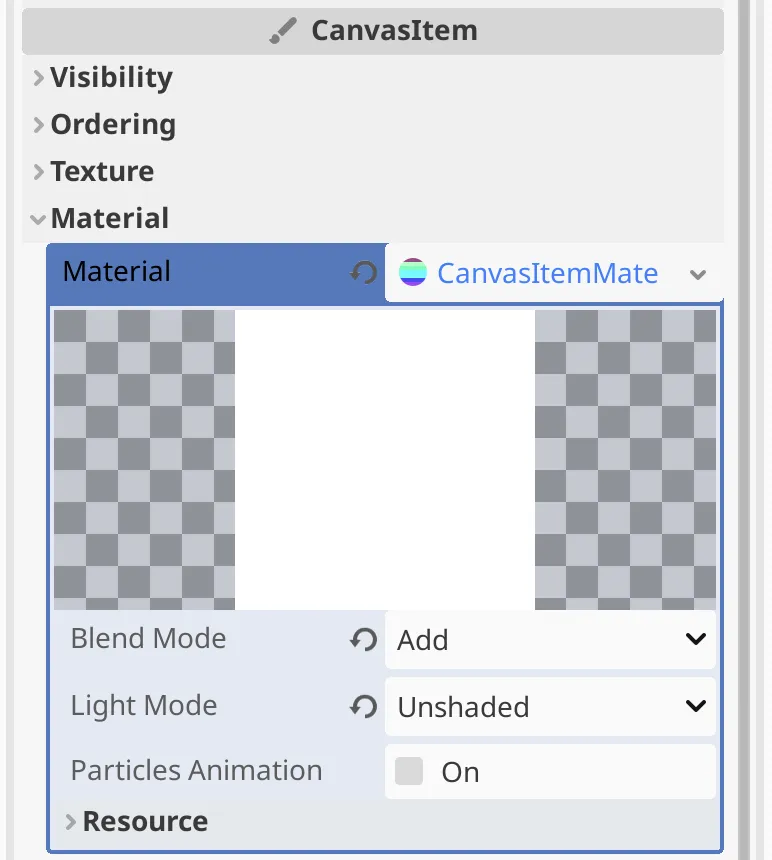
Material
We need to set up a few things before our particles will show up. First we need to give it a material, under CanvasItem › Material. Give it a new CanvasItemMaterial. The particles will add glow, so set its Blend Mode to Add. Set Light Mode to Unshaded as well, even though we're not using lighting at this point, because these particles should never be affected by lighting nor pay the cost for calculating it.
Texture
The second thing that we set up is the particle system's Texture, which is used to draw each particle. Create another radial 2D gradient, this time only 8×8 pixels large, going from white to black. Use offsets 0, 0.5, 1, with colors ffffff, ffffff, 000000. Note that we leave the alpha channels unchanged because we're adding colors, so black is invisible.
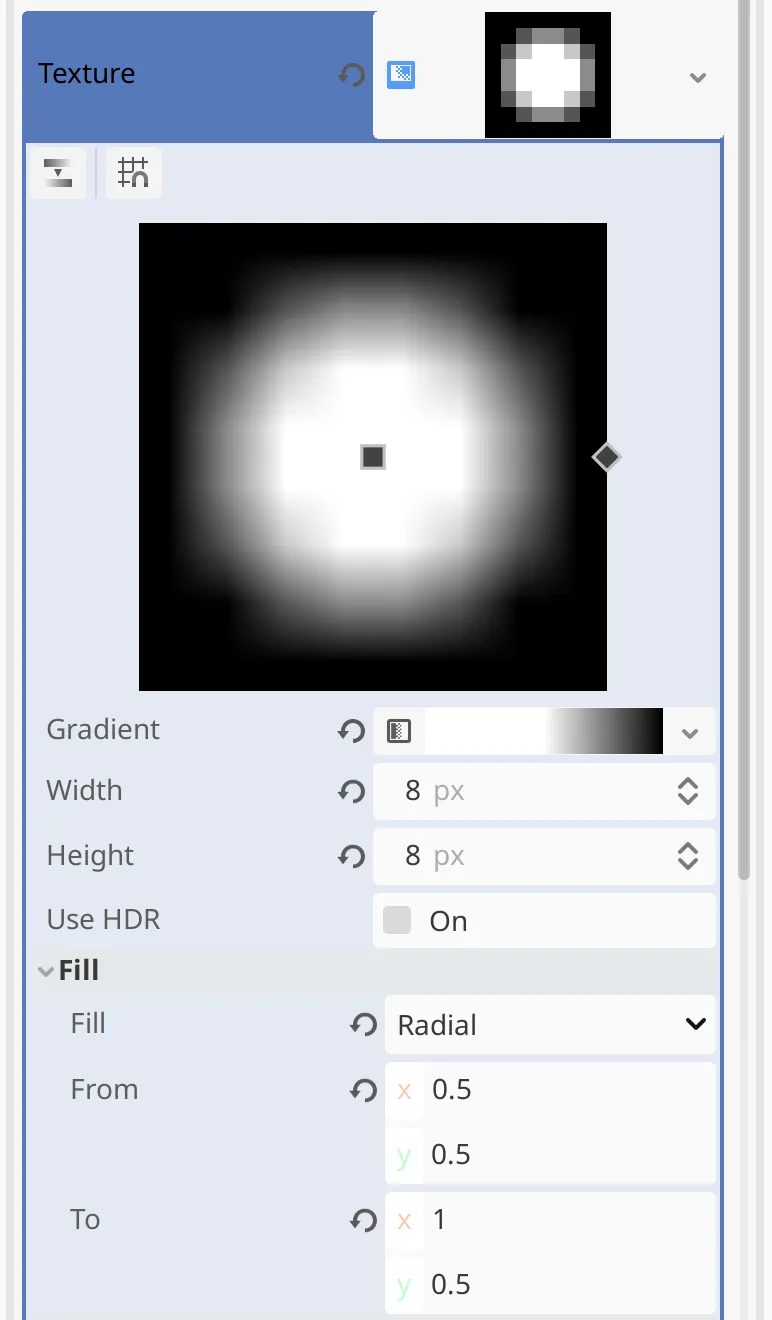
We keep the particle system's texture filtering as it is, using linear filtering, not nearest. This will add a little visual variety to the particles as they will not be placed at exact integer coordinates.
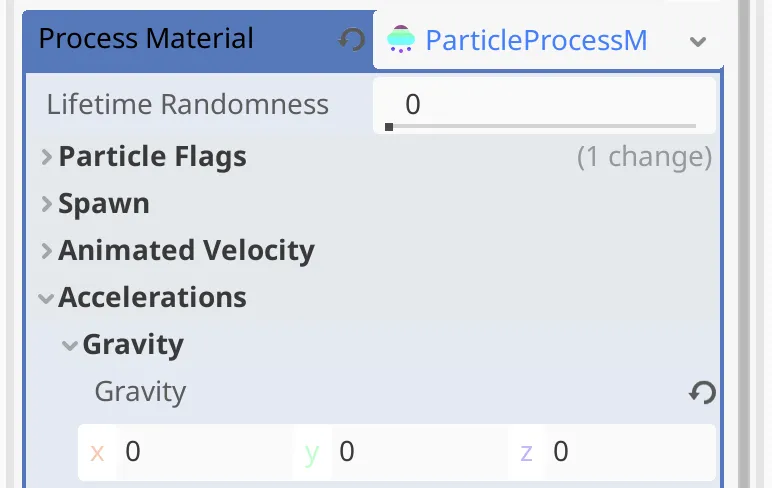
Process Material
The particle system runs on the GPU. To control it we need to select a new ParticleProcessMaterial for its Process Material. Even though its name suggests that it works like a regular material it can be thought of as a script that runs on the GPU. Just adding one to our system makes particles show up in the scene, moving out of the player character.
They also show up when running the game, although they currently don't make sense yet, always moving down from where they spawned, until their time is up and they disappear.
The default configuration of the process material applies gravity, which is not what we want. Set it to zero under Accelerations › Gravity.
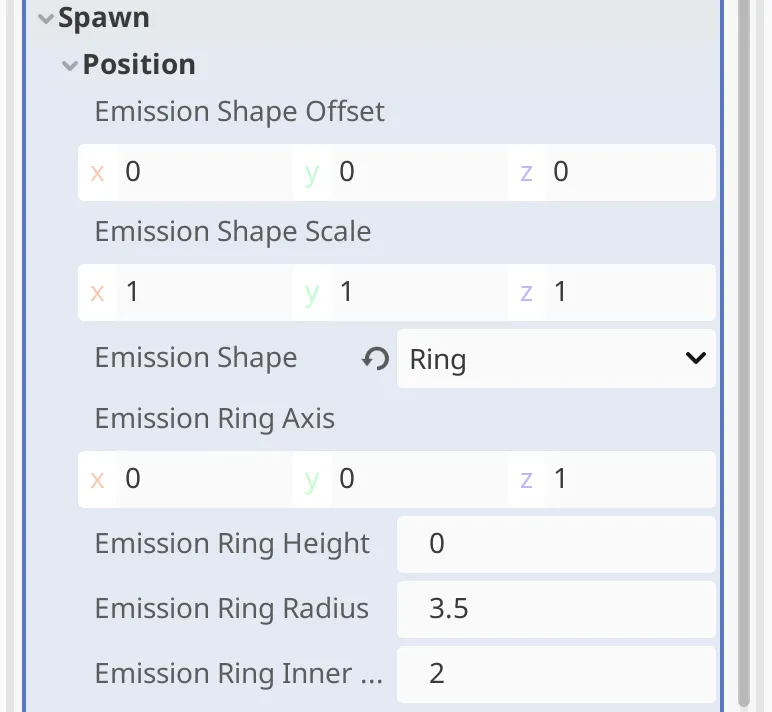
Next, we improve the spawn positions of the particles. They currenty always spawn at the center of the player character. We add some variety by adjusting its Spawn › Position. Set Emsission Shape to Ring, which makes a few more configuration options show up. Set Emission Ring Height to zero as we're working in 2D, set Emission Ring Radius to 3.5, and set Emission Ring Inner Radius to 2. This lets the particles spawn at random in a small ring around the player character's center, while avoiding the exact center. Thus each particle always has some offset.
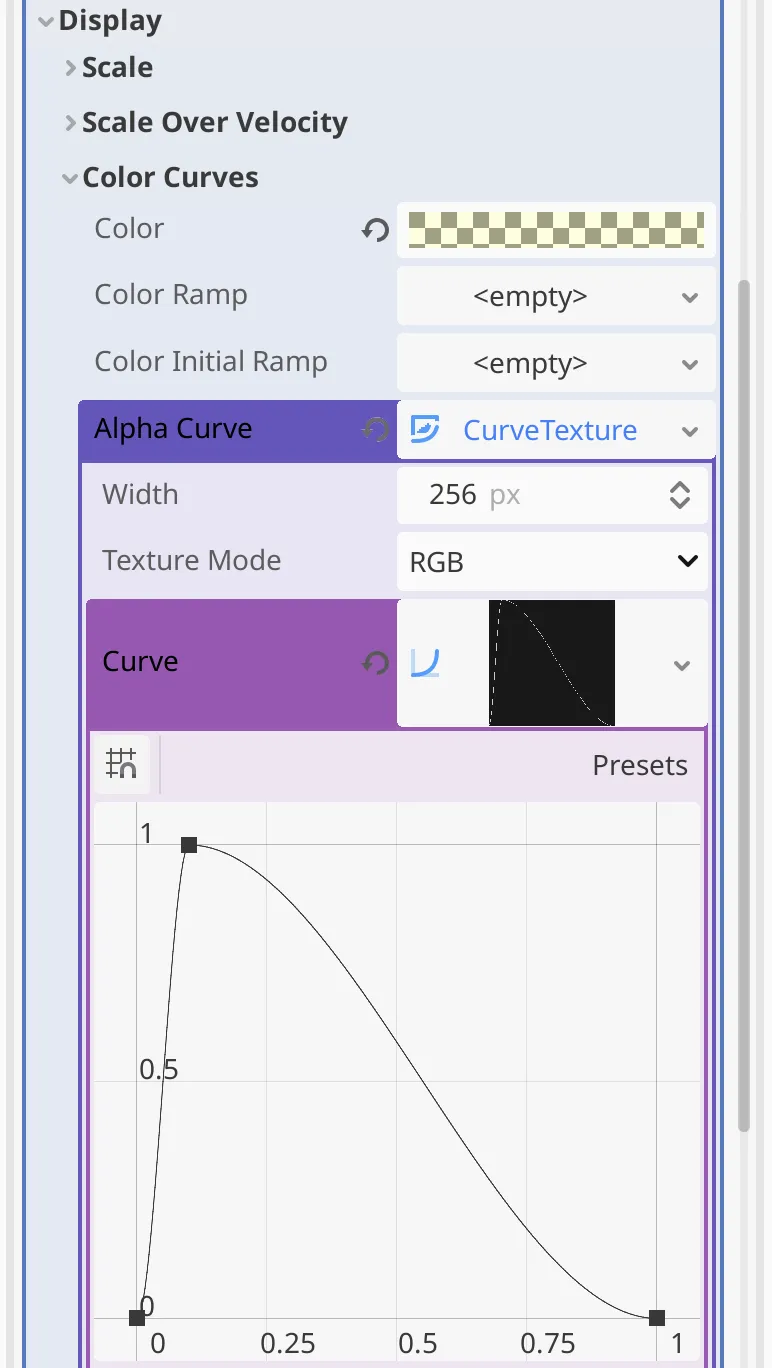
As a final touch we adjust the Display › Color Curves. Set Color to ffff793f so each particle only adds a subtle yellow glow. Then create a new CurveTexture for its Alpha Curve to fade the particles in and out during their one-second lifetime. Create a new curve with three points: (0,0), (0.1, 1), and (1, 0). That makes the particles appear very quickly to then slowly fade away.
Finally, to create a more solid trail increase the particle system's Amount to 30.
The next tutorial is Movable Objects.