Custom SRP 2.0.0
Render Graph
- Switch to the Render Graph API.
- Use passes to partition work.
- Play nice with profiling.
This tutorial is made with Unity 2022.3.5f1 and follows Custom SRP 1.0.0.
Building a Render Graph
Unity has added a render graph system to the RP Core Library somewhere during the Unity 2020 development cycle. Although we're at Unity 2022 now the system is still experimental. This means that its API might change in the future, but we're going ahead and migrate our render pipeline to use it, just like HDRP and URP are doing. This is a breaking change that makes it impossible to easily convert back to Unity 2019, so we increase our version to 2.0.0.
Note that for our current render pipeline the render graph system can be considered overkill. In 2.0.0 we won't get any benefit from it, only additional overhead. We only perform the minimum amount of conversion work to get a functional render graph version of our RP that still has the same features as before. That's roughly the current state of URP as well, though it's simpler in our case because we won't support disabling the render graph.
Profiling
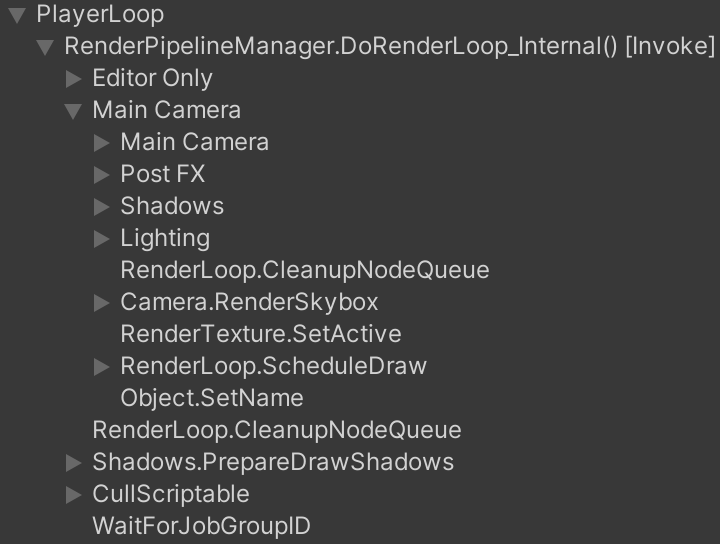
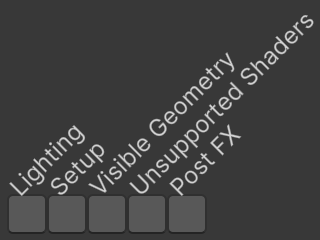
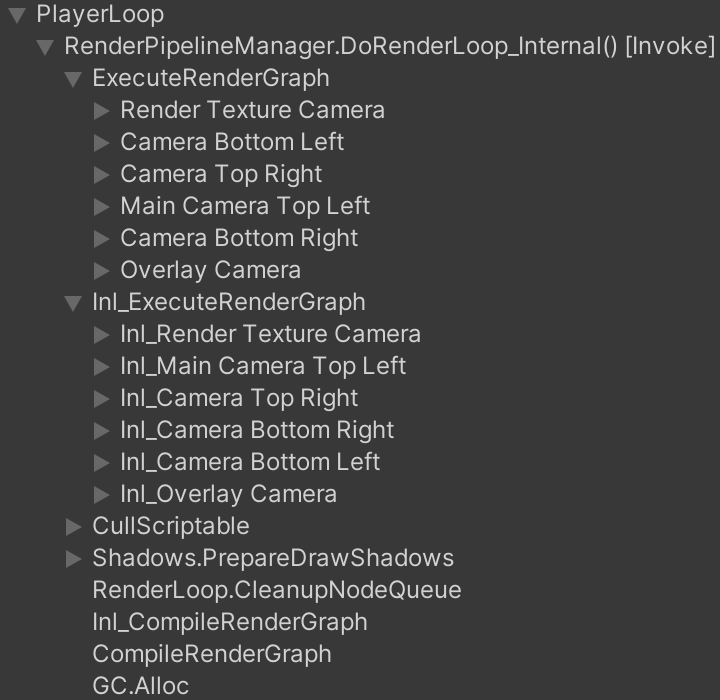
To demonstrate our baseline functionality we use the Particles scene as a reference point and look at its profiling data. The profiler shows the CPU work our RP does, under PlayerLoop / RenderPipelineManager.DoRenderLoop_Internal() [Invoke], based on the profiling and command buffer samples that we register. Note that Editor Only allocates memory each frame in the editor because we retrieve the camera's name.
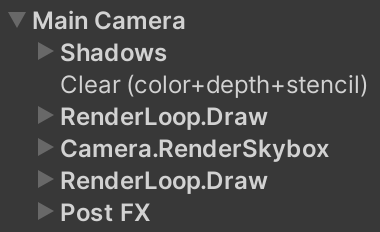
The frame debugger shows only the command buffers samples, in execution order.
One Render Graph
To access the Render Graph API we need to use its experimental namespace. Add it to CustomRenderPipeline and later to all C# scripts as needed.
using UnityEngine.Experimental.Rendering.RenderGraphModule;
A render pipeline does everything via a single render graph. We create and keep track of it in CustomRenderPipeline, naming it Custom SRP Render Graph. We must invoke Cleanup on it when our RP gets disposed, so it cleans up all the data that it manages.
	readonly RenderGraph renderGraph = new("Custom SRP Render Graph");

	…

	protected override void Dispose(bool disposing)
	{
		…
		renderGraph.Cleanup();
	}
The same render graph is used to render all cameras. We'll pass it as a new first argument when invoking Render on each camera. After we're done we invoke EndFrame on the render graph so it can clean up and release anything it no longer needs.
	protected override void Render(ScriptableRenderContext context, List<Camera> cameras)
	{
		for (int i = 0; i < cameras.Count; i++)
		{
			renderer.Render(
				renderGraph, context, cameras[i], cameraBufferSettings,
				useDynamicBatching, useGPUInstancing, useLightsPerObject,
				shadowSettings, postFXSettings, colorLUTResolution);
		}
		renderGraph.EndFrame();
	}
This is everything that CustomRenderPipeline needs to do with the render graph. To make this compile add the required parameter to CameraRenderer.Render.
	public void Render(
		RenderGraph renderGraph,
		ScriptableRenderContext context, Camera camera,
		CameraBufferSettings bufferSettings,
		bool useDynamicBatching, bool useGPUInstancing, bool useLightsPerObject,
		ShadowSettings shadowSettings, PostFXSettings postFXSettings,
		int colorLUTResolution)
	{ … }
Recording and Executing
At this point we have an active render graph, but it doesn't do anything yet. To make the render graph do something we have to invoke RecordAndExecute on it, with a new RenderGraphParameters struct as an argument. It returns something on which we immediately invoke Dispose. Do this at the end of CameraRenderer.Render, before cleaning up and submitting.
	public void Render(…)
	{
		…
		DrawGizmosAfterFX();

		var renderGraphParameters = new RenderGraphParameters { };
		renderGraph.RecordAndExecute(renderGraphParameters).Dispose();

		Cleanup();
		Submit();
	}
This will cause the render graph to generate errors. Regardless what it's complaining about the reason is that we did not give it a command buffer via its parameters struct. We copy Unity's own approach here and retrieve a pooled command buffer object via CommandBufferPool. Release it at the end of Render.
Although it is possible to name the command buffer we should not do this. Getting a command buffer from the pool without passing it a name sets the buffer's name to the empty string, which is the only way to make it play nice with the render graph's way of generating profiler data.
		var renderGraphParameters = new RenderGraphParameters
		{
			commandBuffer = CommandBufferPool.Get()
		};
		renderGraph.RecordAndExecute(renderGraphParameters).Dispose();

		Cleanup();
		Submit();
		CommandBufferPool.Release(renderGraphParameters.commandBuffer);
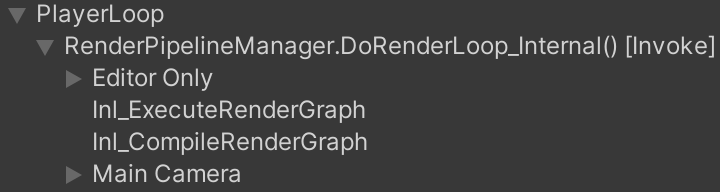
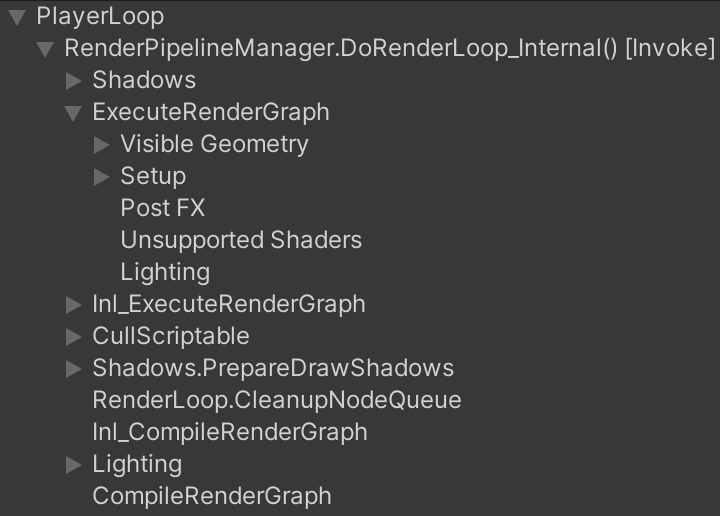
The profiler will now show something new: ExecuteRenderGraph and CompileRenderGraph, both prefixed with Inl_. The prefix stands for inline, which refers to the recording and compilation phases of the render graph. The inline execution part covers everything that happens in between invoking RecordAndExecute and Dispose, which is currently nothing. The compilation part comes after that, which also currently does nothing because the graph is empty. For the same reason there also isn't any actual execution.
To make our usage of the render graph fully correct we also have to provide it the current frame index, an execution name for which we'll use Render Camera, and a reference to the ScriptableRenderContext instance.
		var renderGraphParameters = new RenderGraphParameters
		{
			commandBuffer = CommandBufferPool.Get(),
			currentFrameIndex = Time.frameCount,
			executionName = "Render Camera",
			scriptableRenderContext = context
		};
Adding a Pass
A render graph contains passes, which we sequentially add to it in between invoking RecordAndExecute and Dispose. To make it easy to guarantee the proper closure of this phase the Render Graph API uses the disposable pattern. So we can declare that we are using whatever RecordAndExecute returns, with the using keyword, inside the code block that follows it. What's used will be disposed of implicitly when the code execution leaves that scope, even if exceptions are generated.
		using (renderGraph.RecordAndExecute(renderGraphParameters)) {
			// Add passes here.
		}
A pass is added by invoking AddRenderPass on the render graph, which requires at least two arguments. First is the name of the pass. Second is an output parameter of a type that is a class with a default constructor. The idea is that the render graph creates and pools instances of those types, which can be used to store data needed by the pass. As a simple example we're going to add a pass named Test Pass and use CameraSettings for its data type, just because it already exists and doesn't do anything special.
		using (renderGraph.RecordAndExecute(renderGraphParameters))
		{
			renderGraph.AddRenderPass("Test Pass", out CameraSettings data);
		}
Adding a render pass also uses the disposable pattern, in this case returning a RenderGraphBuilder that we need to build the pass and have to dispose of when we are done.
		using (renderGraph.RecordAndExecute(renderGraphParameters))
		{
			RenderGraphBuilder builder =
				renderGraph.AddRenderPass("Test Pass", out CameraSettings data);
			builder.Dispose();
		}
We can again insert a using block here, but it's also possible to omit the block and only write using in front of the variable declaration. That way the end of the enclosing scope is implicitly used to dispose of it.
		using (renderGraph.RecordAndExecute(renderGraphParameters))
		{
			using RenderGraphBuilder builder =
				renderGraph.AddRenderPass("Test Pass", out CameraSettings data);
			//builder.Dispose();
		}
Every pass is required to have a render function. This is a delegate with two parameters, first for the pass data and second for a RenderGraphContext instance provided by the render graph. It's set by invoking SetRenderFunc on the builder. As this is just an example we use a lambda expression to give it an empty anonymous function.
			using RenderGraphBuilder builder =
				renderGraph.AddRenderPass("Test Pass", out CameraSettings data);
			builder.SetRenderFunc(
				(CameraSettings data, RenderGraphContext context) => { });
Our test pass now shows up in the profiler, as part of its inline execution, which is its recording phase.

Converting to Passes
Now that we know how we can create passes we're going to convert our existing code, splitting into multiple passes. For this version we make the minimal amount of changes, so mostly keep the existing code where it is. Instead of moving code out of CameraRenderer we'll make it public when needed by a pass. Anything local to CameraRenderer.Render that is needed by a pass we'll pass along and store in their fields. This is bad coding practice, but we'll properly isolate the code in a future version.
The current design of the render graph is based on using data-only classes and a separate anonymous function or static method for the rendering code. This is a low-level design that makes it impossible to use object-oriented C# features. HDRP and URP work around this by passing lots of references around. As a result the code of those RPs is quite messy, especially because they are still transitioning to using render graph exclusively, just like we are.
To keep our code simple and clear it would've been convenient if we instead had a pass interface with a void Render(RenderGraphContext context) method. So let's pretend that is the case when we create our own passes.
We'll create passes from the end to the beginning, iteratively pulling parts of our existing code into the RecordAndExecute block, while keeping our RP functional throughout the process.
Gizmos Pass
The last thing that our RP does before cleaning up is drawing gizmos. The gizmos are split into pre-FX and post-FX, but I have failed to find an example of pre-FX gizmos and there is no way to create any, thus I assume that they do not actually exist. So we'll simply draw both together at the end.
Create a GizmosPass class and put in a new Passes folder under Runtime. Make it implement our imaginary interface, copying code from CameraRenderer.DrawGizmosBeforeFX and also making it draw post-FX gizmos. It needs access to the camera, whether an intermediate buffer is used, and invoke the Draw and Execute methods, so give it a reference to CameraRenderer via a field and make those members public. Finally, make all that only compile for the editor and exclude the check whether gizmos should be drawn, as we'll skip the pass if it isn't needed.
using System.Diagnostics;
using UnityEditor;
using UnityEngine.Experimental.Rendering.RenderGraphModule;
using UnityEngine.Rendering;

public class GizmosPass
{
#if UNITY_EDITOR
	CameraRenderer renderer;

	void Render(RenderGraphContext context)
	{
		if (renderer.useIntermediateBuffer)
		{
			renderer.Draw(
				CameraRenderer.depthAttachmentId, BuiltinRenderTextureType.CameraTarget,
				true);
			renderer.ExecuteBuffer();
		}
		context.renderContext.DrawGizmos(renderer.camera, GizmoSubset.PreImageEffects);
		context.renderContext.DrawGizmos(renderer.camera, GizmoSubset.PostImageEffects);
	}
#endif
}
To record the pass, introduce a public static Record method with parameters for the render graph and our camera renderer. This method cannot be partial so we use conditional compilation to only include it in the editor. Its code should be included only if compiling for the editor. It is here that we check whether gizmos should be rendered.
#if UNITY_EDITOR
	…
#endif

	[Conditional("UNITY_EDITOR")]
	public static void Record(RenderGraph renderGraph, CameraRenderer renderer)
	{
#if UNITY_EDITOR
		if (Handles.ShouldRenderGizmos()) { }
#endif
	}
If gizmos should be rendered we add a Gizmos render pass using our GizmosPass type. Set its renderer and give it a function that invokes its imaginary interface method.
		if (Handles.ShouldRenderGizmos())
		{
			using RenderGraphBuilder builder =
				renderGraph.AddRenderPass("Gizmos", out GizmosPass pass);
			pass.renderer = renderer;
			builder.SetRenderFunc<GizmosPass>((pass, context) => pass.Render(context));
		}
Remove the calls to draw gizmos from CameraRenderer.Render and replace the test pass with the recording of our gizmos pass.
//DrawGizmosBeforeFX();if (postFXStack.IsActive) { postFXStack.Render(colorAttachmentId); } else if (useIntermediateBuffer) { DrawFinal(cameraSettings.finalBlendMode); ExecuteBuffer(); }//DrawGizmosAfterFX();var renderGraphParameters = new RenderGraphParameters { … }; using (renderGraph.RecordAndExecute(renderGraphParameters)) {//using RenderGraphBuilder builder =// renderGraph.AddRenderPass("Test Pass", out CameraSettings data);//builder.SetRenderFunc(// (CameraSettings data, RenderGraphContext context) => { });GizmosPass.Record(renderGraph, this); }
Everything should still work at this point, but now the gizmos are drawn via the render graph, if needed. We can also remove all gizmo-drawing code from CameraRenderer.
//partial void DrawGizmosBeforeFX();//partial void DrawGizmosAfterFX();… #if UNITY_EDITOR …//partial void DrawGizmosBeforeFX() { … }//partial void DrawGizmosAfterFX() { … }… #endif
Final Pass
The second pass that we introduce is the final pass, which is used when we are rendering to intermediate buffers while not using post FX. It needs the camera renderer and the final blend mode to do its work.
using UnityEngine.Experimental.Rendering.RenderGraphModule;
using UnityEngine.Rendering;

public class FinalPass
{
	CameraRenderer renderer;

	CameraSettings.FinalBlendMode finalBlendMode;

	void Render(RenderGraphContext context)
	{
		renderer.DrawFinal(finalBlendMode);
		renderer.ExecuteBuffer();
	}

	public static void Record(
		RenderGraph renderGraph,
		CameraRenderer renderer,
		CameraSettings.FinalBlendMode finalBlendMode)
	{
		using RenderGraphBuilder builder =
			renderGraph.AddRenderPass("Final", out FinalPass pass);
		pass.renderer = renderer;
		pass.finalBlendMode = finalBlendMode;
		builder.SetRenderFunc<FinalPass>((pass, context) => pass.Render(context));
	}
}
Pull it into the render graph, leaving the post FX for the next step.
		if (postFXStack.IsActive)
		{
			postFXStack.Render(colorAttachmentId);
		}
		//else if (useIntermediateBuffer)
		//{
		//	DrawFinal(cameraSettings.finalBlendMode);
		//	ExecuteBuffer();
		//}

		var renderGraphParameters = new RenderGraphParameters
		{ … };
		using (renderGraph.RecordAndExecute(renderGraphParameters))
		{
			if (postFXStack.IsActive)
			{ }
			else if (useIntermediateBuffer)
			{
				FinalPass.Record(renderGraph, this, cameraSettings.finalBlendMode);
			}
			GizmosPass.Record(renderGraph, this);
		}
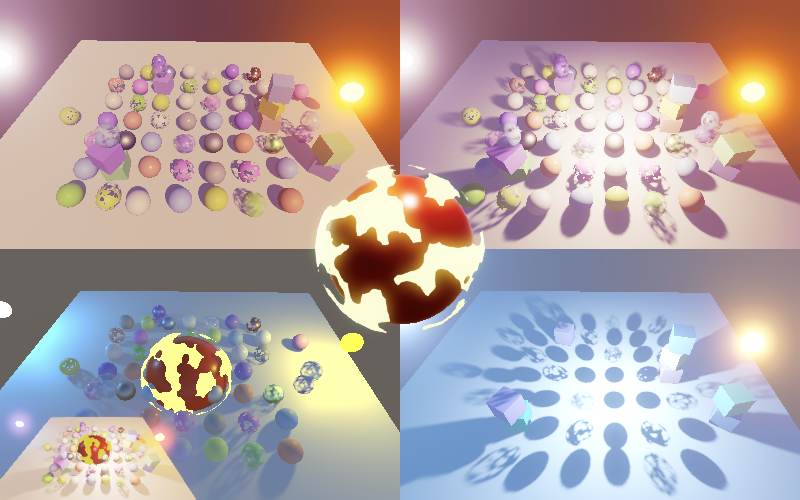
The final pass can be seen by disabling post FX for the Particles scene, by enabling Override Post FX on our custom camera component, with its Post FX Settings set to none. It will also be used for the scene window if post FX are disabled for it.
Post FX Pass
Next comes the Post FX pass. It simply uses our existing post FX stack, also needing to know the color attachment ID. We only invoke Render on the stack here. Its Setup method will still be invoked outside the render graph, because it only copies some values and determines whether the stack is active, which we need to know before recording the graph.
using UnityEngine.Experimental.Rendering.RenderGraphModule;
using UnityEngine.Rendering;

public class PostFXPass
{
	PostFXStack postFXStack;

	void Render(RenderGraphContext context) =>
		postFXStack.Render(CameraRenderer.colorAttachmentId);

	public static void Record(RenderGraph renderGraph, PostFXStack postFXStack)
	{
		using RenderGraphBuilder builder =
			renderGraph.AddRenderPass("Post FX", out PostFXPass pass);
		pass.postFXStack = postFXStack;
		builder.SetRenderFunc<PostFXPass>((pass, context) => pass.Render(context));
	}
}
Pull it into the render graph as well.
//if (postFXStack.IsActive)//{// postFXStack.Render(colorAttachmentId);//}var renderGraphParameters = new RenderGraphParameters { … }; using (renderGraph.RecordAndExecute(renderGraphParameters)) { if (postFXStack.IsActive) { PostFXPass.Record(renderGraph, postFXStack); } … }
Unsupported Shaders Pass
A pass to draw common shaders not supported by our RP is next. It wraps an invocation of our DrawUnsupportedShaders method, but only while in the editor, using the same approach as the gizmos pass.
using System.Diagnostics;
using UnityEngine.Experimental.Rendering.RenderGraphModule;
using UnityEngine.Rendering;

public class UnsupportedShadersPass
{
#if UNITY_EDITOR
	CameraRenderer renderer;

	void Render(RenderGraphContext context) => renderer.DrawUnsupportedShaders();
#endif

	[Conditional("UNITY_EDITOR")]
	public static void Record(RenderGraph renderGraph, CameraRenderer renderer)
	{
#if UNITY_EDITOR
		using RenderGraphBuilder builder = renderGraph.AddRenderPass(
			"Unsupported Shaders", out UnsupportedShadersPass pass);
		pass.renderer = renderer;
		builder.SetRenderFunc<UnsupportedShadersPass>(
			(pass, context) => pass.Render(context));
#endif
	}
}
Pull it into the render graph.
//DrawUnsupportedShaders();var renderGraphParameters = new RenderGraphParameters { … }; using (renderGraph.RecordAndExecute(renderGraphParameters)) { UnsupportedShadersPass.Record(renderGraph, this); … }
Also, DrawUnsupportedShaders no longer needs to be partial as it is now only invoked by code compiled for the editor.
//partial void DrawUnsupportedShaders();… #if UNITY_EDITOR …//partial void DrawUnsupportedShaders()public void DrawUnsupportedShaders() { … } … #endif
Visible Geometry Pass
At this point we have worked our way back to the drawing of all visible geometry. We could split this into multiple passes, but to keep things as simple as possible we make one pass that forwards to our DrawVisibleGeometry method. It just needs to copy a bunch of parameters.
using UnityEngine.Experimental.Rendering.RenderGraphModule;
using UnityEngine.Rendering;

public class VisibleGeometryPass
{
	CameraRenderer renderer;

	bool useDynamicBatching, useGPUInstancing, useLightsPerObject;

	int renderingLayerMask;

	void Render(RenderGraphContext context) => renderer.DrawVisibleGeometry(
		useDynamicBatching, useGPUInstancing, useLightsPerObject, renderingLayerMask);

	public static void Record(
		RenderGraph renderGraph, CameraRenderer renderer,
		bool useDynamicBatching, bool useGPUInstancing, bool useLightsPerObject,
		int renderingLayerMask)
	{
		using RenderGraphBuilder builder =
			renderGraph.AddRenderPass("Visible Geometry", out VisibleGeometryPass pass);
		pass.renderer = renderer;
		pass.useDynamicBatching = useDynamicBatching;
		pass.useGPUInstancing = useGPUInstancing;
		pass.useLightsPerObject = useLightsPerObject;
		pass.renderingLayerMask = renderingLayerMask;
		builder.SetRenderFunc<VisibleGeometryPass>(
			(pass, context) => pass.Render(context));
	}
}
Pull it into the render graph.
//DrawVisibleGeometry(// useDynamicBatching, useGPUInstancing, useLightsPerObject,// cameraSettings.renderingLayerMask);var renderGraphParameters = new RenderGraphParameters { … }; using (renderGraph.RecordAndExecute(renderGraphParameters)) { VisibleGeometryPass.Record( renderGraph, this, useDynamicBatching, useGPUInstancing, useLightsPerObject, cameraSettings.renderingLayerMask); … }
Setup Pass
Next is the setup pass, which invokes Setup, which creates intermediate buffers if needed and clears the render target.
using UnityEngine.Experimental.Rendering.RenderGraphModule;
using UnityEngine.Rendering;

public class SetupPass
{
	CameraRenderer renderer;

	void Render(RenderGraphContext context) => renderer.Setup();

	public static void Record(
		RenderGraph renderGraph, CameraRenderer renderer)
	{
		using RenderGraphBuilder builder =
			renderGraph.AddRenderPass("Setup", out SetupPass pass);
		pass.renderer = renderer;
		builder.SetRenderFunc<SetupPass>((pass, context) => pass.Render(context));
	}
}
Pull it into the render graph.
//Setup();var renderGraphParameters = new RenderGraphParameters { … }; using (renderGraph.RecordAndExecute(renderGraphParameters)) { SetupPass.Record(renderGraph, this); … }
But to keep everything functioning correctly we still have to determine whether we use an intermediate buffer before recording the render graph.
	public void Render(…)
	{
		…

		useIntermediateBuffer = useScaledRendering ||
			useColorTexture || useDepthTexture || postFXStack.IsActive;

		var renderGraphParameters = new RenderGraphParameters
		{ … };
		…
	}

	…

	public void Setup()
	{
		context.SetupCameraProperties(camera);
		CameraClearFlags flags = camera.clearFlags;

		//useIntermediateBuffer = useScaledRendering ||
		//	useColorTexture || useDepthTexture || postFXStack.IsActive;
		…
	}
Also, we can delay setting the buffer size vector until the end of Setup. This eliminates the functional usage of the command buffer by Render itself, except for sampling.
	public void Render(…)
	{
		…

		buffer.BeginSample(SampleName);
		//buffer.SetGlobalVector(bufferSizeId, new Vector4(
		//	1f / bufferSize.x, 1f / bufferSize.y, bufferSize.x, bufferSize.y));
		ExecuteBuffer();

		…
	}

	…

	public void Setup()
	{
		…
		buffer.SetGlobalVector(bufferSizeId, new Vector4(
			1f / bufferSize.x, 1f / bufferSize.y, bufferSize.x, bufferSize.y));
		ExecuteBuffer();
	}
Lighting Pass
The last pass to create is the first one to execute, which is lighting. It invokes Setup on our lighting object, which also renders shadows if needed.
using UnityEngine.Experimental.Rendering.RenderGraphModule;
using UnityEngine.Rendering;

public class LightingPass
{
	Lighting lighting;

	CullingResults cullingResults;

	ShadowSettings shadowSettings;

	bool useLightsPerObject;

	int renderingLayerMask;

	void Render(RenderGraphContext context) => lighting.Setup(
		context.renderContext, cullingResults, shadowSettings,
		useLightsPerObject, renderingLayerMask);

	public static void Record(
		RenderGraph renderGraph, Lighting lighting,
		CullingResults cullingResults, ShadowSettings shadowSettings,
		bool useLightsPerObject, int renderingLayerMask)
	{
		using RenderGraphBuilder builder =
			renderGraph.AddRenderPass("Lighting", out LightingPass pass);
		pass.lighting = lighting;
		pass.cullingResults = cullingResults;
		pass.shadowSettings = shadowSettings;
		pass.useLightsPerObject = useLightsPerObject;
		pass.renderingLayerMask = renderingLayerMask;
		builder.SetRenderFunc<LightingPass>((pass, context) => pass.Render(context));
	}
}
Pull it into the graph, so it happens after setting up the post FX stack and verifying FXAA, which is fine.
//lighting.Setup(// context, cullingResults, shadowSettings, useLightsPerObject,// cameraSettings.maskLights ? cameraSettings.renderingLayerMask : -1);bufferSettings.fxaa.enabled &= cameraSettings.allowFXAA; postFXStack.Setup(…); buffer.EndSample(SampleName); var renderGraphParameters = new RenderGraphParameters { … }; using (renderGraph.RecordAndExecute(renderGraphParameters)) { LightingPass.Record( renderGraph, lighting, cullingResults, shadowSettings, useLightsPerObject, cameraSettings.maskLights ? cameraSettings.renderingLayerMask : -1); … }
These are the passes that we include in version 2.0.0. All command buffer execution and rendering now happens inside the render graph.
Profiling
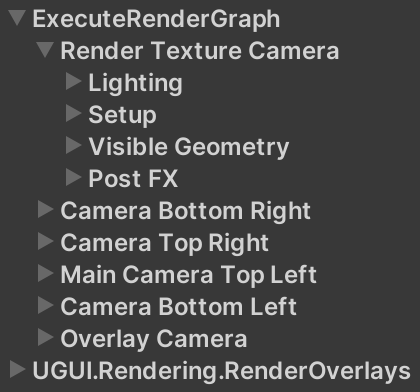
Now that we have a functional render graph with multiple passes we can inspect it, via Window / Analysis / Render Graph Viewer. Its Current Graph should be set to Custom SRP Render Graph and the only option for Current Execution is Render Camera. If nothing is shown you can trigger a visualization via Capture Graph. Which passes are shown depends on which were included in the graph. Gizmos, post FX, and the final pass could all be missing.
This gives us an overview of the render graph and what resources are used by which passes, but we don't use that functionality in this version yet so it only shows the passes themselves. Note that when the render graph viewer window is open—even when not visible—the render graph generates debug information, which causes allocations.
Besides the render graph viewer the profiler and frame debugger are very useful, but we're currently not yet using the render graph correctly which makes this data incomplete.
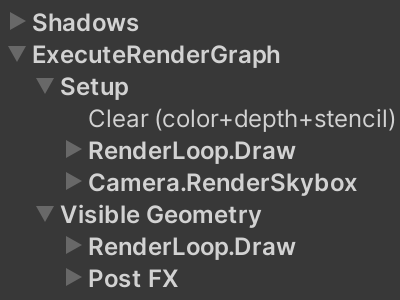
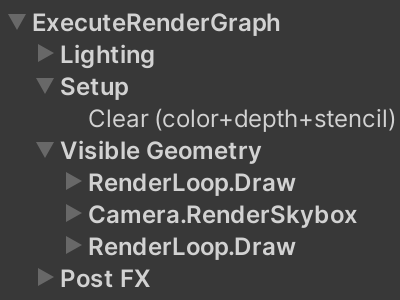
The idea is that the render graph executes using the pooled command buffer that we gave it. It adds samples for itself and all passes to the command buffer, but because we never execute it we don't see those yet. To make this work correctly all our passes should use the command buffer provided via the render graph context. We begin with Then set the buffer to the same used for the render graph in Next, delete Then delete all code that relies on them. This means that we can also remove the initial invocation of After this change we no longer get editor-only memory allocations, because we no longer retrieve the camera name. If you do see allocations it's because the render graph viewer window is open. Also, the profiler no longer shows a camera and shadows are listed outside the render graph. The frame debugger hierarchy has also become messy. The main problem is that lighting and shadows each have their own command buffer, which makes proper nesting of sampling scopes impossible. To fix this we'll have Give Our Provide the new argument for And remove the no longer needed argument for Now that everything uses the same command buffer the frame debugger hierarchy looks a lot better, but it isn't completely fixed yet. The rendering of opaque geometry and the skybox still fall inside the setup scope, which is incorrect. This happens because the render graph invokes The render graph uses instances of If we don't provide an explicit sampler as a third argument to Then do the same for all other passes. Everything appears to work fine, as long as we have a single camera. But let's open the Multiple Cameras scene. It renders six cameras next to and on top of each other, including one rendering to a texture that is displayed via a UI canvas. It turns out that everything gets grouped together under ExecuteRenderGraph in the profiler and frame debugger. Also, only one Render Camera can be selected in render graph viewer. To make it possible to see the graph for each camera we have to give them all a different execution name. Let's use the camera's name for that. This works, but we once again allocate memory each frame and it only makes a difference for the viewer while the profiler and frame debugger are unaffected. To solve the latter we can add an extra profiling scope at the top level of our render graph, by creating a new The profiler now correctly groups the work per camera. And the frame debugger does so as well. Finally, to get rid of the allocations again we have to cache both the camera name and the profiling sampler. As this is per camera the only place where we could efficiently do so is in Now we can retrieve the sampler in There are two downsides to this approach. First, camera's without our The second downside is that, because we cache the samplers, changes to the camera name aren't picked up. Only loading a scene will pick up the change, either by explicitly opening one or caused by a domain reload, as the samplers are then lost and created again. URP has the same issue. We can make this slightly better by getting rid of the sampler when our component is enabled. That way the name is updated when play mode is entered, even when domain and scene reloading are disabled, and also if a camera is enabled while in play mode. This is only needed in the editor or for a development build. The next tutorial is Custom SRP 2.1.0.Using the Pooled Command Buffer
CameraRenderer itself, removing its buffer name and leaving its buffer uninitialized.
	//const string bufferName = "Render Camera";

	…

	//readonly CommandBuffer buffer = new()
	//{
	//	name = bufferName
	//};
CommandBuffer buffer;Render. This is technically incorrect because the render graph could internally use multiple buffers, but that's only the case when asynchronous passes are used, which we don't. var renderGraphParameters = new RenderGraphParameters
{
commandBuffer = CommandBufferPool.Get(),
currentFrameIndex = Time.frameCount,
executionName = "Render Camera",
scriptableRenderContext = context
};
buffer = renderGraphParameters.commandBuffer;
PrepareBuffer and SampleName.
	//partial void PrepareBuffer();

#if UNITY_EDITOR

	…

	//string SampleName
	//{ get; set; }

	…

	//partial void PrepareBuffer() { … }

//#else

	//const string SampleName = bufferName;

#endifExecuteBuffer in Render. The split sample scope that we used here was needed to keep the frame debugger layout tidy in the past. public void Render(…)
{
…
//PrepareBuffer();
…
//buffer.BeginSample(SampleName);
//ExecuteBuffer();
bufferSettings.fxaa.enabled &= cameraSettings.allowFXAA;
postFXStack.Setup(…);
//buffer.EndSample(SampleName);
…
}
…
public void Setup()
{
…
buffer.ClearRenderTarget(…);
//buffer.BeginSample(SampleName);
…
}
…
void Submit()
{
//buffer.EndSample(SampleName);
ExecuteBuffer();
context.Submit();
}
Lighting and Shadows
LightingPass forward the render graph context to Lighting.Setup, instead of the scriptable render context. void Render(RenderGraphContext context) => lighting.Setup(
context, cullingResults, shadowSettings,
useLightsPerObject, renderingLayerMask);
Lighting must use the command buffer from that context instead of its own and no longer sample itself.
	//const string bufferName = "Lighting";

	…

	//readonly CommandBuffer buffer = new()
	//{
	//	name = bufferName
	//};
	CommandBuffer buffer;

	…

	public void Setup(
		RenderGraphContext context, CullingResults cullingResults,
		ShadowSettings shadowSettings, bool useLightsPerObject, int renderingLayerMask)
	{
		buffer = context.cmd;
		this.cullingResults = cullingResults;
		//buffer.BeginSample(bufferName);
		shadows.Setup(context, cullingResults, shadowSettings);
		SetupLights(useLightsPerObject, renderingLayerMask);
		shadows.Render();
		//buffer.EndSample(bufferName);
		context.renderContext.ExecuteCommandBuffer(buffer);
		buffer.Clear();
}Shadows the same treatment. In this case we can keep the samples specific for directional and other shadows, giving them appropriate names.
	//const string bufferName = "Shadows";

	…

	//readonly CommandBuffer buffer = new()
	//{
	//	name = bufferName
	//};
	CommandBuffer buffer;

	…

	public void Setup(
		RenderGraphContext context, CullingResults cullingResults,
		ShadowSettings settings)
	{
		buffer = context.cmd;
		this.context = context.renderContext;
		…
	}

	…

	public void Render()
	{
		…
		//buffer.BeginSample(bufferName);
		…
		//buffer.EndSample(bufferName);
		ExecuteBuffer();
	}

	void RenderDirectionalShadows()
	{
		…
		buffer.BeginSample("Directional Shadows");
		…
		buffer.EndSample("Directional Shadows");
		ExecuteBuffer();
	}

	…

	void RenderOtherShadows()
	{
		…
		buffer.BeginSample("Other Shadows");
		…
		buffer.EndSample("Other Shadows");
		ExecuteBuffer();
	}
Post FX
PostFXStack also has its own command buffer, which we have to replace with the one from the render graph. In this case we do it by adding the render graph context as a first parameter to its Render method and remove the scriptable render context parameter from Setup.
	//const string bufferName = "Post FX";

	…

	//readonly CommandBuffer buffer = new()
	//{
	//	name = bufferName
	//};
	CommandBuffer buffer;

	//ScriptableRenderContext context;

	…

	public void Setup(
		//ScriptableRenderContext context,
		…)
	{
		…
		//this.context = context;
		…
	}

	public void Render(RenderGraphContext context, int sourceId)
	{
		buffer = context.cmd;
		…
		context.renderContext.ExecuteCommandBuffer(buffer);
		buffer.Clear();
}Render in PostFXPass. void Render(RenderGraphContext context) =>
postFXStack.Render(context, CameraRenderer.colorAttachmentId);
Setup in CameraRenderer. postFXStack.Setup(
//context,
…);Visible Geometry

BeginSample and EndSample on the command buffer, but it doesn't execute the buffer. So passes don't start with an empty buffer, it contains the sample instructions and whatever a previous pass didn't clear. That's why we still have to execute the buffer ourselves after the graph is finished. We fix the sample hierarchy by executing—and clearing—the command buffer at the start of DrawVisibleGeometry. public void DrawVisibleGeometry(…)
{
ExecuteBuffer();
…
}
Custom Samplers
UnityEngine.Rendering.ProfilingSampler to do its profiling. Each internally has two samplers, one used for the pass execution and the other—the inline one—use for the recording of the pass.AddRenderPass then the render graph will create one based on the pass name, pooling it in a dictionary. Although this works it is inefficient, because it requires calculating the hash code of the name every time we add the pass. So let's give our passes each their own explicit sampler. First for SetupPass. static readonly ProfilingSampler sampler = new("Setup");
CameraRenderer renderer;
void Render(RenderGraphContext context) => renderer.Setup();
public static void Record(
RenderGraph renderGraph, CameraRenderer renderer)
{
using RenderGraphBuilder builder =
renderGraph.AddRenderPass(sampler.name, out SetupPass pass, sampler);
pass.renderer = renderer;
builder.SetRenderFunc<SetupPass>((pass, context) => pass.Render(context));
}
}
Multiple Cameras
		var renderGraphParameters = new RenderGraphParameters
		{
			commandBuffer = CommandBufferPool.Get(),
			currentFrameIndex = Time.frameCount,
			executionName = camera.name,
			scriptableRenderContext = context
		};
RenderGraphProfilingScope as the first recording step, passing it the graph and a profiling sampler, for which we use the camera name. This is a disposable that adds extra passes that begin and end sampling. var cameraSampler = new ProfilingSampler(camera.name);
var renderGraphParameters = new RenderGraphParameters
{
commandBuffer = CommandBufferPool.Get(),
currentFrameIndex = Time.frameCount,
executionName = cameraSampler.name,
scriptableRenderContext = context
};
buffer = renderGraphParameters.commandBuffer;
using (renderGraph.RecordAndExecute(renderGraphParameters))
{
using var _ = new RenderGraphProfilingScope(renderGraph, cameraSampler);
…
}
CustomRenderPipelineCamera. Make the sampler available via a Sampler getter property, just like its settings.using UnityEngine;
using UnityEngine.Rendering;
[DisallowMultipleComponent, RequireComponent(typeof(Camera))]
public class CustomRenderPipelineCamera : MonoBehaviour
{
[SerializeField]
CameraSettings settings = default;
ProfilingSampler sampler;
public ProfilingSampler Sampler => sampler ??= new(GetComponent<Camera>().name);
public CameraSettings Settings => settings ??= new();
}
CameraRenderer.Render, if the camera has our component. If not we'll use a generic sampler based on the camera's type, via ProfilingSampler.Get. This is a generic method that pools samplers in a dictionary based on an enum type. This isn't as bad as using a string, because the enum's hash is much simpler.
		//var crpCamera = camera.GetComponent<CustomRenderPipelineCamera>();
		//CameraSettings cameraSettings =
		//	crpCamera ? crpCamera.Settings : defaultCameraSettings;
		ProfilingSampler cameraSampler;
		CameraSettings cameraSettings;
		if (camera.TryGetComponent(out CustomRenderPipelineCamera crpCamera))
		{
			cameraSampler = crpCamera.Sampler;
			cameraSettings = crpCamera.Settings;
		}
		else
		{
			cameraSampler = ProfilingSampler.Get(camera.cameraType);
			cameraSettings = defaultCameraSettings;
		}

		…

//var cameraSampler = new ProfilingSampler(camera.name);CustomRenderPipelineCamera will have a generic name, usually Game for a game camera, but you'll also see the scene view, reflection, and preview camera show up. These won't be shown in the frame debugger but you can find them in the render graph viewer and also in the profiler if it is in edit mode.#if UNITY_EDITOR || DEVELOPMENT_BUILD
void OnEnable() => sampler = null;
#endif