Mesh Deformation
Making a Stress Ball
- Cast rays at objects and draw a debug lines.
- Convert forces to velocities for vertices.
- Maintain shape with springs and dampening.
- Compensate for object transformation.
This tutorial is an introduction to mesh deformation. We'll turn a mesh into bouncy mass and poke at it.
This tutorial follows Cube Sphere. It is a continuation of the same kind of mesh manipulation and we'll use the cube sphere as our test model. It is suitable for Unity 5.0.1 and up.
Scene Setup
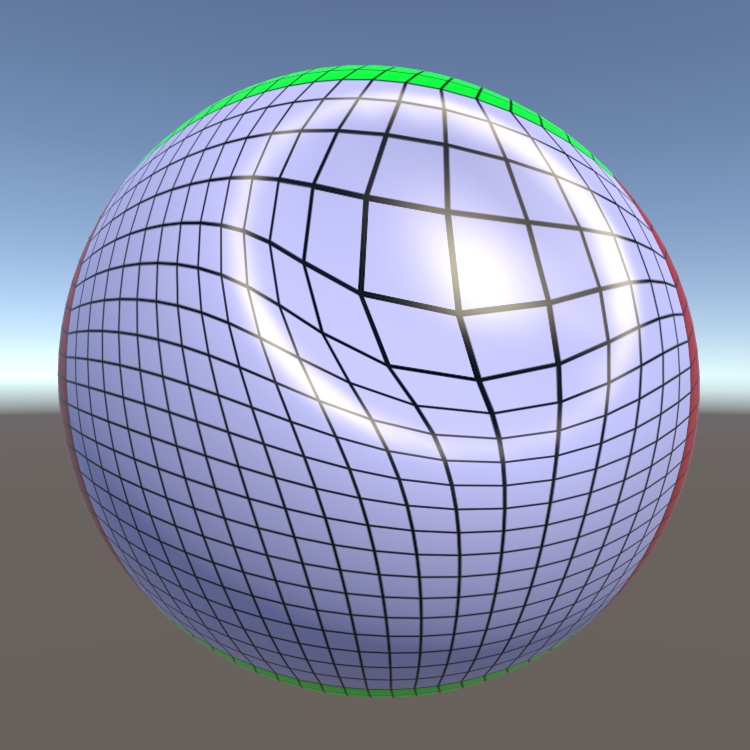
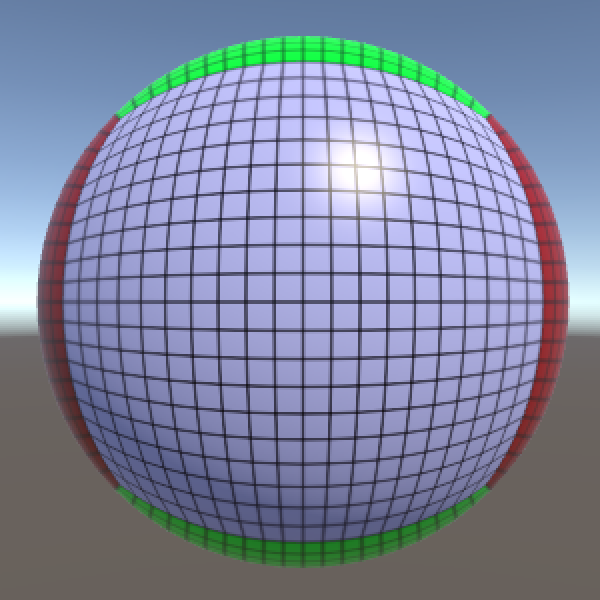
We start with a scene that has a single cube sphere object at its center. You can either make it from scratch or continue with the scene from Cube Sphere, removing everything that is no longer needed.
To get a smooth deformation, the sphere should contain a decent amount of vertices. I set the sphere's grid size to 20 and its radius to 1.
Mesh Deformer
Create a new MeshDeformer script to take care of the deformation. Just as the cube sphere component, it needs a mesh filter to work with.
using UnityEngine;

[RequireComponent(typeof(MeshFilter))]
public class MeshDeformer : MonoBehaviour {
}
Add the new component to the cube sphere.
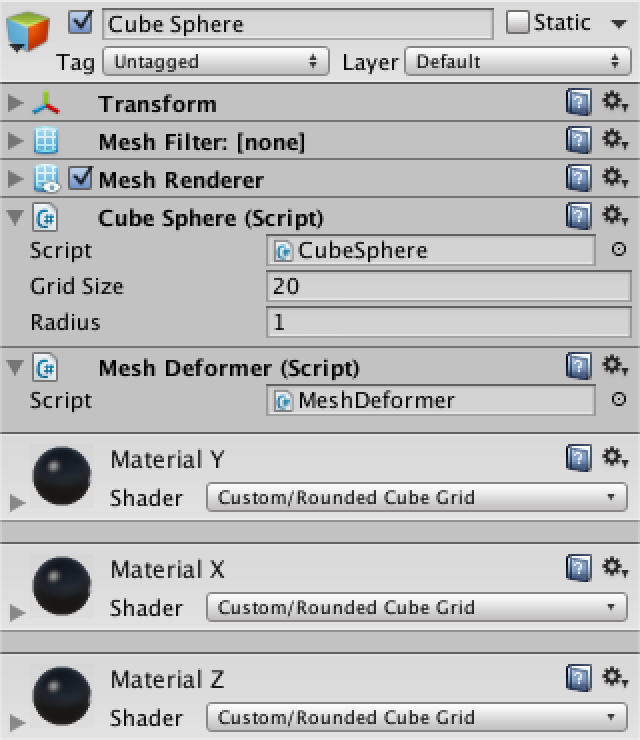
Note that we only require a mesh filter. We don't care how it gets a mesh. Right now we're using our procedural cube sphere, but it could be any mesh.
Preparation
To perform any deformation, we need access to mesh. Once we have the mesh, we can extract the original vertex positions. We also have to keep track of the displaced vertices during deformation.
	Mesh deformingMesh;
	Vector3[] originalVertices, displacedVertices;
Aquire the mesh and its vertices in the Start method and copy the original vertices to the displaced vertices.
	void Start () {
		deformingMesh = GetComponent<MeshFilter>().mesh;
		originalVertices = deformingMesh.vertices;
		displacedVertices = new Vector3[originalVertices.Length];
		for (int i = 0; i < originalVertices.Length; i++) {
			displacedVertices[i] = originalVertices[i];
		}
	}
We're using Start so procedural meshes can be generated in Awake, which is always invoked first. This approach relies on other components taking care of their stuff in Awake, so it is no guarantee. You could also adjust the script execution order to enforce who goes first and last.
Vertex Velocities
Vertices move as the mesh is deformed. So we also have to store the velocity of each vertex.
	Vector3[] vertexVelocities;

	void Start () {
		…
		vertexVelocities = new Vector3[originalVertices.Length];
	}
Now we have the basic ingredients to support mesh deformation.
Mesh Deformer Input
We need some way to control how the mesh is deformed. We will use user input for that, so it is interactive. Whenever the user touches our object, we will apply a force at that point.
The MeshDeformer component takes care of the actual deformation, but it doesn't care about the input method. We should create a separate component to take care of the user input. Give it a configurable input force.
using UnityEngine;

public class MeshDeformerInput : MonoBehaviour {

	public float force = 10f;
}
It makes most sense to attach this component to the camera, as that represents the user's point of view. We shouldn't attach it to the deforming mesh object, because there could be multiple of those in the scene.
Detecting Input
We will handle the user's input whenever the default mouse button is held down. So whenever there is a click or a drag, as long as the user keeps pressing.
	void Update () {
		if (Input.GetMouseButton(0)) {
			HandleInput();
		}
	}
Now we have to figure out where the user is pointing. We do this by casting a ray from the camera into the scene. We'll grab the main camera of the scene and use it to convert the cursor position into a ray.
	void HandleInput () {
		Ray inputRay = Camera.main.ScreenPointToRay(Input.mousePosition);
	}
We use the physics engine to cast the ray and store information about what it hit. If the ray collided with something, we can retrieve the MeshDeformer component from the object that was hit.
		Ray inputRay = Camera.main.ScreenPointToRay(Input.mousePosition);
		RaycastHit hit;

		if (Physics.Raycast(inputRay, out hit)) {
			MeshDeformer deformer = hit.collider.GetComponent<MeshDeformer>();
		}
Applying Force
If we hit something, and that something has a MeshDeformer component, then we can deform that something! So go ahead and add a deforming force at the contact point.
			MeshDeformer deformer = hit.collider.GetComponent<MeshDeformer>();
			if (deformer) {
				Vector3 point = hit.point;
				deformer.AddDeformingForce(point, force);
			}
Of course that assumes that our MeshDeformer component has a AddDeformingForce method. So add this method. Let's not do any deforming yet, though. First, just draw a debug line from the main camera to the point, to visualize the ray.
	public void AddDeformingForce (Vector3 point, float force) {
		Debug.DrawLine(Camera.main.transform.position, point);
	}
Force Offset
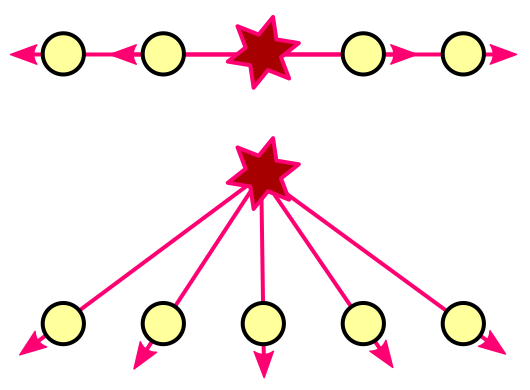
The experience we're trying to evoke is of the mesh being poked and dented by the user. This requires that the vertices near the contact point are pushed into the surface. However, the deforming force doesn't have an inherent direction. It will be applied in all directions equally. This will cause vertices on a flat surface to be pushed apart, not pushed inward.
We can add a direction by pulling the force point away from the surface. A slight offset already guarantees that vertices are always pushed into the surface. The normal at the contact point can be used as the offset direction.
	public float forceOffset = 0.1f;

	void HandleInput () {
		Ray inputRay = Camera.main.ScreenPointToRay(Input.mousePosition);
		RaycastHit hit;

		if (Physics.Raycast(inputRay, out hit)) {
			MeshDeformer deformer = hit.collider.GetComponent<MeshDeformer>();
			if (deformer) {
				Vector3 point = hit.point;
				point += hit.normal * forceOffset;
				deformer.AddDeformingForce(point, force);
			}
		}
	}
Basic Deformation
It is time to do some real displacement. MeshDeformer.AddDeformingForce has to loop through all currently displaced vertices and apply the deforming force to each vertex individually.
	public void AddDeformingForce (Vector3 point, float force) {
		for (int i = 0; i < displacedVertices.Length; i++) {
			AddForceToVertex(i, point, force);
		}
	}

	void AddForceToVertex (int i, Vector3 point, float force) {
	}
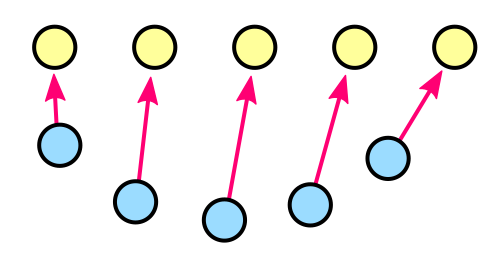
Convert Force to Velocity
The mesh is deformed because a force is applied to each of its vertices. As the vertices are pushes, they acquire a velocity. Over time, the vertices all change their position. If all vertices would experience the exact same forces, the entire object would move without changing its shape. But they don't.
Think of a big explosion. If you're at ground zero, you are dead. If you're nearby, you get knocked down. If you're far away, no problem. Force diminishes with distance. Combined with differences in orientation, this attenuation is responsible for our object's deformation.
So we need to know both the direction and the distance of the deforming force per vertex. Both can be derived from a vector that points from the force point to the vertex position.
	void AddForceToVertex (int i, Vector3 point, float force) {
		Vector3 pointToVertex = displacedVertices[i] - point;
	}
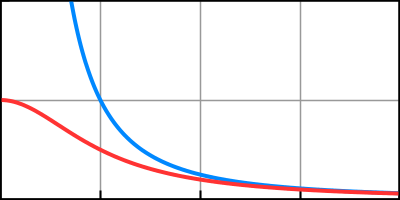
The attenuated force can now be found using the inverse-square law. Just divide the original force by the distance squared, `F_v = F / d^2`. Actually, I divide by one plus the distance squared, `F_v = F / (1 + d^2)`. This guarantees that the force is at full strength when the distance is zero. Otherwise the force would be at full strength at a distance of one and it shoots toward infinity the closer you get to the point.
		Vector3 pointToVertex = displacedVertices[i] - point;
		float attenuatedForce = force / (1f + pointToVertex.sqrMagnitude);
Now that we have our force, we can convert it into a velocity delta. Actually, the force is first converted into an acceleration via `a = F / m`. Then the change in velocity is found via `Delta v = a Delta t`. To keep things simple, we'll ignore the mass as if it were one for each vertex. So we end up with `Delta v = F Delta t`.
		Vector3 pointToVertex = displacedVertices[i] - point;
		float attenuatedForce = force / (1f + pointToVertex.sqrMagnitude);
		float velocity = attenuatedForce * Time.deltaTime;
At this point we have a velocity delta, but not yet a direction. We find that by normalizing the vector that we started with. Then we can add the result to the vertex velocity.
		Vector3 pointToVertex = displacedVertices[i] - point;
		float attenuatedForce = force / (1f + pointToVertex.sqrMagnitude);
		float velocity = attenuatedForce * Time.deltaTime;
		vertexVelocities[i] += pointToVertex.normalized * velocity;
Move Vertices
Now that the vertices have velocities, we can move them. Add an Update method to process each vertex. Afterwards, assign the displaces vertices to the mesh so that it actually changes. Because the shape of the mesh is no longer constant, we also have to recalculate its normals.
	void Update () {
		for (int i = 0; i < displacedVertices.Length; i++) {
			UpdateVertex(i);
		}
		deformingMesh.vertices = displacedVertices;
		deformingMesh.RecalculateNormals();
	}
Updating a vertex is a matter of adjusting its position, via `Delta p = v Delta t`.
	void UpdateVertex (int i) {
		Vector3 velocity = vertexVelocities[i];
		displacedVertices[i] += velocity * Time.deltaTime;
	}
Staying in Shape
Vertices now start moving as soon as we apply some force to them. But they don't stop. They keep moving and the original shape of the object will be lost. Let's now make the object bounce back to its original shape.
Real objects are solid and are compressed and stretched while being deformed. They resist this deformation. They can also return to their original shape once left undisturbed.
We don't have a real volume, just a collection of vertices that describes a surface. We cannot perform a realistic physics simulation with this. But that is not a problem. All we really need is something that looks believable.
Springs
We are keeping track of both the original and the deformed position of each vertex. Imagine that we attach springs between the two versions of each vertex. Whenever the deformed vertex is moved away from the original, the spring will pull it back. The further away the deformed vertex is, the stronger the pull of the spring becomes.
We can directly use the displacement vector as a velocity adjustment, multiplied by a configurable spring force. This is simple and looks pretty good. We do this each time the vertices are updated.
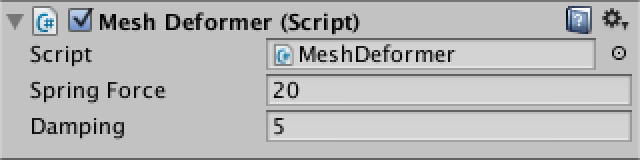
	public float springForce = 20f;

	void UpdateVertex (int i) {
		Vector3 velocity = vertexVelocities[i];
		Vector3 displacement = displacedVertices[i] - originalVertices[i];
		velocity -= displacement * springForce * Time.deltaTime;
		vertexVelocities[i] = velocity;
		displacedVertices[i] += velocity * Time.deltaTime;
	}

Damping
Our vertices now resist deformation and jumps back to their original position. But they overshoot and keep bouncing without end. This happens because the springs keep pulling while the vertex corrects itself, increasing its speed. It only slows down after it moved back too far.
We can prevent this eternal oscillation by constantly slowing the vertices down. This dampening effect is a substitute for resistances, drag, inertia, and so on. It is a simple factor that decreases velocity over time, `v_d = v (1 - d Delta t)`.
The higher the dampening, the less bouncy and more sluggish the object appears.
	public float damping = 5f;

	void UpdateVertex (int i) {
		Vector3 velocity = vertexVelocities[i];
		Vector3 displacement = displacedVertices[i] - originalVertices[i];
		velocity -= displacement * springForce * Time.deltaTime;
		velocity *= 1f - damping * Time.deltaTime;
		vertexVelocities[i] = velocity;
		displacedVertices[i] += velocity * Time.deltaTime;
	}
Dealing with Transformations
Our mesh deformation is now fully functional, except when we transform the object. All our calculations are performed in local space. Go ahead and move or rotate our sphere. You will see that the deformation force will be applied incorrectly.
We have to compensate for the object's transformation. We do this by converting the deforming force's position from world space to local space.
	public void AddDeformingForce (Vector3 point, float force) {
		point = transform.InverseTransformPoint(point);
		for (int i = 0; i < displacedVertices.Length; i++) {
			AddForceToVertex(i, point, force);
		}
	}
Adjusting Scale
The force is now applied in the correct place, but something else is still wrong. Uniformly scale the sphere up or down. You will notice that the deformation scales by the same amount. This is not correct. Small and large objects should be subject to the same physics.
We have to compensate for our object's scale. First, we need to know its uniform scale. We can find it by checking one of the transform's local scale axes. Do this each update, so we can somewhat work with objects that change their scale dynamically.
	float uniformScale = 1f;

	void Update () {
		uniformScale = transform.localScale.x;
		…
	}
Now fix AddForceToVertex by scaling the pointToVertex vector by the uniform scale. This ensures that we use the correct distance.
	void AddForceToVertex (int i, Vector3 point, float force) {
		Vector3 pointToVertex = displacedVertices[i] - point;
		pointToVertex *= uniformScale;
		float attenuatedForce = force / (1f + pointToVertex.sqrMagnitude);
		float velocity = attenuatedForce * Time.deltaTime;
		vertexVelocities[i] += pointToVertex.normalized * velocity;
	}
Do the same for displacement in UpdateVertex. Now our velocities are correct.
	void UpdateVertex (int i) {
		Vector3 velocity = vertexVelocities[i];
		Vector3 displacement = displacedVertices[i] - originalVertices[i];
		displacement *= uniformScale;
		velocity -= displacement * springForce * Time.deltaTime;
		velocity *= 1f - damping * Time.deltaTime;
		vertexVelocities[i] = velocity;
		displacedVertices[i] += velocity * Time.deltaTime;
	}
However, our velocities are now correct for an object that wasn't scaled. As our object is in fact scaled, we have to adjust the vertex movement as well. This time we have to divide instead of multiply.
displacedVertices[i] += velocity * (Time.deltaTime / uniformScale);
And there you have it. A deforming mesh that works at any position, rotation, and uniform scale. Keep in mind that this is a simple and relatively cheap visual effect. It is not a soft-body physics simulation. The colliders of the object do not change, so the physics engine is unaware of the perceived shape of the object.