Custom Gravity
Walking on a Sphere
- Support arbitrary gravity.
- Work with a variable up axis.
- Pull everything to a single point.
- Apply custom gravity to arbitrary bodies.
This is the fifth installment of a tutorial series about controlling the movement of a character. It covers replacing standard gravity with a custom approach, through which we support walking on a sphere.
This tutorial is made with Unity 2019.2.21f1. It also uses the ProBuilder package.
Variable Gravity
Up to this point we have always worked with a fixed gravity vector: 9.81 straight down. This is sufficient for most games, but not all. For example, walking on the surface of a sphere that represents a planet isn't currently possible. So we're going to add support for custom gravity, which needn't be uniform.
Before we get complex, let's start by simply flipping the gravity and see what happens, by making the Y component of the gravity vector positive, via the project settings. This effectively turns it into antigravity, which should make our sphere fall upward.
It turns out that our sphere does fly upward, but it initially clings to the ground. That's because we're snapping it to the ground and our code assumes normal gravity. We have to change it so it can work with any gravity vector.
Up Axis
We relied on the up axis always being equal to the Y axis. To let go of this assumption we have to add an up axis field to MovingSphere and use that instead. To support gravity that can change at any time we'll have to set the up axis at the start of FixedUpdate. It points in the opposite direction that gravity pulls, so it's equal to the negated normalized gravity vector.
	Vector3 upAxis;

	…

	void FixedUpdate () {
		upAxis = -Physics.gravity.normalized;
		…
	}
Now we have to replace all usage of Vector3.up with the new up axis. First, in UpdateState when the sphere is in the air and we use it for the contact normal.
	void UpdateState () {
		…
		else {
			contactNormal = upAxis;
		}
	}
Second, in Jump when biasing the jump direction.
	void Jump () {
		…
		jumpDirection = (jumpDirection + upAxis).normalized;
		…
	}
And we also have to adjust how we determine the jump speed. The idea is that we counteract gravity. We used −2 times the gravity Y component, but this no longer works. Instead we have to use the magnitude of the gravity vector, regardless of its direction. This means that we have to remove the minus sign as well.
float jumpSpeed = Mathf.Sqrt(2f * Physics.gravity.magnitude * jumpHeight);
Finally, when probing for the ground in SnapToGround we have to replace Vector3.down with the up axis, negated.
	bool SnapToGround () {
		…
		if (!Physics.Raycast(
			body.position, -upAxis, out RaycastHit hit,
			probeDistance, probeMask
		)) {
			return false;
		}
		…
	}
Dot Products
We can also no longer directly use the Y component of a normal vector when we need a dot product. We have to invoke Vector3.Dot with the up axis and normal vector as arguments. First in SnapToGround, when checking if we found ground.
		float upDot = Vector3.Dot(upAxis, hit.normal);
		if (upDot < GetMinDot(hit.collider.gameObject.layer)) {
			return false;
		}
Then in CheckSteepContacts to see whether we're wedged in a crevasse.
	bool CheckSteepContacts () {
		if (steepContactCount > 1) {
			steepNormal.Normalize();
			float upDot = Vector3.Dot(upAxis, steepNormal);
			if (upDot >= minGroundDotProduct) {
				…
			}
		}
		return false;
	}
And in EvaluateCollision to check what kind of contact we have.
	void EvaluateCollision (Collision collision) {
		float minDot = GetMinDot(collision.gameObject.layer);
		for (int i = 0; i < collision.contactCount; i++) {
			Vector3 normal = collision.GetContact(i).normal;
			float upDot = Vector3.Dot(upAxis, normal);
			if (upDot >= minDot) {
				groundContactCount += 1;
				contactNormal += normal;
			}
			else if (upDot > -0.01f) {
				steepContactCount += 1;
				steepNormal += normal;
			}
		}
	}
Our sphere can now move around no matter which direction is up. It's also possible to change the gravity direction while in play mode and it will immediately adjust to the new situation.
Relative Controls
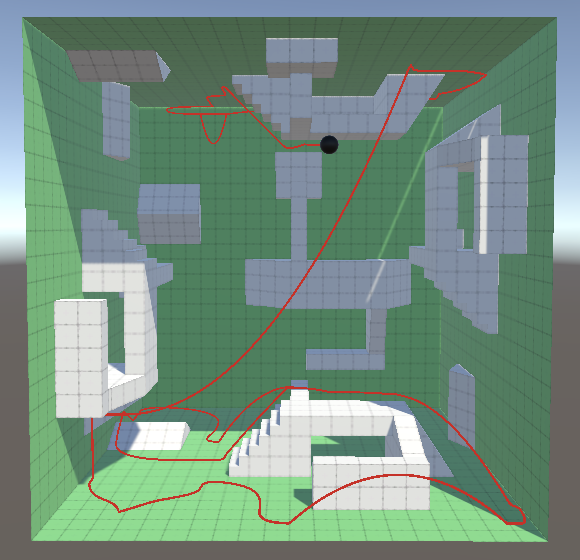
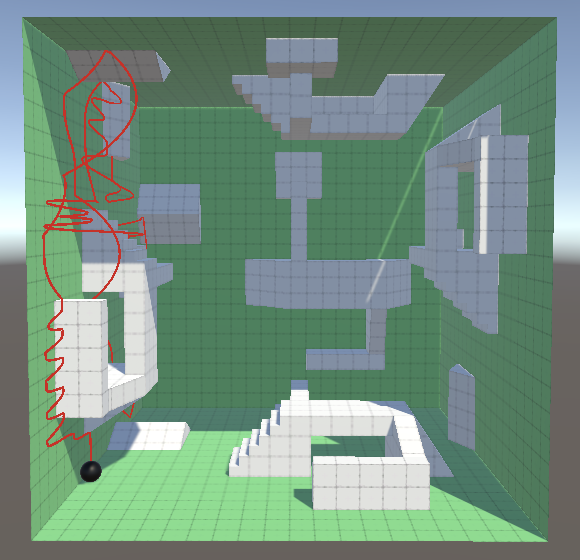
However, although flipping gravity upside down works without issue, any other direction makes it harder to control the sphere. For example, when gravity aligns with the X axis we can only control movement along the Z axis. Movement along the Y axis is out of our control, only gravity and collisions can affect it. The X axis of our input gets eliminated because we still define our control in the world-space XZ plane. We have to define the desired velocity in a gravity-aligned plane instead.
As gravity can vary we also have to make the right and forward axes relative. Add fields for them.
Vector3 upAxis, rightAxis, forwardAxis;
We need to project directions on a plane to make this work, so let's replace ProjectOnContactPlane with a more general ProjectDirectionOnPlane method that works with an arbitrary normal and also performs the normalization at the end.
//Vector3 ProjectOnContactPlane (Vector3 vector) {// return vector - contactNormal * Vector3.Dot(vector, contactNormal);//}Vector3 ProjectDirectionOnPlane (Vector3 direction, Vector3 normal) { return (direction - normal * Vector3.Dot(direction, normal)).normalized; }
Use this new method in AdjustVelocity to determine the X and Z control axes, feeding it the variable axes and contact normal.
	void AdjustVelocity () {
		Vector3 xAxis = ProjectDirectionOnPlane(rightAxis, contactNormal);
		Vector3 zAxis = ProjectDirectionOnPlane(forwardAxis, contactNormal);

		…
	}
The gravity-relative axes are derived in Update. If a player input space exists then we project its right and forward vectors on the gravity plane to find the gravity-aligned X and Z axes. Otherwise we project the world axes. The desired velocity is now defined relative to these axes, so the input vector need not be converted to a different space.
	void Update () {
		…

		if (playerInputSpace) {
			rightAxis = ProjectDirectionOnPlane(playerInputSpace.right, upAxis);
			forwardAxis =
				ProjectDirectionOnPlane(playerInputSpace.forward, upAxis);
		}
		else {
			rightAxis = ProjectDirectionOnPlane(Vector3.right, upAxis);
			forwardAxis = ProjectDirectionOnPlane(Vector3.forward, upAxis);
		}
		desiredVelocity =
			new Vector3(playerInput.x, 0f, playerInput.y) * maxSpeed;
		//}

		desiredJump |= Input.GetButtonDown("Jump");
	}
This still doesn't solve the problem that a control axis gets eliminated when it aligns with gravity, but when using the orbit camera we can orient it such that we regain full control.
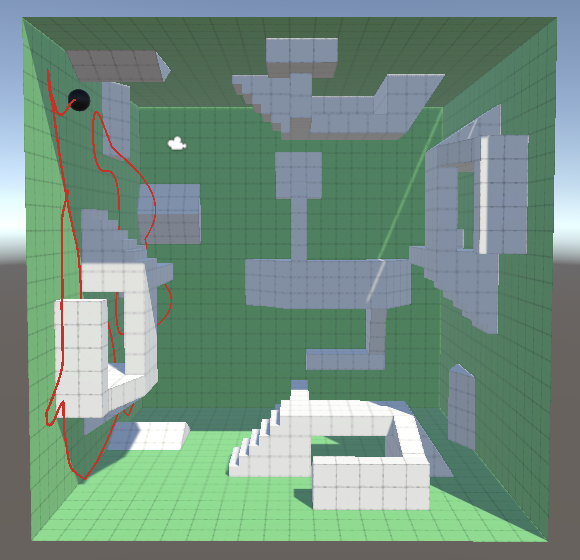
Aligning Orbit Camera
The orbit camera is still awkward, because it always uses the world Y axis for its up direction. So we can still end up eliminating a control axis when looking straight up or down. Ideally the orbit camera aligns itself with gravity, which is both intuitive and makes sure that relative movement always works as expected.
We use orbit angles to control the camera's orbit and constrain them so that it cannot go too far up or down. We want to keep this functionality no matter which way up happens to be. This can be done by applying a second rotation that aligns the orbit rotation with gravity. Add a Quaternion gravityAlignment field to OrbitCamera for this purpose, initialized with the identity rotation.
Quaternion gravityAlignment = Quaternion.identity;
At the start of LateUpdate adjust the alignment so it remains synchronized with the current up direction. In order to keep the orbit from changing erratically when an adjustment is needed we have to use the minimal rotation from the current alignment to the new one. The minimal rotation can be found via Quaternion.FromRotation, which creates a rotation from one direction to another. In our cause that's from the last aligned up direction to the current up direction. Then we multiply that with the current alignment to end up with the new one.
	void LateUpdate () {
		gravityAlignment =
			Quaternion.FromToRotation(
				gravityAlignment * Vector3.up, -Physics.gravity.normalized
			) * gravityAlignment;

		…
	}
The orbit rotation logic has to remain unaware of the gravity alignment. To make this possible add a field to keep track of the orbit rotation separately. This quaternion contains the orbit angle rotation and should be initialized in Awake, set to the same value as the initial camera rotation. We can use a chained assignment for this.
	Quaternion orbitRotation;

	…

	void Awake () {
		…
		transform.localRotation = orbitRotation = Quaternion.Euler(orbitAngles);
	}
It only needs to change in LateUpdate when there is a manual or automatic rotation. The look rotation then becomes the gravity alignment multiplied by the orbit rotation.
	void LateUpdate () {
		…
		//Quaternion lookRotation;
		if (ManualRotation() || AutomaticRotation()) {
			ConstrainAngles();
			orbitRotation = Quaternion.Euler(orbitAngles);
		}
		//else {
		//	lookRotation = transform.localRotation;
		//}
		Quaternion lookRotation = gravityAlignment * orbitRotation;

		…
	}

This works when manually adjusting the orbit, but AutomaticRotation fails because it only works when gravity points straight down. We can solve this by undoing gravity alignment before we determine the correct angles. That's done by applying the inverse gravity alignment to the movement delta, which we can get via the Quaternion.Inverse method.
		Vector3 alignedDelta =
			Quaternion.Inverse(gravityAlignment) *
			(focusPoint - previousFocusPoint);
		Vector2 movement = new Vector2(alignedDelta.x, alignedDelta.z);
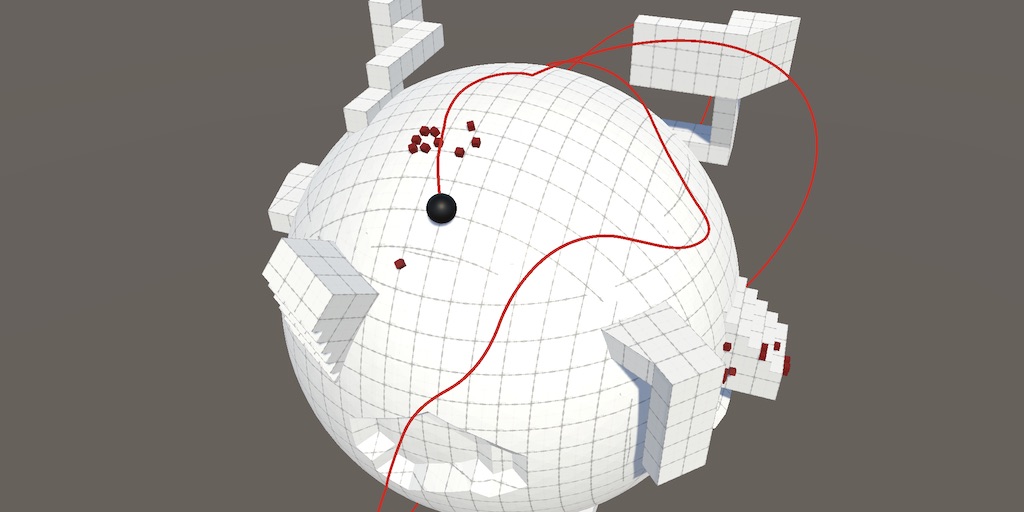
Spherical Gravity
We support arbitrary gravity, but we're still limited to the uniform Physics.gravity vector. If we want to support spherical gravity and walk on a planet then we have to come up with a custom gravity solution.
Custom Gravity
For this tutorial we'll use a very simple approach. Create a static CustomGravity class with a public GetGravity method that returns a gravity vector, given a position in world space. Initially we'll return Physics.gravity unmodified.
using UnityEngine;

public static class CustomGravity {

	public static Vector3 GetGravity (Vector3 position) {
		return Physics.gravity;
	}
}
As we use gravity to determine the up axis both for the sphere and orbit camera, let's also add a convenient GetUpAxis method, again with a position parameter.
	public static Vector3 GetUpAxis (Vector3 position) {
		return -Physics.gravity.normalized;
	}
We can go a step further and include a GetGravity variant method that provides both in one go. Let's do that by adding an output parameter for the up axis. We mark it as such by writing out in front of the parameter definition.
	public static Vector3 GetGravity (Vector3 position, out Vector3 upAxis) {
		upAxis = -Physics.gravity.normalized;
		return Physics.gravity;
	}
Applying Custom Gravity
From now on we can rely on CustomGravity.GetUpAxis in OrbitCamera.LateUpdate to perform the gravity alignment. We'll do that based on the current focus point.
		gravityAlignment =
			Quaternion.FromToRotation(
				gravityAlignment * Vector3.up,
				CustomGravity.GetUpAxis(focusPoint)
			) * gravityAlignment;
And in MovingSphere.FixedUpdate we can use CustomGravity.GetGravity based on the body's position to get both the gravity and up axis. We have to apply the gravity ourselves, simply by adding it to the final velocity as an acceleration. Also, let's pass the gravity vector to Jump.
	void FixedUpdate () {
		//upAxis = -Physics.gravity.normalized;
		Vector3 gravity = CustomGravity.GetGravity(body.position, out upAxis);
		UpdateState();
		AdjustVelocity();

		if (desiredJump) {
			desiredJump = false;
			Jump(gravity);
		}

		velocity += gravity * Time.deltaTime;

		body.velocity = velocity;
		ClearState();
	}
That way we can calculate the gravity's magnitude when needed, without having to determine gravity again for our position.
	void Jump (Vector3 gravity) {
		…
		float jumpSpeed = Mathf.Sqrt(2f * gravity.magnitude * jumpHeight);
		…
	}
And because we're using custom gravity we have to make sure that standard gravity doesn't get applied to the sphere's body. We can enforce this by setting the body's useGravity property to false in Awake.
	void Awake () {
		body = GetComponent<Rigidbody>();
		body.useGravity = false;
		OnValidate();
	}

Pulling Toward the Origin
Although we've switched to a custom gravity approach everything should still work the same. Changing Unity's gravity vector affects everything just like before. To make gravity spherical we have to make a few changes. We'll keep it simple and use the world origin as the center of our gravity source. The up axis is thus simply the direction to the position. Adjust CustomGravity.GetUpAxis accordingly.
	public static Vector3 GetUpAxis (Vector3 position) {
		return position.normalized;
	}
True gravity varies with distance. The further away you are the less you are affected by it. But we'll keep its strength constant, using the configured Y component of Unity's gravity vector. Thus we can suffice with scaling the up axis.
	public static Vector3 GetGravity (Vector3 position) {
		return position.normalized * Physics.gravity.y;
	}

	public static Vector3 GetGravity (Vector3 position, out Vector3 upAxis) {
		upAxis = position.normalized;
		return upAxis * Physics.gravity.y;
	}
This is all it takes to make simple spherical gravity work.
Note that when walking and jumping on a tiny planet it is possible to end up stuck in an orbit around it. You're falling down, but forward momentum makes you fall alongside the surface instead of toward it, just like a satellite.
This can be mitigated by increasing gravity or the planet's radius, allowing air acceleration, or by introducing a drag force that slows you down.
Pushing Away
We don't have to limit ourselves to realistic scenarios. By making gravity positive we end up pushing the sphere away from the origin instead, which makes it possible to move along the inside of a sphere. However, we have to flip the up axis when that is the case.
	public static Vector3 GetGravity (Vector3 position, out Vector3 upAxis) {
		Vector3 up = position.normalized;
		upAxis = Physics.gravity.y < 0f ? up : -up;
		return up * Physics.gravity.y;
	}

	public static Vector3 GetUpAxis (Vector3 position) {
		Vector3 up = position.normalized;
		return Physics.gravity.y < 0f ? up : -up;
	}
Other Bodies
Our sphere and orbit camera work with custom gravity, but everything else still relies on the default gravity to fall down. To make arbitrary objects with Rigidbody components fall toward the origin we'll have to apply custom gravity to them as well.
Specialized Rigidbody Component
We could extend the existing Rigidbody component to add custom gravity, but that would make it hard to convert objects that already have a configured Rigidbody. So we'll create a new CustomGravityRigidbody component type instead, which requires the existence of a body and retrieves a reference to it when it awakens. It also disables regular gravity.
using UnityEngine;

[RequireComponent(typeof(Rigidbody))]
public class CustomGravityRigidbody : MonoBehaviour {

	Rigidbody body;

	void Awake () {
		body = GetComponent<Rigidbody>();
		body.useGravity = false;
	}
}
To make the body fall toward the origin all we have to do is invoke AddForce on it in FixedUpdate, passing it our custom gravity based on its position.
	void FixedUpdate () {
		body.AddForce(CustomGravity.GetGravity(body.position));
	}
But gravity is an acceleration, so add ForceMode.Acceleration as a second argument.
		body.AddForce(
			CustomGravity.GetGravity(body.position), ForceMode.Acceleration
		);
Sleeping
A downside of applying gravity ourselves each fixed update is that the Rigidbody no longer goes to sleep. PhysX puts bodies to sleep when it can, effectively putting them in stasis, reducing the amount of work it has to do. For this reason it is a good idea to limit how many bodies are affected by our custom gravity.
One thing we could do is check whether the body is sleeping at the start of FixedUpdate, by invoking the body's IsSleeping method. If so, it's in equilibrium and we shouldn't disturb it, so return immediately.
	void FixedUpdate () {
		if (body.IsSleeping()) {
			return;
		}

		body.AddForce(
			CustomGravity.GetGravity(body.position), ForceMode.Acceleration
		);
	}
But it never goes to sleep, because we apply an acceleration to it. So we have to first stop doing that. Let's assume that if the body's velocity is very low it has come to rest. We'll use a threshold of 0.0001 for the square magnitude of its velocity. That's 0.01 units per second. If it's slower than that don't apply gravity.
	void FixedUpdate () {
		if (body.IsSleeping()) {
			return;
		}

		if (body.velocity.sqrMagnitude < 0.0001f) {
			return;
		}

		body.AddForce(
			CustomGravity.GetGravity(body.position), ForceMode.Acceleration
		);
	}
That doesn't work, because bodies begin stationary and can also end up hovering in place for a moment for various reasons while still in the air. So let's add a float delay, during which we assume that the body is floating but might still fall. It always resets to zero except when the velocity is below the threshold. In that case we wait one second before we stop applying gravity. If that wasn't enough time to make the body move then it should've come to rest.
	float floatDelay;

	…

	void FixedUpdate () {
		if (body.IsSleeping()) {
			floatDelay = 0f;
			return;
		}

		if (body.velocity.sqrMagnitude < 0.0001f) {
			floatDelay += Time.deltaTime;
			if (floatDelay >= 1f) {
				return;
			}
		}
		else {
			floatDelay = 0f;
		}

		body.AddForce(
			CustomGravity.GetGravity(body.position), ForceMode.Acceleration
		);
	}
Note that we do not force the body to go to sleep ourselves. We leave that up to PhysX. This is not the only way to support sleeping, but it's easy and sufficient for most simple situations.
Staying Awake
Our approach is fairly robust but not perfect. One assumption we make is that gravity remains constant for a given position. Once we've stopped applying gravity the bodies remain where they are, even if gravity were to suddenly flip. There might be other cases where our assumptions fail as well, for example bodies might move very slowly, or the floor might disappear while we're floating but not yet sleeping. Also, we don't need to worry about sleeping if a body is short-lived anyway, like temporary debris. So let's make it configurable whether a body is allowed to float so it can go to sleep.
	[SerializeField]
	bool floatToSleep = false;

	…

	void FixedUpdate () {
		if (floatToSleep) {
			…
		}

		body.AddForce(
			CustomGravity.GetGravity(body.position), ForceMode.Acceleration
		);
	}

The next tutorial is Complex Gravity.