Hashing
Small xxHash
- Create a grid for hash visualization.
- Convert 2D coordinates to pseudorandom values.
- Implement a small version of xxHash.
- Use hash values to color and offset cubes.
This is the first tutorial in a series about pseudorandom noise. It comes after the Basics series. It introduces a way to generate apparently random values via a hash function, specifically a smaller version of xxHash.
This tutorial is made with Unity 2020.3.6f1.
Visualization
Randomness is needed to make things unpredictable, varied, and appear natural. It doesn't matter whether the perceived phenomena are truly random or only appear that way due to a lack of information or understanding of the observer. So we can make do with something that is fully deterministic and not random at all, as long as this isn't obvious. This is good, because software is inherently deterministic. Poorly-designed multithreaded code can lead to race conditions and thus unpredictable results, but this isn't a reliable source of randomness. True reliable randomness can only be obtained from external sources—like hardware that samples atmospheric noise—which are usually not available.
True randomness is usually not desired. Anything generated by it is a one-time event that cannot be reproduced. The results will be different each time. Ideally we have a process that for any specific input yields a unique and fixed apparently random output. This is what hash functions are for.
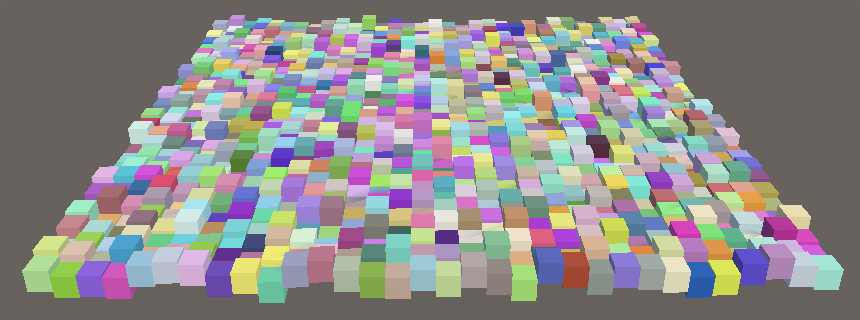
In this tutorial we'll create a 2D grid of small cubes and use it to visualize a hash function. Start with a new project as described in the Basics series. We'll use the jobs system so import the Burst package. I'll also use URP so import Universal RP and create an asset for it and configure Unity to use it.
Hash Job
We'll use a job to create hash values for all the cubes in the grid. Create a HashVisualization component type with such a job in it, following the same approach as introduced in the Basics series. The job will fill a NativeArray with hashes. Hash values are essentially a collection of bits without inherent meaning. We'll use the uint type for them, which comes closest to packets of 32 bits—four bytes—of generic data. Initially we'll directly use the job's execution index as the hash value.
using Unity.Burst;
using Unity.Collections;
using Unity.Jobs;
using Unity.Mathematics;
using UnityEngine;

using static Unity.Mathematics.math;

public class HashVisualization : MonoBehaviour {

	[BurstCompile(FloatPrecision.Standard, FloatMode.Fast, CompileSynchronously = true)]
	struct HashJob : IJobFor {

		[WriteOnly]
		public NativeArray<uint> hashes;

		public void Execute(int i) {
			hashes[i] = (uint)i;
		}
	}
}
Initialization and Rendering
Again as in the Basics series, we'll add configuration options for an instance mesh and material to HashVisualization, along with a resolution slider, and the required NativeArray, ComputeBuffer and MaterialPropertyBlock. We'll use _Hashes for the shader identifier of the buffer and also add a _Config shader property for additional configuration.
	static int
		hashesId = Shader.PropertyToID("_Hashes"),
		configId = Shader.PropertyToID("_Config");

	[SerializeField]
	Mesh instanceMesh;

	[SerializeField]
	Material material;

	[SerializeField, Range(1, 512)]
	int resolution = 16;

	NativeArray<uint> hashes;

	ComputeBuffer hashesBuffer;

	MaterialPropertyBlock propertyBlock;
Initialize everything in OnEnable. Because we're not going to animate the hashes we can immediately run the job here and also configure the property block once, instead of doing it every update.
We need to both multiply with and divide by the resolution in the shader, so store the resolution and its reciprocal in the first two components of a configuration vector.
	void OnEnable () {
		int length = resolution * resolution;
		hashes = new NativeArray<uint>(length, Allocator.Persistent);
		hashesBuffer = new ComputeBuffer(length, 4);

		new HashJob {
			hashes = hashes
		}.ScheduleParallel(hashes.Length, resolution, default).Complete();

		hashesBuffer.SetData(hashes);

		propertyBlock ??= new MaterialPropertyBlock();
		propertyBlock.SetBuffer(hashesId, hashesBuffer);
		propertyBlock.SetVector(configId, new Vector4(resolution, 1f / resolution));
	}
Clean up the hashes and buffer in OnDisable and again use the approach of resetting everything in OnValidate, so configuration changes while in play mode will refresh the grid.
	void OnDisable () {
		hashes.Dispose();
		hashesBuffer.Release();
		hashesBuffer = null;
	}

	void OnValidate () {
		if (hashesBuffer != null && enabled) {
			OnDisable();
			OnEnable();
		}
	}
This time the only thing we have to do in Update is issue the draw command. We'll keep our grid inside a unit cube at the origin.
	void Update () {
		Graphics.DrawMeshInstancedProcedural(
			instanceMesh, 0, material, new Bounds(Vector3.zero, Vector3.one),
			hashes.Length, propertyBlock
		);
	}
Shader
Create an HLSL include file with a procedural configuration function. The difference with the earlier versions from the Basics series is that we'll directly derive the instance's position from its identifier.
A 1D line be converted to a 2D grid by cutting it into segments of equal length and placing those next to each other, offset in the second dimension. We do this by dividing the identifier by the resolution as an integer division. GPUs don't have integer divisions so we'll just discard the fractional part of the division, via the floor function. That gives us the coordinate in the second dimension, which we'll name V. The U coordinate is then found by subtracting V multiplied with the resolution from the identifier.
We then use the UV coordinates to place the instance on the XZ plane, offset and scaled such that it remains inside the unit cube at the origin.
#if defined(UNITY_PROCEDURAL_INSTANCING_ENABLED)
	StructuredBuffer<uint> _Hashes;
#endif

float4 _Config;

void ConfigureProcedural () {
	#if defined(UNITY_PROCEDURAL_INSTANCING_ENABLED)
		float v = floor(_Config.y * unity_InstanceID);
		float u = unity_InstanceID - _Config.x * v;

		unity_ObjectToWorld = 0.0;
		unity_ObjectToWorld._m03_m13_m23_m33 = float4(
			_Config.y * (u + 0.5) - 0.5,
			0.0,
			_Config.y * (v + 0.5) - 0.5,
			1.0
		);
		unity_ObjectToWorld._m00_m11_m22 = _Config.y;
	#endif
}
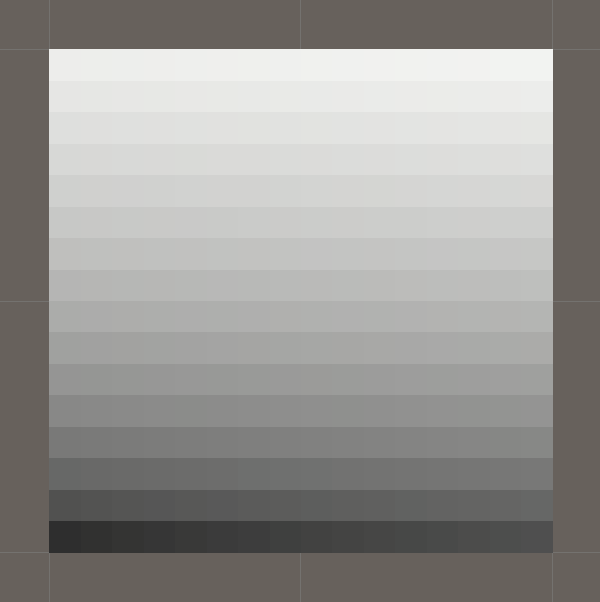
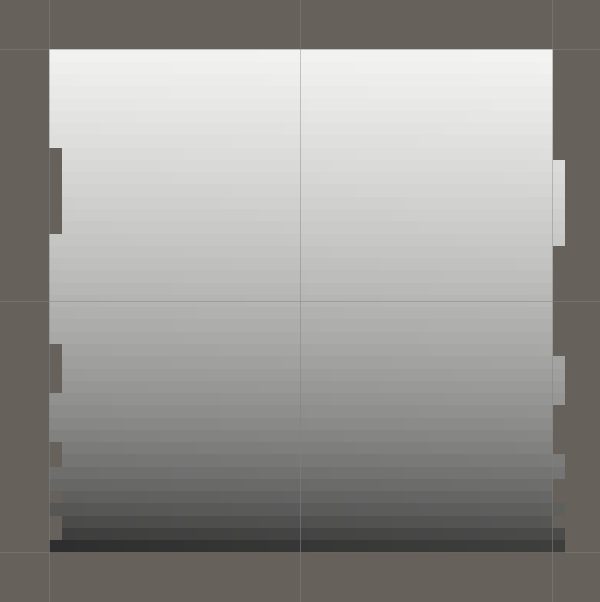
Also introduce a function that retrieves the hash and uses it to produce an RGB color. Initially make it a grayscale value that divides the hash by the resolution squared, thus going from black to white based on the hash index.
float3 GetHashColor () {
	#if defined(UNITY_PROCEDURAL_INSTANCING_ENABLED)
		uint hash = _Hashes[unity_InstanceID];
		return _Config.y * _Config.y * hash;
	#else
		return 1.0;
	#endif
}
Follow up with the shader graph function that we'll use to pass though the position and also output the color.
void ShaderGraphFunction_float (float3 In, out float3 Out, out float3 Color€) {
	Out = In;
	Color€ = GetHashColor();
}

void ShaderGraphFunction_half (half3 In, out half3 Out, out half3 Color€) {
	Out = In;
	Color€ = GetHashColor();
}
Then create a shader graph exactly like we did in the Basics series, except that we use the new HLSL file and function and directly connect our color to the shader's base color. I also use the default 0.5 value for smoothness instead of making it configurable.
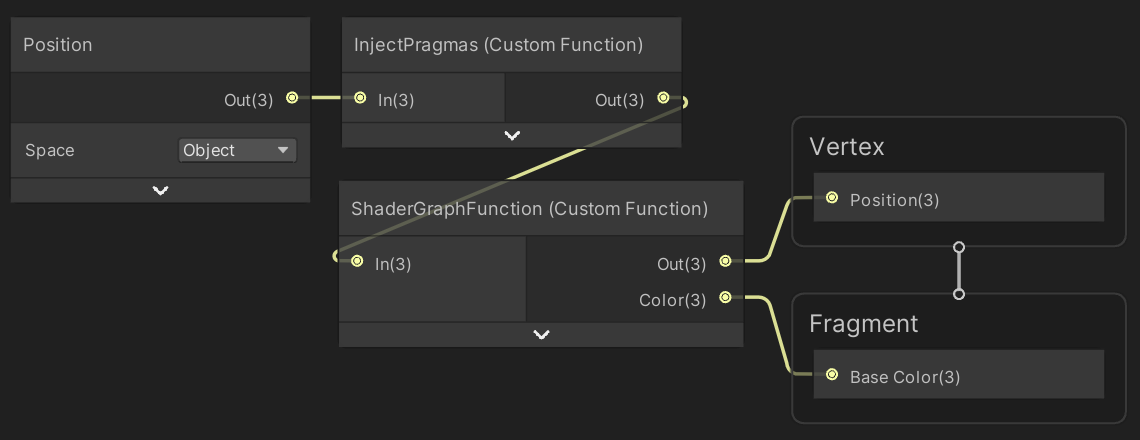
And here is the code text used for the InjectPragmas custom function node:
#pragma instancing_options assumeuniformscaling procedural:ConfigureProcedural
#pragma editor_sync_compilation

Out = In;
Now we can create a material that uses our shader, and also a game object with our HashVisualization component that uses that material and cubes for its instances.
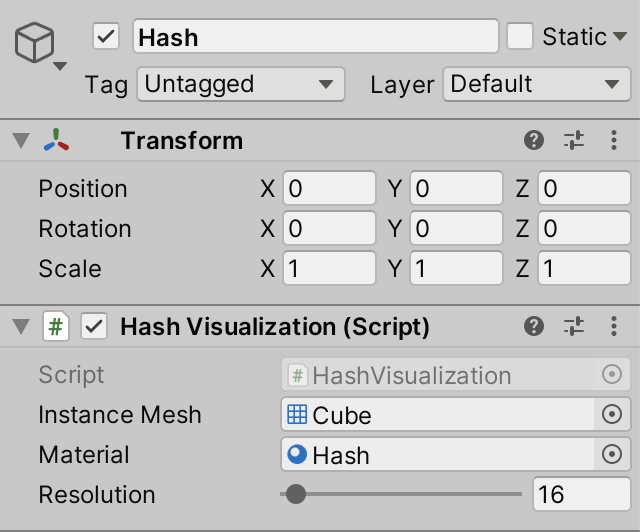
At this point a grid should appear in play mode.
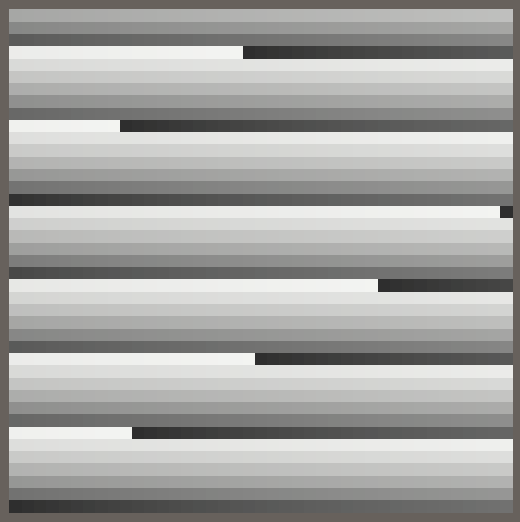
Adjusting the resolution via the inspector while in play mode causes the grid to recreate itself. It appears to work fine most of the time, but the grid is misaligned for some resolutions.
This error is caused by floating-point precision limitations. In some cases we end up with values that are a tiny bit less than a whole number before applying floor, which causes the instance to be misplaced. In our case we can fix this by adding a 0.00001 positive bias before discarding the fractional part.
float v = floor(_Config.y * unity_InstanceID + 0.00001);
Patterns
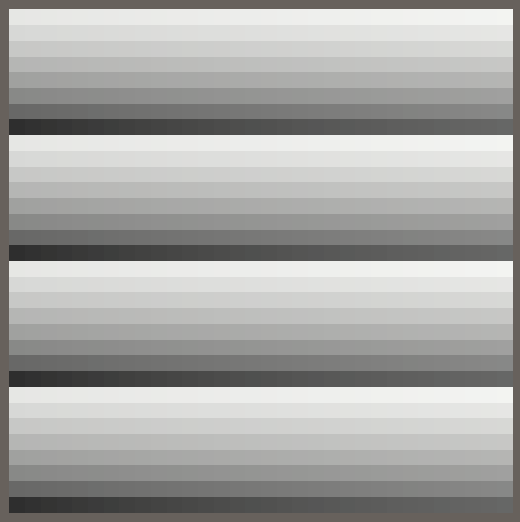
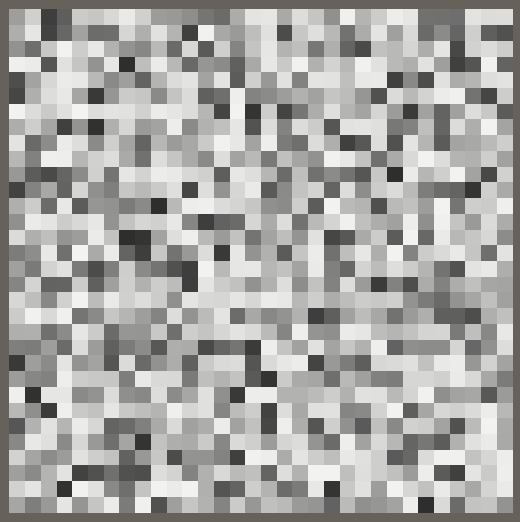
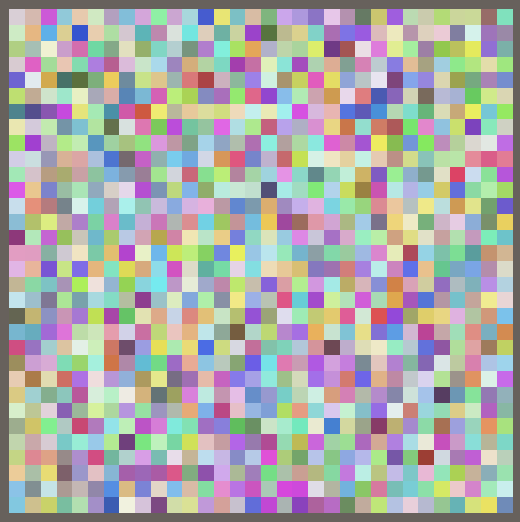
Before we move on to implementing a true hash function, let's briefly consider simple mathematical functions. As a first step we'll make our current grayscale gradient repeat every 256 points. We do this by only considering the eight least-significant bits of the hash in GetHashColor. This is done by combining the hash with binary 11111111 which is decimal 255, via the & bitwise AND operator. This masks the value so only its eight least-significant bits are retained, limiting it to the 0–255 range. That range can then be scaled down to 0–1 via division by 255.
		uint hash = _Hashes[unity_InstanceID];
		return (1.0 / 255.0) * (hash & 255);
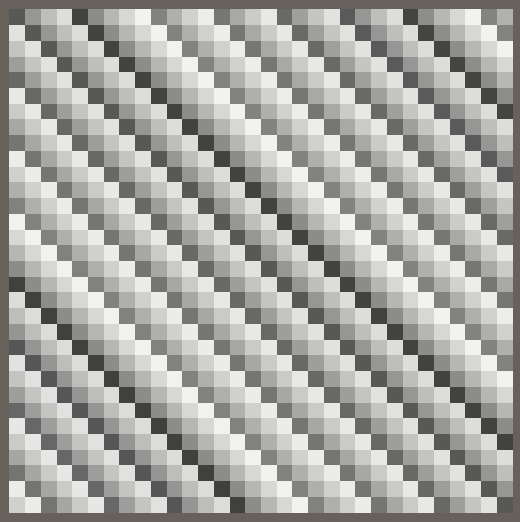
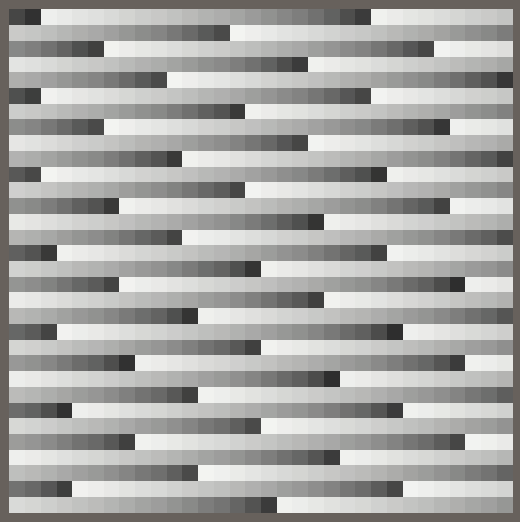
The resulting pattern depends on the resolution. At resolution 32 we get a gradient along Z that repeats four times, but this pattern goes out of alignment when the resolution is changed a little, for example to 41.
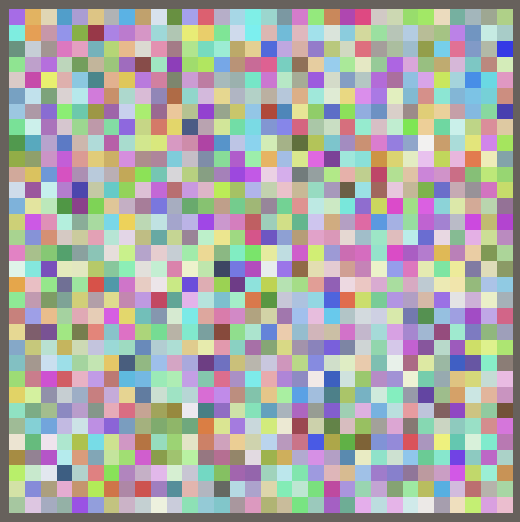
Let's replace the obvious gradient with a Weyl sequence, the same we also initially used to colorize our fractal in the Organic Variety tutorial. Do this based on the index in HashJob.Execute and multiply the result with 256 before casting to uint so we get hashes between 0 and 255 inclusive.
hashes[i] = (uint)(frac(i * 0.381f) * 256f);
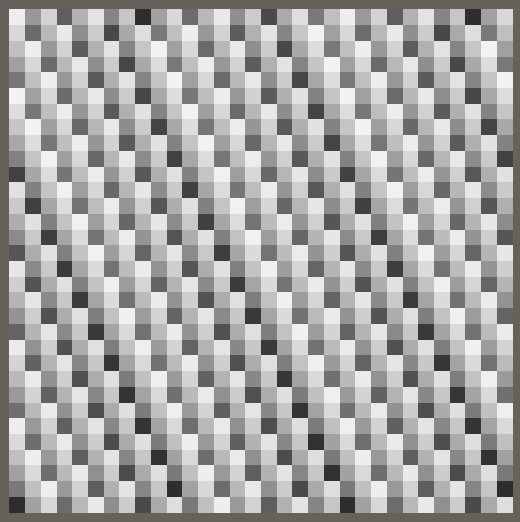
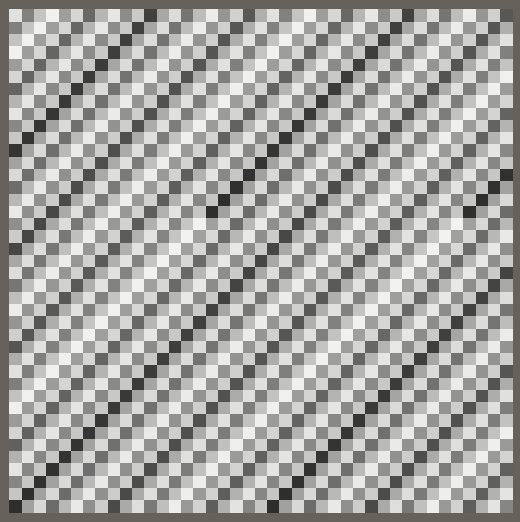
We always end up with an obvious repeating gradient, in a direction that depends on the resolution. To make it independent of the resolution we have to base our function on the UV coordinates of the points instead of their index. We can find the coordinates in the job the same way we do in the shader. Then use the product of U and V as the basis for the sequence. This requires us to add fields for the resolution and its reciprocal.
		public int resolution;

		public float invResolution;

		public void Execute(int i) {
			float v = floor(invResolution * i + 0.00001f);
			float u = i - resolution * v;
			hashes[i] = (uint)(frac(u * v * 0.381f) * 255f);
		}
Pass the required data to the job in OnEnable.
		new HashJob {
			hashes = hashes,
			resolution = resolution,
			invResolution = 1f / resolution
		}.ScheduleParallel(hashes.Length, resolution, default).Complete();
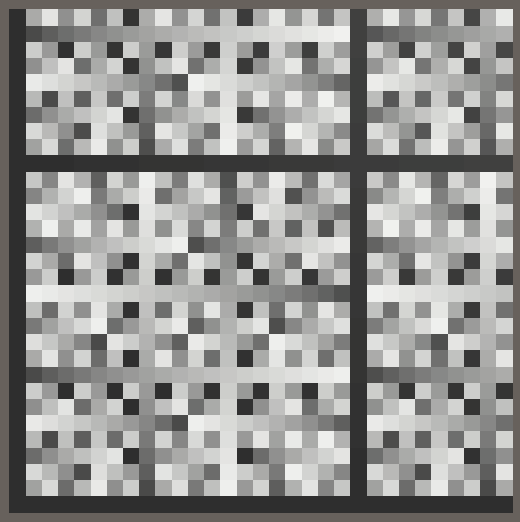
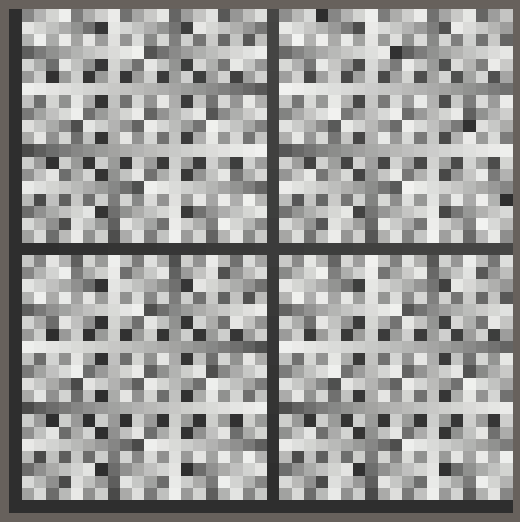
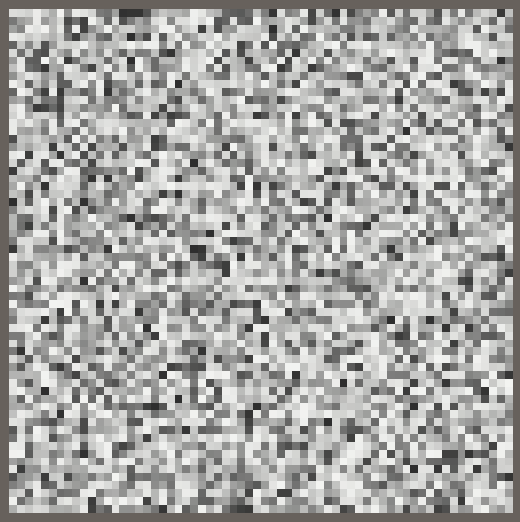
We now get a more interesting pattern which looks more arbitrary than before, but it has very obvious repetition. To get better results we'll need a good hash function.
Small xxHash
There are many known hash functions. We don't care about cryptographic hash functions that can be used for securing data and connections, we're looking for one that's both fast and produces good visual results. The xxHash fast digest algorithm designed by Yann Collet is a good candidate. Because we're working with very small input data—only two integers—we'll create a variant of XXH32 that skips steps 2, 3, and 4 of the algorithm. I name it SmallXXHash.
Hash Struct
Create a struct type for SmallXXHash in a separate C# file. Define five uint constants in it as shown below. These are five binary prime numbers—named A to E—used to manipulate bits. These values were empirically chosen by Yann Collet.
public struct SmallXXHash {

	const uint primeA = 0b10011110001101110111100110110001;
	const uint primeB = 0b10000101111010111100101001110111;
	const uint primeC = 0b11000010101100101010111000111101;
	const uint primeD = 0b00100111110101001110101100101111;
	const uint primeE = 0b00010110010101100110011110110001;
}
The algorithm works by storing hash bits in an accumulator, for which we need a uint field. This value gets initialized with a seed number, to which the prime E is added. This is the first step of creating a hash, so we do this via a public constructor method with a seed parameter. We'll treat the seed as a uint, but signed integers are typically used in code so an int parameter is more convenient.
	uint accumulator;

	public SmallXXHash (int seed) {
		accumulator = (uint)seed + primeE;
	}
This allows us to create a seeded SmallXXHash value. To get to a final uint hash value we can introduce a public ToUint method, which simply returns the accumulator.
public uint ToUint () => accumulator;
But we can make the conversion to uint implicit. First rewrite the method so it becomes static and acts on a given SmallXXHash value.
public static uint ToUint (SmallXXHash hash) => hash.accumulator;
Then turn the static method into a cast-to-uint operator, by replacing the method name with operator uint.
public static operator uint (SmallXXHash hash) => hash.accumulator;
Type casting has to be either implicit or explicit. Let's make ours implicit by writing the implicit keyword in front of operator. This makes it so that we can directly assign a SmallXXHash value to a uint and the conversion will happen implicitly without us having to write (uint) in front of it.
public static implicit operator uint (SmallXXHash hash) => hash.accumulator;
Now we can create a new SmallXXHash value in our job, initially with its seed set to zero, and then directly use it as the final hash value.
		public void Execute(int i) {
			float v = floor(invResolution * i + 0.00001f);
			float u = i - resolution * v;

			var hash = new SmallXXHash(0);
			hashes[i] = hash;
		}
Eating Data
XXHash32 works by consuming its input in portions of 32 bits, potentialy in parallel. Our small version only concerns itself with eating a single portion in isolation, for which we'll add a SmallXXHash.Eat method that has an int parameter and returns nothing. We'll treat the input data as uint again, multiply it with prime C, and then add it to the accumulator. This will lead to integer overflows, but that's fine as we don't care about numerical interpretations of the data. So all operations are effectively modulo 232.
	public void Eat (int data) {
		accumulator += (uint)data * primeC;
	}
Adjust HashJob.Execute so U and V are integers, then feed U and V to the hash before using it for the result.
		public void Execute(int i) {
			int v = (int)floor(invResolution * i + 0.00001f);
			int u = i - resolution * v;

			var hash = new SmallXXHash(0);
			hash.Eat(u);
			hash.Eat(v);
			hashes[i] = hash;
		}
This is only the first step of the eating process. After adding the value Eat has to rotate the bits of the accumulator to the left. Let's add a private static method for that, shifting some data by a given amount of steps. Begin by shifting all bits leftward with the << operator.
static uint RotateLeft (uint data, int steps) => data << steps;
The difference between rotating and shifting is that bits that would be lost by a shift are reinserted on the other side by a rotation. This can be accomplished for 32-bit data by also shifting in the other direction by 32 minus the indicated steps, then merging the results of both shifts with the | binary OR operator.
	static uint RotateLeft (uint data, int steps) =>
		(data << steps) | (data >> 32 - steps);
Now rotate the accumulator to the left by 17 bits in Eat. Burst will also inline this method invocation and directly use 15 for the right shift, eliminating the constant subtraction.
	public void Eat (int data) {
		accumulator = RotateLeft(accumulator + (uint)data * primeC, 17);
	}
The last step of the eating process is to multiply the accumulator with prime D.
	public void Eat (int data) {
		accumulator = RotateLeft(accumulator + (uint)data * primeC, 17) * primeD;
	}
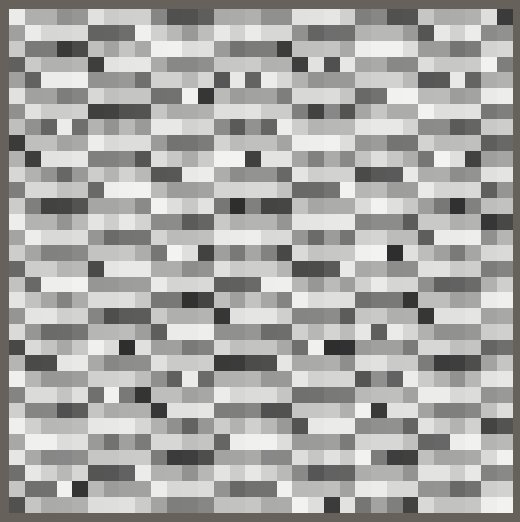
Although the results don't look good yet, the Eat method is finished. Although we won't use it in this tutorial, let's also add a variant Eat method that accept a single byte, as XXHash32 treats that data size a little different: it rotates left by 11 instead of 17 steps and multiplies with primes E and A and instead of primes C and D.
	public void Eat (byte data) {
		accumulator = RotateLeft(accumulator + data * primeE, 11) * primeA;
	}
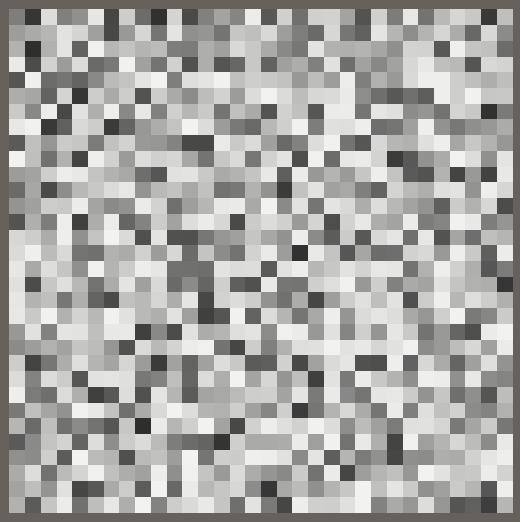
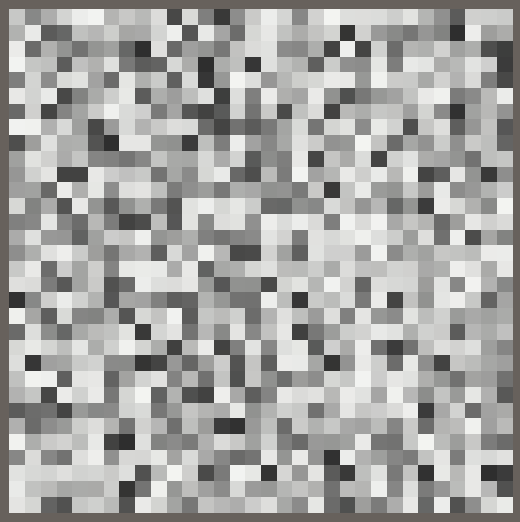
Avalanche
The final step of the XXHash algorithm is to mix the bits of the accumulator, to spread the influence of all input bits around. This is known as an avalanche effect. This happens after all data is eaten and the final hash value is needed, so we'll do this when converting to uint.
The avalanche value begins equal to the accumulator. It's shifted right 15 steps and then combined with its original value via the ^ bitwise XOR operator. After that it's multiplied with prime B. This process is done again, shifted right 13 steps, XOR-ed, and multiplied with prime C, and then again with 16 steps but without further multiplication.
	public static implicit operator uint (SmallXXHash hash) {
		uint avalanche = hash.accumulator;
		avalanche ^= avalanche >> 15;
		avalanche *= primeB;
		avalanche ^= avalanche >> 13;
		avalanche *= primeC;
		avalanche ^= avalanche >> 16;
		return avalanche;
	}
Negative Coordinates
To demonstrate that our hash function also works for negative coordinates, subtract half the resolution from U and V in HashJob.Execute.
			int v = (int)floor(invResolution * i + 0.00001f);
			int u = i - resolution * v - resolution / 2;
			v -= resolution / 2;
When adjusting the resolution the hash pattern will now stay centered, although it will jitter by one step as it switches between even and odd resolutions.
Method Chaining
Although SmallXXHash is already fully functional we can make it more convenient to work with, by adding support for method chaining. This means that we change both Eat methods so they return the hash itself, which can be done via the this keyword.
	public SmallXXHash Eat (int data) {
		accumulator = RotateLeft(accumulator + (uint)data * primeC, 17) * primeD;
		return this;
	}

	public SmallXXHash Eat (byte data) {
		accumulator = RotateLeft(accumulator + data * primeE, 11) * primeA;
		return this;
	}
The current code in HashJob.Execute still works, ignoring the returned hash values. But now we can directly invoke Eat on the result of the constructor invocation, and also directly on the result of Eat itself, reducing our code to a single line.
//var hash = new SmallXXHash(0).Eat(u).Eat(v);//hash.Eat(u);//hash.Eat(v);hashes[i] = new SmallXXHash(0).Eat(u).Eat(v);
Immutability
We can go a step further and make it so that the SmallXXHash.Eat methods don't adjust the accumulator of the value they're invoked on. This makes it possible to keep an intermediate hash and reuse it later, which is something that we'll use in the future. Thus we make SmallXXHash an immutable struct, truly behaving exactly like a uint value.
Add the readonly modifier to SmallXXHash to indicate and enforce that it is immutable.
public readonly struct SmallXXHash { … }
We must mark its accumulator field the same way.
readonly uint accumulator;
From now on the only way to get a different accumulator value is by passing it as an argument to a constructor method, because only constructors are allowed to modify readonly fields. Adjust the existing constructor so it directly sets the accumulator instead of applying a seed.
	public SmallXXHash (uint accumulator) {
		this.accumulator = accumulator;
	}
At this point we have a direct conversion from uint to SmallXXHash. Let's create a convenient implicit cast method for it.
	public static implicit operator SmallXXHash (uint accumulator) =>
		new SmallXXHash(accumulator);
The Eat methods can now directly return the new accumulator value as a SmallXXHash.
	public SmallXXHash Eat (int data) =>
		RotateLeft(accumulator + (uint)data * primeC, 17) * primeD;

	public SmallXXHash Eat (byte data) =>
		RotateLeft(accumulator + data * primeE, 11) * primeA;
Finally, to make initialization with a seed again possible introduce a public static Seed method that creates a SmallXXHash with an appropriate accumulator value.
public static SmallXXHash Seed (int seed) => (uint)seed + primeE;
Use this new method to initialize the hash in HashJob.Execute, so we're no longer explicitly invoking a constructor method and instead rely on a chain of regular method invocations, of which the first is static.
hashes[i] = SmallXXHash.Seed(0).Eat(u).Eat(v);
Note that these changes are purely for style. Burst still generates the same instructions.
Showing More of the Hash
With SmallXXHash finished, let's focus our attention on the visualization of its results.
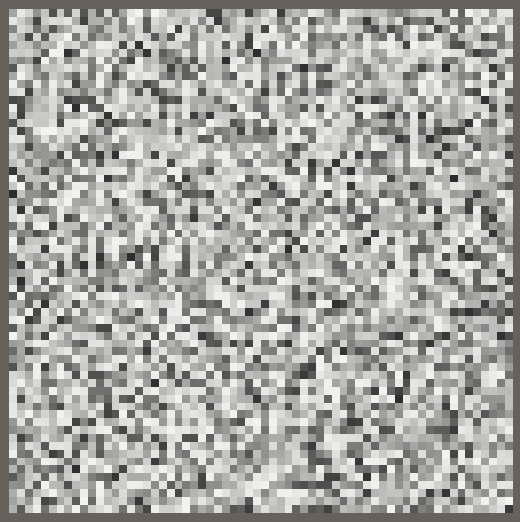
Using Different Bits
So far we've only looked at the least significant byte of the generated hash values. A quick way to change this is by shifting the hash bits in GetHashColor. For example, by shifting the hash to the right by eight bits we end up seeing the second byte that is one step more significant.
return (1.0 / 255.0) * ((hash >> 8) & 255);
This way we could create four completely separate 8-bit visualizations with the same hash, though it's also possible to use different bit counts and shifts.
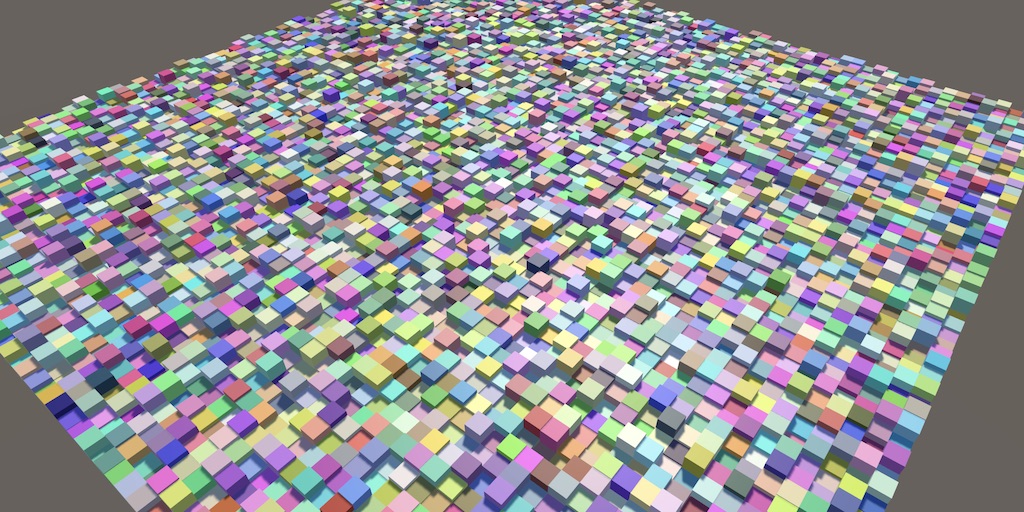
Coloring
We can combine the visualization of three bytes by using each for a different RGB channel of the final color. Let's use the lowest byte for red, the second-lowest for green, and the third for blue. Thus we have to shift zero, 8, and 16 bits to the right.
		uint hash = _Hashes[unity_InstanceID];
		return (1.0 / 255.0) * float3(
			hash & 255,
			(hash >> 8) & 255,
			(hash >> 16) & 255
		);
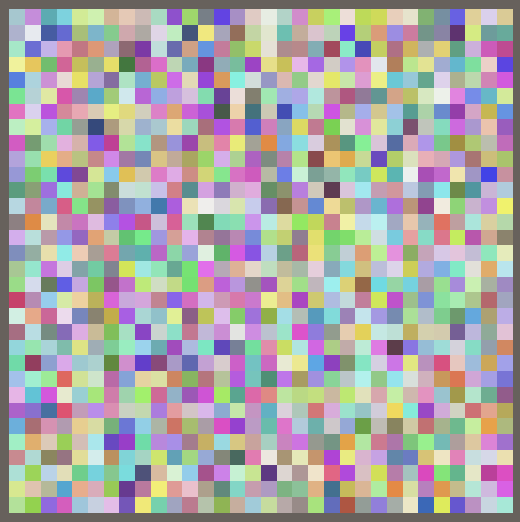
Configurable Seed
Now that we have a good visualization that shows 75% of the hash bits let's make the seed configurable. Add a field for it to HashJob and use it to initialize the hash.
		public int seed;

		public void Execute(int i) {
			…

			hashes[i] = SmallXXHash.Seed(seed).Eat(u).Eat(v);
		}
Also add the configuration field to HashVisualization add pass it to the job in OnEnable. The seed is an unrestricted integer value.
	[SerializeField]
	int seed;

	…

	void OnEnable () {
		…

		new HashJob {
			hashes = hashes,
			resolution = resolution,
			invResolution = 1f / resolution,
			seed = seed
		}.ScheduleParallel(hashes.Length, resolution, default).Complete();

		…
	}

Now you can drastically change the pattern by adjusting the seed. Each seed yields an entirely different pattern, without an apparent relationship among them.
We can go a step further and hoist the initialization of the hash out of the job. Besides the minor optimization of eliminating a single addition from the job, this shows that you can initialize the hash however you like before using it in a job.
Replace the seed field of HashJob with a SmallXXHash field and use that directly in Execute.
//public int seed;public SmallXXHash hash; public void Execute(int i) { … hashes[i] = hash.Eat(u).Eat(v); }
Then pass a seeded hash to the job in OnEnable.
		new HashJob {
			hashes = hashes,
			resolution = resolution,
			invResolution = 1f / resolution,
			hash = SmallXXHash.Seed(seed)
		}.ScheduleParallel(hashes.Length, resolution, default).Complete();
Using the Last Byte
There is still one byte of the hash that isn't visualized yet. We could use it for opacity, but that would make everything harder to see and require appropriate depth-based sorting of the cube instances to render correctly. So let's instead use the fourth byte to give the cubes a vertical offset.
Make the vertical offset configurable, with a limited range like −2–2 and a default of 1. We make this offset relative to the cube instance size, so the actual offset will be divided by the resolution. Pass this scale to the GPU as the third component of the configuration vector.
	[SerializeField, Range(-2f, 2f)]
	float verticalOffset = 1f;

	…

	void OnEnable () {
		…
		propertyBlock.SetVector(configId, new Vector4(
			resolution, 1f / resolution, verticalOffset / resolution
		));
	}
Apply the offset in ConfigureProcedural. The last byte is found by shifting right 24 steps and as all other bits are zero at that point we don't need to mask it afterwards. Scale it down to 0–1 and then subtract a half to change the range to −½–½. Then apply the configured vertical offset scale.
		unity_ObjectToWorld._m03_m13_m23_m33 = float4(
			_Config.y * (u + 0.5) - 0.5,
			_Config.z * ((1.0 / 255.0) * (_Hashes[unity_InstanceID] >> 24) - 0.5),
			_Config.y * (v + 0.5) - 0.5,
			1.0
		);

The next tutorial is Hashing Space.