Enemies
Moving Through a Maze
- Place spawn points.
- Make enemies appear and move across the board.
- Create smooth motion with constant speed.
- Vary enemy size, speed, and placement.
This is the second installment of a tutorial series about creating a simple tower defense game. It covers spawning enemies and moving them to the nearest destination.
This tutorial is made with Unity 2018.3.0f2.

Spawn Points
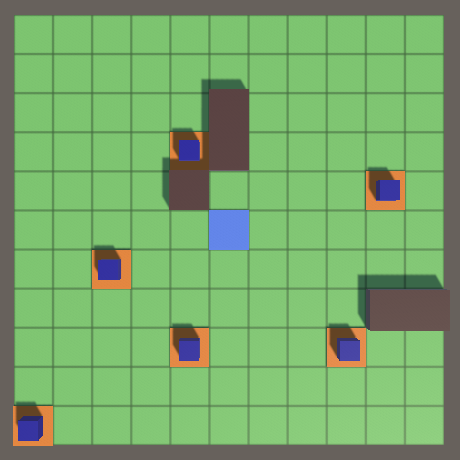
Before we can spawn enemies we need to decide where to place them on the board. We'll create spawn points for that.
Tile Content
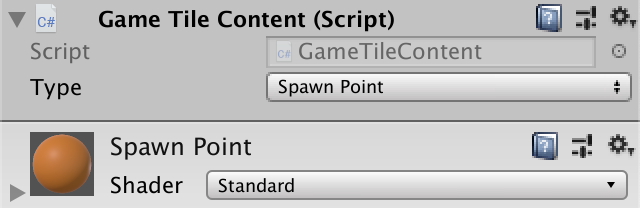
A spawn point is another type of tile content, so add an entry for it to GameTileContentType.
public enum GameTileContentType {
	Empty, Destination, Wall, SpawnPoint
}
Then create a prefab to visualize it. We can suffice with duplicating the destination prefab, changing its content type, and giving it another material. I made it orange.
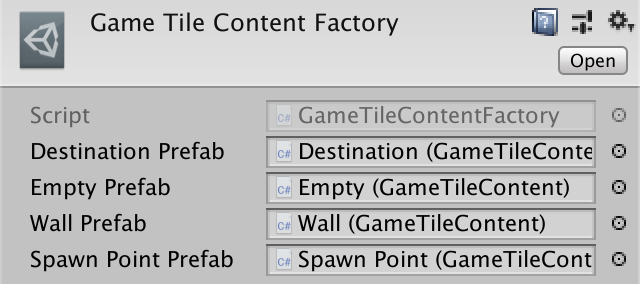
Add support for spawn points to the content factory and give it a reference to the prefab.
	[SerializeField]
	GameTileContent spawnPointPrefab = default;

	…

	public GameTileContent Get (GameTileContentType type) {
		switch (type) {
			case GameTileContentType.Destination: return Get(destinationPrefab);
			case GameTileContentType.Empty: return Get(emptyPrefab);
			case GameTileContentType.Wall: return Get(wallPrefab);
			case GameTileContentType.SpawnPoint: return Get(spawnPointPrefab);
		}
		Debug.Assert(false, "Unsupported type: " + type);
		return null;
	}
Toggling Spawn Points
Add a method to toggle a spawn point to GameBoard, just like the other toggle methods. But spawn points don't affect pathfinding, so we don't need to find new paths after a change.
	public void ToggleSpawnPoint (GameTile tile) {
		if (tile.Content.Type == GameTileContentType.SpawnPoint) {
			tile.Content = contentFactory.Get(GameTileContentType.Empty);
		}
		else if (tile.Content.Type == GameTileContentType.Empty) {
			tile.Content = contentFactory.Get(GameTileContentType.SpawnPoint);
		}
	}
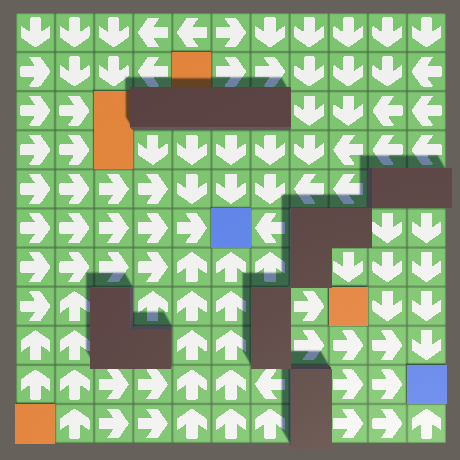
A game only makes sense if there are enemies, which requires spawn points. So a valid board should contain at least one spawn point. We'll also need to access spawn points later when adding enemies, so let's use a list to keep track of all tiles with spawn points. Update the list when toggling a spawn point, and prevent removal of the last spawn point.
	List<GameTile> spawnPoints = new List<GameTile>();

	…

	public void ToggleSpawnPoint (GameTile tile) {
		if (tile.Content.Type == GameTileContentType.SpawnPoint) {
			if (spawnPoints.Count > 1) {
				spawnPoints.Remove(tile);
				tile.Content = contentFactory.Get(GameTileContentType.Empty);
			}
		}
		else if (tile.Content.Type == GameTileContentType.Empty) {
			tile.Content = contentFactory.Get(GameTileContentType.SpawnPoint);
			spawnPoints.Add(tile);
		}
	}
Initialize must now set a spawn point to produce an initial valid board state. Let's simply toggle the first tile, which is the bottom left corner.
	public void Initialize (
		Vector2Int size, GameTileContentFactory contentFactory
	) {
		…

		ToggleDestination(tiles[tiles.Length / 2]);
		ToggleSpawnPoint(tiles[0]);
	}
We'll make it so the alternative touch toggles spawn points from now on, except when the left shift key is held down—checked via the Input.GetKey method—in which case a destination is toggled instead.
	void HandleAlternativeTouch () {
		GameTile tile = board.GetTile(TouchRay);
		if (tile != null) {
			if (Input.GetKey(KeyCode.LeftShift)) {
				board.ToggleDestination(tile);
			}
			else {
				board.ToggleSpawnPoint(tile);
			}
		}
	}
Accessing Spawn Points
The board takes care of its tiles, but enemies won't be its responsibility. Instead, we'll make it possible to access its spawn points via a public GetSpawnPoint method with an index parameter.
	public GameTile GetSpawnPoint (int index) {
		return spawnPoints[index];
	}
To know which indices are valid requires knowledge of the amount of spawn points, so expose that via a public getter property.
public int SpawnPointCount => spawnPoints.Count;
Spawning Enemies
Spawning an enemy is somewhat like creating tile content. We create an instance of a prefab via a factory, which we then put on the board.
Factories
We'll create a factory for enemies, which will put everything it creates in its own scene. That functionality is shared with the factory that we already have, so let's put the code for that in a common base class, GameObjectFactory. We can suffice with a single CreateGameObjectInstance method with a generic prefab parameter, which creates and returns an instance and takes care of all scene management. Make the method protected, which means that it is only accessible to the class itself and all types that extend it. That's all the base class does, it isn't intended to be used as a fully-functional factory. So mark it as abstract, which makes it impossible to create object instances of it.
using UnityEngine;
using UnityEngine.SceneManagement;

public abstract class GameObjectFactory : ScriptableObject {

	Scene scene;

	protected T CreateGameObjectInstance<T> (T prefab) where T : MonoBehaviour {
		if (!scene.isLoaded) {
			if (Application.isEditor) {
				scene = SceneManager.GetSceneByName(name);
				if (!scene.isLoaded) {
					scene = SceneManager.CreateScene(name);
				}
			}
			else {
				scene = SceneManager.CreateScene(name);
			}
		}
		T instance = Instantiate(prefab);
		SceneManager.MoveGameObjectToScene(instance.gameObject, scene);
		return instance;
	}
}
Adjust GameTileContentFactory so it extends this factory type and uses CreateGameObjectInstance in its Get method, then remove the scene-management code from it.
using UnityEngine;//using UnityEngine.SceneManagement;[CreateAssetMenu] public class GameTileContentFactory : GameObjectFactory { …//Scene contentScene;… GameTileContent Get (GameTileContent prefab) { GameTileContent instance = CreateGameObjectInstance(prefab); instance.OriginFactory = this;//MoveToFactoryScene(instance.gameObject);return instance; }//void MoveToFactoryScene (GameObject o) {// …//}}
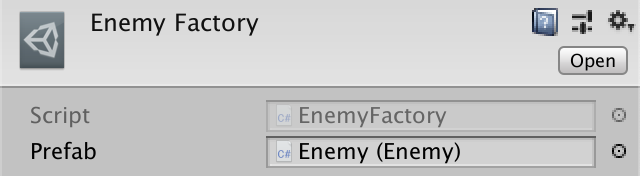
After that, create a new EnemyFactory type that instantiates a single Enemy prefab via a Get method, along with an accompanying Reclaim method.
using UnityEngine;

[CreateAssetMenu]
public class EnemyFactory : GameObjectFactory {

	[SerializeField]
	Enemy prefab = default;

	public Enemy Get () {
		Enemy instance = CreateGameObjectInstance(prefab);
		instance.OriginFactory = this;
		return instance;
	}

	public void Reclaim (Enemy enemy) {
		Debug.Assert(enemy.OriginFactory == this, "Wrong factory reclaimed!");
		Destroy(enemy.gameObject);
	}
}
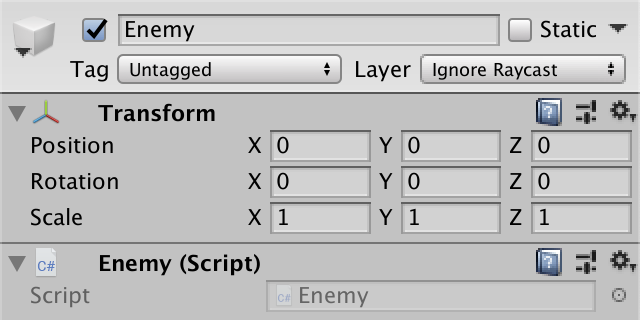
The new Enemy type initially only needs to keep track of its origin factory.
using UnityEngine;

public class Enemy : MonoBehaviour {

	EnemyFactory originFactory;

	public EnemyFactory OriginFactory {
		get => originFactory;
		set {
			Debug.Assert(originFactory == null, "Redefined origin factory!");
			originFactory = value;
		}
	}
}
Prefab
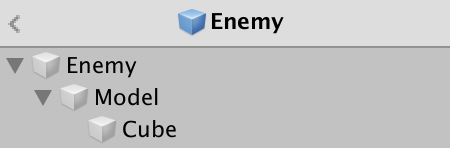
Enemies need a visualization, which could be anything. A robot, a spider, a ghost, or something simpler like a cube, which is what we'll use. But in general the enemy has a 3D model of arbitrary complexity. To make it easy to support this, we'll use a root object for our enemy prefab hierarchy that only has the Enemy component attached to it.
Give this object a single child, which is the model root. It should have the identity transform.

The purpose of the model root is to position the 3D model relative to the local origin of the enemy, so it treats it as a pivot point on which it stands, or hovers above. In our case the model will be a default cube at half scale, which I made dark blue. Make it a child of the model root and set its Y position to 0.25, so it sits on the ground.
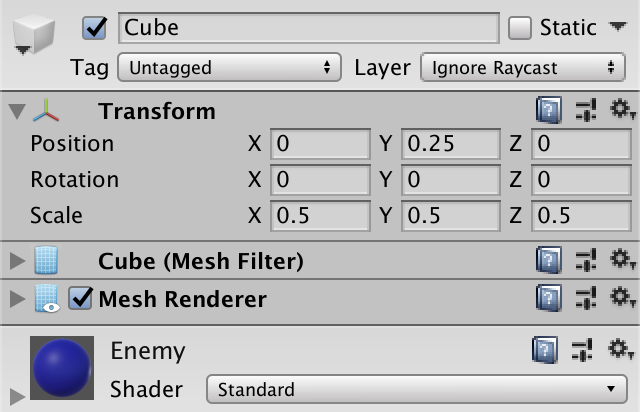
The enemy prefab thus consists of three nested objects: a prefab root, a model root, and a cube. This can be considered overkill for a simple cube, but makes it possible to move and animate any enemy without worrying about its details.
Create an enemy factory and assign the prefab to it.
Placing Enemies on the Board
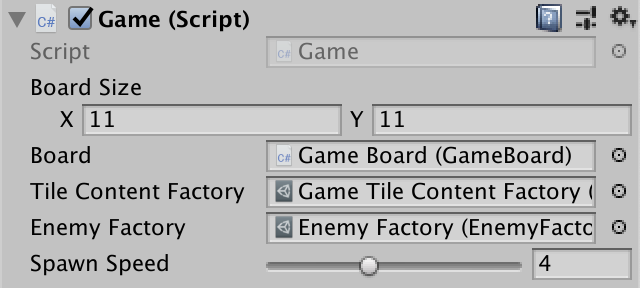
To put enemies on the board, Game needs a reference to the enemy factory. As we'll need lots of enemies, also add a configuration option for a spawn speed, expressed in enemies per second. A range of 0.1–10 seems reasonable, with a default of 1.
	[SerializeField]
	EnemyFactory enemyFactory = default;

	[SerializeField, Range(0.1f, 10f)]
	float spawnSpeed = 1f;
Keep track of the spawn progress in Update by increasing it by the speed multiplied by the time delta. If the progress exceeds 1, decrement it and spawn an enemy via a new SpawnEnemy method. Keep doing this as long as progress exceeds 1, in case the speed is high and the frame time ended up so long that multiple enemies should've been spawned.
	float spawnProgress;

	…

	void Update () {
		…

		spawnProgress += spawnSpeed * Time.deltaTime;
		while (spawnProgress >= 1f) {
			spawnProgress -= 1f;
			SpawnEnemy();
		}
	}
Have SpawnEnemy grab a random spawn point from the board and spawn an enemy on that tile. We'll give Enemy a SpawnOn method to correctly position itself.
	void SpawnEnemy () {
		GameTile spawnPoint =
			board.GetSpawnPoint(Random.Range(0, board.SpawnPointCount));
		Enemy enemy = enemyFactory.Get();
		enemy.SpawnOn(spawnPoint);
	}
Right now all SpawnOn needs to do is set its own position to the tile's center. Because the prefab's model is positioned correctly the enemy cube ends up on top of the tile.
	public void SpawnOn (GameTile tile) {
		transform.localPosition = tile.transform.localPosition;
	}
Moving Enemies
Once an enemy has appeared it should start moving along the path to the nearest destination. We'll have to animate them to make that happen. We'll start by simply sliding them from tile to tile, and then make their movement more complex.
Enemy Collection
We'll use the same approach that we used in the Object Management series to update enemies. Give Enemy a public GameUpdate method that returns whether it is still alive, which is always at this point. For now, just make it move forward based on the time delta.
	public bool GameUpdate () {
		transform.localPosition += Vector3.forward * Time.deltaTime;
		return true;
	}
Next, we have to keep track of a list of living enemies and update them all, removing dead ones from the list. We could put all that code in Game, but let's isolate it and create an EnemyCollection type for that instead. It's a serializable class that doesn't extend anything. Give it a public method to add an enemy and another one to update the entire collection.
using System.Collections.Generic;

[System.Serializable]
public class EnemyCollection {

	List<Enemy> enemies = new List<Enemy>();

	public void Add (Enemy enemy) {
		enemies.Add(enemy);
	}

	public void GameUpdate () {
		for (int i = 0; i < enemies.Count; i++) {
			if (!enemies[i].GameUpdate()) {
				int lastIndex = enemies.Count - 1;
				enemies[i] = enemies[lastIndex];
				enemies.RemoveAt(lastIndex);
				i -= 1;
			}
		}
	}
}
Now Game can suffice with creating one such collection, updating it each frame, and adding spawned enemies to it. Update the enemies after potentially spawning a new one, so they get updated immediately.
	EnemyCollection enemies = new EnemyCollection();

	…

	void Update () {
		…
		enemies.GameUpdate();
	}

	…

	void SpawnEnemy () {
		…
		enemies.Add(enemy);
	}
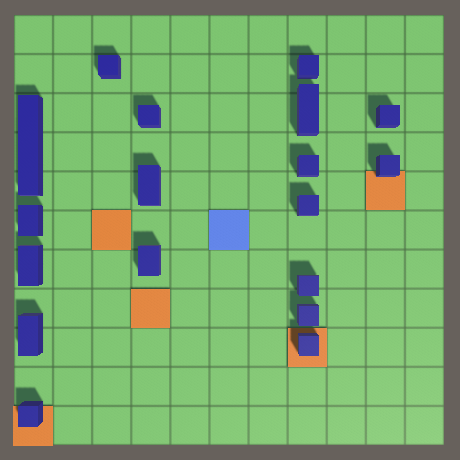
Following the Path
Our enemies are moving, but they're not yet following the path. To make that possible, enemies must be able to know where to go next. So give GameTile a public getter property to retrieve the next tile on the path.
public GameTile NextTileOnPath => nextOnPath;
Given a tile from which and a tile to which to move, it is possible for enemies to determine a starting and destination point for a single-tile journey. The enemy can interpolate between those two by keeping track of its progress. After progress is complete, the process is repeated for the next tile. But the paths could change at any time. Rather than figure out where to go while in progress, we'll just keep moving along the planned route and re-evaluate once the next tile is reached.
Have Enemy keep track of both tiles, so it is not affected by path changes. Also keep track of the positions, so we don't have to retrieve them each frame. And it needs to keep track of the progress as well.
	GameTile tileFrom, tileTo;
	Vector3 positionFrom, positionTo;
	float progress;
Initialize these fields in SpawnOn. The given tile is from where to go and the destination is the next tile on the path. This assumes that there is a next tile. If not we spawned on a destination, which should be impossible. Then cache the positions of the tiles and set progress to zero. We don't have to set the position of the enemy here, because its GameUpdate method will get invoked during the same frame.
	public void SpawnOn (GameTile tile) {
		//transform.localPosition = tile.transform.localPosition;
		Debug.Assert(tile.NextTileOnPath != null, "Nowhere to go!", this);
		tileFrom = tile;
		tileTo = tile.NextTileOnPath;
		positionFrom = tileFrom.transform.localPosition;
		positionTo = tileTo.transform.localPosition;
		progress = 0f;
	}
Increase its progress in GameUpdate. Add the unmodified time delta, so our enemies move one tile per second. While progress is complete, shift the data so To becomes From and the new To is the next tile on the path. Then decrement progress. Once the data is up to date, interpolate the position of the enemy between From and To. Because the progress is our interpolator it is guaranteed to lie between 0 and 1, so we can use Vector3.LerpUnclamped.
	public bool GameUpdate () {
		progress += Time.deltaTime;
		while (progress >= 1f) {
			tileFrom = tileTo;
			tileTo = tileTo.NextTileOnPath;
			positionFrom = positionTo;
			positionTo = tileTo.transform.localPosition;
			progress -= 1f;
		}
		transform.localPosition =
			Vector3.LerpUnclamped(positionFrom, positionTo, progress);
		return true;
	}
This makes enemies follow the path, but would fail when the destination tile is reached. So check whether the next tile on the path is null before adjusting the From and To positions. If so, we reached a destination and the enemy is done. Reclaim it and return false.
		while (progress >= 1f) {
			tileFrom = tileTo;
			tileTo = tileTo.NextTileOnPath;
			if (tileTo == null) {
				OriginFactory.Reclaim(this);
				return false;
			}
			positionFrom = positionTo;
			positionTo = tileTo.transform.localPosition;
			progress -= 1f;
		}
Enemies now move from one tile's center to the next. Note that because they only change their movement state at tile centers they do not immediately respond to patch changes. This means that sometimes enemies will move through walls that have just been placed. Once they're going toward a cell, there's no stopping them. That's why walls also need valid paths.
Going From Edge to Edge
Moving between tile centers and suddenly changing direction looks fine for an abstract game where the enemies are sliding cubes, but in general smoother movement looks better. The first step in getting there is to move between tile edges instead of centers.
The edge point between adjacent tiles can be found by averaging their positions. Rather than calculating that per step per enemy, we'll calculate it only when the path changes, in GameTile.GrowPathTo. Make it available via an ExitPoint property.
	public Vector3 ExitPoint { get; private set; }

	…

	GameTile GrowPathTo (GameTile neighbor) {
		…
		neighbor.ExitPoint =
			(neighbor.transform.localPosition + transform.localPosition) * 0.5f;
		return
			neighbor.Content.Type != GameTileContentType.Wall ? neighbor : null;
	}
The only special case is a destination cell, for which the exit point is its center.
	public void BecomeDestination () {
		distance = 0;
		nextOnPath = null;
		ExitPoint = transform.localPosition;
	}
Adjust Enemy so it uses the exit points instead of the tile centers.
	public bool GameUpdate () {
		progress += Time.deltaTime;
		while (progress >= 1f) {
			…
			positionTo = tileFrom.ExitPoint;
			progress -= 1f;
		}
		transform.localPosition = Vector3.Lerp(positionFrom, positionTo, progress);
		return true;
	}

	public void SpawnOn (GameTile tile) {
		…
		positionTo = tileFrom.ExitPoint;
		progress = 0f;
	}
A side effect of this change is that when enemies turn around due to a path change they remain stationary for a second.
Orientation
Although the enemies move along paths, they currently never change their orientation. To make them look where they're going they have to know the direction of the path that they're following. Once again we'll define this when paths are found so that enemies don't have to calculate it.
We have four directions: north, east, south, and west. Define an enumeration for this.
public enum Direction {
	North, East, South, West
}
Then give GameTile a property for its path direction.
public Direction PathDirection { get; private set; }
Add a direction parameter to GrowTo, which sets the property. As we grow the path backwards, the direction is the opposite of where we grow the path to.
	public GameTile GrowPathNorth () => GrowPathTo(north, Direction.South);

	public GameTile GrowPathEast () => GrowPathTo(east, Direction.West);

	public GameTile GrowPathSouth () => GrowPathTo(south, Direction.North);

	public GameTile GrowPathWest () => GrowPathTo(west, Direction.East);

	GameTile GrowPathTo (GameTile neighbor, Direction direction) {
		…
		neighbor.PathDirection = direction;
		return
			neighbor.Content.Type != GameTileContentType.Wall ? neighbor : null;
	}
We'll need to convert directions to rotations, expressed as quaternions. It would be convenient if we could just invoke GetRotation on a direction, so let's make that possible by creating an extension method. Add a public static DirectionExtensions class, give it an array to cache the required quaternions, plus the GetRotation method to return the appropriate value for a direction. In this case it makes sense to put the extension class in the same file as the enumeration type.
using UnityEngine;

public enum Direction {
	North, East, South, West
}

public static class DirectionExtensions {

	static Quaternion[] rotations = {
		Quaternion.identity,
		Quaternion.Euler(0f, 90f, 0f),
		Quaternion.Euler(0f, 180f, 0f),
		Quaternion.Euler(0f, 270f, 0f)
	};

	public static Quaternion GetRotation (this Direction direction) {
		return rotations[(int)direction];
	}
}
Now we can rotate Enemy when spawning and each time we enter a new tile. After updating the data, the From tile gives us the direction.
	public bool GameUpdate () {
		progress += Time.deltaTime;
		while (progress >= 1f) {
			…
			transform.localRotation = tileFrom.PathDirection.GetRotation();
			progress -= 1f;
		}
		transform.localPosition =
			Vector3.LerpUnclamped(positionFrom, positionTo, progress);
		return true;
	}

	public void SpawnOn (GameTile tile) {
		…
		transform.localRotation = tileFrom.PathDirection.GetRotation();
		progress = 0f;
	}
Changing Direction
Rather than immediately snap to a new orientation, it's better if we interpolate between rotations, just like we interpolate between positions. To go from one orientation to another requires us to know the direction change that we have to make: none, turn right, turn left, or turn around. Add an enumeration for that, which can once again be put in the same file as Direction, as they're small and closely related.
public enum Direction {
	North, East, South, West
}

public enum DirectionChange {
	None, TurnRight, TurnLeft, TurnAround
}
Add another extension method, in this case GetDirectionChangeTo, which returns the direction change from the current direction to the next. If the directions are the same, then there is none. If next is one more than current, then it's a right turn. But as the directions wrap around, this is also the case if next is three less than current. Left turns are the same, but with addition and subtraction flipped. The only other case is turning around.
	public static DirectionChange GetDirectionChangeTo (
		this Direction current, Direction next
	) {
		if (current == next) {
			return DirectionChange.None;
		}
		else if (current + 1 == next || current - 3 == next) {
			return DirectionChange.TurnRight;
		}
		else if (current - 1 == next || current + 3 == next) {
			return DirectionChange.TurnLeft;
		}
		return DirectionChange.TurnAround;
	}
We're only rotating in one dimension, so a linear angle interpolation suffices. Add another extension method that gets the angle of a direction, in degrees.
	public static float GetAngle (this Direction direction) {
		return (float)direction * 90f;
	}
Enemy now also has to keep track of its direction, its direction change, and the angles it has to interpolate between.
	Direction direction;
	DirectionChange directionChange;
	float directionAngleFrom, directionAngleTo;
SpawnOn is getting more complex, so let's move the state-preparation code to another method. We'll designate the initial state of the enemy as the intro state, so name it PrepareIntro. In this state it moves from the center to the edge of its starting tile, so there is no direction change. The From and To angles are the same.
	public void SpawnOn (GameTile tile) {
		Debug.Assert(tile.NextTileOnPath != null, "Nowhere to go!", this);
		tileFrom = tile;
		tileTo = tile.NextTileOnPath;
		//positionFrom = tileFrom.transform.localPosition;
		//positionTo = tileFrom.ExitPoint;
		//transform.localRotation = tileFrom.PathDirection.GetRotation();
		progress = 0f;
		PrepareIntro();
	}

	void PrepareIntro () {
		positionFrom = tileFrom.transform.localPosition;
		positionTo = tileFrom.ExitPoint;
		direction = tileFrom.PathDirection;
		directionChange = DirectionChange.None;
		directionAngleFrom = directionAngleTo = direction.GetAngle();
		transform.localRotation = direction.GetRotation();
	}
We're making something like a small state machine at this point. To keep GameUpdate simple, move the state-changing code to a new PrepareNextState method. Only keep the adjustment of the From and To tiles, as we use that here to check whether the enemy is finished.
	public bool GameUpdate () {
		progress += Time.deltaTime;
		while (progress >= 1f) {
			…
			//positionFrom = positionTo;
			//positionTo = tileFrom.ExitPoint;
			//transform.localRotation = tileFrom.PathDirection.GetRotation();
			progress -= 1f;
			PrepareNextState();
		}
		…
	}
When entering a new state, we always have to adjust the positions, find the direction change, update the current direction, and shift the To angle to From. We no longer always set the rotation.
	void PrepareNextState () {
		positionFrom = positionTo;
		positionTo = tileFrom.ExitPoint;
		directionChange = direction.GetDirectionChangeTo(tileFrom.PathDirection);
		direction = tileFrom.PathDirection;
		directionAngleFrom = directionAngleTo;
	}
What else we have to do depends on the direction change. Let's add a method for each possibility. In case we go forward, the To angle matches the current cell's path direction. We also have to set the rotation so the enemy points straight ahead.
	void PrepareForward () {
		transform.localRotation = direction.GetRotation();
		directionAngleTo = direction.GetAngle();
	}
In case of a turn we don't rotate immediately. Instead, have to interpolate to a different angle: 90° more for a right turn, 90° less for a left turn, and 180° more when turning around. The To angle has to be relative to the current direction to prevent rotating in the wrong way, due to wrapping angles. We don't need to worry about going below 0° or above 360° because Quaternion.Euler can deal with that.
	void PrepareTurnRight () {
		directionAngleTo = directionAngleFrom + 90f;
	}

	void PrepareTurnLeft () {
		directionAngleTo = directionAngleFrom - 90f;
	}

	void PrepareTurnAround () {
		directionAngleTo = directionAngleFrom + 180f;
	}
At the end of PrepareNextState, we can use a switch on the direction change to decide which of the four methods to invoke.
	void PrepareNextState () {
		…
		switch (directionChange) {
			case DirectionChange.None: PrepareForward(); break;
			case DirectionChange.TurnRight: PrepareTurnRight(); break;
			case DirectionChange.TurnLeft: PrepareTurnLeft(); break;
			default: PrepareTurnAround(); break;
		}
	}
Now we have to check at the end of GameUpdate whether there is a direction change. If so, interpolate between the two angles and set the rotation.
	public bool GameUpdate () {
		…
		transform.localPosition =
			Vector3.LerpUnclamped(positionFrom, positionTo, progress);
		if (directionChange != DirectionChange.None) {
			float angle = Mathf.LerpUnclamped(
				directionAngleFrom, directionAngleTo, progress
			);
			transform.localRotation = Quaternion.Euler(0f, angle, 0f);
		}
		return true;
	}
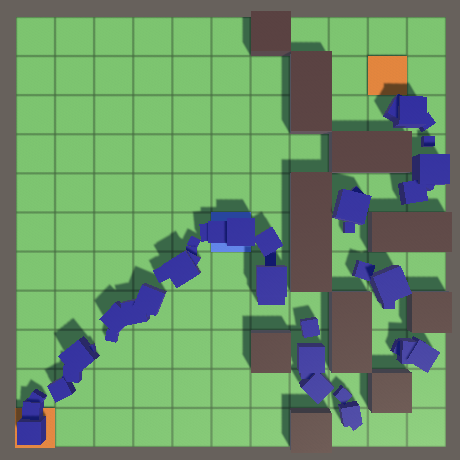
Curving Motion
We can improve movement further by having enemies move along a curve while turning. Instead of going straight from edge to edge, we'll make them move along a quarter circle. The center of this circle lies at the corner shared by the From and To tiles, on the same edge that the enemy entered the From tile.
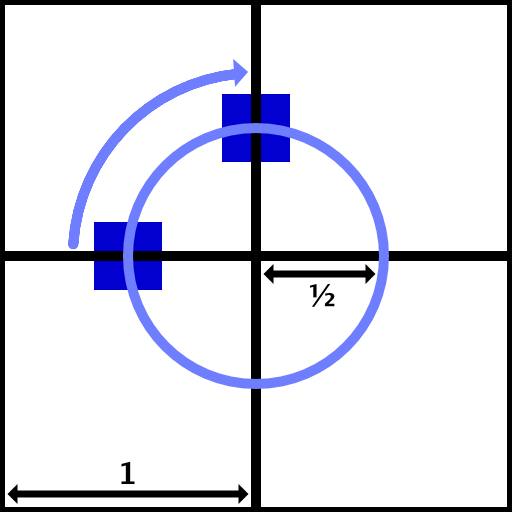
We could implement this by moving the enemy along the arc using trigonometry, while also rotating it. But we can simplify this to only rotation by temporarily moving the enemy's local origin to the circle's center. To make that possible we have to adjust the position of the enemy model, so give Enemy a reference to its model, exposed via a configuration field.
	[SerializeField]
	Transform model = default;

When preparing to move forward or turn around the model should be set to its default position, at the enemy's local origin. Otherwise, the model has to be offset half a unit—the rotation circle's radius—away from the rotation point.
	void PrepareForward () {
		transform.localRotation = direction.GetRotation();
		directionAngleTo = direction.GetAngle();
		model.localPosition = Vector3.zero;
	}

	void PrepareTurnRight () {
		directionAngleTo = directionAngleFrom + 90f;
		model.localPosition = new Vector3(-0.5f, 0f);
	}

	void PrepareTurnLeft () {
		directionAngleTo = directionAngleFrom - 90f;
		model.localPosition = new Vector3(0.5f, 0f);
	}

	void PrepareTurnAround () {
		directionAngleTo = directionAngleFrom + 180f;
		model.localPosition = Vector3.zero;
	}
Next, the enemy itself has to move to the rotation point. Again this is by half a unit, but the exact offset depends on the direction. Let's add a convenient GetHalfVector extension method to Direction for that.
	static Vector3[] halfVectors = {
		Vector3.forward * 0.5f,
		Vector3.right * 0.5f,
		Vector3.back * 0.5f,
		Vector3.left * 0.5f
	};

	…

	public static Vector3 GetHalfVector (this Direction direction) {
		return halfVectors[(int)direction];
	}
Add the appropriate vector when turning right or left.
	void PrepareTurnRight () {
		directionAngleTo = directionAngleFrom + 90f;
		model.localPosition = new Vector3(-0.5f, 0f);
		transform.localPosition = positionFrom + direction.GetHalfVector();
	}

	void PrepareTurnLeft () {
		directionAngleTo = directionAngleFrom - 90f;
		model.localPosition = new Vector3(0.5f, 0f);
		transform.localPosition = positionFrom + direction.GetHalfVector();
	}
And when turning around the position should be the normal starting point.
	void PrepareTurnAround () {
		directionAngleTo = directionAngleFrom + 180f;
		model.localPosition = Vector3.zero;
		transform.localPosition = positionFrom;
	}
Also, we can use the half vector in GameTile.GrowPathTo when calculating the exit point, so we don't need to access two tile positions.
		neighbor.ExitPoint =
			neighbor.transform.localPosition + direction.GetHalfVector();
Now we must not interpolate the position at all in Enemy.GameUpdate when there is a direction change, because the movement is taken care of by the rotation.
	public bool GameUpdate () {
		…
		if (directionChange == DirectionChange.None) {
			transform.localPosition =
				Vector3.LerpUnclamped(positionFrom, positionTo, progress);
		}
		//if (directionChange != DirectionChange.None) {
		else {
			float angle = Mathf.LerpUnclamped(
				directionAngleFrom, directionAngleTo, progress
			);
			transform.localRotation = Quaternion.Euler(0f, angle, 0f);
		}
		return true;
	}
Constant Speed
Up to this point the speed of our enemies is always one tile per second, no matter how they move inside a tile. But the distance that they cover depends on their state, so their speed expressed as units per second varies. To keep this speed constant, we have to adjust the progress speed depending on the state. So add a progress factor field and use it to scale the delta in GameUpdate.
	float progress, progressFactor;

	…

	public bool GameUpdate () {
		progress += Time.deltaTime * progressFactor;
		…
	}
But if the progress varies per state, leftover progress cannot directly be applied to the next state. Instead, before preparing the next state we have to normalize the progress and apply the new factor once we're in the new state.
	public bool GameUpdate () {
		progress += Time.deltaTime * progressFactor;
		while (progress >= 1f) {
			…
			//progress -= 1f;
			progress = (progress - 1f) / progressFactor;
			PrepareNextState();
			progress *= progressFactor;
		}
		…
	}
The forward state requires no change so uses factor 1. When turning right or left the enemy covers a quarter circle with radius ½, so the distance covered is ¼π. The progress is one divided by that. Turning around shouldn't take too long, so let's double the progress to make it half a second. Finally, the intro movement covers only half a tile, so its progress should be doubled as well to keep the speed constant.
	void PrepareForward () {
		…
		progressFactor = 1f;
	}

	void PrepareTurnRight () {
		…
		progressFactor = 1f / (Mathf.PI * 0.25f);
	}

	void PrepareTurnLeft () {
		…
		progressFactor = 1f / (Mathf.PI * 0.25f);
	}

	void PrepareTurnAround () {
		…
		progressFactor = 2f;
	}

	void PrepareIntro () {
		…
		progressFactor = 2f;
	}
Outro State
As we have an intro state, let's also add an outro state. Currently enemies vanish as soon as they reach a destination, but let's delay that until they reach the destination tile's center. Create a PrepareOutro method for it, setting up forward movement but only toward the tile's center, with doubled progress to keep speed constant.
	void PrepareOutro () {
		positionTo = tileFrom.transform.localPosition;
		directionChange = DirectionChange.None;
		directionAngleTo = direction.GetAngle();
		model.localPosition = Vector3.zero;
		transform.localRotation = direction.GetRotation();
		progressFactor = 2f;
	}
To prevent GameUpdate from terminating the enemy too soon, remove the tile shifting from it. That will become the responsibility of PrepareNextState. That way the null check will only yield true after the outro has finished.
	public bool GameUpdate () {
		progress += Time.deltaTime * progressFactor;
		while (progress >= 1f) {
			//tileFrom = tileTo;
			//tileTo = tileTo.NextTileOnPath;
			if (tileTo == null) {
				OriginFactory.Reclaim(this);
				return false;
			}
			…
		}
		…
	}
In PrepareNextState, begin by shifting the tiles. Then after setting the From position but before setting the To position check whether the To tile is null. If so, prepare the outro and skip the rest of the method.
	void PrepareNextState () {
		tileFrom = tileTo;
		tileTo = tileTo.NextTileOnPath;
		positionFrom = positionTo;
		if (tileTo == null) {
			PrepareOutro();
			return;
		}
		positionTo = tileFrom.ExitPoint;
		…
	}
Enemy Variety
We have a stream of enemies that are all the same cube, moving at the same speed. The result can look more like a long snake than individual enemies. Let's make them a bit more distinct by randomizing their size, offset, and speed.
Float Range
We'll tweak enemies by randomly picking their characteristics from a range of values. The FloatRange struct that we defined in Object Management, Configuring Shapes is useful here, so let's copy it. The only changes are that I've added a constructor with a single parameter and exposed the minimum and maximum via readonly properties, to make the range immutable.
using UnityEngine;

[System.Serializable]
public struct FloatRange {

	[SerializeField]
	float min, max;

	public float Min => min;

	public float Max => max;

	public float RandomValueInRange {
		get {
			return Random.Range(min, max);
		}
	}

	public FloatRange(float value) {
		min = max = value;
	}

	public FloatRange (float min, float max) {
		this.min = min;
		this.max = max < min ? min : max;
	}
}
Also copy the attribute that we defined for it, to constrain its range.
using UnityEngine;

public class FloatRangeSliderAttribute : PropertyAttribute {

	public float Min { get; private set; }

	public float Max { get; private set; }

	public FloatRangeSliderAttribute (float min, float max) {
		Min = min;
		Max = max < min ? min : max;
	}
}
We only need the slider visualization, so copy FloatRangeSliderDrawer to an Editor folder.
using UnityEditor;
using UnityEngine;

[CustomPropertyDrawer(typeof(FloatRangeSliderAttribute))]
public class FloatRangeSliderDrawer : PropertyDrawer {

	public override void OnGUI (
		Rect position, SerializedProperty property, GUIContent label
	) {
		int originalIndentLevel = EditorGUI.indentLevel;
		EditorGUI.BeginProperty(position, label, property);

		position = EditorGUI.PrefixLabel(
			position, GUIUtility.GetControlID(FocusType.Passive), label
		);
		EditorGUI.indentLevel = 0;
		SerializedProperty minProperty = property.FindPropertyRelative("min");
		SerializedProperty maxProperty = property.FindPropertyRelative("max");
		float minValue = minProperty.floatValue;
		float maxValue = maxProperty.floatValue;
		float fieldWidth = position.width / 4f - 4f;
		float sliderWidth = position.width / 2f;
		position.width = fieldWidth;
		minValue = EditorGUI.FloatField(position, minValue);
		position.x += fieldWidth + 4f;
		position.width = sliderWidth;
		FloatRangeSliderAttribute limit = attribute as FloatRangeSliderAttribute;
		EditorGUI.MinMaxSlider(
			position, ref minValue, ref maxValue, limit.Min, limit.Max
		);
		position.x += sliderWidth + 4f;
		position.width = fieldWidth;
		maxValue = EditorGUI.FloatField(position, maxValue);
		if (minValue < limit.Min) {
			minValue = limit.Min;
		}
		if (maxValue < minValue) {
			maxValue = minValue;
		}
		else if (maxValue > limit.Max) {
			maxValue = limit.Max;
		}
		minProperty.floatValue = minValue;
		maxProperty.floatValue = maxValue;

		EditorGUI.EndProperty();
		EditorGUI.indentLevel = originalIndentLevel;
	}
}
Model Scale
We begin by adjusting the enemy scale. Add a scale configuration option to EnemyFactory. The scale range shouldn't be too large, but enough to create mini and giant version of an enemy. Something like 0.5–2, with the default set to 1. Pick a random scale in this range in Get and pass it to the enemy, via a new Initialize method.
	[SerializeField, FloatRangeSlider(0.5f, 2f)]
	FloatRange scale = new FloatRange(1f);

	public Enemy Get () {
		Enemy instance = CreateGameObjectInstance(prefab);
		instance.OriginFactory = this;
		instance.Initialize(scale.RandomValueInRange);
		return instance;
	}
The Enemy.Initialize method simply sets the uniform scale of its model.
	public void Initialize (float scale) {
		model.localScale = new Vector3(scale, scale, scale);
	}

Path Offset
To break up the uniformity of the enemy stream more, we can adjust their relative position inside the tiles. They move forward, so offsetting in that direction only changes the timing of their movement, which doesn't add much. Instead, we'll offset them laterally, away from the ideal path that goes through the center of tiles. Add a path offset range to EnemyFactory and pass a random offset to Initialize. The offset is either positive or negative, but never more than ½ because that would shift the enemy into an adjacent tile. We also don't want the enemies to extend beyond the tile they're going through, so the actual range should be smaller than that, like 0.4, through the true limits depend on the enemy's size.
	[SerializeField, FloatRangeSlider(-0.4f, 0.4f)]
	FloatRange pathOffset = new FloatRange(0f);

	public Enemy Get () {
		Enemy instance = CreateGameObjectInstance(prefab);
		instance.OriginFactory = this;
		instance.Initialize(
			scale.RandomValueInRange, pathOffset.RandomValueInRange
		);
		return instance;
	}
Because the path offset influences the path followed, Enemy has to keep track of it.
	float pathOffset;

	…

	public void Initialize (float scale, float pathOffset) {
		model.localScale = new Vector3(scale, scale, scale);
		this.pathOffset = pathOffset;
	}
When moving straight ahead—either during the intro, outro, or normal forward movement—we can simply apply the offset directly to the model. This is also the case when turning around. When making a right or left turn we already offset the model, which now becomes relative to the path offset.
	void PrepareForward () {
		transform.localRotation = direction.GetRotation();
		directionAngleTo = direction.GetAngle();
		model.localPosition = new Vector3(pathOffset, 0f);
		progressFactor = 1f;
	}

	void PrepareTurnRight () {
		directionAngleTo = directionAngleFrom + 90f;
		model.localPosition = new Vector3(pathOffset - 0.5f, 0f);
		transform.localPosition = positionFrom + direction.GetHalfVector();
		progressFactor = 1f / (Mathf.PI * 0.25f);
	}

	void PrepareTurnLeft () {
		directionAngleTo = directionAngleFrom - 90f;
		model.localPosition = new Vector3(pathOffset + 0.5f, 0f);
		transform.localPosition = positionFrom + direction.GetHalfVector();
		progressFactor = 1f / (Mathf.PI * 0.25f);
	}

	void PrepareTurnAround () {
		directionAngleTo = directionAngleFrom + 180f;
		model.localPosition = new Vector3(pathOffset, 0f);
		transform.localPosition = positionFrom;
		progressFactor = 2f;
	}

	void PrepareIntro () {
		…
		model.localPosition = new Vector3(pathOffset, 0f);
		transform.localRotation = direction.GetRotation();
		progressFactor = 2f;
	}

	void PrepareOutro () {
		…
		model.localPosition = new Vector3(pathOffset, 0f);
		transform.localRotation = direction.GetRotation();
		progressFactor = 2f;
	}
As the path offset changes the radius when turning, we have to adjust how we calculate the progress factor. The path offset must be subtracted from ½ to get the radius for a right turn and added to it for a left turn.
	void PrepareTurnRight () {
		…
		progressFactor = 1f / (Mathf.PI * 0.5f * (0.5f - pathOffset));
	}

	void PrepareTurnLeft () {
		…
		progressFactor = 1f / (Mathf.PI * 0.5f * (0.5f + pathOffset));
	}
We now also get a turn radius when making a 180° turn. In this case we're covering half of a circle with a radius equal to the path offset, so the distance is simply π times the offset. However, this doesn't work when the offset is zero and results in very quick turns for tiny offsets. We can enforce a minimum radius for our speed calculation to prevent instantaneous turns, for example 0.2.
	void PrepareTurnAround () {
		directionAngleTo = directionAngleFrom + (pathOffset < 0f ? 180f : -180f);
		model.localPosition = new Vector3(pathOffset, 0f);
		transform.localPosition = positionFrom;
		progressFactor =
			1f / (Mathf.PI * Mathf.Max(Mathf.Abs(pathOffset), 0.2f));
	}

Note that enemies never change their relative path offset, even when turning around. So the total path length varies per enemy.
Also note that to prevent enemies from poking into adjacent tiles their maximum possible scale must be taken into consideration. I've simply set the size maximum to 1, so the maximum allowed offset of our cube is 0.25. If the maximum size were 1.5 then the offset maximum should be reduced to 0.125.
Speed
The last thing that we'll randomize is the enemy speed. Add another range for that to EnemyFactory and pass a value to the instantiated enemy. Make it the second argument of Initialize. Enemies shouldn't be too slow nor too fast, so the game doesn't become trivial or impossible. Let's limit the range to 0.2–5. That's expressed in units per second, which corresponds to tiles per second only when moving forward.
	[SerializeField, FloatRangeSlider(0.2f, 5f)]
	FloatRange speed = new FloatRange(1f);

	[SerializeField, FloatRangeSlider(-0.4f, 0.4f)]
	FloatRange pathOffset = new FloatRange(0f);

	public Enemy Get () {
		Enemy instance = CreateGameObjectInstance(prefab);
		instance.OriginFactory = this;
		instance.Initialize(
			scale.RandomValueInRange,
			speed.RandomValueInRange,
			pathOffset.RandomValueInRange
		);
		return instance;
	}
Enemy now has to keep track of its speed as well.
	float speed;

	…

	public void Initialize (float scale, float speed, float pathOffset) {
		model.localScale = new Vector3(scale, scale, scale);
		this.speed = speed;
		this.pathOffset = pathOffset;
	}
When we didn't use explicit speeds we simply always used a speed of 1. All we have to do now is base the progress factor on the speed.
	void PrepareForward () {
		…
		progressFactor = speed;
	}

	void PrepareTurnRight () {
		…
		progressFactor = speed / (Mathf.PI * 0.5f * (0.5f - pathOffset));
	}

	void PrepareTurnLeft () {
		…
		progressFactor = speed / (Mathf.PI * 0.5f * (0.5f + pathOffset));
	}

	void PrepareTurnAround () {
		…
		progressFactor =
			speed / (Mathf.PI * Mathf.Max(Mathf.Abs(pathOffset), 0.2f));
	}

	void PrepareIntro () {
		…
		progressFactor = 2f * speed;
	}

	void PrepareOutro () {
		…
		progressFactor = 2f * speed;
	}

The next tutorial is Towers.