Hex Map 11
More Features
- Add towers to walls.
- Connect roads across rivers via bridges.
- Support large special features.
This is part eleven of a tutorial series about hexagon maps. It adds wall towers, bridges, and special features to our terrain.
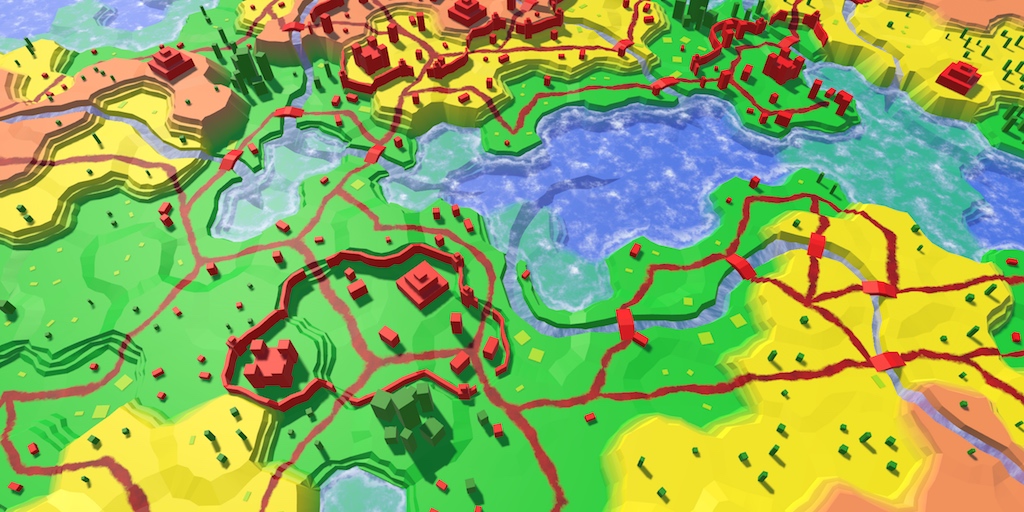
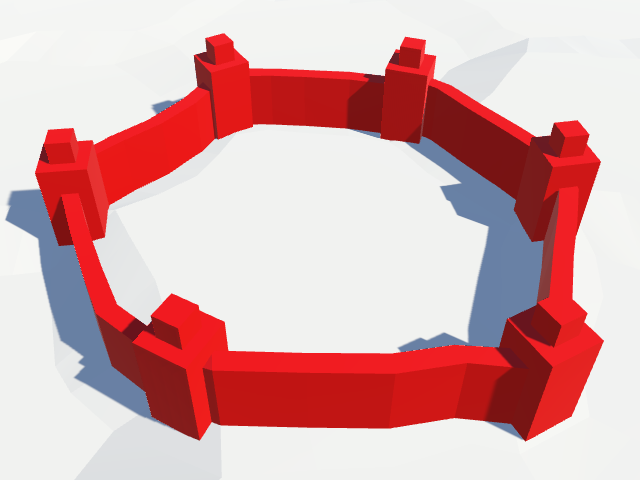
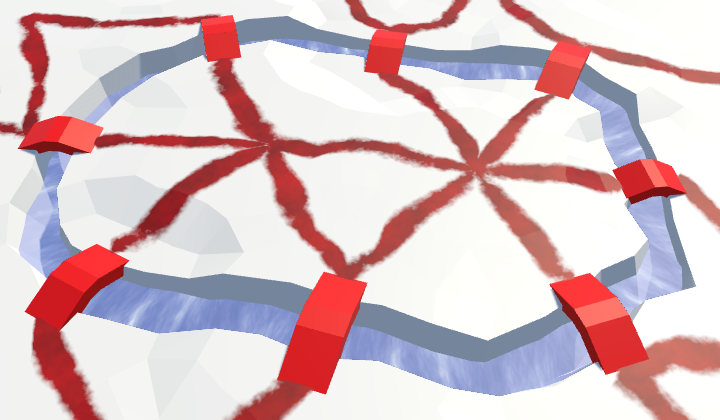
Wall Towers
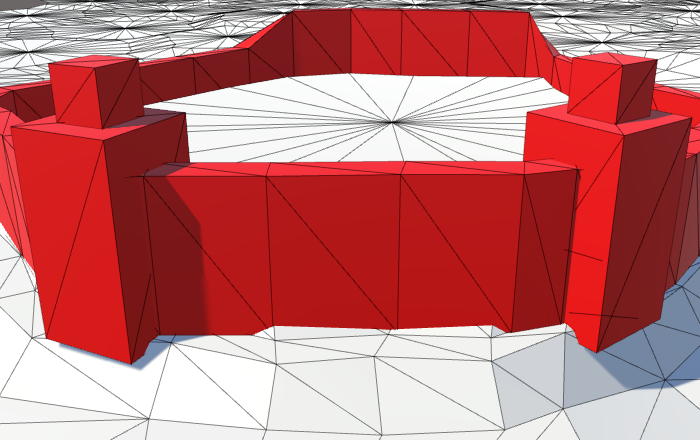
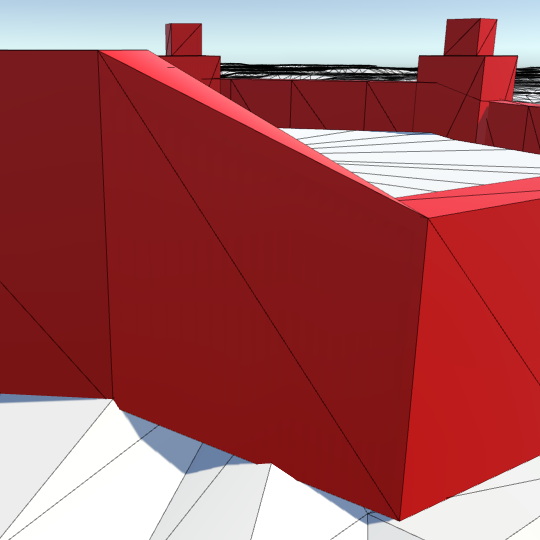
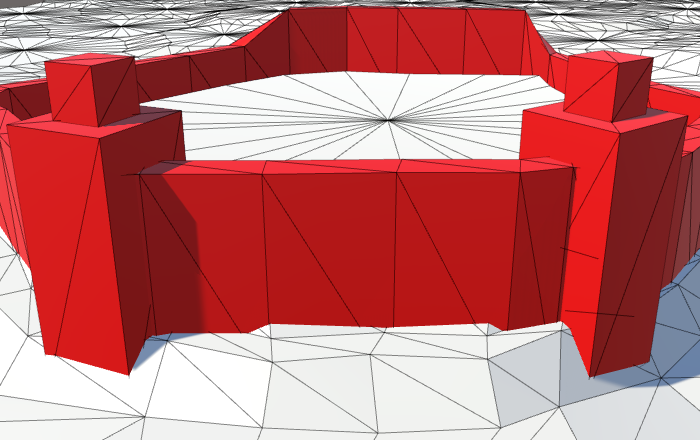
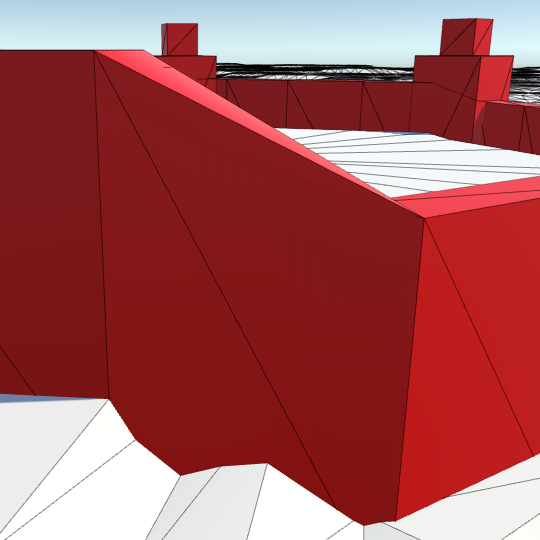
We added support for walls in the previous tutorial. They're simple straight wall segments, without any distinguishing features. Now we're going to make the walls more interesting, by adding towers to them.
The wall segments had to be created procedurally, to fit the terrain. This is not required for the towers. We can use a simple prefab.
You can created a simple tower shape with two cubes that have the red urban material. The tower base is 2 by 2 units wide and 4 units high, so it's both thicker and taller than the wall. Above this cube, put a unit cube to represent the top of the tower. Like the other prefabs, these cubes don't need colliders.
Because the tower model consists of multiple objects, make them children of a root object. Position them so the root's local origin sits at the base of the tower. That way, we can place the towers without having to worry about their height.

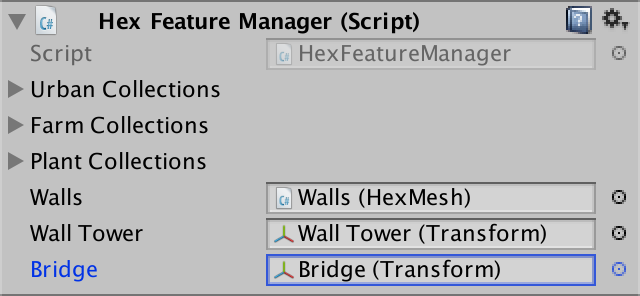
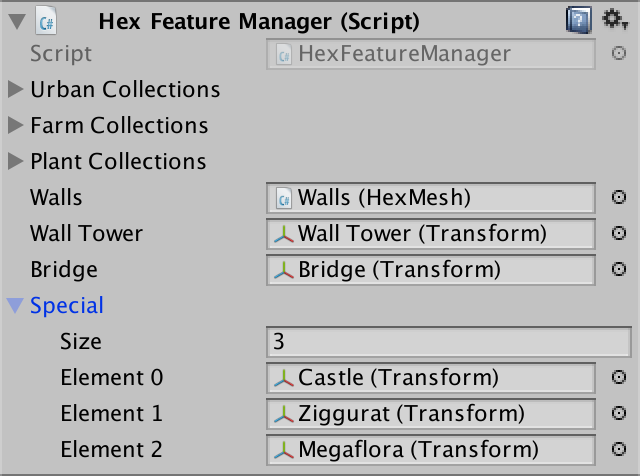
Add a reference to this prefab to HexFeatureManager and hook it up.
public Transform wallTower;
Building Towers
Let's begin by placing a tower in the middle of every wall segment. To do this, instantiate a tower at the end of the AddWallSegment method. Its position is the average of the left and right points of the segment.
	void AddWallSegment (
		Vector3 nearLeft, Vector3 farLeft, Vector3 nearRight, Vector3 farRight
	) {
		…

		Transform towerInstance = Instantiate(wallTower);
		towerInstance.transform.localPosition = (left + right) * 0.5f;
		towerInstance.SetParent(container, false);
	}
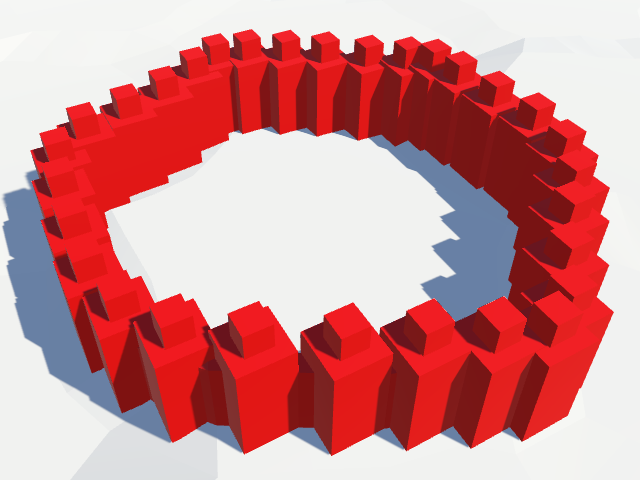
We get a lot of towers along the wall, but their orientation doesn't vary. We have to adjust their rotation so they align themselves with the wall. As we have the left and right points of the wall, we know which direction is right. We can use this to determine the orientation of the wall segment, and thus that of its tower.
Rather than compute the rotation ourselves, we can just assign a vector to the Transform.right property. Unity's code will take care of adjusting the object's rotation so its local right direction aligns with the provided vector.
		Transform towerInstance = Instantiate(wallTower);
		towerInstance.transform.localPosition = (left + right) * 0.5f;
		Vector3 rightDirection = right - left;
		rightDirection.y = 0f;
		towerInstance.transform.right = rightDirection;
		towerInstance.SetParent(container, false);
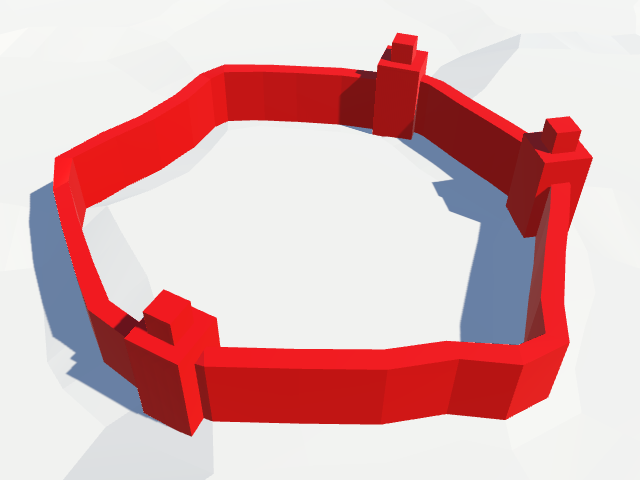
Fewer Towers
One tower per wall segment is way too much. So let's make adding a tower optional, by adding a boolean parameter to AddWallSegment. Give it a default value of false. That will make all the towers disappear.
	void AddWallSegment (
		Vector3 nearLeft, Vector3 farLeft, Vector3 nearRight, Vector3 farRight,
		bool addTower = false
	) {
		…

		if (addTower) {
			Transform towerInstance = Instantiate(wallTower);
			towerInstance.transform.localPosition = (left + right) * 0.5f;
			Vector3 rightDirection = right - left;
			rightDirection.y = 0f;
			towerInstance.transform.right = rightDirection;
			towerInstance.SetParent(container, false);
		}
	}
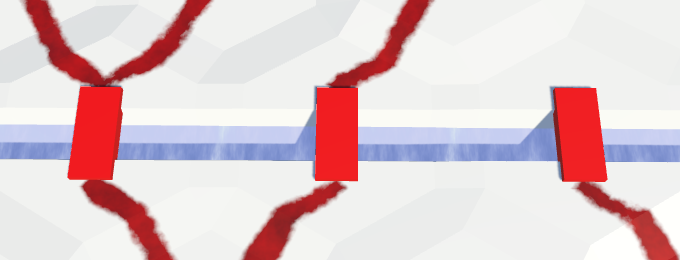
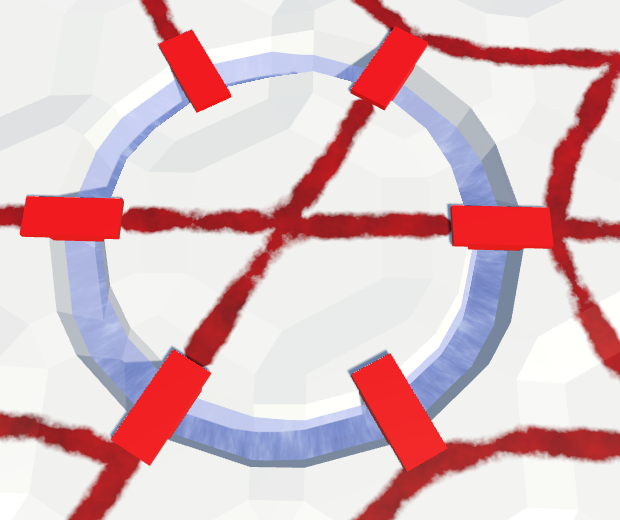
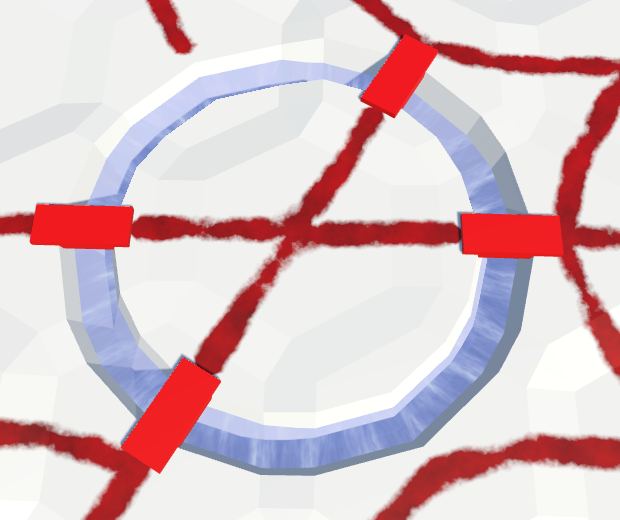
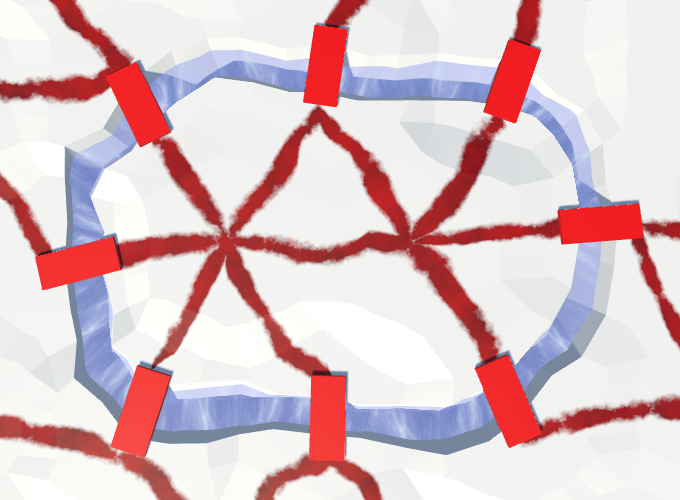
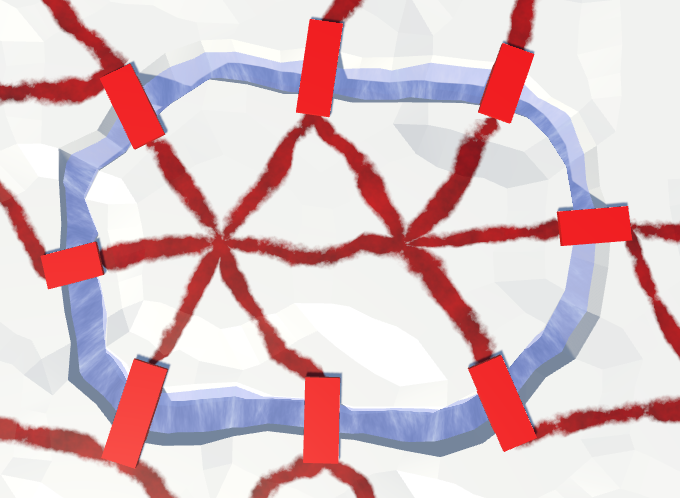
Let's limit towers to the wall segments places at the cell corners. That will result in a few towers with fairly regular distances between them.
	void AddWallSegment (
		Vector3 pivot, HexCell pivotCell,
		Vector3 left, HexCell leftCell,
		Vector3 right, HexCell rightCell
	) {
		…
				AddWallSegment(pivot, left, pivot, right, true);
		…
	}
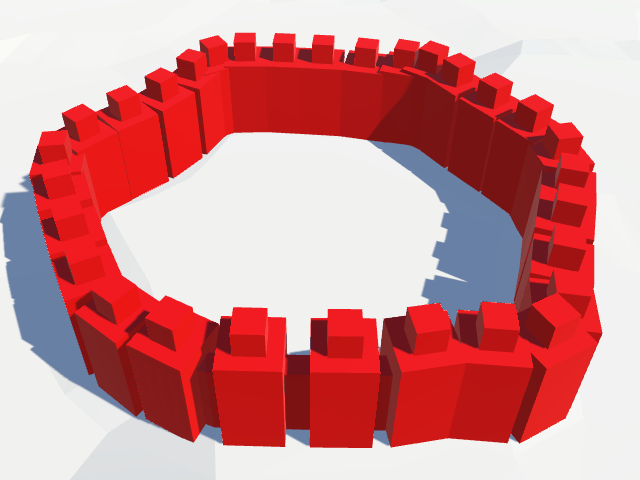
This look quite good, but you might want less regular wall placement than this. Like with the other features, we can use the hash grid to decide whether we place a tower at a corner. To do so, use the center of the corner to sample the grid, then compare one of the hash values with a tower threshold.
				HexHash hash = HexMetrics.SampleHashGrid(
					(pivot + left + right) * (1f / 3f)
				);
				bool hasTower = hash.e < HexMetrics.wallTowerThreshold;
				AddWallSegment(pivot, left, pivot, right, hasTower);
The threshold value belongs in HexMetrics. A value of 0.5 would spawn towers about half of the time, although you could get walls with many or no towers at all.
public const float wallTowerThreshold = 0.5f;
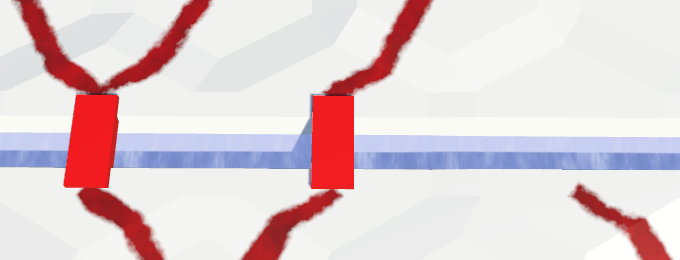
No Towers on Slopes
We're currently placing towers regardless off the shape of the terrain. However, towers don't make much sense on slopes. The walls are at an angle there, and might cut through the top of the tower.
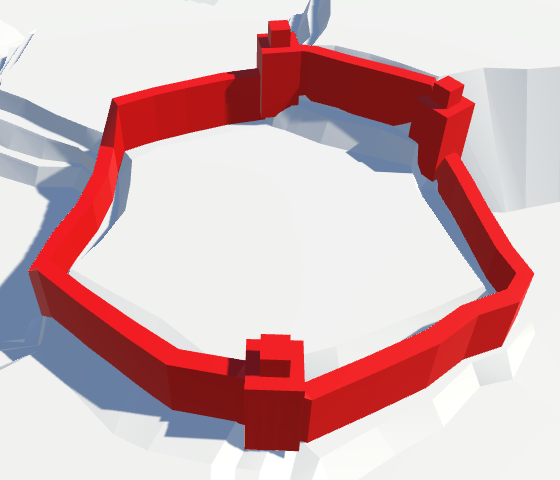
To avoid slopes, check whether the left and right cell of the corner have the same elevation. Only then do we allow a potential tower.
				bool hasTower = false;
				if (leftCell.Elevation == rightCell.Elevation) {
					HexHash hash = HexMetrics.SampleHashGrid(
						(pivot + left + right) * (1f / 3f)
					);
					hasTower = hash.e < HexMetrics.wallTowerThreshold;
				}
				AddWallSegment(pivot, left, pivot, right, hasTower);
Grouding Walls and Towers
Although we avoid sloped walls, the terrain on both sides of the wall can still have a different elevation. Walls can run along terraces, and cells of the same elevation can have different vertical adjustments. This can cause the base of the towers to float.
Actually, sloped walls can float as well, although it is not as noticeable as the towers.
A simple way to fix this is by extending the foundation of the walls an towers into the ground. To do this, add an Y offset for walls to HexMetrics. One unit down should be enough. Increase the height of the walls by the same amount.
	public const float wallHeight = 4f;

	public const float wallYOffset = -1f;
Adjust HexMetrics.WallLerp so it takes the new offset into account when determining the Y coordinate.
		public static Vector3 WallLerp (Vector3 near, Vector3 far) {
		near.x += (far.x - near.x) * 0.5f;
		near.z += (far.z - near.z) * 0.5f;
		float v =
			near.y < far.y ? wallElevationOffset : (1f - wallElevationOffset);
		near.y += (far.y - near.y) * v + wallYOffset;
		return near;
	}
We also have to adjust the tower prefab, as its base will now end up one unit below ground. So increase the base cube's height by one unit, and adjust the local position of the cubes accordingly.
Bridges
Up to this point, we have rivers and roads, but no way for roads to cross rivers. It is high time that we added bridges.
Start with a simple scaled cube to play the role of a bridge prefab. The width of our rivers vary, but there's roughly seven units between road centers on either side. So sets its scale to something like (3, 1, 7). Give it the red urban material, and get rid of its collider. Like the wall tower, put the cube inside a root object with uniform scale. This way, the actual geometry of the bridge doesn't matter.
Add a bridge prefab reference to HexFeatureManager and assign the prefab to it.
public Transform wallTower, bridge;
Placing Bridges
To place a bridge, we need a HexFeatureManager.AddBridge method. The bridge should be placed between the road centers on either side of a river.
	public void AddBridge (Vector3 roadCenter1, Vector3 roadCenter2) {
		Transform instance = Instantiate(bridge);
		instance.localPosition = (roadCenter1 + roadCenter2) * 0.5f;
		instance.SetParent(container, false);
	}
We'll pass along the unperturbed road centers, so we have to perturb them before placing the bridge.
		roadCenter1 = HexMetrics.Perturb(roadCenter1);
		roadCenter2 = HexMetrics.Perturb(roadCenter2);
		Transform instance = Instantiate(bridge);
To properly align the bridge, we can use the same approach that we used to rotate the wall towers. In this case, the road centers define the forward vector of the bridge. As we stay within a single cell, this vector is guaranteed to be horizontal, so we don't have to set its Y component to zero.
		Transform instance = Instantiate(bridge);
		instance.localPosition = (roadCenter1 + roadCenter2) * 0.5f;
		instance.forward = roadCenter2 - roadCenter1;
		instance.SetParent(container, false);
Bridging Straight Rivers
The only river configurations that need bridges are straight and curved ones. Roads can run around end points, and zigzags can only have roads on one side of them.
Let's first deal with straight rivers. Inside HexGridChunk.TriangulateRoadAdjacentToRiver, the first else if case takes care of placing roads adjacent to such rivers. It is here that we'll add the bridge.
We're on one side of the river. The road center is pulled away from the river, and then the cell center itself is moved as well. To find the road center on the opposite side, we have to pull in the opposite direction by the same amount. This has to be done before the center itself is modified.
	void TriangulateRoadAdjacentToRiver (
		HexDirection direction, HexCell cell, Vector3 center, EdgeVertices e
	) {
		…
		else if (cell.IncomingRiver == cell.OutgoingRiver.Opposite()) {
			…
			roadCenter += corner * 0.5f;
			features.AddBridge(roadCenter, center - corner * 0.5f);
			center += corner * 0.25f;
		}
		…
	}
Bridges appear! But we now get one bridge instance for each direction that doesn't have a river flowing through it. We have to ensure that only one bridge instance is generated per cell. This can be done by choosing one direction relative to the river, to generate a bridge from. It doesn't matter which.
			roadCenter += corner * 0.5f;
			if (cell.IncomingRiver == direction.Next()) {
				features.AddBridge(roadCenter, center - corner * 0.5f);
			}
			center += corner * 0.25f;
Furthermore, we should only add a bridge when there is a road on both sides of the river. By this point, we're already sure that there's a road on the current side. So we have to check whether there's a road on the other side as well.
			if (cell.IncomingRiver == direction.Next() && (
				cell.HasRoadThroughEdge(direction.Next2()) ||
				cell.HasRoadThroughEdge(direction.Opposite())
			)) {
				features.AddBridge(roadCenter, center - corner * 0.5f);
			}
Bridging Curving Rivers
Bridges across curving rivers work similarly, but the topology is slightly different. We'll add the bridge when we're on the outside of the curve. This is the case in the final else block. There, the middle direction is used to offset the road center. We'll need to use this offset twice, with different scale, so store it in a variable.
	void TriangulateRoadAdjacentToRiver (
		HexDirection direction, HexCell cell, Vector3 center, EdgeVertices e
	) {
		…
		else {
			HexDirection middle;
			if (previousHasRiver) {
				middle = direction.Next();
			}
			else if (nextHasRiver) {
				middle = direction.Previous();
			}
			else {
				middle = direction;
			}
			if (
				!cell.HasRoadThroughEdge(middle) &&
				!cell.HasRoadThroughEdge(middle.Previous()) &&
				!cell.HasRoadThroughEdge(middle.Next())
			) {
				return;
			}
			Vector3 offset = HexMetrics.GetSolidEdgeMiddle(middle);
			roadCenter += offset * 0.25f;
		}

		…
	}
The offset scale on the outside of the curve is 0.25, but it's HexMetrics.innerToOuter * 0.7f on the inside. Use this to place the bridge.
			Vector3 offset = HexMetrics.GetSolidEdgeMiddle(middle);
			roadCenter += offset * 0.25f;
			features.AddBridge(
				roadCenter,
				center - offset * (HexMetrics.innerToOuter * 0.7f)
			);
Once again, we have to prevent duplicate bridges. We can do this by only adding a bridge from the middle direction.
			Vector3 offset = HexMetrics.GetSolidEdgeMiddle(middle);
			roadCenter += offset * 0.25f;
			if (direction == middle) {
				features.AddBridge(
					roadCenter,
					center - offset * (HexMetrics.innerToOuter * 0.7f)
				);
			}
And again, we have to make sure that there's a road on the opposite side as well.
			if (
				direction == middle &&
				cell.HasRoadThroughEdge(direction.Opposite())
			) {
				features.AddBridge(
					roadCenter,
					center - offset * (HexMetrics.innerToOuter * 0.7f)
				);
			}
Scaling Bridges
Because we perturb the terrain, the distance between road centers on opposite sides of a river vary. Sometimes our bridges are too short, and sometimes they're too long.
Although we've designed out bridge for a length of seven units, we could scale the bridge to match the true distance between road centers. This means that the bridge model will get deformed. As the distances don't vary too much, this deformation might be more acceptable than misfit bridges.
To perform correct scaling, we need to know the design length of the bridge prefab. Store this length in HexMetrics.
public const float bridgeDesignLength = 7f;
Now we can set the Z scale of the bridge instance to the distance between the road centers, divided by the design length. As the root of the bridge prefab has uniform scale, the bridge will be stretched correctly.
	public void AddBridge (Vector3 roadCenter1, Vector3 roadCenter2) {
		roadCenter1 = HexMetrics.Perturb(roadCenter1);
		roadCenter2 = HexMetrics.Perturb(roadCenter2);
		Transform instance = Instantiate(bridge);
		instance.localPosition = (roadCenter1 + roadCenter2) * 0.5f;
		instance.forward = roadCenter2 - roadCenter1;
		float length = Vector3.Distance(roadCenter1, roadCenter2);
		instance.localScale = new Vector3(
			1f,	1f, length * (1f / HexMetrics.bridgeDesignLength)
		);
		instance.SetParent(container, false);
	}
Bridge Design
Instead of a single cube, you can use a more interesting bridge model. For example, you can create a crude arch bridge with three scaled and rotated cubes. Of course you could create much more fancy 3D models, including bits of road. But keep in mind that the whole thing will be squashed and stretched a bit.
Special Features
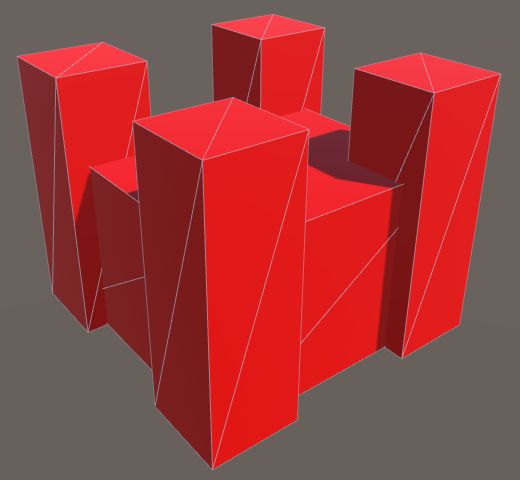
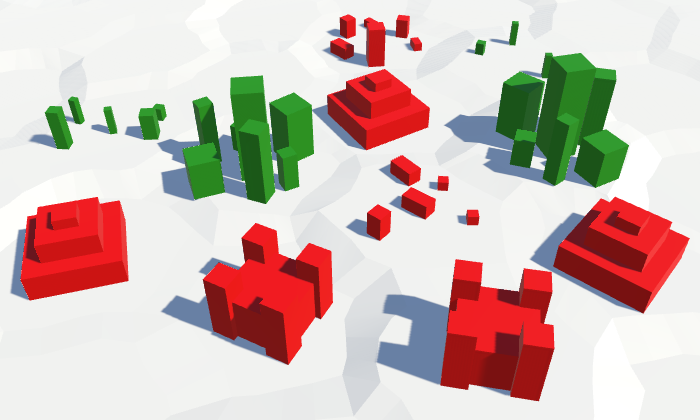
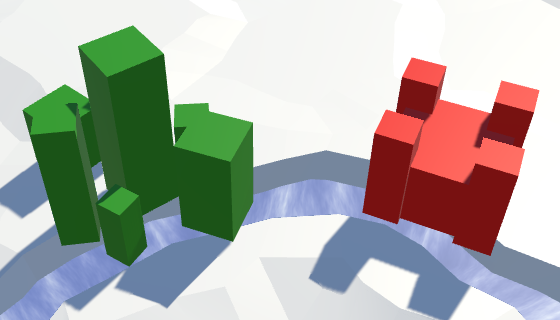
So far, our cells can contain urban, farm, and plant features. Even through they have three levels each, the features are all relatively small, compared to the size of a cell. What if we want to add a large structure, like a castle?
Let's add a special feature type to our terrain. These features are so large that they occupy an entire cell. Each of these features is unique and needs its own prefab. For example, a simple castle can be created with one large central cube, plus four corner towers. A scale of (6, 4, 6) for the center cube produces a fairly large castle that still fits inside highly deformed cells.
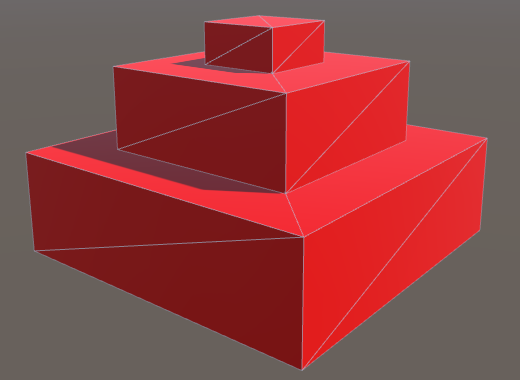
Another special feature could be a ziggurat, for example made from three stacked cubes. (8, 2.5, 8) is a good scale for the bottom cube.
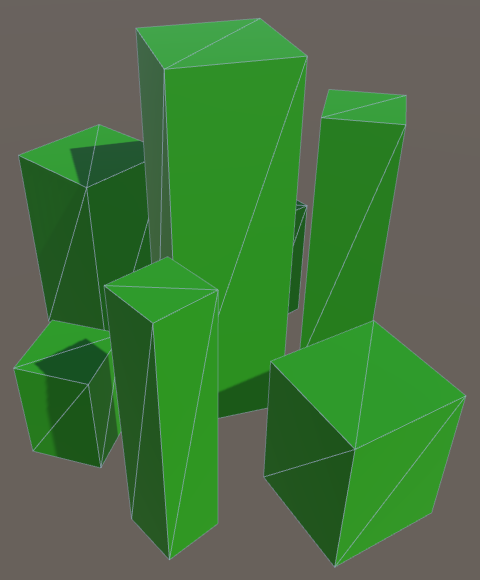
Special features could be anything, they needn't be limited to architecture. For instance, a group of massive trees up to ten units high can represent a cell filled with megaflora.
Add an array to HexFeatureManager to keep track of these prefabs.
public Transform[] special;
Add the castle to the array first, then the ziggurat, and then the megaflora.
Making Cells Special
HexCell now needs a special index, to determine the special feature it has, if any.
int specialIndex;
Like the other features, give it a property to get and set this value.
	public int SpecialIndex {
		get {
			return specialIndex;
		}
		set {
			if (specialIndex != value) {
				specialIndex = value;
				RefreshSelfOnly();
			}
		}
	}
By default, a cell does not contain a special feature. We'll indicate this with index zero. Add a property which uses this approach to determine whether the cell is special, or not.
	public bool IsSpecial {
		get {
			return specialIndex > 0;
		}
	}
To edit the cells, add support for the special index to HexMapEditor. It works just like the levels for urban, farm, and plant features.
	int activeUrbanLevel, activeFarmLevel, activePlantLevel, activeSpecialIndex;

	…

	bool applyUrbanLevel, applyFarmLevel, applyPlantLevel, applySpecialIndex;

	…

	public void SetApplySpecialIndex (bool toggle) {
		applySpecialIndex = toggle;
	}

	public void SetSpecialIndex (float index) {
		activeSpecialIndex = (int)index;
	}

	…

	void EditCell (HexCell cell) {
		if (cell) {
			if (applyColor) {
				cell.Color = activeColor;
			}
			if (applyElevation) {
				cell.Elevation = activeElevation;
			}
			if (applyWaterLevel) {
				cell.WaterLevel = activeWaterLevel;
			}
			if (applySpecialIndex) {
				cell.SpecialIndex = activeSpecialIndex;
			}
			if (applyUrbanLevel) {
				cell.UrbanLevel = activeUrbanLevel;
			}
			…
		}
	}
Add a slider to the UI to control the special feature. As we have three features, set the slider's range to 0–3. Zero means no feature, one is a castle, two is a ziggurat, and three is megaflora.
Adding Special Features
We can now assign special features to cells. To make them appear, we have to add yet another method to HexFeatureManager. It simply instantiates the desired special feature and places it at the desired position. Because zero is reserved for no feature, we have to subtract one from the cell's special index before accessing the prefab array.
	public void AddSpecialFeature (HexCell cell, Vector3 position) {
		Transform instance = Instantiate(special[cell.SpecialIndex - 1]);
		instance.localPosition = HexMetrics.Perturb(position);
		instance.SetParent(container, false);
	}
Give the features an arbitrary orientation, using the hash grid.
	public void AddSpecialFeature (HexCell cell, Vector3 position) {
		Transform instance = Instantiate(special[cell.SpecialIndex - 1]);
		instance.localPosition = HexMetrics.Perturb(position);
		HexHash hash = HexMetrics.SampleHashGrid(position);
		instance.localRotation = Quaternion.Euler(0f, 360f * hash.e, 0f);
		instance.SetParent(container, false);
	}
When triangulating a cell in HexGridChunk.Triangulate, check whether the cell has a special feature. If so, invoke our new method, just like AddFeature.
	void Triangulate (HexCell cell) {
		for (HexDirection d = HexDirection.NE; d <= HexDirection.NW; d++) {
			Triangulate(d, cell);
		}
		if (!cell.IsUnderwater && !cell.HasRiver && !cell.HasRoads) {
			features.AddFeature(cell, cell.Position);
		}
		if (cell.IsSpecial) {
			features.AddSpecialFeature(cell, cell.Position);
		}
	}
Avoiding Rivers
Because special features sit in the centers of cells, they do not combine well with rivers. They end up floating above them.
To prevent special features from being placed on top of rivers, adjust the HexCell.SpecialIndex property. Only change the index when the cell doesn't have a river.
	public int SpecialIndex {
		…
		set {
			if (specialIndex != value && !HasRiver) {
				specialIndex = value;
				RefreshSelfOnly();
			}
		}
	}
Also, when adding a river, we have to get rid of any special features. The river will wash them away. This can be done by setting the special indices to zero in the HexCell.SetOutgoingRiver method.
	public void SetOutgoingRiver (HexDirection direction) {
		…
		hasOutgoingRiver = true;
		outgoingRiver = direction;
		specialIndex = 0;

		neighbor.RemoveIncomingRiver();
		neighbor.hasIncomingRiver = true;
		neighbor.incomingRiver = direction.Opposite();
		neighbor.specialIndex = 0;

		SetRoad((int)direction, false);
	}
Avoiding Roads
Like rivers, roads also don't combine well with special features, although it is not as bad. You might decide to leave the roads as they are. Maybe some features could work with roads, while others cannot. So you could make it depend on the feature. But we'll keep it simple.
In this case, let's have the special features beat roads. So when adjusting the special index, remove all the roads from the cell as well.
	public int SpecialIndex {
		…
		set {
			if (specialIndex != value && !HasRiver) {
				specialIndex = value;
				RemoveRoads();
				RefreshSelfOnly();
			}
		}
	}
This also means that we have to perform additional checks when trying to add a road. Only add the road when neither cell is special.
	public void AddRoad (HexDirection direction) {
		if (
			!roads[(int)direction] && !HasRiverThroughEdge(direction) &&
			!IsSpecial && !GetNeighbor(direction).IsSpecial &&
			GetElevationDifference(direction) <= 1
		) {
			SetRoad((int)direction, true);
		}
	}
Avoiding other Features
Special features don't mix with the other feature types either. Having them overlap can get quite messy. Again, this could vary per special feature, but we'll use a uniform approach.
In this case, let's suppress the minor features, like when they end up underwater. This time, let's perform the check in HexFeatureManager.AddFeature.
	public void AddFeature (HexCell cell, Vector3 position) {
		if (cell.IsSpecial) {
			return;
		}

		…
	}
Avoiding Water
Finally, there's the issue of water. Do special features survive being submerged, or not? As we suppress the minor features in submerged cells, let's do the same for the special features.
In HexGridChunk.Triangulate, perform the same underwater check for both regular and special features.
	void Triangulate (HexCell cell) {
		for (HexDirection d = HexDirection.NE; d <= HexDirection.NW; d++) {
			Triangulate(d, cell);
		}
		if (!cell.IsUnderwater && !cell.HasRiver && !cell.HasRoads) {
			features.AddFeature(cell, cell.Position);
		}
		if (!cell.IsUnderwater && cell.IsSpecial) {
			features.AddSpecialFeature(cell, cell.Position);
		}
	}
As both if statements now check whether the cell in underwater, we can extract it and do it only once.
	void Triangulate (HexCell cell) {
		for (HexDirection d = HexDirection.NE; d <= HexDirection.NW; d++) {
			Triangulate(d, cell);
		}
		if (!cell.IsUnderwater) {
			if (!cell.HasRiver && !cell.HasRoads) {
				features.AddFeature(cell, cell.Position);
			}
			if (cell.IsSpecial) {
				features.AddSpecialFeature(cell, cell.Position);
			}
		}
	}
That should be enough feature types to play with. The next tutorial is Saving and Loading.