Hex Map 13
Managing Maps
- Create new maps in play mode.
- Support multiple map sizes.
- Add map size to save data.
- Save and load arbitrary maps.
- Show a list of maps.
This is part 13 of a tutorial series about hexagon maps. The previous installment made it possible to save and load map data. This time, we'll add support for multiple map sizes, as well as saving to different files.
From now on, this tutorial series is made with Unity 5.5.0.
Creating New Maps
Up to this point, the only time we create a hex grid is when the scene is loaded. Now we're going to make it possible to start a new map whenever we want. The new map will simply replace the current one.
When HexGrid awakens, it initializes some metrics, then figures out the cell count and creates the required chunks and cells. By creating a new set of chunks and cells, we create a new map. So let's split HexGrid.Awake into two parts, the original initialization code, and a public CreateMap method.
	void Awake () {
		HexMetrics.noiseSource = noiseSource;
		HexMetrics.InitializeHashGrid(seed);
		HexMetrics.colors = colors;
		CreateMap();
	}

	public void CreateMap () {
		cellCountX = chunkCountX * HexMetrics.chunkSizeX;
		cellCountZ = chunkCountZ * HexMetrics.chunkSizeZ;
		CreateChunks();
		CreateCells();
	}
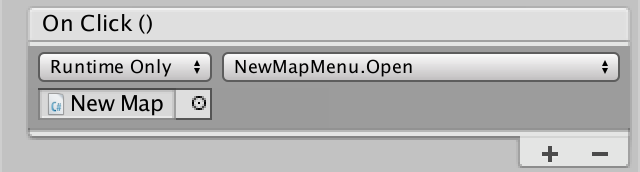
Add a button to create a new map to our UI. I made it a big button and placed it underneath the save and load buttons.
Connect the On Click event of this button to the CreateMap method of our HexGrid object. So we're not going through Hex Map Editor, we'll directly invoke a method of our Hex Grid object.

Clearing Old Data
Clicking the New Map button will now create a new set of chunks and cells. However, the old ones aren't automatically removed. So we end up with multiple superimposed map meshes. To prevent this, we have to get rid of the old objects first. This can be done by destroying all the current chunks at the start of CreateMap.
	public void CreateMap () {
		if (chunks != null) {
			for (int i = 0; i < chunks.Length; i++) {
				Destroy(chunks[i].gameObject);
			}
		}

		…
	}
Cells instead of Chunks for Size
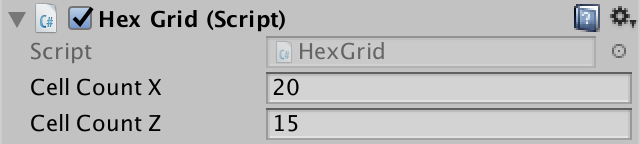
We currently set the size of our map via the chunkCountX and chunkCountZ fields of HexGrid. But it's much more convenient to specify map size in terms of cells. That way, we could even change the chunk size later, without affecting the sizes of maps. So let's swap the roles of the cell-count and chunk-count fields.
// public int chunkCountX = 4, chunkCountZ = 3;public int cellCountX = 20, cellCountZ = 15; …// int cellCountX, cellCountZ;int chunkCountX, chunkCountZ; … public void CreateMap () { …// cellCountX = chunkCountX * HexMetrics.chunkSizeX;// cellCountZ = chunkCountZ * HexMetrics.chunkSizeZ;chunkCountX = cellCountX / HexMetrics.chunkSizeX; chunkCountZ = cellCountZ / HexMetrics.chunkSizeZ; CreateChunks(); CreateCells(); }
This will lead to a compile error, because HexMapCamera uses the chunk sizes to clamp its position. Adjust HexMapCamera.ClampPosition so it directly uses the cell counts instead, which is what it needs anyway.
	Vector3 ClampPosition (Vector3 position) {
		float xMax = (grid.cellCountX - 0.5f) * (2f * HexMetrics.innerRadius);
		position.x = Mathf.Clamp(position.x, 0f, xMax);

		float zMax = (grid.cellCountZ - 1) * (1.5f * HexMetrics.outerRadius);
		position.z = Mathf.Clamp(position.z, 0f, zMax);

		return position;
	}
Our chunk size is 5 by 5 cells, and we used 4 by 3 chunks as our default map size. So to keep the map the same, we'll have to use 20 by 15 cells. Even though we assigned default values in code, our grid object won't automatically use those. That's because the fields already existed and used to have zero as default value.
Arbitrary Map Sizes
The next step is to support creating maps of any size, not just the default. To do so, add an X and Z parameter to HexGrid.CreateMap. Those will replace the existing cell counts. Inside Awake, simply invoke it with the current cell counts.
	void Awake () {
		HexMetrics.noiseSource = noiseSource;
		HexMetrics.InitializeHashGrid(seed);
		HexMetrics.colors = colors;
		CreateMap(cellCountX, cellCountZ);
	}

	public void CreateMap (int x, int z) {
		…

		cellCountX = x;
		cellCountZ = z;
		chunkCountX = cellCountX / HexMetrics.chunkSizeX;
		chunkCountZ = cellCountZ / HexMetrics.chunkSizeZ;
		CreateChunks();
		CreateCells();
	}
However, this will only work correctly with cell counts that are multiples of the chunk size. Otherwise, the integer divisions will produce too few chunks. While we could add support for chunks that are only partially filled with cells, let's simply disallow sizes that don't fit our chunks.
We can use the % operator to compute the remainder of the cell count divided by the chunk count. If that isn't zero, there is a mismatch and we won't create a new map. While we're at it, let's also guard against zero and negative sizes.
	public void CreateMap (int x, int z) {
		if (
			x <= 0 || x % HexMetrics.chunkSizeX != 0 ||
			z <= 0 || z % HexMetrics.chunkSizeZ != 0
		) {
			Debug.LogError("Unsupported map size.");
			return;
		}

		…
	}
New Map Menu
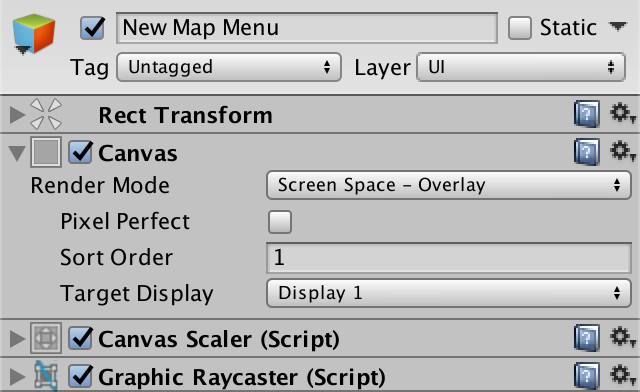
At this point, the New Map button no longer works. That's because the HexGrid.CreateMap method now has two parameters. We cannot directly connect Unity events with such methods. Also, to support multiple map sizes, we're going to need multiple buttons. Instead of adding all those buttons to our main UI, let's create a separate popup menu.
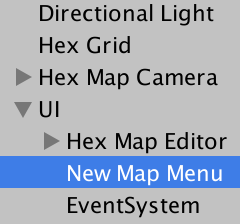
Add a new canvas to the scene, via GameObject / UI / Canvas. Use the same settings as our already existing canvas, except that its Sort Order should be set to 1. That will ensure that it ends up on top of the main editor UI. I made both canvases and the event system children of a new UI object, to keep the scene hierarchy clean.
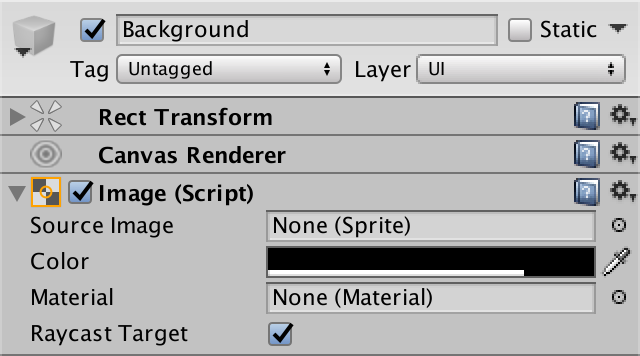
Add a panel to the New Map Menu that covers the entire screen. Its purpose is to darken the background and block the cursor from interacting with anything else when the menu is open. I gave it a uniform color by clearing its Source Image and set its Color to (0, 0, 0, 200).
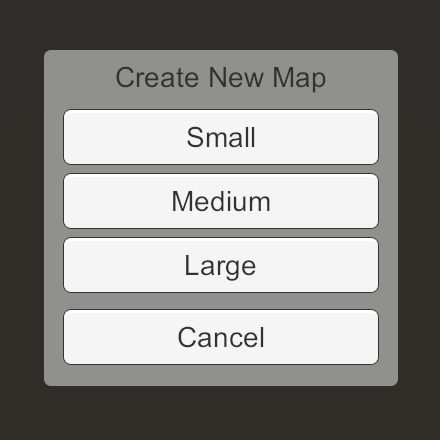
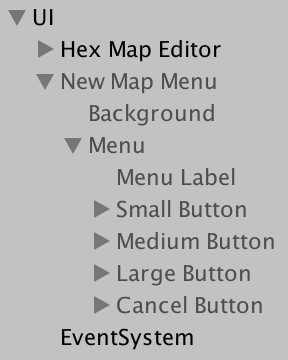
Add a menu panel to the center of the canvas, like the panels of Hex Map Editor. Give it a descriptive label and buttons for a small, medium, and large map. Also give it a cancel button, in case you change your mind. Once you're done designing, deactivate the entire New Map Menu.
To control the menu, create a NewMapMenu component and add it to the New Map Menu canvas object. To create a new map, we need to access our Hex Grid object. So give it a public field for that and hook it up.
using UnityEngine;

public class NewMapMenu : MonoBehaviour {

	public HexGrid hexGrid;
}

Opening and Closing
We can open and close our popup menu simply by activating and deactivating the canvas object. Let's add two public methods to NewMapMenu to take care of this.
	public void Open () {
		gameObject.SetActive(true);
	}

	public void Close () {
		gameObject.SetActive(false);
	}
Now connect the New Map button of the editor UI to the Open method of our New Map Menu object.
Also, connect the Cancel button to the Close method. This allows us to both open and close our popup menu.
Creating New Maps
To actually create new maps, we need to invoked the CreateMap method of our Hex Grid object. Also, after doing that we should close the popup menu. Add a method to NewMapMenu to take care of this, given an arbitrary size.
	void CreateMap (int x, int z) {
		hexGrid.CreateMap(x, z);
		Close();
	}
This method needn't be public, because we cannot directly connect it with the button events anyway. Instead, create one method per button, which invokes CreateMap with a specific size. I used 20 by 15 for the small map, corresponding to the default map size. I chose double that – 40 by 30 – for the medium map, and again double that for the large map. Connect the buttons with their respective methods.
	public void CreateSmallMap () {
		CreateMap(20, 15);
	}

	public void CreateMediumMap () {
		CreateMap(40, 30);
	}

	public void CreateLargeMap () {
		CreateMap(80, 60);
	}
Locking the Camera
We can now use the popup menu to create new maps with three different sizes! It works fine, but there is one detail that we should take care of. When the New Map Menu is active, we can no longer interact with the editor UI, nor edit cells. However, we can still control the camera. Ideally, the camera should be locked while the menu is open.
As we only have a single camera, the quick and pragmatic solution is to add a static Locked property to it. This is not a good general-purpose solution, but it suffices for our simple interface. This requires that we keep track of a static instance inside HexMapCamera, which we set when the camera awakens.
	static HexMapCamera instance;

	…

	void OnEnable () {
		instance = this;
	}
The Locked property can be a simple setter-only static boolean property. All it does is disable the HexMapCamera instance when it gets locked, and enables it when it gets unlocked.
	public static bool Locked {
		set {
			instance.enabled = !value;
		}
	}
Now NewMapMenu.Open can lock the camera, and NewMapMenu.Close can unlock it.
	public void Open () {
		gameObject.SetActive(true);
		HexMapCamera.Locked = true;
	}

	public void Close () {
		gameObject.SetActive(false);
		HexMapCamera.Locked = false;
	}
Keeping a Valid Camera Position
There is another potential problem with the camera. When creating a new map which is smaller than the current one, the camera can end up outside the map's bounds. It will stay that way, until you try to move the camera. Only then will it be constrained to the bounds of the new map.
To solve this issue, we can add a static ValidatePosition method to HexMapCamera. Invoking the instance's AdjustPosition method with a zero offset will enforce the map bounds. If the camera was already inside the new map's bounds, it won't move.
	public static void ValidatePosition () {
		instance.AdjustPosition(0f, 0f);
	}
Invoke this method inside NewMapMenu.CreateMap, after the new map has been created.
	void CreateMap (int x, int z) {
		hexGrid.CreateMap(x, z);
		HexMapCamera.ValidatePosition();
		Close();
	}
Saving Map Size
While we can create maps of different sizes, we don't take size into consideration yet when saving or loading. This means that loading a map will lead to an error or an invalid map, unless the current map size happens to match the one that we're loading.
To solve this problem, we have to create a new map with the appropriate size, before loading the cell data. Let's assume that we have a small map stored. In that case, creating a 20 by 15 map at the start of HexGrid.Load will ensure that everything will go all right.
	public void Load (BinaryReader reader) {
		CreateMap(20, 15);

		for (int i = 0; i < cells.Length; i++) {
			cells[i].Load(reader);
		}
		for (int i = 0; i < chunks.Length; i++) {
			chunks[i].Refresh();
		}
	}
Storing Map Size
Of course we could have stored a map of any size. So the generic solution is to write the map size before the cell data, when saving.
	public void Save (BinaryWriter writer) {
		writer.Write(cellCountX);
		writer.Write(cellCountZ);

		for (int i = 0; i < cells.Length; i++) {
			cells[i].Save(writer);
		}
	}
Then we can retrieve the actual size and use that to create a map with the correct dimensions.
	public void Load (BinaryReader reader) {
		CreateMap(reader.ReadInt32(), reader.ReadInt32());

		…
	}
As we can now load maps with different sizes, we run into the camera position problem again. Solve this by validating its position after loading the map, in HexMapEditor.Load.
	public void Load () {
		string path = Path.Combine(Application.persistentDataPath, "test.map");
		using (BinaryReader reader = new BinaryReader(File.OpenRead(path))) {
			int header = reader.ReadInt32();
			if (header == 0) {
				hexGrid.Load(reader, header);
				HexMapCamera.ValidatePosition();
			}
			else {
				Debug.LogWarning("Unknown map format " + header);
			}
		}
	}
New File Format
While this approach works with maps that we save from now on, it doesn't work with older maps. Conversely, the previous tutorial wouldn't be able to correctly load the newer map files. To distinguish between the old and new format, we'll increase the header integer. The old save format without the map size was version 0. The new format with the map size is version 1. So when saving, HexMapEditor.Save should write a 1 instead of a 0.
	public void Save () {
		string path = Path.Combine(Application.persistentDataPath, "test.map");
		using (
			BinaryWriter writer =
				new BinaryWriter(File.Open(path, FileMode.Create))
		) {
			writer.Write(1);
			hexGrid.Save(writer);
		}
	}
From this point, maps will be saved as version 1. If you'd try to open them in a build of the previous tutorial, it will refuse to load and complain about an unknown map format. In fact, that's what happens when we try to load such a map right now. We have to adjust the HexMapEditor.Load method so that it accepts the new version.
	public void Load () {
		string path = Path.Combine(Application.persistentDataPath, "test.map");
		using (BinaryReader reader = new BinaryReader(File.OpenRead(path))) {
			int header = reader.ReadInt32();
			if (header == 1) {
				hexGrid.Load(reader);
				HexMapCamera.ValidatePosition();
			}
			else {
				Debug.LogWarning("Unknown map format " + header);
			}
		}
	}
Backwards Compatibility
Actually, we could still load version 0 maps if we wanted to, assuming that they all have the same 20 by 15 size. So the header doesn't have to be exactly 1, it can be 0 as well. As each version requires a different approach, HexMapEditor.Load has to pass the header on to HexGrid.Load.
			if (header <= 1) {
				hexGrid.Load(reader, header);
				HexMapCamera.ValidatePosition();
			}
Add the header parameter to HexGrid.Load, then use it to decide what to do. If the header is at least 1, then the map size data should be read. Otherwise, use the old fixed 20 by 15 map size and skip reading the size data.
	public void Load (BinaryReader reader, int header) {
		int x = 20, z = 15;
		if (header >= 1) {
			x = reader.ReadInt32();
			z = reader.ReadInt32();
		}
		CreateMap(x, z);

		…
	}
version 0 map file
Checking Map Size
Like when creating a new map, it is theoretically possible that we end up loading a map that isn't compatible with our chunk size. When that happens, we should abort loading the map. HexGrid.CreateMap already refuses to create the map and logs an error. To communicate this to whoever invokes this method, let it return a bool which indicates whether the map got created.
	public bool CreateMap (int x, int z) {
		if (
			x <= 0 || x % HexMetrics.chunkSizeX != 0 ||
			z <= 0 || z % HexMetrics.chunkSizeZ != 0
		) {
			Debug.LogError("Unsupported map size.");
			return false;
		}

		…
		return true;
	}
Now HexGrid.Load can abort as well, when the map creation failed.
	public void Load (BinaryReader reader, int header) {
		int x = 20, z = 15;
		if (header >= 1) {
			x = reader.ReadInt32();
			z = reader.ReadInt32();
		}
		if (!CreateMap(x, z)) {
			return;
		}

		…
	}
Because loading overwrites all the data of the existing cells, we actually don't have to create a new map if we end up loading one with the same size. So it's possible to skip this step.
		if (x != cellCountX || z != cellCountZ) {
			if (!CreateMap(x, z)) {
				return;
			}
		}
File Management
We can save and load maps of varying size, but we always end up writing to and reading from test.map. Now we're going to make it possible to use multiple files.
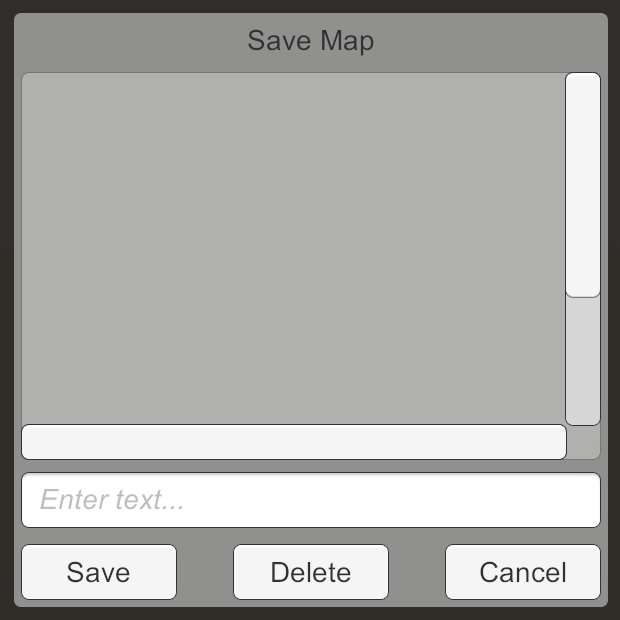
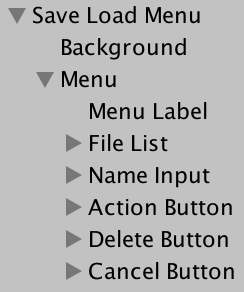
Instead of directly saving or loading a map, we'll use another popup menu to allow more advanced file management. Create another canvas like New Map Menu, but this time name it Save Load Menu. This menu will take care of either saving or loading maps, depending on which button will be used to open it.
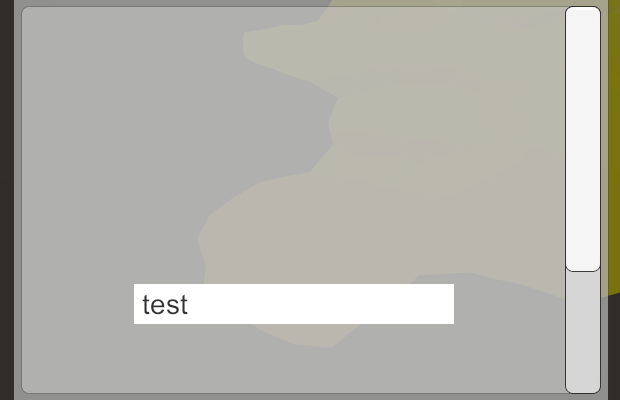
We'll design the Save Load Menu as if it were a save menu. We'll dynamically turn it into a load menu later. It should get a background and a menu panel, a menu label, and a cancel button, like the other menu. Then add a scroll view to the menu via GameObject / UI / Scroll View, to show a file list. Below that, put an input field via GameObject / UI / Input Field, to specify new map names. We also needs an action button, to save the map. Finally, let's add a Delete button to get rid of maps that are no longer wanted.
The default scroll view allows both horizontal and vertical scrolling, but we only need a vertically scrolling list. So disable Horizontal scrolling and disconnect the horizontal scrollbar. Also, I set the Movement Type to clamped and disabled Inertia. That gives us a list with a rigid feel to it.
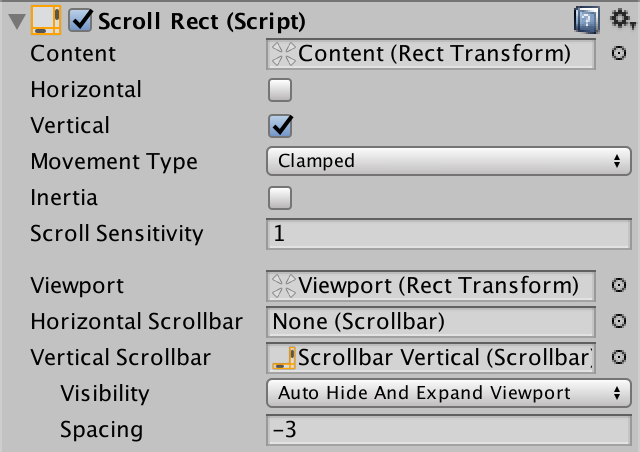
Delete the Scrollbar Horizontal child of our File List object, as we don't need it. Then adjust the size of Scrollbar Vertical so it reaches the bottom of the list.
You can adjust the placeholder text of the Name Input object, via its Placeholder child. I used a more descriptive text, but you could also leave it empty and get rid of the placeholder.
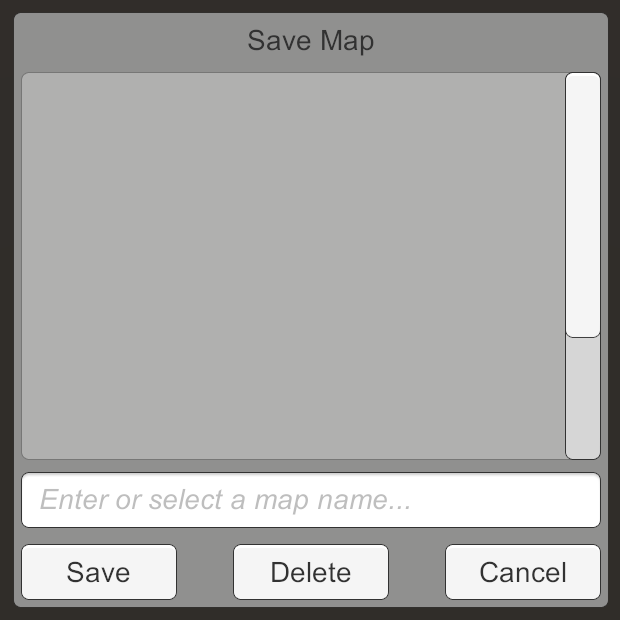
As we're done with designing, deactivate the menu so it is hidden by default.
Controlling the Menu
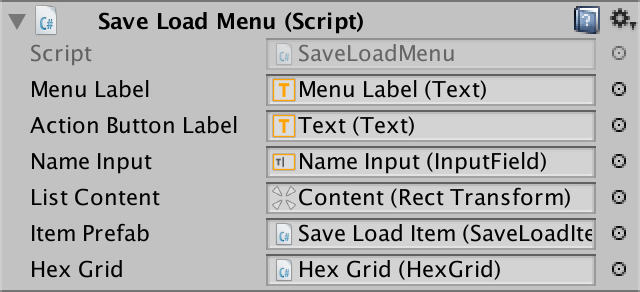
To make the menu work, we need another script, in this case SaveLoadMenu. Like NewMapMenu, it needs a reference to the grid, and Open and Close methods.
using UnityEngine;

public class SaveLoadMenu : MonoBehaviour {

	public HexGrid hexGrid;

	public void Open () {
		gameObject.SetActive(true);
		HexMapCamera.Locked = true;
	}

	public void Close () {
		gameObject.SetActive(false);
		HexMapCamera.Locked = false;
	}
}
Add this component to the SaveLoadMenu and give it a reference to our grid object.

The menu will be opened either for saving or for loading. To facilitate this, add a boolean parameter to the Open method. This indicates whether the menu should be in save mode. Keep track of this mode in a field, so we know which action to perform later.
	bool saveMode;

	public void Open (bool saveMode) {
		this.saveMode = saveMode;
		gameObject.SetActive(true);
		HexMapCamera.Locked = true;
	}
Now connect the Save and Load buttons of the Hex Map Editor to the Open method of the Save Load Menu object. Check the boolean parameter for the Save button only.
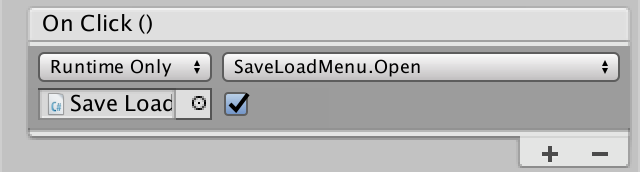
If you haven't done so already, hook the event of the Cancel button up with the Close method. Now the Save Load Menu can be opened and closed.
Changing Appearance
We designed the menu as if it were a save menu, but its mode is determined by which button is used to open it. We should change the menu's appearance depending on its mode. Specifically, we should change the menu label and the label of the action button. This means that we need references to these labels.
using UnityEngine;
using UnityEngine.UI;

public class SaveLoadMenu : MonoBehaviour {

	public Text menuLabel, actionButtonLabel;

	…
}
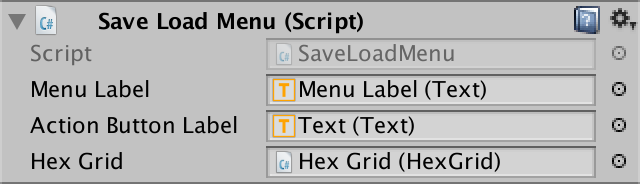
When the menu is opened in save mode, we'll use the existing labels, which are Save Map for the menu, and Save for the action button. Otherwise, we're in load mode and use Load Map and Load.
	public void Open (bool saveMode) {
		this.saveMode = saveMode;
		if (saveMode) {
			menuLabel.text = "Save Map";
			actionButtonLabel.text = "Save";
		}
		else {
			menuLabel.text = "Load Map";
			actionButtonLabel.text = "Load";
		}
		gameObject.SetActive(true);
		HexMapCamera.Locked = true;
	}
Entering a Map Name
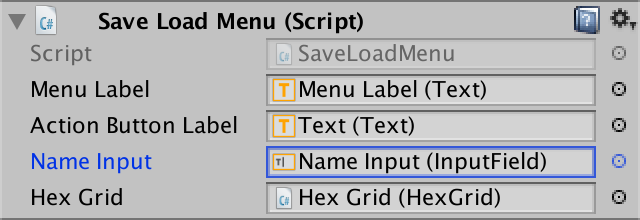
Ignoring the file list for now, the user can specify which file to save to or load from, by writing a map name in the input field. To retrieve this data, we need a reference to the InputField component of the Name Input object.
public InputField nameInput;
The user shouldn't be required to write the full path of a map file. Just the map name will do, without the .map extension. Let's add a method that takes the user input and constructs the correct path for it. This isn't possible when the input is empty, so we'll return null when that's the case.
using UnityEngine;
using UnityEngine.UI;
using System.IO;

public class SaveLoadMenu : MonoBehaviour {

	…

	string GetSelectedPath () {
		string mapName = nameInput.text;
		if (mapName.Length == 0) {
			return null;
		}
		return Path.Combine(Application.persistentDataPath, mapName + ".map");
	}
}
Saving and Loading
Saving and loading is now the responsibility of SaveLoadMenu. So move the Save and Load methods from HexMapEditor to SaveLoadMenu. They no longer need to be public, and will work with a path parameter instead of a fixed path.
	void Save (string path) {
//		string path = Path.Combine(Application.persistentDataPath, "test.map");
		using (
			BinaryWriter writer =
			new BinaryWriter(File.Open(path, FileMode.Create))
		) {
			writer.Write(1);
			hexGrid.Save(writer);
		}
	}

	void Load (string path) {
//		string path = Path.Combine(Application.persistentDataPath, "test.map");
		using (BinaryReader reader = new BinaryReader(File.OpenRead(path))) {
			int header = reader.ReadInt32();
			if (header <= 1) {
				hexGrid.Load(reader, header);
				HexMapCamera.ValidatePosition();
			}
			else {
				Debug.LogWarning("Unknown map format " + header);
			}
		}
	}
Because we're now loading arbitrary files, it is a good idea to make sure that the file actually exists, before we attempt to read from it. If not, we'll log an error and abort.
	void Load (string path) {
		if (!File.Exists(path)) {
			Debug.LogError("File does not exist " + path);
			return;
		}
		…
	}
Now add a public Action method. It starts with retrieving the path that's selected by the user. If there's a path, either save to it or load from it, as appropriate. Then close the menu.
	public void Action () {
		string path = GetSelectedPath();
		if (path == null) {
			return;
		}
		if (saveMode) {
			Save(path);
		}
		else {
			Load(path);
		}
		Close();
	}
After connecting the Action Button event to this method, we're able to save and load using arbitrary map names. Because we're not resetting the input field, the selected name will persist for the next save or load action. That's convenient when saving to or loading from the same file multiple times in a row, so we don't need to change that.
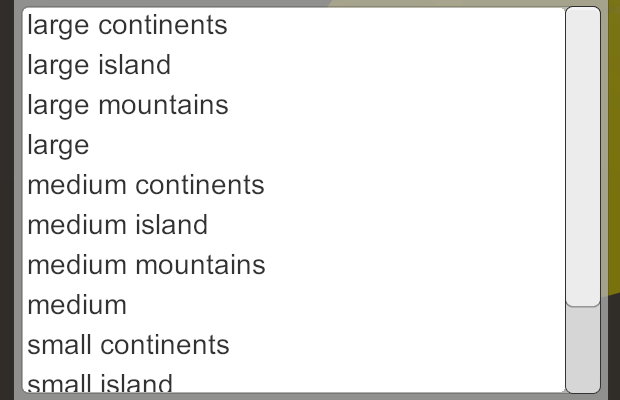
Map Items
Next up, we'll populate the file list with all the maps that are in the persistent data path. When one of the items in the list is clicked, it will be used to set the text of the Name Input. Add a public method to facilitate this to SaveLoadMenu.
	public void SelectItem (string name) {
		nameInput.text = name;
	}
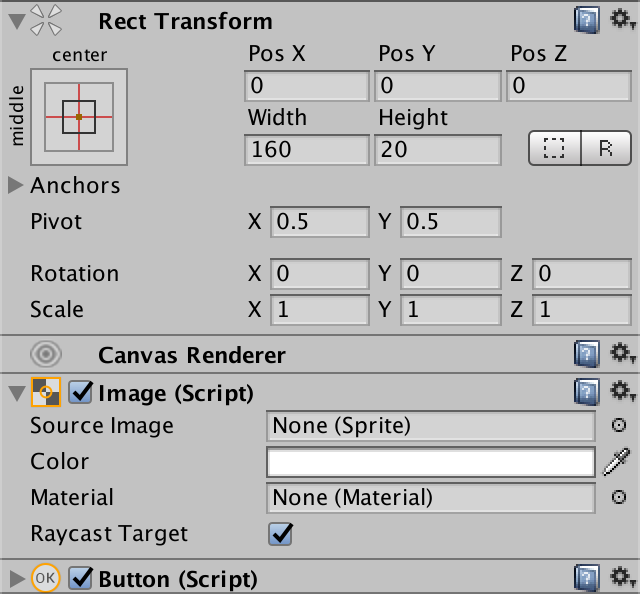
We need something to represent a list item. A simple button will do. Create one and reduce its height to 20 units, so it won't take up much vertical space. It shouldn't look like a button, so clear the Source Image reference of its Image component. That will make it solid white. Also, set its label to use left alignment, and make sure there's some space between the text and the left side of the button. Once done with the design, turn it into a prefab.

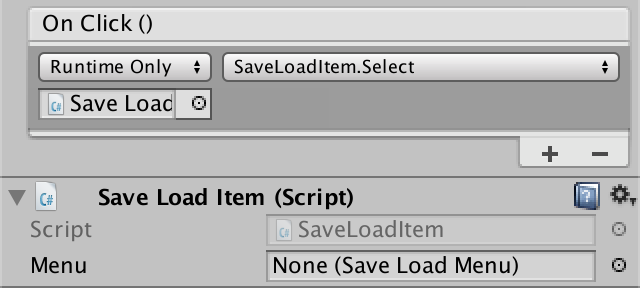
We cannot directly connect the button event to New Map Menu, because it's a prefab and doesn't exist in the scene yet. So the item needs a reference to the menu, so it can invoke the SelectItem method when clicked. It also needs to keep track of the map name it represents, and set its text. Create a small SaveLoadItem component to take care of this.
using UnityEngine;
using UnityEngine.UI;

public class SaveLoadItem : MonoBehaviour {

	public SaveLoadMenu menu;

	public string MapName {
		get {
			return mapName;
		}
		set {
			mapName = value;
			transform.GetChild(0).GetComponent<Text>().text = value;
		}
	}

	string mapName;

	public void Select () {
		menu.SelectItem(mapName);
	}
}
Add the component to our item, and have the button invoke its Select method.
Filling the List
To fill the list, SaveLoadMenu needs a reference to the Content inside the Viewport of the File List object. It also needs a reference to the item prefab.
	public RectTransform listContent;

	public SaveLoadItem itemPrefab;
We'll use a new method to fill this list. The first step is to figure out which map files exist. We can use the Directory.GetFiles method to get an array containing all the file paths inside a directory. This method has a second parameter which allows us to filter the files. In our case, we only want the files that match *.map.
	void FillList () {
		string[] paths =
			Directory.GetFiles(Application.persistentDataPath, "*.map");
	}
Unfortunately, the order of the files is not guaranteed. To display them in alphabetical order, we'll have to sort the array, using System.Array.Sort.
using UnityEngine;
using UnityEngine.UI;
using System;
using System.IO;

public class SaveLoadMenu : MonoBehaviour {

	…

	void FillList () {
		string[] paths =
			Directory.GetFiles(Application.persistentDataPath, "*.map");
		Array.Sort(paths);
	}

	…
}
Next, we create prefab instances for each item in the array. Link the item to the menu, set its map name, and make it a child of the list content.
		Array.Sort(paths);
		for (int i = 0; i < paths.Length; i++) {
			SaveLoadItem item = Instantiate(itemPrefab);
			item.menu = this;
			item.MapName = paths[i];
			item.transform.SetParent(listContent, false);
		}
As Directory.GetFiles returns the full paths of the files, we have to sanitize them. Fortunately, the convenient Path.GetFileNameWithoutExtension method does exactly what we need.
item.MapName = Path.GetFileNameWithoutExtension(paths[i]);
We have to fill the list before we show the menu. And because the files are likely to change, we should do this every time the menu is opened.
	public void Open (bool saveMode) {
		…
		FillList();
		gameObject.SetActive(true);
		HexMapCamera.Locked = true;
	}
When filling the list multiple times, we have to make sure to remove all old items before adding new ones.
	void FillList () {
		for (int i = 0; i < listContent.childCount; i++) {
			Destroy(listContent.GetChild(i).gameObject);
		}
		…
	}
Item Layout
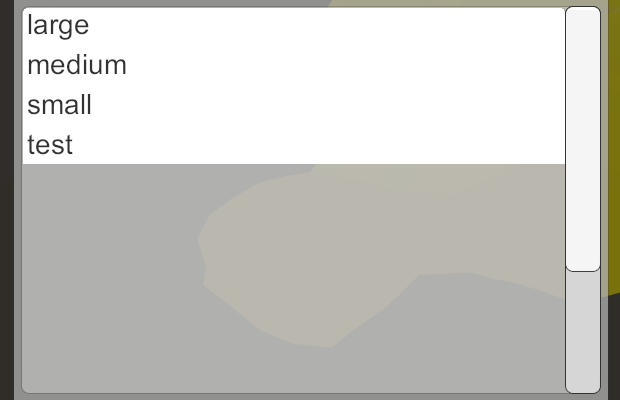
Items will now be displayed in the list, but they end up overlapping and in a bad position. To have them form a vertical list, add a Vertical Layout Group component to the list's Content object, via Component / Layout / Vertical Layout Group.
To make the layout work correctly, enable the Width of both Child Control Size and Child Force Expand. Both Height options should be disabled.
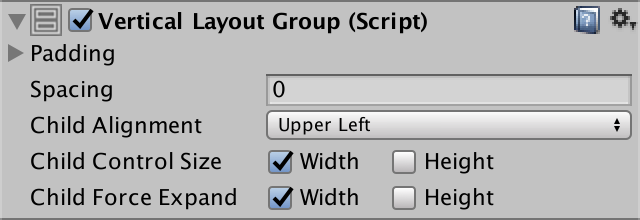
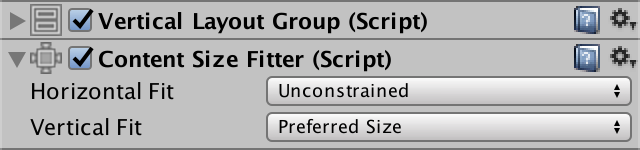
We now get a nice list of items. However, the size of the list content doesn't adjust to fit the actual amount of items. Because of this, the scrollbar never changes size. We can make Content automatically adjust its size by adding a Content Size Fitter component to it, via Component / Layout / Content Size Fitter. Its Vertical Fit mode should be set to Preferred Size.
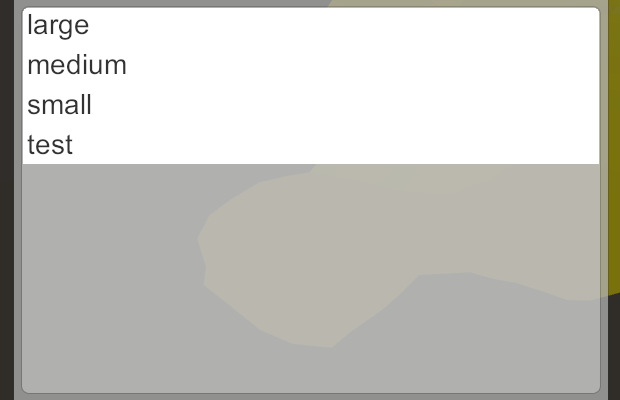
Now the scrollbar will disappear when there are only a few items. And when there are too many items to fit in the viewport, the scrollbar will appear, appropriately sized.
Deleting Maps
It is now possible to conveniently work with many map files. However, at some point you might want to get rid of some of the maps. That's what the Delete button is for. Create a method for it and have the button invoke it. If there is a path selected, simply delete it using File.Delete.
	public void Delete () {
		string path = GetSelectedPath();
		if (path == null) {
			return;
		}
		File.Delete(path);
	}
We should once again make sure that we're working with a file that actually exist. If not, we shouldn't attempt to delete it, but it doesn't warrant an error.
		if (File.Exists(path)) {
			File.Delete(path);
		}
After deleting a map, we don't have to close the menu. This makes it easier to delete multiple files in a row, or just before saving or loading. We should clear Name Input after the deletion though, and also refresh the file list.
		if (File.Exists(path)) {
			File.Delete(path);
		}
		nameInput.text = "";
		FillList();
The next tutorial is Terrain Textures.