Many Clocks
This is the third tutorial in a series that introduces you to the Godot Engine, version 4. It follows Programming a Clock, adding a main scene and 2D physics. Like with the previous tutorial, you can either continue working in the same project, make a duplicate project, or download the repository.
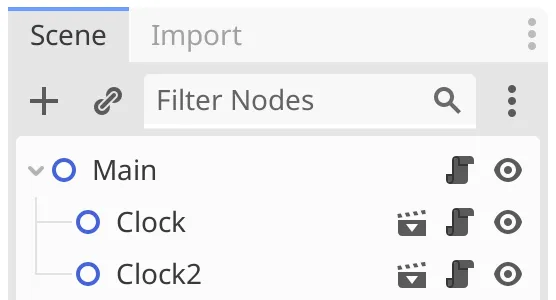
Main Scene
We current have a single scene that contains our clock. This is can be considered a content scene. We're going to add a second scene, which will act as the main scene that controls our app. It will use the clock
scene to spawn multiple clocks inside itself.
Second Scene
Create a new scene via Scene › New Scene and make it a 2D scene so its root node is a Node2D. Rename the node to Main
and save the scene as main.tscn
. Also add a script to the root node, named main.gd
, using no or an empty template.
Scenes in a Scene
We can put a clock in the main scene by instantiating its scene there. We can either use the Instantiate Child Scene context menu option of the root node, use the Instantiate Scene Here context menu option in the viewport, or drag the scene from the file system into the viewport. We can create multiple instances of the same scene this way.

Can we instantiate a scene inside itself?
No, Godot will complain if you try to do that. You also shouldn't try to create cyclical scene dependencies, as that could make Godot fail.
The instantiated scene will show up as a single node in the scene hierarchy. It has an icon indicating that it's a scene, which you can click to open that scene.
Packed Scene
Manually instantiating scenes is for when you want to explicitly place a few instances. But we're going to put many clocks in the scene, at arbitrary positions. So we're going to do it via scripting.
Delete the clock nodes and open the main.gd
script. It already extends Node2D. We'll give the main scene a property to configure the clock scene that it should spawn. Do this by adding an exported clock_scene variable. It's type must be PackedScene, which is a resource that represents a serialized scene.
What does it mean to be serialized?
Serialization is the act of converting something into a linear stream of data. This data can be send somewhere and stored. The same data can be linearly read to reconstruct the original thing, which is the act of deserialization.
extends Node2D


## Clock to be spawned.
@export var clock_scene: PackedScene
We can now assign our clock
scene to this property in the inspector, either via dragging from the file system or by loading it via the dropdown menu of the property.
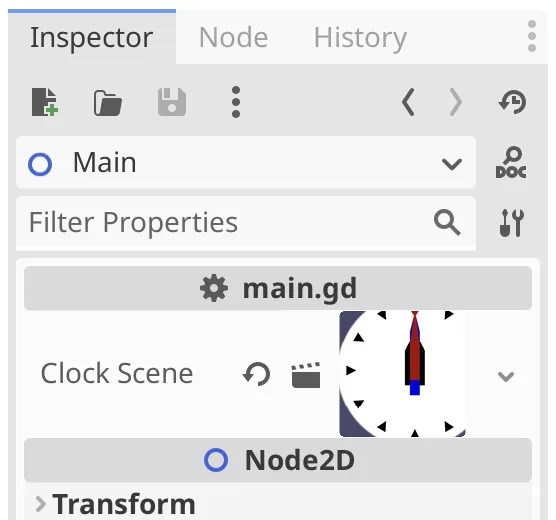
Why does my clock preview look different?
Godot creates the preview image of a scene based on what's visible in its editor viewport when you save it.
Instantiating a Scene
To create a clock instance we have to invoke instantiate() on clock_scene. Do this in a new _ready() function and store the returned instance in a clock variable.
func _ready() -> void:
	var clock := clock_scene.instantiate()
If we run the main scene now no clock appears yet. It does get created, but we have to also add it to the main scene's node tree. We do this by invoking add_child() with clock as an argument.
	var clock := clock_scene.instantiate()
	add_child(clock)
Now a clock appears in the scene when we run it. The clock's own _ready() function gets invoked when it becomes a child node in the scene tree. The visual result is the exact same as running the clock
scene directly.
To make it clear that we're in a different scene, let's move the clock to the top left corner of the viewport, by settings its position to 128 in both dimensions, matching our clock's radius. We do this by assinging a Vector2 value to clock.position. The vector is constructed by invoking Vector2 as a function, like we did with float, but now passing it 128.0 twice, for both its X and Y coordinates. We could do this either before of after adding the clock to the scene. Let's configure it first and then make it a child.
Are vector components also 64-bit values?
No, they are 32-bit by default. This is usually not an issue, but something to be aware of. If needed, you could compile the Godot engine yourself so it uses 64-bit values instead.
	var clock := clock_scene.instantiate()
	clock.position = Vector2(128.0, 128.0)
	add_child(clock)
The line of code that sets clock.position is marked as type unsafe, because instantiate() returns a Node, which doesn't have a position. We resolve this by indicating the clock is a Node2D.
var clock := clock_scene.instantiate() as Node2DNow we can see which scene we're running, based on whether the clock is at the top left or in the center of the viewport. Which scene we runs depends on which has the focus in the editor at that time. We can also designate a main scene for the project and always run that one, by using the Run Project option, via the play button on the top-right editor toolbar.
If no main scene has been selected yet Godot will ask you pick the current one. You can change it via the project settings under General › Application › Run › Main Scene.
Randomized Position
The idea is that we will spawn clocks at random positions. We'll randomize the X coordinate of our single clock.
Ideally the clock could appear anywhere horizontally within the viewport, at most touching its edge. So the minimum X coordinate is 128. But we know that because we know the radius of our clock. This information does not belong to our main script, so let's externalize it by exporting a clock_radius variable. We use 128.0 as its default, but this allows us to change the clock's inherent size later without having to change the main script, instead only changing a property. Use this variable to position the clock at the top left.
## Radius of the clock, in pixels.
@export var clock_radius := 128.0


func _ready() -> void:
	var clock := clock_scene.instantiate() as Node2D
	clock.position = Vector2(clock_radius, clock_radius)
	add_child(clock)
The maximum X coordinate is equal to whatever the viewport's horizontal size is, minus clock_radius. Our app's viewport size is equal to its window size. We can retrieve the Window by invoking get_window(). It has a size, of which we need its X component.
The window's size is a Vector2i, which is a 2D integer vector, because its size is in pixels.
	clock.position = Vector2(
			get_window().size.x - clock_radius,
			clock_radius
	)
Now we can use randf_range() to give the clock a random horizontal position while staying fully visible, as long as the viewport is wider than the clock.
	clock.position = Vector2(
			randf_range(clock_radius, get_window().size.x - clock_radius),
			clock_radius
	)
Physics
We didn't give the clock a random vertical position because we're going to let it fall. It will start above the top of the viewport and then drop down due to gravity. This requires us to use Godot's 2D physics engine.
Rigid Body
To make our clock behave like a physical entity we have to change the type of the root node of the clock
scene. This can be done via its Change Type context menu option. Turn it into a RigidBody2D node.
Why is the body rigid?
There are generally two types of physics bodies used. Besides rigid bodies there are also soft bodies, which can deform. Rigid bodies do not deform and are thus much simpler to work with.

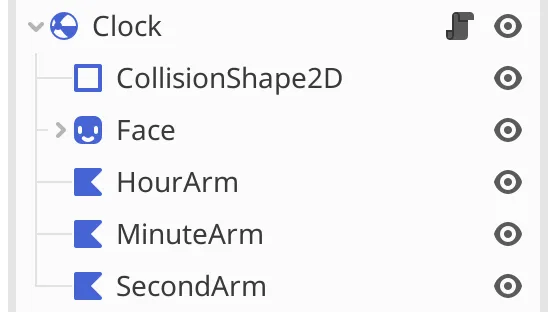
Once the Clock
node is a RigidBody2D it will get a warning triangle icon, because it doesn't have a collision shape yet. This means that it cannot interact with anything else, however gravity already affects it. We can verify this by running the clock scene and watching it fall.
Collision Shape
To make the rigid body collide with other shapes we have to give it a CollisionShape2D child node. We then have to give that node a specific shape, via its Shape property. As our clock is a circle pick the New CircleShape2D option and set its Radius to 128.
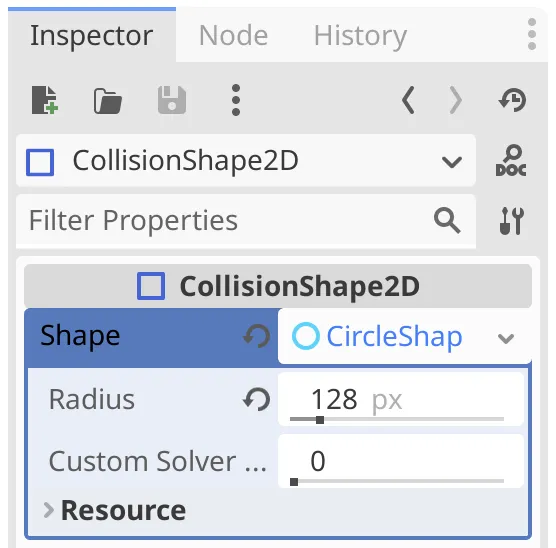
Collision shapes are invisible, but they have a debug visualization which makes it easier to work with them. If the shape is the last child of Clock
it will cover it entirely. By default it is semitransparent cyan, but you can configure this per shape.
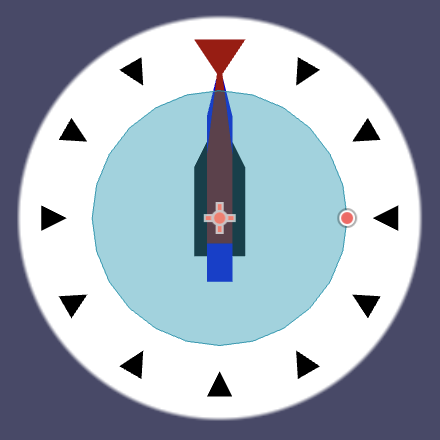
To avoid the shape covering the clock make it the first child, so its visualization is drawn first and the clock is drawn on top of it.
Reaching the Bottom
Now that the clock has a collision shape it can interact with other physics nodes. We'll use this to detect when the clock reaches the bottom of the viewport.
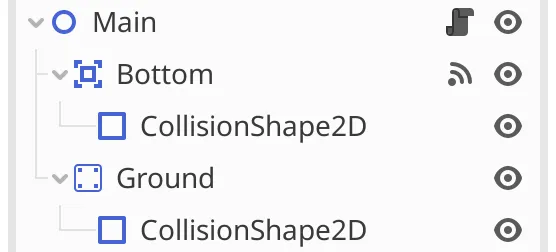
Add an Area2D node named Bottom
to the main scene. Give it a CollisionShape2D child node and pick New WorldBoundaryShape2D for its Shape.
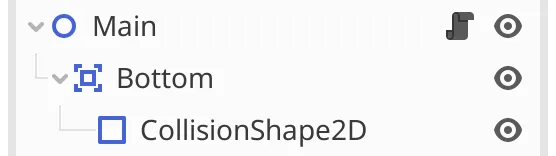
This shape defines a line that forms the end of the 2D world. The default configuration is for a horizontal line at Y zero that defines the bottom.

What's a Normal?
It's a normal vector, which is a unit-length vector that points straight away from the surface. In this case it's the normal vector for the world bottom, so it points straight up.
We can use this to stop the clock from falling out of view, by correctly positioning the bottom node in _ready(). It's also a Node2D so we can set its Y coordinate to the vertical window size. At this point we'll directly access it via the $Bottom node reference, but we'll clean that up later.
	var window_size := get_window().size
	($Bottom as Node2D).position.y = window_size.y
Deleting the Clock
Let's go a step further and immediately delete the clock when it reaches the bottom.
Nodes can send signals when certain conditions are met. These signals are displayed in the Node
tab, found in the same place as the Inspector
tab. Here we can see either signals or groups, but we only need the former.
We're interested in the body_entered() signal of Area2D. It has a Connect...
context menu option via which a popup window allows us to connect it to the Main
node. Double-clicking also pops up this window.
Establishing the connection means that a specific function, also known as a method, will be invoked on the node when the signal is emitted. The function name can be configured via the Receiver Method
field of the popup window. In our case it's automatically set to _on_bottom_body_entered() and we'll use that default.
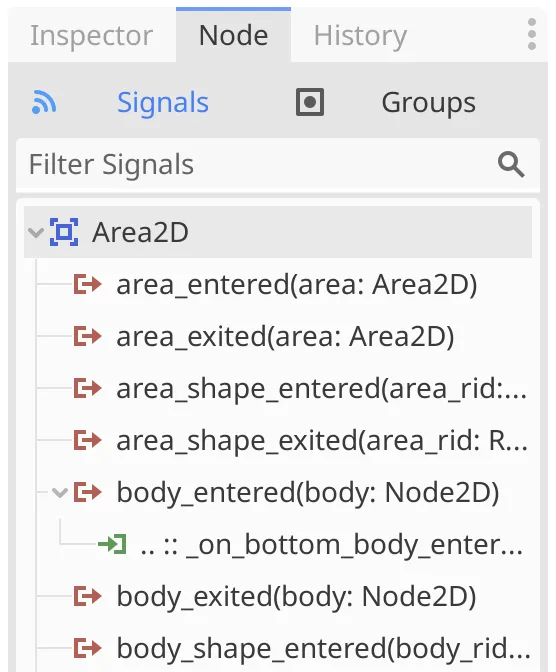
Because the function didn't exist yet it will be automatically added to our main.gd
script.
func _on_bottom_body_entered(body: Node2D) -> void:
	pass # Replace with function body.
An icon is added in front of its declaration, matching the one shown in the signals list, indicating that it's connected to a signal. Clicking it will pop up a window listing all signals it's connected to.
The function has a parameter, which refers to the node that entered the body and triggered the signal. That's our clock. We delete it by invoking queue_free() on it, which frees all resources claimed by that node instance and makes it cease to exist.
func _on_bottom_body_entered(body: Node2D) -> void:
	body.queue_free()
Why not use free() instead?
The free() function immediately deletes the node. The queue_free() function instead queues the node for deletion at the end of the current frame. This means that it remains valid to interact with that node for the entire frame. Queueing the same node for deletion multiple times is possible and won't cause any issues. So the rule of thumb would be to always queue, unless there is a good reason to free immediately.
This causes the clock to vanish as soon as it touches the bottom of the window. Let's lower the bottom further down by twice the clock radius, so deletion is delayed until the clock is no longer visible. This way we get rid of the clock when we no longer need it.
($Bottom as Node2D).position.y = window_size.y + 2.0 * clock_radiusHitting the Ground
Let's go back to having the clock collide with the bottom of the window, but this time using a different approach. We keep Bottom
and add a new StaticBody2D node named Ground
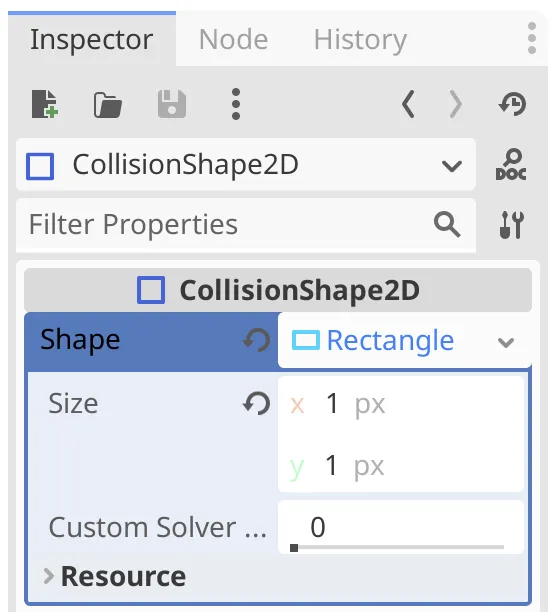
. Give it a CollisionShape2D and pick the New RectangleShape2D option for its Shape.
A StaticBody2D is like a RigidBody2D body that isn't affected by any external forces. Leave the Size of its rectangle at 1×1 pixels.
We set the ground's size in _ready(), making it as wide as the window and as tall as the clock radius so it is sufficiently thick. We do this by settings its scale.
	var window_size := get_window().size
	($Bottom as Node2D).position.y = window_size.y + 2.0 * clock_radius
	var ground := $Ground as Node2D
	ground.scale = Vector2(window_size.x, clock_radius)
We then position it so its top matches the bottom of the window. Because the position is at the center of the rectangle its X coordinate has to be half the window size and its Y coordinate has to be the window height plus half the clock radius.
	var ground := $Ground as Node2D
	ground.position = Vector2(
			0.5 * window_size.x,
			window_size.y + 0.5 * clock_radius
	)
	ground.scale = Vector2(window_size.x, clock_radius)
The point of this approach is that if the clock ends up rolling out of view it will fall off the ground rectangle, reach the bottom, and get deleted.
Can we change a static body?
Yes, although the physics system won't move it, we are still able to modify it. Otherwise it wouldn't be possible to configure it via code.
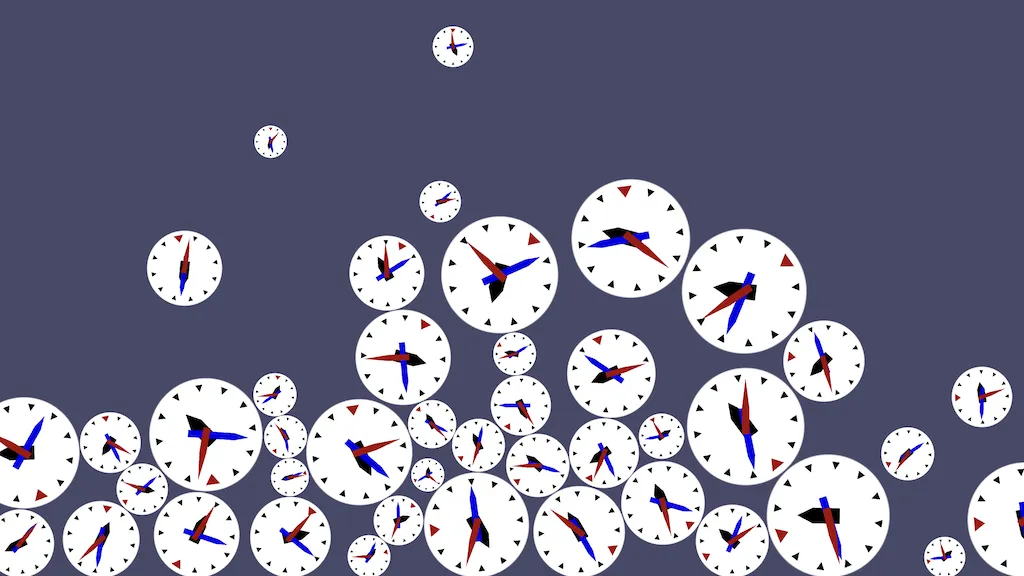
It's Raining Clocks
Our single clock falls straight down and will never roll away on its own. So let's drop a lot of them on top of each other. When clocks pile up they will push each other to the side and eventually out of view.
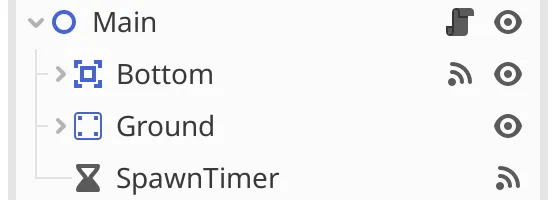
To make it continuously rain clocks we'll introduce a timer. Add a Timer node named SpawnTimer
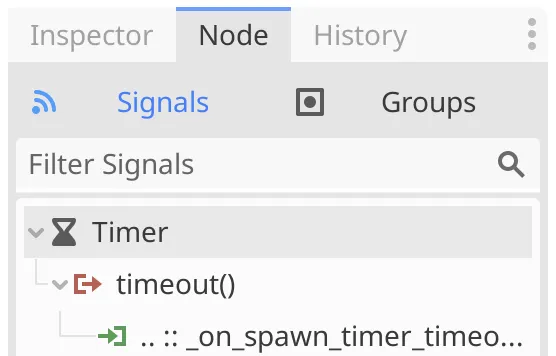
to the scene. Set its Wait Time to 0.2 so it will trigger five times per second. Enable its Autostart option so it will immediately run. Then connect its timeout() signal to our main script.
Use the _on_spawn_timer_timeout() function declaration to cut _ready() in two. The bottom and ground configuration stays in _ready() while the clock-spawning code moves to _on_spawn_timer_timeout(). Note that we now need to fetch the window size in both functions.
func _ready() -> void:
	var window_size := get_window().size
	($Bottom as Node2D).position.y = window_size.y + 2.0 * clock_radius
	var ground := $Ground as Node2D
	ground.position = Vector2(
			0.5 * window_size.x,
			window_size.y + 0.5 * clock_radius
	)
	ground.scale = Vector2(window_size.x, clock_radius)


func _on_spawn_timer_timeout() -> void:
	var window_size := get_window().size
	var clock := clock_scene.instantiate() as Node2D
	clock.position = Vector2(
			randf_range(clock_radius, window_size.x - clock_radius),
			clock_radius
	)
add_child(clock)Instead of immediately spawning a single clock we now spawn a new clock every 0.2 seconds. But there are two issues. First, a newly spawned clock can end up overlapping other clocks, causing weird physics behavior. Second and a bit harder to notice, clocks now always display 00:00:00 during their first frame and only display the correct time starting on their second frame. The latter happens because they get spawned too late during the frame for their _process function to get invoked.
We could solve the second issue by manually invoking _process() on the clock. However, we can solve both issues by spawning clocks out of view, above the window top. This will make it look like it's raining clocks. To give enough room for clocks to sort themselves out let's move their starting Y coordinates up by three times the clock radius.
	clock.position = Vector2(
			randf_range(clock_radius, window_size.x - clock_radius),
			-3.0 * clock_radius
)Shouldn't we use object pooling?
As our clocks are fairly small node hierarchies instantiating and freeing them is very fast. Godot uses reference counting to manage their memory, so you don't need to worry about accumulating memory garbage. Object pooling might make sense for big hierarchies, or when using C# because then you're relying on the .NET garbage collector for C# object management. That's why object pooling is a rule of thumb for engines that use C#, which doesn't apply to Godot by default.
In some cases reusing nodes, by temporarily hiding them or removing them from the scene tree, could result in better performance, but that has to be tested per case. This is only useful if the instantiation-freeing overhead is a performance bottleneck.
Clock Randomization
We're spawning many clocks and they are all the same, clones of the clock scene. Let's make things more interesting by introducing random variations.
Clock Configuration
The most obvious randomization would be to let each clock display a random time. We could do this by setting the clock's Start Time property in the clock scene. But we can also do this via code when spawning a clock, overriding the configured mode.
To access the start_time variable of a clock instance in a type-save way we have to declare it to be of the Clock type. This type currently doesn't exist, because the clock.gd
script defines an anonymous type. We have to give the script its own explicit type, thus making it define a named class of node. We do that by writing class_name on the line above extends, followed by the name, for which we use Clock. This also makes the inspector use the Clock
class name instead of the clock.gd
file name.
class_name Clock
extends Node2D
Now we can get a clock instance as a node of type Clock in our main script and can set its start_time to a random time. As StartTimeMode is defined inside the Clock type we access it here via Clock.StartTimeMode.
	var clock := clock_scene.instantiate() as Clock
	clock.start_time = Clock.StartTimeMode.RANDOM_TIME
Let's randomize the clock's time scale as well. Add configuration options for a time scale minimum and maximum to the main script, using −10.0 and 10.0 for the default values. Put the properties in a Clock Instances
group.
@export var clock_radius := 128.0

@export_group("Clock Instances")
@export var time_scale_min := -10.0
@export var time_scale_max := 10.0
Then pick a random value inside that range and use it for the spawned clock's time scale.
	clock.start_time = Clock.StartTimeMode.RANDOM_TIME
	clock.time_scale = randf_range(time_scale_min, time_scale_max)
Clock Size
We can also give the clocks different sizes by scaling them, but we must be careful here. The clock's collider shape is a circle, which only supports uniform scaling. This means that the X and Y components of the scale must be equal. It is technically possible to apply a non-uniform scale, but this will cause weird physics behavior.
To make it easy to set the clock's uniform scale let's add a set_uniform_scale function to Clock that has a scale_factor parameter and uses it to set its scale uniformly.
func set_uniform_scale(scale_factor: float) -> void:
	scale = Vector2(scale_factor, scale_factor)
Back to the main script, introduce properties for the scale min and max, clamped to the 0.1–1.0 range, with defaults 0.25 and 1.
@export_group("Clock Instances")
@export_range(0.1, 1.0) var scale_min := 0.25
@export_range(0.1, 1.0) var scale_max := 1.0
@export var time_scale_min := -10.0
@export var time_scale_max := 10.0
Then give the instantiated clock a uniform scale in the configured range when spawning it.
	clock.time_scale = randf_range(time_scale_min, time_scale_max)
	clock.set_uniform_scale(randf_range(scale_min, scale_max))
This would work, if our clock wasn't a physics node. But because it is, its collision shape overrules its scale, forcing it to be 1. So let's scale its $CollisionShape2D child node instead in Clock.set_uniform_scale.
func set_uniform_scale(scale_factor: float) -> void:
	($CollisionShape2D as Node2D).scale = Vector2(scale_factor, scale_factor)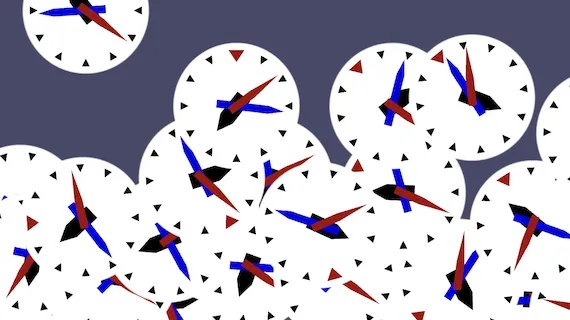
That only scales the collision shape and doesn't affects its visualization, so the clocks end up overlapping. Let's apply the same scale vector to the $Face child node as well.
func set_uniform_scale(scale_factor: float) -> void:
	var scale_vector = Vector2(scale_factor, scale_factor)
	($CollisionShape2D as Node2D).scale = scale_vector
	($Face as Node2D).scale = scale_vector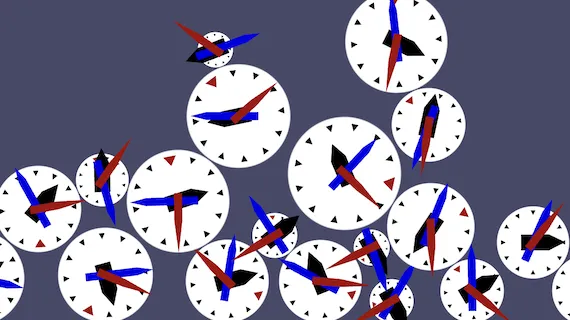
This fixes the clock's face but not its arms. We could scale those individually, but we can also make the arm nodes children of the face so they automatically get scaled as well. Let's do that. This means that we have to change the node references of the arms. The second arm's reference has to change from $SecondArm to $Face/SecondArm and the other arm references have to change in the same way.
@onready var second_arm := $Face/SecondArm as Node2D
@onready var minute_arm := $Face/MinuteArm as Node2D
@onready var hour_arm := $Face/HourArm as Node2D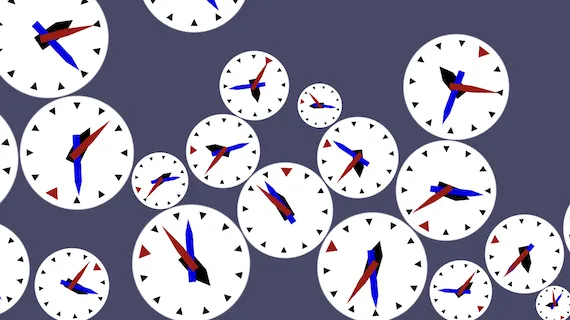
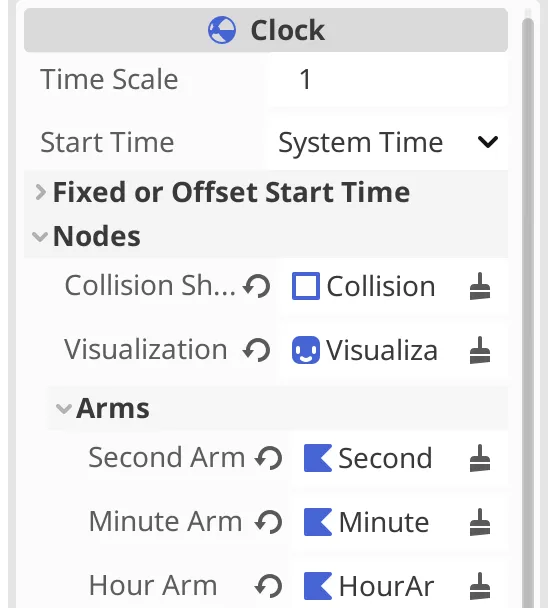
Exporting Node References
We originally kept the arms separate from the face because we treated them as separate elements of the clock. But we can change the way we look at things, reinterpreting the original face node as the root node of the clock's visualization. So let's change its name to Visualization
. Let's also change the collision shape node's name to CollisionCircle
to be a bit more descriptive. This makes it clear that the clock's physics shape and visualization are two separate things.

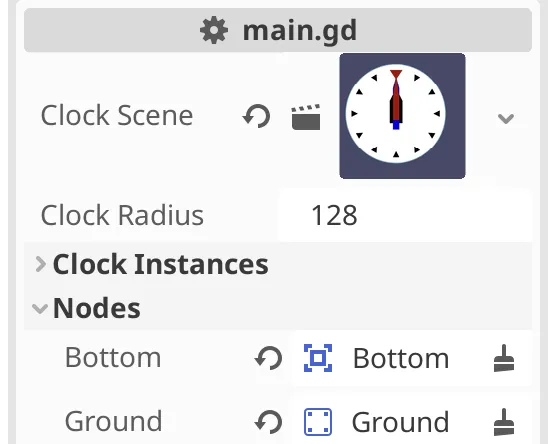
However, renaming the nodes requires us to again update the node references in our script. This is a downside of script code containing explicit references to nodes. We can avoid that by replacing the node references with exported variables. Let's do this for the arms and also for the collision shape and the visualization, putting them in a Nodes
group. We can suffice with the Node2D type for all, but let's explicitly require the collision shape to be a CollisionShape2D because that makes sense.
@export_group("Nodes")
@export var collision_shape: CollisionShape2D
@export var visualization: Node2D
@export var second_arm: Node2D
@export var minute_arm: Node2D
@export var hour_arm: Node2D

var seconds := 0.0

#@onready var second_arm := $Face/SecondArm as Node2D
#@onready var minute_arm := $Face/MinuteArm as Node2D
#@onready var hour_arm := $Face/HourArm as Node2D
As the arms form their own little group inside Nodes
let's indicate this by declaring an Arms
subgroup for them, by using the @export_subgroup annotation.
@export_group("Nodes")
@export var collision_shape: CollisionShape2D
@export var visualization: Node2D
@export_subgroup("Arms")
@export var second_arm: Node2D
@export var minute_arm: Node2D
@export var hour_arm: Node2D
We can now configure the nodes in the inspector by dragging them from the scene hierarchy, or clicking the properties and selecting them from the popup window.
Use the new variables in set_uniform_scale instead of the explicit node references.
func set_uniform_scale(scale_factor: float) -> void:
	var scale_vector = Vector2(scale_factor, scale_factor)
	collision_shape.scale = scale_vector
	visualization.scale = scale_vector
Bouncy Clocks
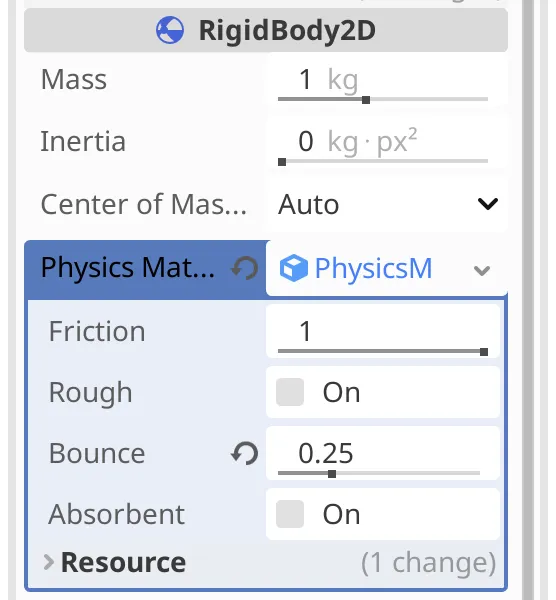
Currently our clocks come to an immediate stop when they hit the ground. Let's make them a bit like glass marbles that bounce. We do this by giving the clock's RigidBody2D a custom physics material, by adjusting its Physics Material Override property, picking New PhysicsMaterial. Set its Bounce to 0.25.
Furthermore, the bounce and collision behavior should be different for large and small clocks, because they would logically have different mass. RigidBody2D has a mass that we can change. As our clock's root is such a node, make our script explicitly extend that type instead of the more generic Node2D.
class_name Clock
extends RigidBody2D
Now we can set the mass in set_uniform_scale() based on the scale factor. The mass is 1 by default, which we use as the mass for a clock at its default size. As we're working in 2D let's equate mass with area, so it scales quadratically. Thus we set mass to the scale factor squared.
	collision_shape.scale = scale_vector
mass = scale_factor * scale_factorResizing the Window
One thing we haven't considered so far is what happens when the app's window gets resized. Let's investigate this and see if we can do something interesting with it.
Current Situation
Run the project and resize its window. You can drag any side or corner, but I always drag the bottom right corner.
The exact behavior depends on the operating system context, but in my case the app freezes during a drag while there is no cursor movement. During a drag motion it updates but it can be a little jittery.
The behavior of the viewport when resizing can be configured under the General › Application › Display › Window section of the project settings. The default configuration keeps the 2D world fixed relative to the top left corner of the viewport. So resizing by dragging the bottom right corner changes how much of the world we see relative to that point.
Currently the spawn area grows and shrinks with the window size, but the bottom and ground are fixed. So we can end up seeing below it and can also see clocks fall past the right side of the ground rectangle. Let's adapt the main script so the bottom and ground will always match the window size.
Reacting to Size Changes
We begin by moving all code in our main script's _ready() function to a new _on_size_changed() function, which we then invoke in _ready().
func _ready() -> void:
	_on_size_changed()


func _on_size_changed() -> void:
	var window_size := get_window().size
	($Bottom as Node2D).position.y = window_size.y + 2.0 * clock_radius
	var ground := $Ground as Node2D
	ground.position = Vector2(
			0.5 * window_size.x,
			window_size.y + 0.5 * clock_radius
	)
	ground.scale = Vector2(window_size.x, clock_radius)
Next, we hook up the _on_size_changed() function to the window's size_changed signal at the start of _ready(). This does the same as connecting a signal via the inspector. In code it is done by invoking connect() on the signal and passing it our function. Here we provide a reference to the function itself, so we don't invoke it and thus don't provide it with an argument list.
func _ready() -> void:
	get_window().size_changed.connect(_on_size_changed)
_on_size_changed()Note that we are changing the static ground continuously while dragging, which isn't really the expected behavior of static bodies. This is fine because we assume that window resizing is a rare event.
Code Cleanup
We wrap up this tutorial by cleaning up our main script a bit. First, instead of always retrieving the window when spawning a clock we'll keep track of the window width via a variable, which we set in _on_size_changed(). This way we only need to access the window in a single function.
var _window_width: float

…

func _on_size_changed() -> void:
	var window_size := get_window().size
	_window_width = window_size.x
	…


func _on_spawn_timer_timeout() -> void:
	#var window_size := get_window().size
	…
	clock.position = Vector2(
			randf_range(clock_radius, _window_width - clock_radius),
			-3.0 * clock_radius
	)
	add_child(clock)
Second, let's also configure the bottom and ground via exported variables instead of using explicit node references, like we did for Clock.
@export_group("Nodes")
@export var bottom: Node2D
@export var ground: Node2D

…

func _on_size_changed() -> void:
	var window_size := get_window().size
	_window_width = window_size.x
	bottom.position.y = window_size.y + 2.0 * clock_radius
	#var ground := $Ground as Node2D
	…
The next tutorial is Clocks With Rings.