Hex Map 5
Larger Maps
- Split the grid into chunks.
- Control the camera.
- Paint color and elevation separately.
- Use a larger cell brush.
This tutorial is the fifth part of a series about hexagon maps. Up to this point we've worked with a very small map. It's time we scale it up.
Grid Chunks
We cannot make our grid too large, because we run into the limits of what can fit in a single mesh. The solution? Use more than one mesh. To do so, we have to partition our grid into multiple chunks. We'll use rectangular chunks of a fixed size.
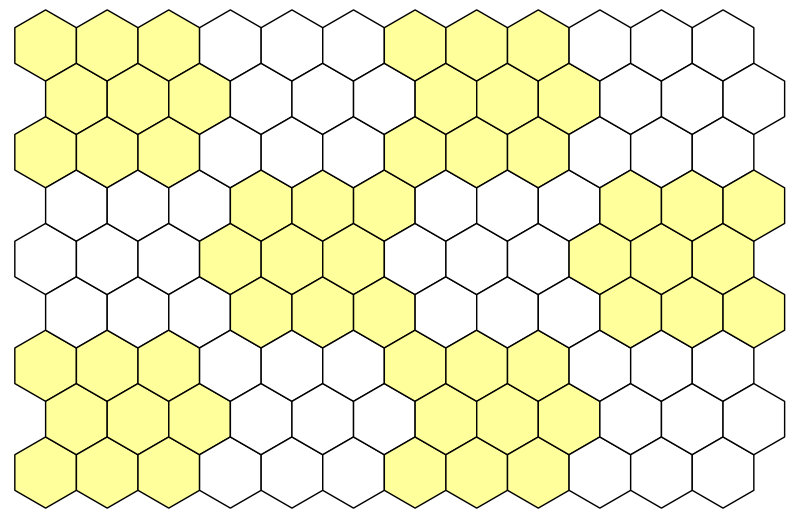
Let's use 5 by 5 blocks, so that's 25 cells per chunk. Define that in HexMetrics.
public const int chunkSizeX = 5, chunkSizeZ = 5;
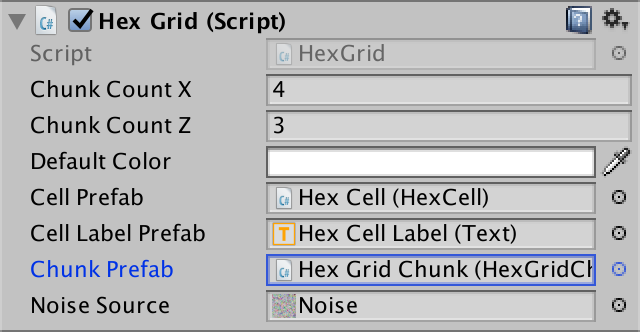
Now we can no longer use any size for our grid, we have to use multiples of the chunk size. So let's change HexGrid so it defines its size in chunks instead of individual cells. Set it to 4 by 3 chunks by default, for a total of 12 chunks and 300 cells. This gives us a nice small test map.
public int chunkCountX = 4, chunkCountZ = 3;
We'll still use width and height, but they should become private. We'll also rename these fields to cellCountX and cellCountZ. Use your editor to rename all occurrences of these variables in one go. Now it's clear when we're dealing with chunk or cell counts.
// public int width = 6;// public int height = 6;int cellCountX, cellCountZ;

Adjust Awake so the cell counts are derived from the chunk counts before they are needed. Put the creation of the cells in their own method as well, to keep Awake tidy.
	void Awake () {
		HexMetrics.noiseSource = noiseSource;

		gridCanvas = GetComponentInChildren<Canvas>();
		hexMesh = GetComponentInChildren<HexMesh>();

		cellCountX = chunkCountX * HexMetrics.chunkSizeX;
		cellCountZ = chunkCountZ * HexMetrics.chunkSizeZ;

		CreateCells();
	}

	void CreateCells () {
		cells = new HexCell[cellCountZ * cellCountX];

		for (int z = 0, i = 0; z < cellCountZ; z++) {
			for (int x = 0; x < cellCountX; x++) {
				CreateCell(x, z, i++);
			}
		}
	}
Chunk Prefab
We need a new component type to represents our grid chunks.
using UnityEngine;
using UnityEngine.UI;

public class HexGridChunk : MonoBehaviour {
}
Next, create a chunk prefab. Do this by duplicating the Hex Grid object and renaming it to Hex Grid Chunk. Remove its HexGrid component and give it a HexGridChunk component instead. Then turn it into a prefab and remove the object from the scene.

As HexGrid will be instantiating these chunks, give it a reference to the chunk prefab.
public HexGridChunk chunkPrefab;
Instantiating chunks looks a lot like instantiating cells. Keep track of them with an array, and use a double loop to fill it.
	HexGridChunk[] chunks;

	void Awake () {
		…

		CreateChunks();
		CreateCells();
	}

	void CreateChunks () {
		chunks = new HexGridChunk[chunkCountX * chunkCountZ];

		for (int z = 0, i = 0; z < chunkCountZ; z++) {
			for (int x = 0; x < chunkCountX; x++) {
				HexGridChunk chunk = chunks[i++] = Instantiate(chunkPrefab);
				chunk.transform.SetParent(transform);
			}
		}
	}
The initialization of a chunk is similar to how we used to initialize the hex grid. It sets things up in Awake and triangulates in Start. It need a reference to its canvas and mesh, and an array for its cells. However, it will not create these cells. We'll still let the grid do that.
public class HexGridChunk : MonoBehaviour {

	HexCell[] cells;

	HexMesh hexMesh;
	Canvas gridCanvas;

	void Awake () {
		gridCanvas = GetComponentInChildren<Canvas>();
		hexMesh = GetComponentInChildren<HexMesh>();

		cells = new HexCell[HexMetrics.chunkSizeX * HexMetrics.chunkSizeZ];
	}

	void Start () {
		hexMesh.Triangulate(cells);
	}
}
Assigning Cells to Chunks
HexGrid is still creating all the cells. This is fine, but it now has to add each cell to the correct chunk, instead of setting them up with its own mesh and canvas.
	void CreateCell (int x, int z, int i) {
		…

		HexCell cell = cells[i] = Instantiate<HexCell>(cellPrefab);
//		cell.transform.SetParent(transform, false);
		cell.transform.localPosition = position;
		cell.coordinates = HexCoordinates.FromOffsetCoordinates(x, z);
		cell.color = defaultColor;

		…

		Text label = Instantiate<Text>(cellLabelPrefab);
//		label.rectTransform.SetParent(gridCanvas.transform, false);
		label.rectTransform.anchoredPosition =
			new Vector2(position.x, position.z);
		label.text = cell.coordinates.ToStringOnSeparateLines();
		cell.uiRect = label.rectTransform;

		cell.Elevation = 0;

		AddCellToChunk(x, z, cell);
	}

	void AddCellToChunk (int x, int z, HexCell cell) {
	}
We can find the correct chunk via integer divisions of x and z by the chunk sizes.
	void AddCellToChunk (int x, int z, HexCell cell) {
		int chunkX = x / HexMetrics.chunkSizeX;
		int chunkZ = z / HexMetrics.chunkSizeZ;
		HexGridChunk chunk = chunks[chunkX + chunkZ * chunkCountX];
	}
Using the intermediate results, we can also determine the cell's index local to its chunk. Once we have that, we can add the cell to the chunk.
	void AddCellToChunk (int x, int z, HexCell cell) {
		int chunkX = x / HexMetrics.chunkSizeX;
		int chunkZ = z / HexMetrics.chunkSizeZ;
		HexGridChunk chunk = chunks[chunkX + chunkZ * chunkCountX];

		int localX = x - chunkX * HexMetrics.chunkSizeX;
		int localZ = z - chunkZ * HexMetrics.chunkSizeZ;
		chunk.AddCell(localX + localZ * HexMetrics.chunkSizeX, cell);
	}
The HexGridChunk.AddCell method then puts the cell in its own array. Then it sets the parents of the cell and its UI.
	public void AddCell (int index, HexCell cell) {
		cells[index] = cell;
		cell.transform.SetParent(transform, false);
		cell.uiRect.SetParent(gridCanvas.transform, false);
	}
Cleaning Up
At this point HexGrid can get rid of its canvas and hex mesh child objects and code.
// Canvas gridCanvas;// HexMesh hexMesh;void Awake () { HexMetrics.noiseSource = noiseSource;// gridCanvas = GetComponentInChildren<Canvas>();// hexMesh = GetComponentInChildren<HexMesh>();… }// void Start () {// hexMesh.Triangulate(cells);// }// public void Refresh () {// hexMesh.Triangulate(cells);// }
Because we got rid of Refresh, HexMapEditor should no longer use it.
	void EditCell (HexCell cell) {
		cell.color = activeColor;
		cell.Elevation = activeElevation;
//		hexGrid.Refresh();
	}
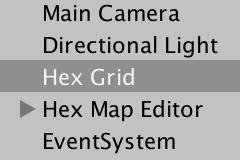
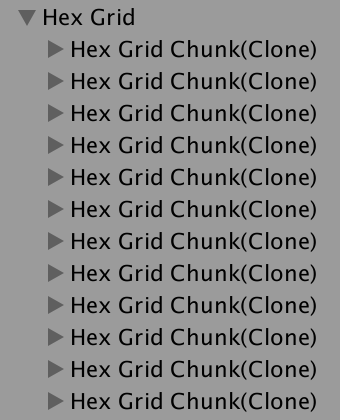
After entering play mode, the map will still look the same. But the object hierarchy will be different. Hex Grid now spawns child chunk objects, which contain the cells, along with their mesh and canvas.
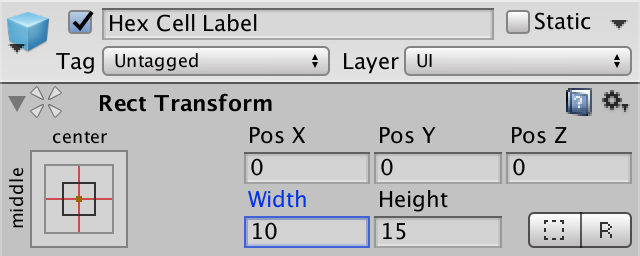
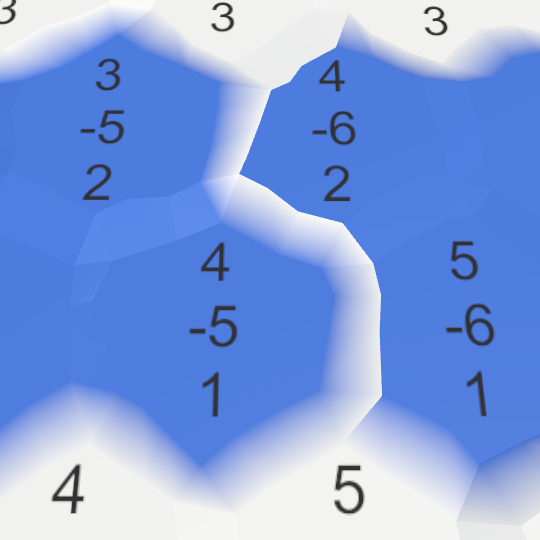
There is probably something wrong with the cell labels. We initially set the label's width to 5. This was enough to show two symbols, which was fine for the small map that we used up to this point. But now we can get coordinates like −10, which have three symbols. These won't fit and will be cut off. To fix this, increase the cell label width to 10, or even more.
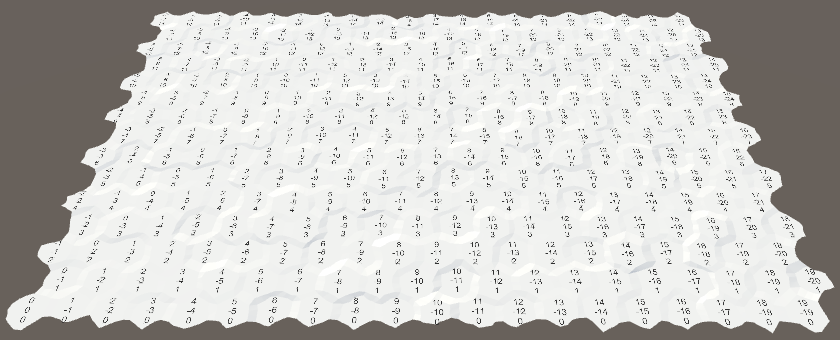
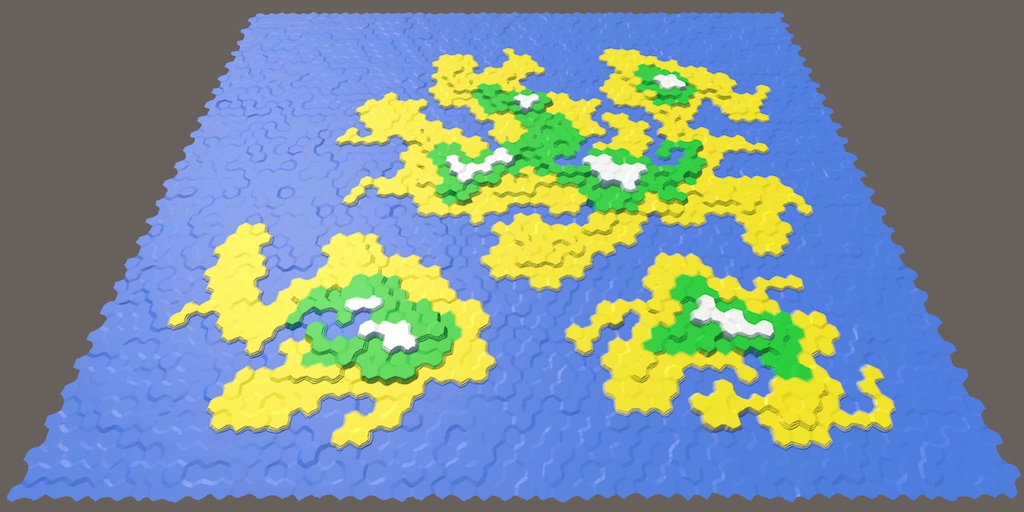
We can now create much larger maps! As we generate the entire grid on startup, it might take a while before huge maps are created. But once that's finished, you have a large area to play with.
Fixing Editing
Right now editing doesn't seem to work, because we no longer refresh the grid. We have to refresh the individual chunks, so let's add a Refresh method to HexGridChunk.
	public void Refresh () {
		hexMesh.Triangulate(cells);
	}
When do we invoke this method? We used to refresh the entire grid every time, because there was only a single mesh. But now we have many chunks. Instead of refreshing them all every time, it would be much more efficient if we only refresh those chunks that have changed. Editing large maps would become very sluggish otherwise.
How do we know which chunk to refresh? A simple way is to make sure each cell knows which chunk it belongs to. Then the cell can refresh its chunk whenever it is changed. So give HexCell a reference to its chunk.
public HexGridChunk chunk;
HexGridChunk can assign itself to the cell when it is added.
	public void AddCell (int index, HexCell cell) {
		cells[index] = cell;
		cell.chunk = this;
		cell.transform.SetParent(transform, false);
		cell.uiRect.SetParent(gridCanvas.transform, false);
	}
With that hooked up, add a Refresh method to HexCell as well. Whenever a cell is refreshed, it simply refreshes its chunk.
	void Refresh () {
		chunk.Refresh();
	}
We don't need to make HexCell.Refresh public, because the cell itself knows best when it has changed. For example, after it has adjusted its elevation.
	public int Elevation {
		get {
			return elevation;
		}
		set {
			…
			Refresh();
		}
	}
Actually, it would only need to refresh if its elevation has been set to a different value. It won't even need to recompute anything if we assign the same elevation to it later. So we can bail out at the start of the setter.
	public int Elevation {
		get {
			return elevation;
		}
		set {
			if (elevation == value) {
				return;
			}
			…
		}
	}
However, this will also skip the computation the first time the elevation is set to zero, because that is currently the grid's default elevation. To prevent this, make sure that the initial value is something that will never be used.
int elevation = int.MinValue;
To detect a change to a cell's color, we have to turn it into a property as well. Rename it to the capitalized Color, then turn it into a property with a private color variable. The default color value is transparent black, which is fine.
	public Color Color {
		get {
			return color;
		}
		set {
			if (color == value) {
				return;
			}
			color = value;
			Refresh();
		}
	}

	Color color;
We now get null-reference exceptions when entering play mode. That's because we set the color and elevation to their default values, before assigning the cell to its chunk. It is fine that we don't refresh the chunks at this point, because we'll triangulate them all after initialization is done. In other words, only refresh the chunk if it has been assigned.
	void Refresh () {
		if (chunk) {
			chunk.Refresh();
		}
	}
We can once again edit cells! However, there is a problem. Seams can appear when painting along chunk boundaries.
This makes sense, because when one cell changes, all connections with its neighbors change as well. And those neighbors can end up in different chunks. The simplest solution is to refresh the chunks of all neighbors as well, if they're different.
	void Refresh () {
		if (chunk) {
			chunk.Refresh();
			for (int i = 0; i < neighbors.Length; i++) {
				HexCell neighbor = neighbors[i];
				if (neighbor != null && neighbor.chunk != chunk) {
					neighbor.chunk.Refresh();
				}
			}
		}
	}
While this works, we can end up refreshing a single chunk multiple times. And once we start painting more than one cell at a time, this will only get worse.
But we don't have to immediately triangulate when a chunk is refreshed. Instead, we can take note that an update is needed, and triangulate once editing is finished.
Because HexGridChunk doesn't do anything else, we can use its enabled state to signal that an update is needed. Whenever it is refreshed, we enable the component. Enabling it multiple times doesn't change anything. Later on, the component is updated. We'll triangulate at that point, and disable the component again.
We'll use LateUpdate instead of Update, so we can be sure that triangulation happens after editing is finished for the current frame.
	public void Refresh () {
//		hexMesh.Triangulate(cells);
		enabled = true;
	}

	void LateUpdate () {
		hexMesh.Triangulate(cells);
		enabled = false;
	}
Because our component is enabled by default, we don't need to explicitly triangulate in Start anymore. So we can remove that method.
// void Start () {// hexMesh.Triangulate(cells);// }
Sharing Lists
Although we have significantly changed how we triangulate our grid, HexMesh is still the same. All it needs is an array of cells, and it will do its job. Whether there is a single or many hex meshes doesn't matter. But we hadn't considered using multiple of them yet. Maybe there is an improvement we could make?
The lists that HexMesh uses are effectively temporary buffers. They are only used during triangulation. And chunks are triangulated one at a time. So we really only need one set of lists, not one set per hex mesh object. We can do so by making the lists static.
	static List<Vector3> vertices = new List<Vector3>();
	static List<Color> colors = new List<Color>();
	static List<int> triangles = new List<int>();

	void Awake () {
		GetComponent<MeshFilter>().mesh = hexMesh = new Mesh();
		meshCollider = gameObject.AddComponent<MeshCollider>();
		hexMesh.name = "Hex Mesh";
//		vertices = new List<Vector3>();
//		colors = new List<Color>();
//		triangles = new List<int>();
	}
Camera Controls
Having a large map is nice, but it is no good if we cannot see it. To reach the entire map, we have to move the camera around. Zooming would also be quite handy. So let's create a camera rig that allows this.
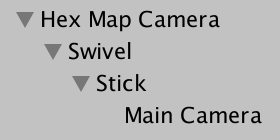
Create an empty object and name it Hex Map Camera. Reset its transform component so it sits at the origin, without any rotation or scale adjustment. Give it a child object named Swivel and give that one a child object named Stick. Make the main camera a child of the stick, and reset its transform component.
The job of the swivel is to control the angle at which the camera looks at the map. Set its rotation to (45, 0, 0). The stick controls how far away the camera is. Set its position to (0, 0, -45).
Now we need a component to control this rig. Assign this component to the root of the camera hierarchy. Give it a reference to its swivel and stick, retrieving them in Awake.
using UnityEngine;

public class HexMapCamera : MonoBehaviour {

	Transform swivel, stick;

	void Awake () {
		swivel = transform.GetChild(0);
		stick = swivel.GetChild(0);
	}
}

Zooming
The first feature we'll support is zooming. We can keep track of the current zoom level with a float variable. A value of 0 means that we are fully zoomed out, while a value of 1 is fully zoomed in. Let's start at maximum zoom.
float zoom = 1f;
Zooming is usually done with the mouse wheel, or an analogous input method. We can do so by using the default Mouse ScrollWheel input axis. Add an Update method that checks whether there is any input delta, and if so invoke a method to adjust the zoom.
	void Update () {
		float zoomDelta = Input.GetAxis("Mouse ScrollWheel");
		if (zoomDelta != 0f) {
			AdjustZoom(zoomDelta);
		}
	}

	void AdjustZoom (float delta) {
	}
To adjust the zoom level, simply add the delta to it, then clamp to keep it in the 0–1 range.
	void AdjustZoom (float delta) {
		zoom = Mathf.Clamp01(zoom + delta);
	}
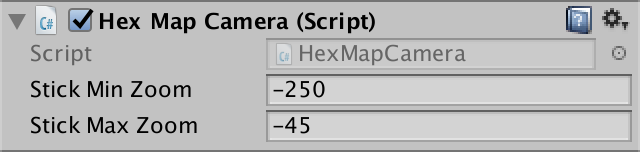
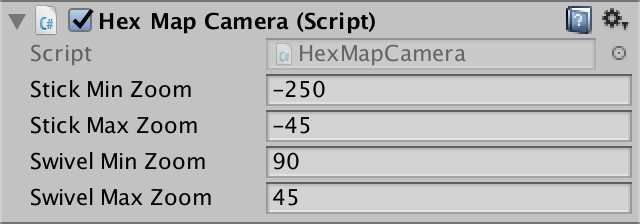
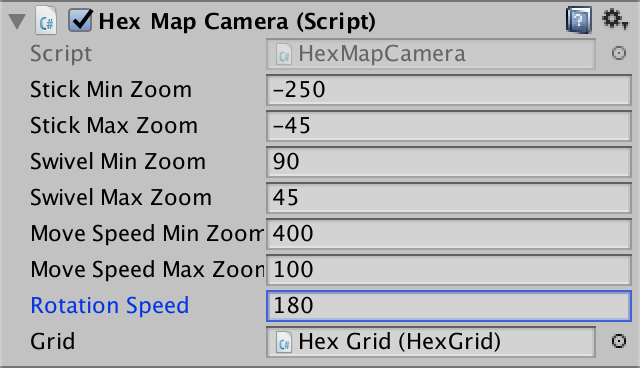
As we zoom in and out, the distance of the camera should change accordingly. We do this by adjusting the stick's Z position. Add two public floats to configure the stick's position at minimum and maximum zoom. As we're developing on a relatively small map, set them to -250 and -45.
public float stickMinZoom, stickMaxZoom;
After adjusting the zoom, linearly interpolate between these two values based on the new zoom value. Then update the stick's position.
	void AdjustZoom (float delta) {
		zoom = Mathf.Clamp01(zoom + delta);

		float distance = Mathf.Lerp(stickMinZoom, stickMaxZoom, zoom);
		stick.localPosition = new Vector3(0f, 0f, distance);
	}
Zooming now works, but it is currently not that useful. Typically, games have their camera transition to a top-down view as it zooms out. We can do so by rotating the swivel. So add min and max variables for the swivel as well. Set them to 90 and 45.
public float swivelMinZoom, swivelMaxZoom;
Just like with the arm position, interpolate to find the appropriate zoom angle. Then set the swivel's rotation.
	void AdjustZoom (float delta) {
		zoom = Mathf.Clamp01(zoom + delta);

		float distance = Mathf.Lerp(stickMinZoom, stickMaxZoom, zoom);
		stick.localPosition = new Vector3(0f, 0f, distance);

		float angle = Mathf.Lerp(swivelMinZoom, swivelMaxZoom, zoom);
		swivel.localRotation = Quaternion.Euler(angle, 0f, 0f);
	}
You can tweak how quickly the zoom changes by adjusting the sensitivity of the scroll wheel input settings. You can find it via Edit / Project Settings / Input. For example, decreasing it from its default 0.1 to 0.025 results in a slower, smoother zoom experience.

Moving
Next up is camera movement. We have to check for movement in the X and Z direction in Update, just like we do for zoom. We can use the default Horizontal and Vertical input axes for this. This allows use to move the camera with the arrow keys and the WASD keys.
	void Update () {
		float zoomDelta = Input.GetAxis("Mouse ScrollWheel");
		if (zoomDelta != 0f) {
			AdjustZoom(zoomDelta);
		}

		float xDelta = Input.GetAxis("Horizontal");
		float zDelta = Input.GetAxis("Vertical");
		if (xDelta != 0f || zDelta != 0f) {
			AdjustPosition(xDelta, zDelta);
		}
	}

	void AdjustPosition (float xDelta, float zDelta) {
	}
The most straightforward approach is to fetch the current position of the camera rig, add the X and Z deltas to it, and assign the result back to the rig's position.
	void AdjustPosition (float xDelta, float zDelta) {
		Vector3 position = transform.localPosition;
		position += new Vector3(xDelta, 0f, zDelta);
		transform.localPosition = position;
	}
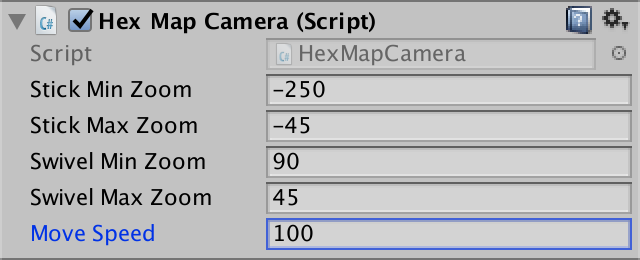
This gets the camera moving while we hold down the arrow or WASD keys, but not at a consistent velocity. It depends on the frame rate. To determine the distance to move, we have use the time delta, as well as a desired movement speed. So add a public moveSpeed variable and set it to 100. Then factor that and the time delta into the position delta.
	public float moveSpeed;

	void AdjustPosition (float xDelta, float zDelta) {
		float distance = moveSpeed * Time.deltaTime;

		Vector3 position = transform.localPosition;
		position += new Vector3(xDelta, 0f, zDelta) * distance;
		transform.localPosition = position;
	}
We can now move with a constant velocity along either the X or Z axis. But when moving along both at the same time – diagonally – we end up going faster. To fix this, we have to normalize the delta vector. That allows us to use it as a direction.
	void AdjustPosition (float xDelta, float zDelta) {
		Vector3 direction = new Vector3(xDelta, 0f, zDelta).normalized;
		float distance = moveSpeed * Time.deltaTime;

		Vector3 position = transform.localPosition;
		position += direction * distance;
		transform.localPosition = position;
	}
Diagonal movement is now correct, but all of a sudden the camera keeps moving for quite a while after we release all keys. This happens because the input axes don't immediately jump to their extreme values when a key in pressed. Instead, they take a while to get there. The same is true for when you release the keys. It takes a while before the axes return to zero. However, because we normalize the input values, we maintain maximum velocity all the time.
We could adjust the input settings to get rid of the delays, but they give a smooth feeling to the input which is worth keeping. What we can do is apply the most extreme axis value as a damping factor to the movement.
		Vector3 direction = new Vector3(xDelta, 0f, zDelta).normalized;
		float damping = Mathf.Max(Mathf.Abs(xDelta), Mathf.Abs(zDelta));
		float distance = moveSpeed * damping * Time.deltaTime;
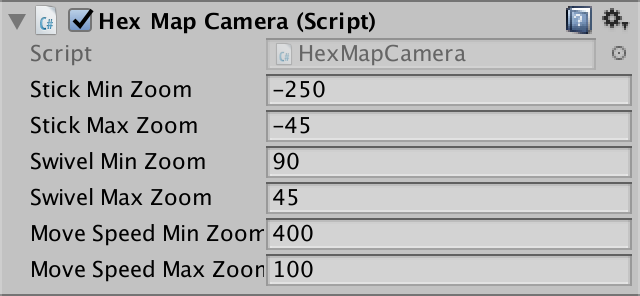
Movement now works fine, at least when zoomed in. When zoomed out, it is way too slow. We should speed up when zooming out. This can be done by replacing our single moveSpeed variable with two for minimum and maximum zoom, and interpolate. Set them to 400 and 100.
// public float moveSpeed;public float moveSpeedMinZoom, moveSpeedMaxZoom; void AdjustPosition (float xDelta, float zDelta) { Vector3 direction = new Vector3(xDelta, 0f, zDelta).normalized; float damping = Mathf.Max(Mathf.Abs(xDelta), Mathf.Abs(zDelta)); float distance = Mathf.Lerp(moveSpeedMinZoom, moveSpeedMaxZoom, zoom) * damping * Time.deltaTime; Vector3 position = transform.localPosition; position += direction * distance; transform.localPosition = position; }
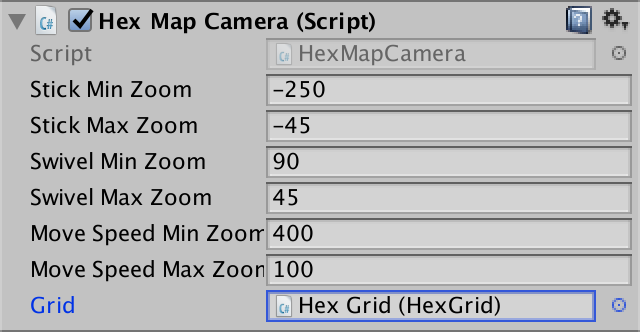
Now we can move around the map quickly! In fact, we can also move far beyond the edges of the map. This isn't desirable. The camera should stay inside the map. To enforce this, we have to know the bounds of the map, so we need a reference to the grid. Add one and hook it up.
public HexGrid grid;
After coming up with a new position, clamp it via a new method.
	void AdjustPosition (float xDelta, float zDelta) {
		…
		transform.localPosition = ClampPosition(position);
	}

	Vector3 ClampPosition (Vector3 position) {
		return position;
	}
The X position has a minimum of zero, and a maximum defined by the map size.
	Vector3 ClampPosition (Vector3 position) {
		float xMax =
			grid.chunkCountX * HexMetrics.chunkSizeX *
			(2f * HexMetrics.innerRadius);
		position.x = Mathf.Clamp(position.x, 0f, xMax);

		return position;
	}
The same goes for the Z position.
	Vector3 ClampPosition (Vector3 position) {
		float xMax =
			grid.chunkCountX * HexMetrics.chunkSizeX *
			(2f * HexMetrics.innerRadius);
		position.x = Mathf.Clamp(position.x, 0f, xMax);

		float zMax =
			grid.chunkCountZ * HexMetrics.chunkSizeZ *
			(1.5f * HexMetrics.outerRadius);
		position.z = Mathf.Clamp(position.z, 0f, zMax);

		return position;
	}
Actually, this is a little inaccurate. The origin lies at the center of a cell, not to the left of it. So we want the camera to stop at the center of the rightmost cells as well. To do so, subtract half a cell from the X maximum.
		float xMax =
			(grid.chunkCountX * HexMetrics.chunkSizeX - 0.5f) *
			(2f * HexMetrics.innerRadius);
		position.x = Mathf.Clamp(position.x, 0f, xMax);
For the same reason, the Z maximum has to be decreased as well. Because the metrics are a little different, we have to subtract a full cell.
		float zMax =
			(grid.chunkCountZ * HexMetrics.chunkSizeZ - 1) *
			(1.5f * HexMetrics.outerRadius);
		position.z = Mathf.Clamp(position.z, 0f, zMax);
We are done with movement, except for one little detail. Sometimes the UI responds to the arrow keys, which ends up moving the slider while moving the camera. This happens when the UI considers itself active, after you clicked on it and are still hovering over it with the cursor.
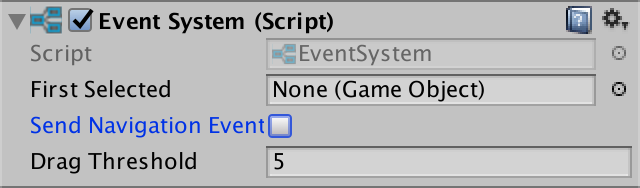
You can prevent the UI from listening to key input. This is done by instructing the EventSystem object to not Send Navigation Events.
Rotating
Want to see what's behind a cliff? It sure would be handy if we could rotate the camera! So let's add that feature.
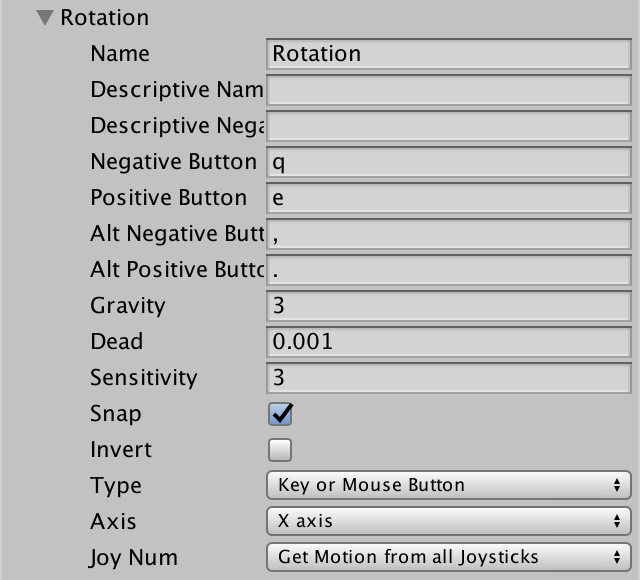
What zoom level we're at doesn't matter for rotation, so one speed suffices. Add a public rotationSpeed variable and set it to 180 degrees. Check the rotation delta in Update by sampling the Rotation axis, and adjust the rotation if needed.
	public float rotationSpeed;

	void Update () {
		float zoomDelta = Input.GetAxis("Mouse ScrollWheel");
		if (zoomDelta != 0f) {
			AdjustZoom(zoomDelta);
		}

		float rotationDelta = Input.GetAxis("Rotation");
		if (rotationDelta != 0f) {
			AdjustRotation(rotationDelta);
		}

		float xDelta = Input.GetAxis("Horizontal");
		float zDelta = Input.GetAxis("Vertical");
		if (xDelta != 0f || zDelta != 0f) {
			AdjustPosition(xDelta, zDelta);
		}
	}

	void AdjustRotation (float delta) {
	}
Actually, there is no default Rotation axis. We have to create it ourselves. Go to the input settings and duplicate the topmost Vertical entry. Change the duplicate's name to Rotation and set its keys to QE and the comma and dot.
Keep track of the rotation angle and adjust it in AdjustRotation. Then rotate the entire camera rig.
	float rotationAngle;

	void AdjustRotation (float delta) {
		rotationAngle += delta * rotationSpeed * Time.deltaTime;
		transform.localRotation = Quaternion.Euler(0f, rotationAngle, 0f);
	}
As a full circle is 360 degrees, wrap the rotation angle so it stays within 0 and 360.
	void AdjustRotation (float delta) {
		rotationAngle += delta * rotationSpeed * Time.deltaTime;
		if (rotationAngle < 0f) {
			rotationAngle += 360f;
		}
		else if (rotationAngle >= 360f) {
			rotationAngle -= 360f;
		}
		transform.localRotation = Quaternion.Euler(0f, rotationAngle, 0f);
	}
Rotation now works. When trying it out, you'll notice that the movement is absolute. So after rotating 180 degrees movement becomes the opposite of what you'd expect. It is a lot more user-friendly if movement was relative to the camera's point of view. We can make it so by multiplying the current rotation with the movement direction.
	void AdjustPosition (float xDelta, float zDelta) {
		Vector3 direction =
			transform.localRotation *
			new Vector3(xDelta, 0f, zDelta).normalized;
		…
	}
Advanced Editing
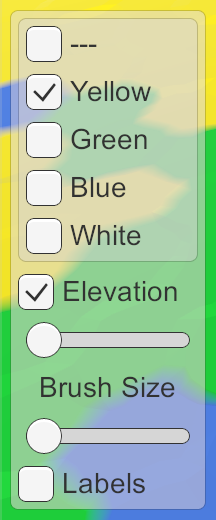
Now that we have a larger map to work with, our map editor tools can use an upgrade. Editing one cell at a time is quite limiting, so a larger brush size is a good idea. It would also be handy if we can decide to only paint color or elevation, leaving the other as it was.
Optional Color and Elevation
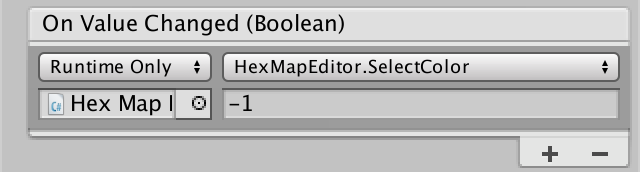
We can make colors optional by adding a blank option to the toggle group. Duplicate one of the color toggles and change its label to --- or something else that indicated that it is not a color. Then set the argument of its On Value Changed event to −1.
Of course this is an invalid index for our color array. We can use it to determine whether we should apply a color to the cells or not.
	bool applyColor;

	public void SelectColor (int index) {
		applyColor = index >= 0;
		if (applyColor) {
			activeColor = colors[index];
		}
	}

	void EditCell (HexCell cell) {
		if (applyColor) {
			cell.Color = activeColor;
		}
		cell.Elevation = activeElevation;
	}
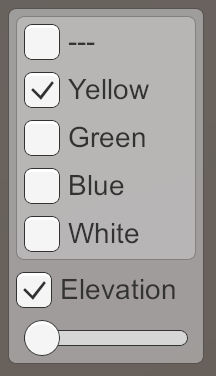
The elevation is controlled via a slider, so we cannot really build a switch into that. Instead, we can use a separate toggle to turn elevation editing on and off. Set it on by default.
	bool applyElevation = true;

	void EditCell (HexCell cell) {
		if (applyColor) {
			cell.Color = activeColor;
		}
		if (applyElevation) {
			cell.Elevation = activeElevation;
		}
	}
Add a new elevation toggle to the UI. I also put everything in a new panel and made the elevation slider to horizontal, to make the UI neater.
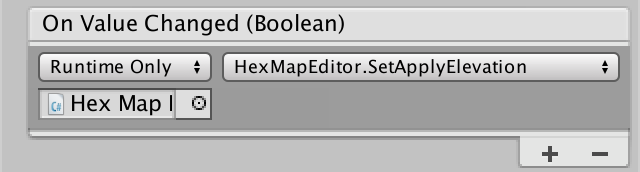
To toggle the elevation, we need a new method to connect it with the UI.
	public void SetApplyElevation (bool toggle) {
		applyElevation = toggle;
	}
When you hook it up to the elevation toggle, make sure that you use the dynamic bool method, at the top of the method list. The correct versions does not show a checkbox in the inspector.
You can now choose to paint only colors or only elevation. Or both, as usual. You can even choose to paint neither, but that isn't very useful right now.
Brush Size
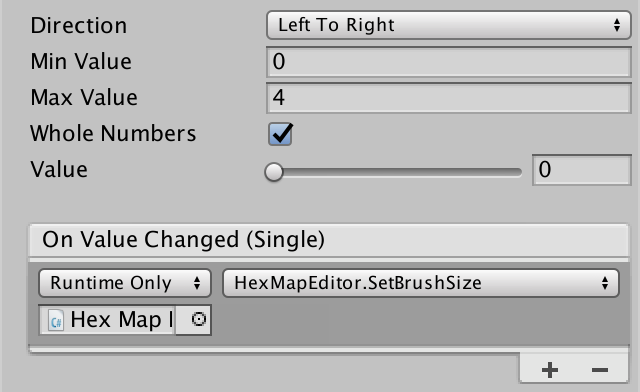
To support a variable brush size, add a brushSize integer variable and a method to set it via the UI. We'll use a slider, so we have to convert from float to int again.
	int brushSize;

	public void SetBrushSize (float size) {
		brushSize = (int)size;
	}
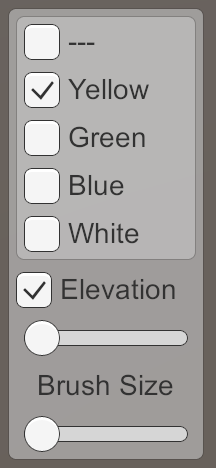
You can create the new slider by duplicating the elevation slider. Change its maximum value to 4 and hook it up to the correct method. I also gave it a label.
Now that we can end up editing more than one cell, we should use an EditCells method. This method will take care of invoking EditCell for all cells that are affected. The originally selected cell will act as the center of our brush.
	void HandleInput () {
		Ray inputRay = Camera.main.ScreenPointToRay(Input.mousePosition);
		RaycastHit hit;
		if (Physics.Raycast(inputRay, out hit)) {
			EditCells(hexGrid.GetCell(hit.point));
		}
	}

	void EditCells (HexCell center) {
	}

	void EditCell (HexCell cell) {
		…
	}
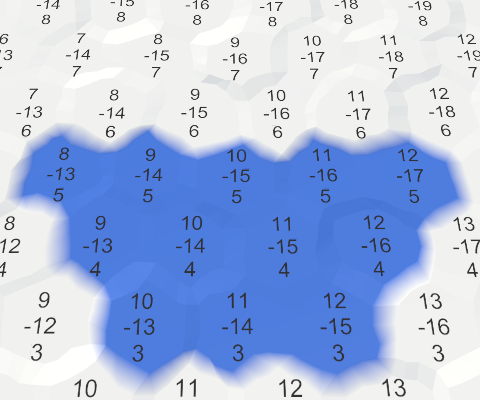
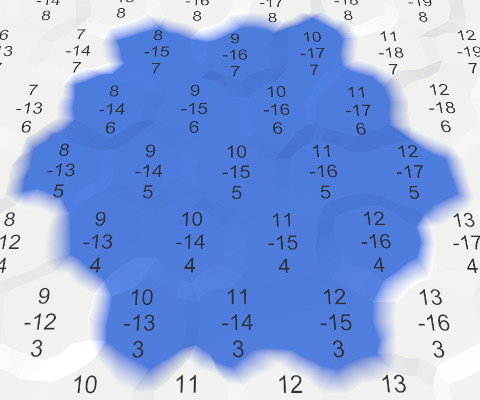
The brush size defines the radius of the effect of our edit. At radius 0, it is just the center cell. At radius 1, it is the center and its neighbors. At radius 2, it includes the neighbors of its direct neighbors as well. And so on.

To edit all the cells, we have to loop through them. First, we need the X and Z coordinates of the center.
	void EditCells (HexCell center) {
		int centerX = center.coordinates.X;
		int centerZ = center.coordinates.Z;
	}
We find the minimum Z coordinate by subtracting the radius. That defines row zero. Starting at that row, let's loop until have covered the row at the center.
	void EditCells (HexCell center) {
		int centerX = center.coordinates.X;
		int centerZ = center.coordinates.Z;

		for (int r = 0, z = centerZ - brushSize; z <= centerZ; z++, r++) {
		}
	}
The first cell of the bottom row has the same X coordinate as the center cell. This coordinate decreases as the row number increases.
The last cell always has an X coordinate equal to the center's plus the radius.
Now we can loop through each row and retrieve the cells via their coordinates.
		for (int r = 0, z = centerZ - brushSize; z <= centerZ; z++, r++) {
			for (int x = centerX - r; x <= centerX + brushSize; x++) {
				EditCell(hexGrid.GetCell(new HexCoordinates(x, z)));
			}
		}
We don't have a HexGrid.GetCell method with a coordinates parameter yet, so create it. Convert to offset coordinates and retrieve the cell.
	public HexCell GetCell (HexCoordinates coordinates) {
		int z = coordinates.Z;
		int x = coordinates.X + z / 2;
		return cells[x + z * cellCountX];
	}
The rest of the brush can be covered by looping from the top down to the center. In this case, the logic is mirrored, and the center row should be excluded.
	void EditCells (HexCell center) {
		int centerX = center.coordinates.X;
		int centerZ = center.coordinates.Z;

		for (int r = 0, z = centerZ - brushSize; z <= centerZ; z++, r++) {
			for (int x = centerX - r; x <= centerX + brushSize; x++) {
				EditCell(hexGrid.GetCell(new HexCoordinates(x, z)));
			}
		}
		for (int r = 0, z = centerZ + brushSize; z > centerZ; z--, r++) {
			for (int x = centerX - brushSize; x <= centerX + r; x++) {
				EditCell(hexGrid.GetCell(new HexCoordinates(x, z)));
			}
		}
	}
This works, unless our brush ends up extending beyond the bounds of the grid. When that happens, you get an index-out-of-range exception. To prevent this, check the bounds in HexGrid.GetCell and return null when a nonexistent cell is requested.
	public HexCell GetCell (HexCoordinates coordinates) {
		int z = coordinates.Z;
		if (z < 0 || z >= cellCountZ) {
			return null;
		}
		int x = coordinates.X + z / 2;
		if (x < 0 || x >= cellCountX) {
			return null;
		}
		return cells[x + z * cellCountX];
	}
To prevent a null-reference-exception, HexMapEditor should check that it really has a cell, before editing it.
	void EditCell (HexCell cell) {
		if (cell) {
			if (applyColor) {
				cell.Color = activeColor;
			}
			if (applyElevation) {
				cell.Elevation = activeElevation;
			}
		}
	}
Toggling Cell Labels
Most of the time, you probably don't need to see the cell labels. So let's make them optional. As each chunk manages its own canvas, add a ShowUI method to HexGridChunk. When the UI should be visible, activate the canvas. Otherwise, deactivate it.
	public void ShowUI (bool visible) {
		gridCanvas.gameObject.SetActive(visible);
	}
Let's hide the UI by default.
	void Awake () {
		gridCanvas = GetComponentInChildren<Canvas>();
		hexMesh = GetComponentInChildren<HexMesh>();

		cells = new HexCell[HexMetrics.chunkSizeX * HexMetrics.chunkSizeZ];
		ShowUI(false);
	}
As the UI is toggled for the entire map, add a ShowUI method to HexGrid as well. It simply passes the request on to its chunks.
	public void ShowUI (bool visible) {
		for (int i = 0; i < chunks.Length; i++) {
			chunks[i].ShowUI(visible);
		}
	}
HexMapEditor gets the same method as well, forwarding the request to the grid.
	public void ShowUI (bool visible) {
		hexGrid.ShowUI(visible);
	}
Finally, we can add a toggle to the UI and hook it up.
The next tutorial is Rivers.