Reactive Environment
Movement with Consequences
- Create jump pads and levitation via an acceleration zone.
- Make a multi-purpose detection zone.
- Reactively swap materials and activate or deactivate objects.
- Move objects via simple interpolation triggered by events.
This is the tenth installment of a tutorial series about controlling the movement of a character. It makes it possible for the environment to react to movement in various ways.
This tutorial is made with Unity 2019.4.4f1. It also uses the ProBuilder package.
Acceleration Zone
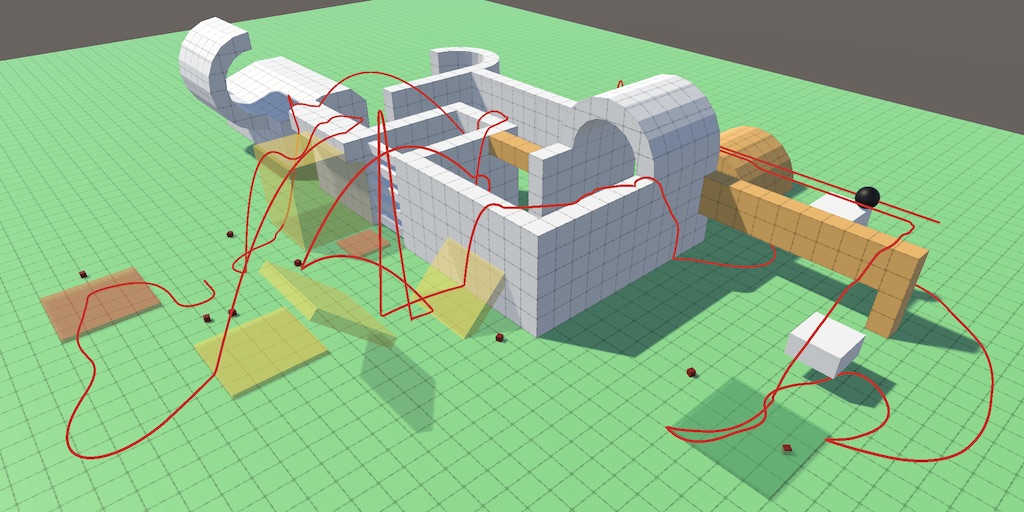
An active environment is more interesting than a static one, especially if it reacts to what's happening. This behavior could react to anything and could do anything, but a simple example is something like a jump pad: whenever something lands on the pad it gets launched upward. This could be our moving sphere or any other body that happens to fall or be pushed onto the pad. Thus the behavior logically belongs to the jump pad. Other objects need not be aware of its existence, they just suddenly end up flying.
Zone Component
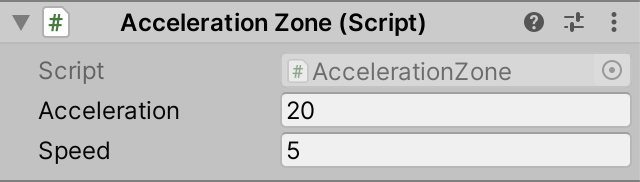
The most generic way to describe the jump pad's behavior is that it's a zone which accelerates anything that enter it. Hence we'll create an AccelerationZone component type, with a configurable speed that cannot be negative.
using UnityEngine;

public class AccelerationZone : MonoBehaviour {

	[SerializeField, Min(0f)]
	float speed = 10f;
}
The zone can be created by adding an object with a trigger collider to the scene, then attaching the zone behavior to it. You can also add objects that visualize the jump pad, but I simply made the zone visible with a semitransparent yellow material.

When something with a Rigidbody enters the zone we should accelerate it. Add an OnTriggerEnter method for this that invokes a new Accelerate method with the triggering body as an argument. This will happen to all bodies that enter the zone, but you can use layers to prevent certain objects from getting detected if desired.
	void OnTriggerEnter (Collider other) {
		Rigidbody body = other.attachedRigidbody;
		if (body) {
			Accelerate(body);
		}
	}

	void Accelerate(Rigidbody body) {}
Accelerate simply makes the Y component of the body's velocity equal to the configured speed, unless it was already greater. The other velocity components are unaffected.
	void Accelerate(Rigidbody body) {
		Vector3 velocity = body.velocity;
		if (velocity.y >= speed) {
			return;
		}

		velocity.y = speed;
		body.velocity = velocity;
	}
Preventing Snapping to Ground
This simple approach works fine when launching regular bodies, but our sphere doesn't get properly launched. It instead appears to gain a lot of forward speed when it moves into the zone. This happens because we snap it to the ground. This can be solved by decreasing the Max Snap Speed in this case, but that won't work for acceleration zones set to a low speed. To prevent ground snapping in general we have to instruct MovingSphere to not perform snapping for the moment. We can do that by adding a public PreventSnapToGround method to it that sets stepsSinceLastJump to −1.
	public void PreventSnapToGround () {
		stepsSinceLastJump = -1;
	}
Now AccelerationZone.Accelerate can invoke this method if the body has a MovingSphere component, which we can both check and retrieve by invoking TryGetComponent with the sphere as an output argument.
	void Accelerate(Rigidbody body) {
		…
		if (body.TryGetComponent(out MovingSphere sphere)) {
			sphere.PreventSnapToGround();
		}
	}
Note that this approach doesn't reset the jump phase, so bouncing off jump pads without landing doesn't refresh air jumps.
Continuous Acceleration
An instantaneous speed change is fine for jump pads, but we could also use the zone to create other acceleration phenomena that are continuous, like a levitation zone. We can support this by simple adding an OnTriggerStay method that does the same as OnTriggerEnter.
	void OnTriggerStay (Collider other) {
		Rigidbody body = other.attachedRigidbody;
		if (body) {
			Accelerate(body);
		}
	}
If the effect is prolonged then it'll look better if the speed change is achieved via proper acceleration, so let's add a configurable acceleration to the zone, again with a minimum of zero. If it's set to zero we'll make the change instantaneous, otherwise we apply acceleration.
	[SerializeField, Min(0f)]
	float acceleration = 10f, speed = 10f;

	…

	void Accelerate(Rigidbody body) {
		…

		if (acceleration > 0f) {
			velocity.y = Mathf.MoveTowards(
				velocity.y, speed, acceleration * Time.deltaTime
			);
		}
		else {
			velocity.y = speed;
		}

		…
	}
It's also possible to apply a force instead, so objects with greater mass end up accelerating slower, but a fixed acceleration makes it easier to design levels, so I used that.
Arbitrary Direction
Finally, to make it possible to accelerate in any direction, convert the body velocity to the zone's local space at the start of Accelerate and convert it back to world space when applying it. Do this with InverseTransformDirection and TransformDirection so the zone's scale doesn't affect it. The acceleration direction can now be controlled by rotating the zone.
	void Accelerate(Rigidbody body) {
		Vector3 velocity = transform.InverseTransformDirection(body.velocity);
		…

		body.velocity = transform.TransformDirection(velocity);
		…
	}
Reacting to Presence
The acceleration zone is just one example of how to create a trigger zone with specific behavior. If you need a zone that does something else you'll have to write new code for it. But the simple behavior of detecting and reacting to the presence of something somewhere is so generic that we ideally write it only once. And a lot of behavior is so simple—like activating an object—that creating a dedicated component type for it might be excessive. And more complex behavior is often just a combination of a few simple actions. It would be convenient if a level designer could create that by simply configuring game objects and adding some components, instead of having to create specialized code all the time.
Detection Zone
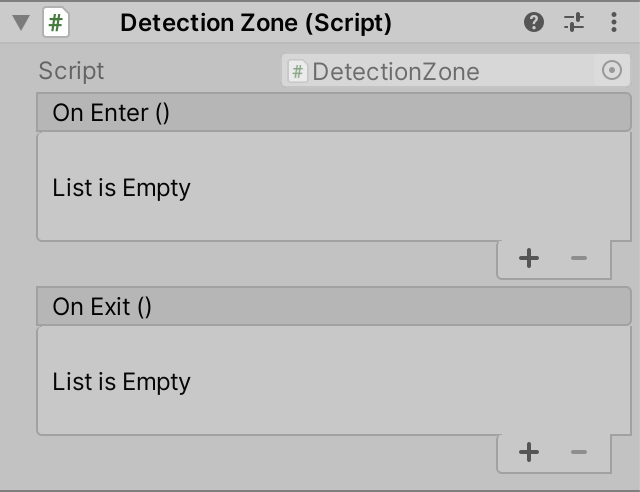
Let's begin by creating a DetectionZone component that detects whether something is present in its zone and notifies whoever is interested when something enters or exits. We do that by giving it configurable onEnter and onExit fields of the type UnityEvent, from the UnityEngine.Events namespace.
using UnityEngine;
using UnityEngine.Events;

public class DetectionZone : MonoBehaviour {

	[SerializeField]
	UnityEvent onEnter = default, onExit = default;
}
Simply have it invoke the Invoke method on the appropriate event in OnTriggerEnter and OnTriggerExit. That will trigger method invocations on everything that registered to the event.
	void OnTriggerEnter (Collider other) {
		onEnter.Invoke();
	}

	void OnTriggerExit (Collider other) {
		onExit.Invoke();
	}
The component's events will be exposed by the inspector as lists named On Enter () and On Exit (), which are initially empty. The parenthesis with nothing between them after the names indicate that these events have no parameter.
Material Selector
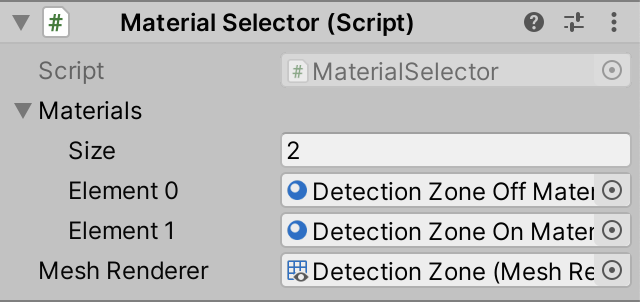
To demonstrate how this works we'll create a simple MaterialSelector component type that has a configurable array of materials and MeshRenderer reference. It has a single public Select method with an index parameter, which assigns the desired material to the renderer, if valid.
using UnityEngine;

public class MaterialSelector : MonoBehaviour {

	[SerializeField]
	Material[] materials = default;

	[SerializeField]
	MeshRenderer meshRenderer = default;

	public void Select (int index) {
		if (
			meshRenderer && materials != null &&
			index >= 0 && index < materials.Length
		) {
			meshRenderer.material = materials[index];
		}
	}
}
Create a material selector component with a red inactive zone and a green active zone material, which will be used to change the visualization of the detection zone. Though it's not required to add it to the game object that it affects, this makes the most sense.
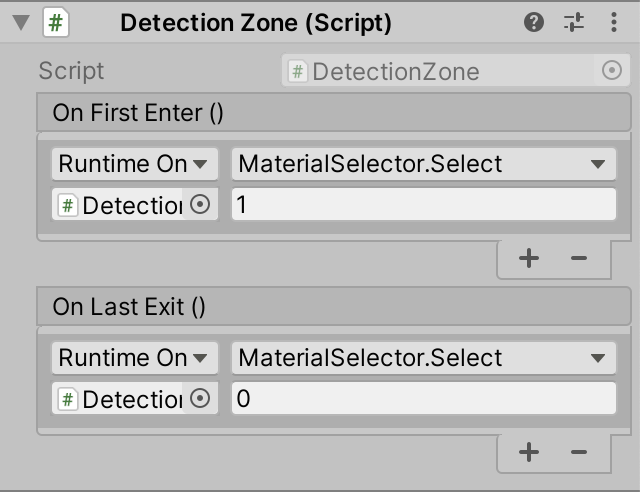
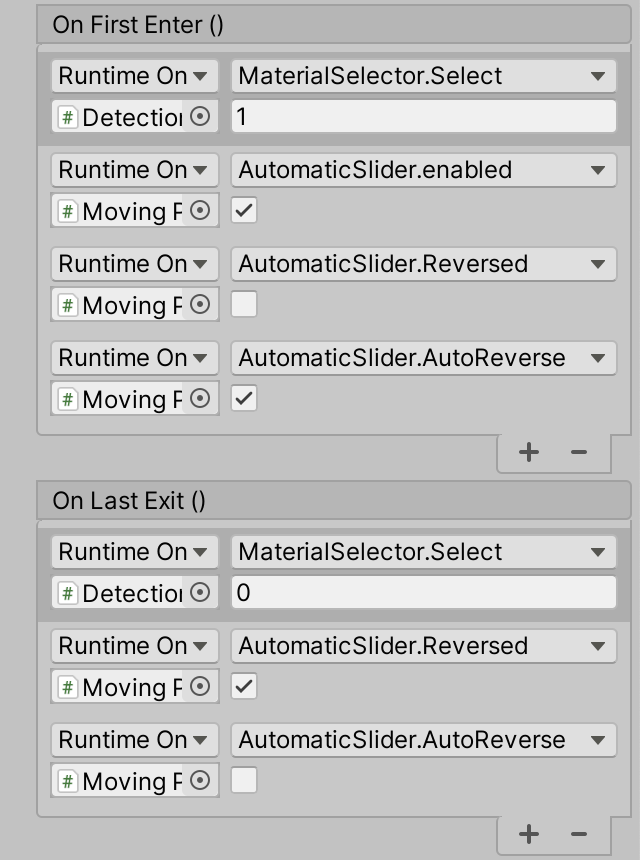
Now add an item to the on-enter event list of the detection zone component, by pressing its + button. Link the game object with the material selector to the item, via its bottom-left field. After that it's possible to select the MaterialSelector.Select method. As this method has an integer argument its value will be displayed below the method name. It's set to zero by default, which represents the inactive state, so set it to 1. Then do the same for the on-exit event, this time leaving the argument at zero.
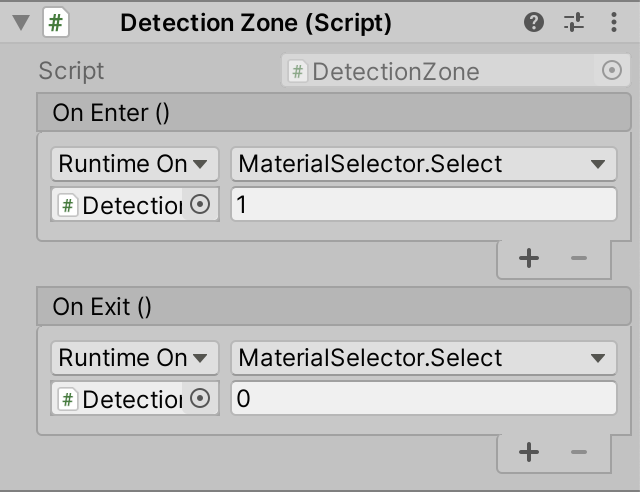
Make sure that the zone object uses the inactive red material by default. Then it starts like that but will switch to the active green material as soon as something enters the zone. And when something exits the zone it will become red again.
First Enter and Last Exit
The detection zone works, but does exactly what it's programmed to do, which is to invoke on-enter each time something enters and on-exit each times something leaves. Thus we can get a mix of enter and exit events—like enter, enter, exit, enter, exit, exit—and can end up with a visually inactive zone while there are still things in it. It's more intuitive for the zone to remain active while there's something in it. It's also easier to design with a zone that guarantees that enter and exit events will strictly alternate. Thus it should only signal when the first thing enters and when the last thing exits. Refactor rename the events to onFirstEnter and onLastExit to make this clear, which will require hooking up the events again.
To make this behavior possible we have to keep track of the colliders that are currently in the zone. We'll do that by giving DetectionZone a List<Collider> field initialized to a new list, from the System.Collections.Generic namespace.
using UnityEngine;
using UnityEngine.Events;
using System.Collections.Generic;

public class DetectionZone : MonoBehaviour {

	[SerializeField]
	UnityEvent onFirstEnter = default, onLastExit = default;

	List<Collider> colliders = new List<Collider>();

	…
}
In OnTriggerEnter only invoke the enter event if the list is empty, then always add the collider to the list to keep track of it.
	void OnTriggerEnter (Collider other) {
		if (colliders.Count == 0) {
			onFirstEnter.Invoke();
		}
		colliders.Add(other);
	}
In OnTriggerExit we remove the collider from the list and only if the list is empty invoke the exit event. The list's Remove method returns whether the removal succeeded. This should always be the case because otherwise we failed to track a collider, but we can check it anyway.
	void OnTriggerExit (Collider other) {
		if (colliders.Remove(other) && colliders.Count == 0) {
			onLastExit.Invoke();
		}
	}
Detecting Appearing and Disappearing Objects
Unfortunately OnTriggerExit isn't reliable, because it doesn't get invoked when game objects or their colliders are deactivated, disabled, or destroyed. Colliders shouldn't be disabled independently because that would result in bodies falling through geometry, so we're not going to support that. But we should be able to deal with entire game objects getting disabled or destroyed while they are inside the zone.
Each physics step we have to check whether the colliders in the zone are still valid. Add a FixedUpdate method that loops through the collider list. If a collider evaluates to false it means that either it or its game object has been destroyed. If that isn't the case we have to check if its game object is deactivated, which we can find out via the activeInHierarchy property of its game object. If the collider is no longer valid remove it from the list and decrement the loop iterator. If the list is then empty invoke the exit event.
	void FixedUpdate () {
		for (int i = 0; i < colliders.Count; i++) {
			Collider collider = colliders[i];
			if (!collider || !collider.gameObject.activeInHierarchy) {
				colliders.RemoveAt(i--);
				if (colliders.Count == 0) {
					onLastExit.Invoke();
				}
			}
		}
	}
It is likely that detection zones don't have objects in them most of the time. To avoid needlessly invoking FixedUpdate continuously we can disable the component when it awakens and after the last collider exits. Then we only enable it after something enters. This works because the trigger methods always get invoked, regardless whether a behavior is enabled.
	void Awake () {
		enabled = false;
	}

	void FixedUpdate () {
		for (int i = 0; i < colliders.Count; i++) {
			Collider collider = colliders[i];
			if (!collider || !collider.gameObject.activeInHierarchy) {
				colliders.RemoveAt(i--);
				if (colliders.Count == 0) {
					onLastExit.Invoke();
					enabled = false;
				}
			}
		}
	}

	void OnTriggerEnter (Collider other) {
		if (colliders.Count == 0) {
			onFirstEnter.Invoke();
			enabled = true;
		}
		colliders.Add(other);
	}

	void OnTriggerExit (Collider other) {
		if (colliders.Remove(other) && colliders.Count == 0) {
			onLastExit.Invoke();
			enabled = false;
		}
	}
Next, we should also deal with the zone game object itself getting deactivated or destroyed, as it makes sense to invoke the exit event when that happens while something is still in the zone. We can do both by adding an OnDisable method that clears the list and invokes the exit event if the list isn't empty.
	void OnDisable () {
		if (colliders.Count > 0) {
			colliders.Clear();
			onLastExit.Invoke();
		}
	}
Note that the detection zone's component shouldn't be disabled by other code, as it manages its own state. The general rule is to not disable the detection zone component nor any individual colliders that could affect the zone. Those game objects should be deactivated or destroyed in their entirety.
Hot Reloads
Because hot reloads—recompilation while in editor play mode—will invoke OnDisable it breaks the rule that we just declared. This will result in exit events getting invoked in response to a hot reload, after which objects already in the zone will be ignored. Fortunately we can detect a hot reload in OnDisable. If both the component is enabled and the game object is active then we have a hot reload and shouldn't do anything. This is also the case when the component is destroyed while the game object isn't, but we ruled that this shouldn't be done.
We only need to check this while playing in the editor, so we can wrap the code in #if UNITY_EDITOR and #endif.
	void OnDisable () {
#if UNITY_EDITOR
		if (enabled && gameObject.activeInHierarchy) {
			return;
		}
#endif
		if (colliders.Count > 0) {
			colliders.Clear();
			onLastExit.Invoke();
		}
	}
More Complex Behavior
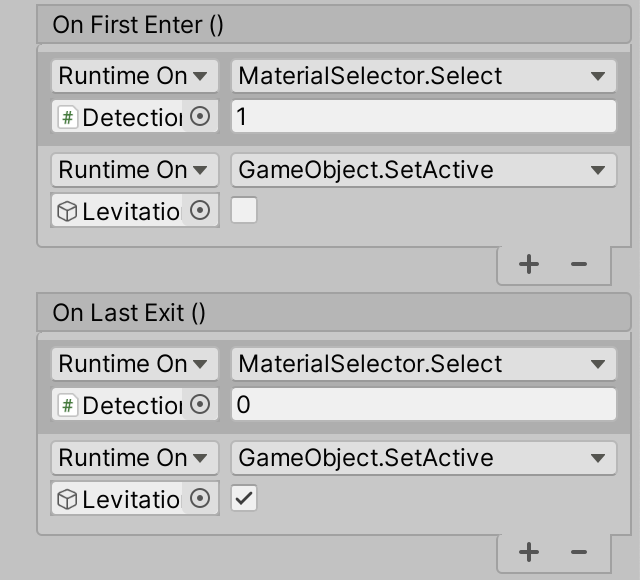
This was only a simple demonstration of what can be done via events. You can create more complex behavior by adding more entries to the event lists. You don't have to create new method for this, you can use existing ones. The restriction is that it have to be void methods—or property setters—that match the event's parameter list, or have at most a single serializable parameter. For example, I set things up so that the levitation zone is turned off while there's something inside the detection zone, besides changing the visualization of the zone itself.
You don't always have to respond to both events for everything. You could have something trigger only on enter or on exit. For example, activate something when a zone gets entered. Exiting then won't deactivate it and re-entry would activate it again, which does nothing.
Simple Movement
One final case that we'll cover in this tutorial is moving environmental objects. Intricate movement can be done via animations, which could be triggered with a detection zone. But often a simple linear interpolation between two points would suffice, for example for doors, elevators, or floating platforms. So let's add support for that.
Automatic Slider
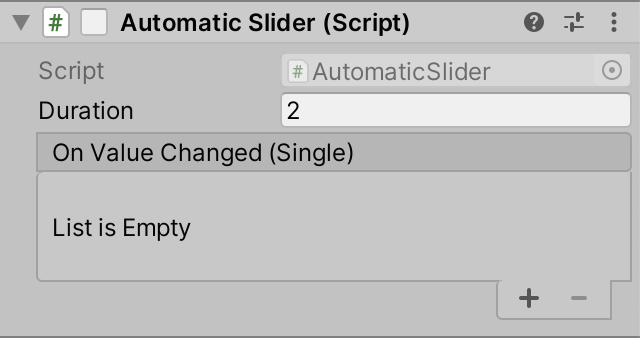
No matter what gets interpolated, it's conceptually controlled by a slider that goes from 0 to 1. How that value gets changed is a separate issue from the interpolation itself. Keeping the slider separate also makes it possible to use it for multiple interpolations. So we'll create an AutomaticSlider component dedicated to this value. It has a configurable duration that must be positive. As we'll use it to animate physics objects we'll have it increase its value in the FixedUpdate method, making sure that it doesn't overshoot. Once the value has reached 1 we're done and can disable the slider.
using UnityEngine;

public class AutomaticSlider : MonoBehaviour {

	[SerializeField, Min(0.01f)]
	float duration = 1f;

	float value;

	void FixedUpdate () {
		value += Time.deltaTime / duration;
		if (value >= 1f) {
			value = 1f;
			enabled = false;
		}
	}
}
Once again we'll use Unity events to make it possible to attach behavior to the slider. In this case we need an on-value-changed event, which we'll use to pass along the current value of the slider. So our event needs a float parameter, for which we can use the UnityEvent<float> type. Invoke the event at the end of FixedUpdate.
using UnityEngine;
using UnityEngine.Events;

public class AutomaticSlider : MonoBehaviour {

	…

	[SerializeField]
	UnityEvent<float> onValueChanged = default;

	float value;

	void FixedUpdate () {
		…
		onValueChanged.Invoke(value);
	}
}
However, Unity cannot serialize generic event types, so the event won't show up in the inspector. We have to create our own concrete serializable event type, which simply extends UnityEvent<float>. This type is specific to our slider, so make it a nested type by declaring it inside the class, along with the event field itself.
	[System.Serializable]
	public class OnValueChangedEvent : UnityEvent<float> { }

	[SerializeField]
	OnValueChangedEvent onValueChanged = default;
The slider will immediately start increasing when entering play mode. If you don't want that simply disable it by default. Then you can hook it up to a detection zone to enable it later.
Note that in this case the event's name is followed by (Single), indicating that it has a parameter. Single refers to the float type, which is a single-precision floating-point number.
Position Interpolator
Next, create a PositionInterpolator component type that interpolates the position of a configurable Rigidbody between two configurable positions, via a public Interpolate method with a float parameter. Use Vector3.LerpUnclamped so the provided value doesn't get clamped, leaving that up to the invoker. We have to change the body's position via its MovePosition method so it's interpreted as movement, otherwise it would be teleportation.
using UnityEngine;

public class PositionInterpolator : MonoBehaviour {

	[SerializeField]
	Rigidbody body = default;

	[SerializeField]
	Vector3 from = default, to = default;

	public void Interpolate (float t) {
		body.MovePosition(Vector3.LerpUnclamped(from, to, t));
	}
}
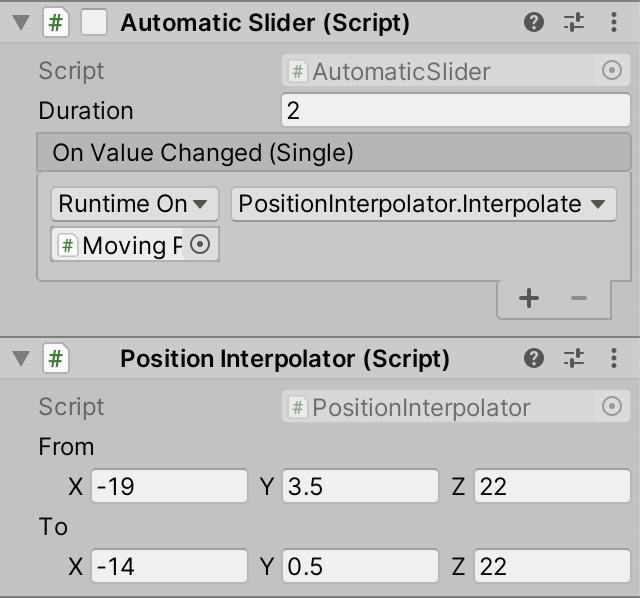
I created a simple moving platform by adding both the sider and interpolator to the same platform object. The dynamic version of the interpolator's Interpolate method is bound to the slider's event, which is why there is no field for its value. I then connected the slider to a detection zone so the platform activates when something enter that zone. Note that the interpolation points are in world space.
Auto Reverse
We can make the interpolation go back and forth by adding a configurable auto-reverse toggle to AutomaticSlider. This requires us to keep track of whether it's reversed and doubles the code in FixedUpdate, having to support going in both directions. Also, when auto-reversing is active we have to bounce instead of clamp the value. In the case of extremely short durations this could cause an overshoot, so we'll still clamp after the bounce.
	[SerializeField]
	bool autoReverse = false;

	…

	bool reversed;

	void FixedUpdate () {
		float delta = Time.deltaTime / duration;
		if (reversed) {
			value -= delta;
			if (value <= 0f) {
				if (autoReverse) {
					value = Mathf.Min€(1f, -value);
					reversed = false;
				}
				else {
					value = 0f;
					enabled = false;
				}
			}
		}
		else {
			value += delta;
			if (value >= 1f) {
				if (autoReverse) {
					value = Mathf.Max(0f, 2f - value);
					reversed = true;
				}
				else {
					value = 1f;
					enabled = false;
				}
			}
		}
		onValueChanged.Invoke(value);
	}

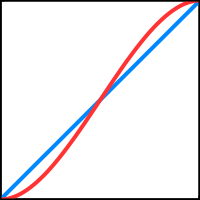
Smoothstep
The motion of linear interpolation is rigid, with abrupt velocity changes when it reverses. We can make it accelerate and decelerate by passing a smoothed variant of the value to the event. We do that by applying the smoothstep function to it, which is 3v2 − 2v3. Make this a configurable option.
	[SerializeField]
	bool autoReverse = false, smoothstep = false;

	…

	float SmoothedValue => 3f * value * value - 2f * value * value * value;

	void FixedUpdate () {
		…
		onValueChanged.Invoke(smoothstep ? SmoothedValue : value);
	}

More Control
Pausing the animation can be done by disabling the slider component via a detection zone event, but let's also make it possible to control its direction. The simplest way to do that is by making its reversed state available via a public property. Replace the reversed field with an automatic Reversed property, adjusting the capitalization of the other code to match.
//bool reversed;public bool Reversed { get; set; }
Let's do the same for the auto-reverse option. In this case we have to keep the serializable field, so add an explicit property.
	public bool AutoReverse {
		get => autoReverse;
		set => autoReverse = value;
	}
Note that direction reversal is sudden, as it's still a simple interpolation. If you want smooth stopping and reversing at any point you'd need to create more complex logic that uses acceleration and velocity.
Crushing Collisions
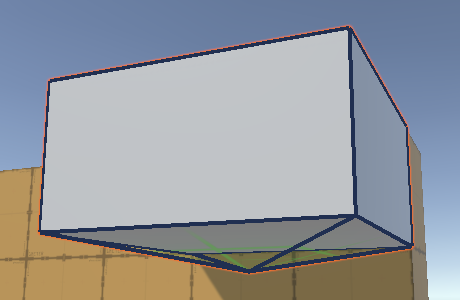
A danger of moving scenery is that bodies can end up caught between two approaching colliders. As the gap between the colliders closes the body either gets ejected or ends up pushed into or through a collider. If the colliding surfaces are at an angle then there is a clear path of escape and the body will be pushed in that direction. If not or if there isn't enough time to escape the body will end up getting crushed, penetrating the colliders. If a body gets stuck between two simple colliders that are thick enough then it can remain inside them, popping out once there is a clear path. Otherwise it will fall through.
If the colliding surfaces are at an angle then the body will be pushed aside and has a good chance of escape. So it is a good idea to engineer such such configurations, either by leaving enough room between surfaces or by introducing angled colliders, invisible or not. Also, hiding a box collider in the floor makes it more solid so objects won't get pushed through it. Alternatively, add a zone that triggers the destruction of the body at the appropriate time, representing it getting crushed.
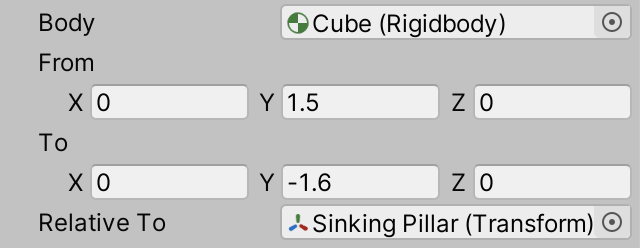
Local Interpolation
Configuration in world space can be inconvenient, because it cannot be reused for the same animation at multiple locations. So let's wrap up by adding a local space option to PositionInterpolator. We do this by adding an optional configurable Transform relative to which interpolation should happen. This would usually refer to the object with the interpolator, but this need not be the case.
	[SerializeField]
	Transform relativeTo = default;

	public void Interpolate (float t) {
		Vector3 p;
		if (relativeTo) {
			p = Vector3.LerpUnclamped(
				relativeTo.TransformPoint(from), relativeTo.TransformPoint(to), t
			);
		}
		else {
			p = Vector3.LerpUnclamped(from, to, t);
		}
		body.MovePosition(p);
	}
The next tutorial is Rolling.