Paddle Square
A Pong Clone
- Use cubes to build an arena, paddles, and a ball.
- Move the ball and paddles.
- Hit the ball and score points.
- Make the camera feel impacts.
- Give the game an abstract neon look.
This is the first tutorial in a series about prototypes. In it we will create a simple Pong clone.
This tutorial is made with Unity 2021.3.16f1 and upgraded to 2022.3.1f1.
This series will cover the creation of simple game prototypes, to show how you can go from an idea to a minimal working game in a short amount of time. The games will be clones so we won't have to invent a new idea from scratch, but we'll deviate from the standard in some way.
Besides keeping things simple, we'll set a design constraint for this series to limit ourselves: we can only render default cubes and world-space text, that's it. Also, I include no sound.
The series assumes that you have worked through at least the Basics series, plus a few more series of your choice so that you are familiar with working and programming in Unity. I won't show every step in as much detail as the other series, assuming that you can create game objects and hook things up in the inspector yourself without screenshots. I also won't explain basic mathematics nor laws of motion.
Game Scene
The game that we'll clone in this tutorial is Pong, a very abstract representation of ping-pong or tennis. You can clone the idea of Pong, but don't give it a similar name lest Atari will ask you to take it down. So we'll name our game Paddle Square, because it's all squares.
We'll start with the default sample scene of a new 3D project, though renamed to Game Scene. The only packages that we'll use are TextMeshPro, Universal RP, the editor integration package of your choice—Visual Studio Editor in my case—and their dependencies. The dependencies of these packages are Burst, Core RP Library, Custom NUnit, Mathematics, Seacher, Shader Graph, Test Framework, and Unity UI.
Create a Rendering / URP Asset (with Universal Renderer) asset and use it for both the Graphics / Scriptable Render Pipeline Settings and the Quality / Render Pipeline Asset in Project Settings.
Arena
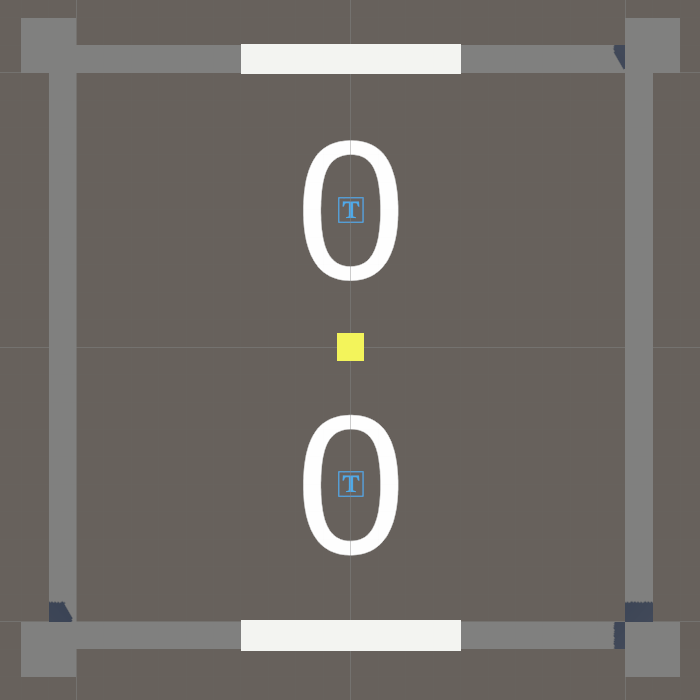
Create a default cube and turn it into a prefab. Remove its collider as we won't rely on a physics system. Use four of these scaled up to 20 units in one dimension each to form the boundaries of a square 20×20 area around the origin on the XZ plane. As the cubes are one unit thick, each much be moved 10.5 units away from the origin in the appropriate direction.
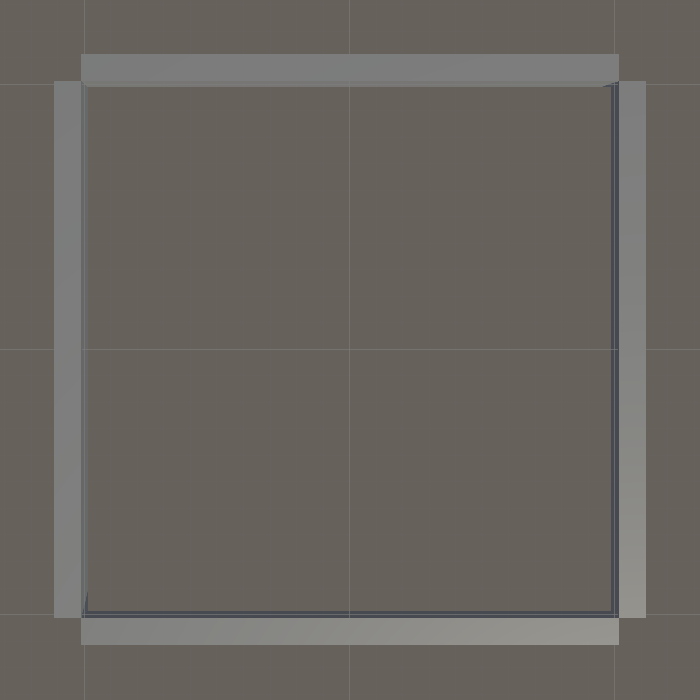
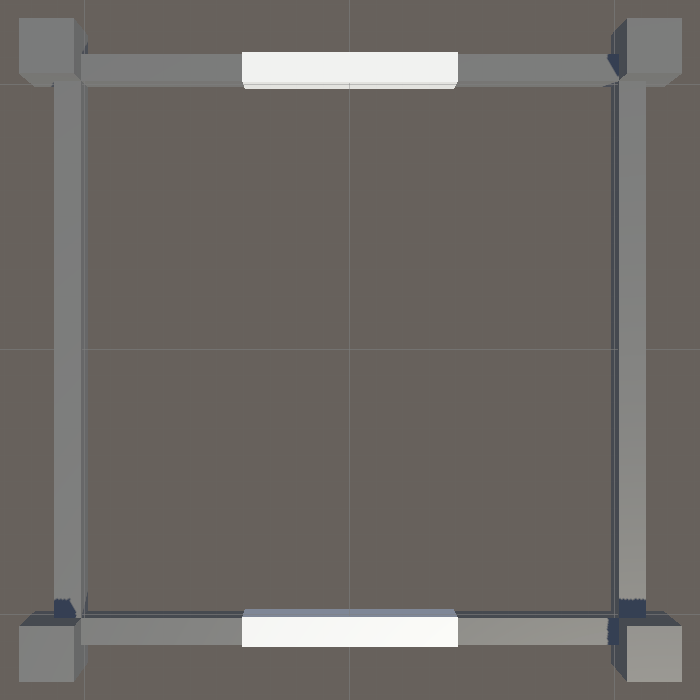
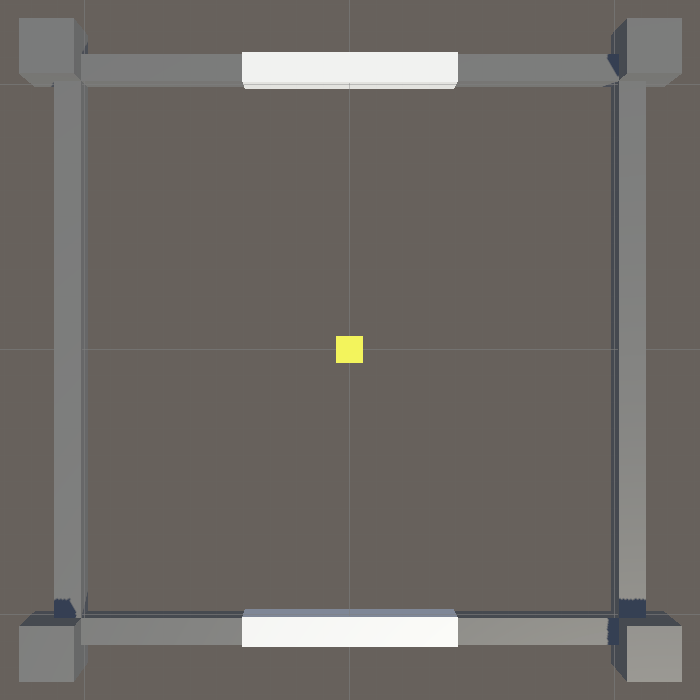
To make it a bit more interesting, add four more prefab instances scaled up to size 2 and use them to fill the boundary corners. Set their Y coordinates to 0.5 so all bottoms are aligned. Also adjust the main camera so it shows a top-down view of the entire arena.

The arena needs to have two paddles. Create another default cube and turn it into a new prefab, again without collider. Set its scale to (8, 1.1, 1.1) and give it a white material. Add two instances of it to the scene so they overlap the middle of the bottom and top boundaries, as seen from above.
The last thing that we need is a ball, which will also be a cube. Create yet another cube prefab for this—in case you decide to add multiple balls later—and give it a yellow material. Put an instance of it in the center of the scene.
Components
Although our game is so simple that we could control everything with a single script, we'll logically split the functionality to keep the code easier to understand. We'll create the obvious component types now and fill them in later.
First, we have a ball that moves, so create a Ball class that extends MonoBehaviour and add it as a component to the ball prefab.
using UnityEngine;

public class Ball : MonoBehaviour {}
Second, we have paddles that will try to hit the ball, so create a Paddle component type for them and add it to the paddle prefab.
using UnityEngine;

public class Paddle : MonoBehaviour {}
Third, we need a component that is in control of the gameplay loop and communicates with the ball and paddles. Simply name it Game, give it configuration fields to connect the ball and both paddles, attach it to an empty game object in the scene, and hook things up.
using UnityEngine;

public class Game : MonoBehaviour
{
	[SerializeField]
	Ball ball;

	[SerializeField]
	Paddle bottomPaddle, topPaddle;
}
Controlling the Ball
The point of the game it to control the ball. The ball moves around the arena, in a straight line until it hits something. Each player tries to position its paddle so that it hits the ball and bounces it back to the other side.
Position and Velocity
In order to move Ball needs to keep track of both its position and its velocity. As this is effectively a 2D game we'll use Vector2 fields for this, with the 2D Y dimension representing the the 3D Z dimension. We begin with a constant X and Y speed, configurable via separate serializable float fields. I use 8 and 10 as default values.
public class Ball : MonoBehaviour
{
	[SerializeField, Min(0f)]
	float
		constantXSpeed = 8f,
		constantYSpeed = 10f;

	Vector2 position, velocity;
}
We might end up making various adjustments to the ball's position and velocity each update, so let's not set its Transform.localPosition all the time. Instead, create a public UpdateVisualization method for this.
	public void UpdateVisualization () =>
		transform.localPosition = new Vector3(position.x, 0f, position.y);
We won't make the ball won't move on its own, but instead make it perform standard movement via a public Move method.
public void Move () => position += velocity * Time.deltaTime;
And we also give it a public StartNewGame method that sets things up for a new game. The ball starts at the center of the arena, updates its visualization to match, and uses the configured velocity. As the bottom paddle will be controlled by the player, make the velocity's Y component negative so it moves toward the player first.
	public void StartNewGame ()
	{
		position = Vector2.zero;
		UpdateVisualization();
		velocity = new Vector2(constantXSpeed, -constantYSpeed);
	}
Now Game can control the ball. At minimum, when it awakens the ball should start a new game and when it updates the ball should move and then update its visualization.
	void Awake () => ball.StartNewGame();

	void Update ()
	{
		ball.Move();
		ball.UpdateVisualization();
	}
Bouncing off the Boundary
At this point we have a ball that starts moving after entering play mode and just keeps going, passing through the bottom boundary and going out of view. Ball doesn't directly know the arena's boundaries and we'll keep it that way. Instead we'll add two public methods to it that force a bounce in a single dimension for a given boundary. We simply assume that the bounce requests are appropriate.
A bounce happens when some boundary got crossed, implying that the ball is currently beyond it. This must be corrected by reflecting its trajectory. The final position is simply equal to double the boundary minus the current position. Also, the velocity in that dimension flips. These bounces are perfect, so the position and velocity in the other dimension are unaffected. Create BounceX and BounceY methods that implement this.
	public void BounceX (float boundary)
	{
		position.x = 2f * boundary - position.x;
		velocity.x = -velocity.x;
	}

	public void BounceY (float boundary)
	{
		position.y = 2f * boundary - position.y;
		velocity.y = -velocity.y;
	}
A proper bounce happens when the ball's edge touches a boundary, not its center. So we need to know the ball's size, for which we'll add a configuration field expressed as extents, set to 0.5 by default, matching the unit cube.
	[SerializeField, Min(0f)]
	float
		constantXSpeed = 8f,
		constantYSpeed = 10f,
		extents = 0.5f;
The ball itself won't decide when to bounce, so its extents and position must be publicly accessible. Add getter properties for that.
	public float Extents => extents;

	public Vector2 Position => position;
Game also needs to know the extents of the arena, which could be any rectangle centered on the origin. Give it a Vector2 configuration field for this, set to 10×10 by default.
	[SerializeField, Min(0f)]
	Vector2 arenaExtents = new Vector2(10f, 10f);
We begin by checking the Y dimension. Create a BounceYIfNeeded method for this. The extents to check is equal to the arena Y extents minus the ball extents. If the ball is below the negative extents or above the positive extents then it should bounce off the appropriate boundary. Invoke this method in between moving the ball and updating its visualization.
	void Update ()
	{
		ball.Move();
		BounceYIfNeeded();
		ball.UpdateVisualization();
	}

	void BounceYIfNeeded ()
	{
		float yExtents = arenaExtents.y - ball.Extents;
		if (ball.Position.y < -yExtents)
		{
			ball.BounceY(-yExtents);
		}
		else if (ball.Position.y > yExtents)
		{
			ball.BounceY(yExtents);
		}
	}
The ball now bounces off the bottom and top edges. To also bounce off the left and right edges create a BounceXIfNeeded method in the same way but for the X dimension and invoke it after BounceYIfNeeded.
	void Update ()
	{
		ball.Move();
		BounceYIfNeeded();
		BounceXIfNeeded();
		ball.UpdateVisualization();
	}

	void BounceXIfNeeded ()
	{
		float xExtents = arenaExtents.x - ball.Extents;
		if (ball.Position.x < -xExtents)
		{
			ball.BounceX(-xExtents);
		}
		else if (ball.Position.x > xExtents)
		{
			ball.BounceX(xExtents);
		}
	}
The ball is now contained by the arena, bouncing off its edges and never escaping.
Moving the Paddle
We also need to know the extents and speed of the paddles, so add configuration fields for them to Paddle, set to 4 and 10 by default.
public class Paddle : MonoBehaviour
{
	[SerializeField, Min(0f)]
	float
		extents = 4f,
		speed = 10f;
}
Paddle gets a public Move method as well, this time with parameters for both a target and arena extents, both in the X dimension. Have it initially get its position, clamp the X coordinate so the paddle can't move further than it should, and then set its position.
	public void Move (float target, float arenaExtents)
	{
		Vector3 p = transform.localPosition;
		float limit = arenaExtents - extents;
		p.x = Mathf.Clamp(p.x, -limit, limit);
		transform.localPosition = p;
	}
The paddle should be controlled by the player, but there are two kinds of players: AIs and humans. Let's first implement a simple AI controller, by creating an AdjustByAI method that takes an X position and target and returns a new X. If it is on the left side of the target it simply moves right at maximum speed until it matches the target, otherwise it moves left in the same way. This is a dumb reactive AI without any prediction, its difficulty only depends on its speed.
	float AdjustByAI (float x, float target)
	{
		if (x < target)
		{
			return Mathf.Min(x + speed * Time.deltaTime, target);
		}
		return Mathf.Max(x - speed * Time.deltaTime, target);
	}
For the human player we create an AdjustByPlayer method doesn't need a target and simply moves left or right depending on which arrow keys are pressed. If both are pressed at the same time it won't move.
	float AdjustByPlayer (float x)
	{
		bool goRight = Input.GetKey(KeyCode.RightArrow);
		bool goLeft = Input.GetKey(KeyCode.LeftArrow);
		if (goRight && !goLeft)
		{
			return x + speed * Time.deltaTime;
		}
		else if (goLeft && !goRight)
		{
			return x - speed * Time.deltaTime;
		}
		return x;
	}
Now add a toggle to determine whether the paddle is controlled by an AI and invoke the appropriate method in Move to adjust the position's X coordinate.
	[SerializeField]
	bool isAI;

	…

	public void Move (float target, float arenaExtents)
	{
		Vector3 p = transform.localPosition;
		p.x = isAI ? AdjustByAI(p.x, target) : AdjustByPlayer(p.x);
		float limit = arenaExtents - extents;
		p.x = Mathf.Clamp(p.x, -limit, limit);
		transform.localPosition = p;
	}
Move both paddles at the start of Game.Update.
	void Update ()
	{
		bottomPaddle.Move(ball.Position.x, arenaExtents.x);
		topPaddle.Move(ball.Position.x, arenaExtents.x);
		ball.Move();
		BounceYIfNeeded();
		BounceXIfNeeded();
		ball.UpdateVisualization();
	}
The paddles now either respond to the arrow keys or move on their own. Enable the AI of the top paddle and reduced its speed to 5 so it is easy to defeat. Note that you could enable or disable the AIs at any time while playing.
Playing the Game
Now that we have a functional ball and paddles we can make a playable game. Players try to move their paddles such that they bounce the ball back to the other side of the arena. If they fail to do this their opponent scores a point.
Hitting the Ball
Add a HitBall method to Paddle that returns whether at its current positions it hits a ball, given its X position and extents. We can check this by subtracting the paddle position from the ball's, then dividing that by the paddle plus ball extents. The result is a hit factor, which lies somewhere inside the −1–1 range if the paddle successfully hit the ball.
	public bool HitBall (float ballX, float ballExtents)
	{
		float hitFactor =
			(ballX - transform.localPosition.x) /
			(extents + ballExtents);
		return -1f <= hitFactor && hitFactor <= 1f;
	}
The hit factor itself is also useful, because its describes where the ball hit relative to the paddle's center and extents. In Pong this determines the angle at which the ball bounces off the paddle. So let's make it available via an output parameter.
	public bool HitBall (float ballX, float ballExtents, out float hitFactor)
	{
		hitFactor =
			(ballX - transform.localPosition.x) /
			(extents + ballExtents);
		return -1f <= hitFactor && hitFactor <= 1f;
	}
If the ball's velocity changes after being hit by a paddle then our simple bounce code doesn't suffice. We have to rewind time to the moment the bounce happened, determine the new velocity, and move time forward to the current moment.
In Ball, rename constantXSpeed to startSpeed and add a configurable maxXSpeed, set to 20 by default. Then create a SetXPositionAndSpeed method that overrides its current ones, given a start position and a speed factor. The new velocity becomes the max speed scaled by the factor, then determine the new position with the given time delta.
	[SerializeField, Min(0f)]
	float
		maxXSpeed = 20f,
		startXSpeed = 8f,
		constantYSpeed = 10f,
		extents = 0.5f;

	…

	public void StartNewGame ()
	{
		position = Vector2.zero;
		UpdateVisualization();
		velocity = new Vector2(startXSpeed, -constantYSpeed);
	}

	public void SetXPositionAndSpeed (float start, float speedFactor, float deltaTime)
	{
		velocity.x = maxXSpeed * speedFactor;
		position.x = start + velocity.x * deltaTime;
	}
To find the exact moment of the bounce the ball's velocity must be known, so add a public getter property for it.
public Vector2 Velocity => velocity;
Game now has more work to do when bouncing in the Y dimension. So instead of directly invoking ball.Bounce we'll first call a new Game.BounceY method, with a parameter for the defending paddle.
	void BounceYIfNeeded ()
	{
		float yExtents = arenaExtents.y - ball.Extents;
		if (ball.Position.y < -yExtents)
		{
			BounceY(-yExtents, bottomPaddle);
		}
		else if (ball.Position.y > yExtents)
		{
			BounceY(yExtents, topPaddle);
		}
	}

	void BounceY (float boundary, Paddle defender)
	{
		ball.BounceY(boundary);
	}
The first thing BounceY must do is determine how long ago the bounce happened. This is found by subtracting the boundary from the ball's Y position and dividing that by the ball's Y velocity. Note that we ignore that the paddle is a little thicker than the boundary, as that's just a visual thing to avoid Z fighting while rendering.
		float durationAfterBounce = (ball.Position.y - boundary) / ball.Velocity.y;

		ball.BounceY(boundary);
Next, calculate the ball's X position when the bounce happened.
		float durationAfterBounce = (ball.Position.y - boundary) / ball.Velocity.y;
		float bounceX = ball.Position.x - ball.Velocity.x * durationAfterBounce;
After that we perform the original Y bounce, and then we check whether the defending paddle hit the ball. If so, set the ball's X position and speed, based on the bounce X position, the hit factor, and how long ago it happened.
		ball.BounceY(boundary);

		if (defender.HitBall(bounceX, ball.Extents, out float hitFactor))
		{
			ball.SetXPositionAndSpeed(bounceX, hitFactor, durationAfterBounce);
		}
At this point we have to consider the possibility that a bounce happened in both dimensions. In that case the X position of the bounce might end up outside the arena. This can be prevented by performing the X bounce first, but only if needed. To support this change BounceXIfNeeded so the X position that it checks is provided via a parameter.
	void Update ()
	{
		…
		BounceXIfNeeded(ball.Position.x);
		ball.UpdateVisualization();
	}

	void BounceXIfNeeded (float x)
	{
		float xExtents = arenaExtents.x - ball.Extents;
		if (x < -xExtents)
		{
			ball.BounceX(-xExtents);
		}
		else if (x > xExtents)
		{
			ball.BounceX(xExtents);
		}
	}
Then we can also invoke BounceXIfNeeded in BounceY based on the where it would have hit the Y boundary. Thus we take care of an X bounce only if it happened before the Y bounce. After that once again calculate the bounce X position, now potentially based on a different ball position and velocity.
		float durationAfterBounce = (ball.Position.y - boundary) / ball.Velocity.y;
		float bounceX = ball.Position.x - ball.Velocity.x * durationAfterBounce;

		BounceXIfNeeded(bounceX);
		bounceX = ball.Position.x - ball.Velocity.x * durationAfterBounce;
		ball.BounceY(boundary);
Next, the ball's velocity changes depending on where it hit a paddle. Its Y speed always remains the same while its X speed is variable. This means that it always takes the same amount of time to move from paddle to paddle, but it might move sideways a little or a lot. Pong's ball behaves the same way.
What's different from Pong is that in our game the ball still bounces off the arena's edge when a paddle misses it, while in Pong that triggers a new round. Our game just keeps going without interruption, not interrupting gameplay. Let's keep this behavior as a unique quirk of our game.
Scoring Points
When the defending paddle misses the ball a point is scored by its opponent. We'll display the score of both players on the floor or the arena. Create a TextMeshPro text game object for this, via GameObject / 3D Object / Text - TextMeshPro. This triggers a popup window, from which we pick the option Import TMP Essentials.
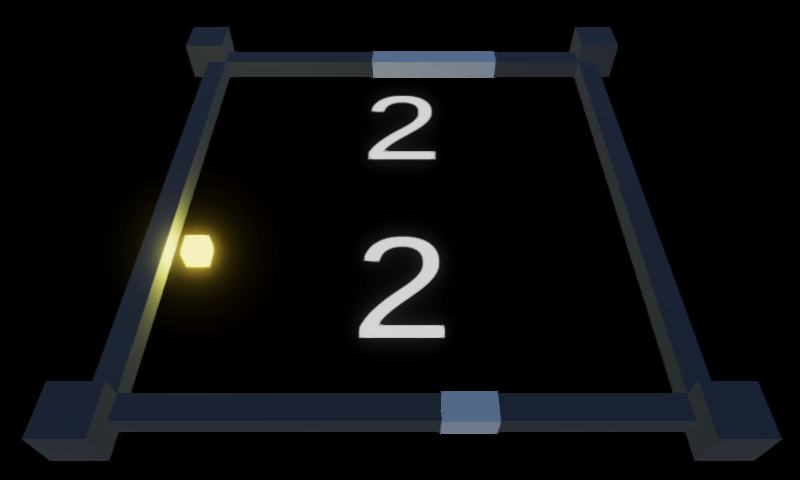
Turn the text into a prefab. Adjust its RectTransform so it has a width of 20, a height of 6, a Y position of −0.5, and an X rotation of 90°. Give its TextMeshPro component a starting text of 0, a font size of 72, and set its alignment to center and middle. Then create two instances of it, with Z positions −5 and 5.
We consider a player and its paddle one and the same thing, so Paddle will keep track of a reference to its score text via a configurable TMPro.TextMeshPro field.
using TMPro;
using UnityEngine;

public class Paddle : MonoBehaviour
{
	[SerializeField]
	TextMeshPro scoreText;

	…
}
It will also keep track of its own store. Give it a private SetScore method that replaces its current score with a new one and updates its text to match. This can be done by invoking SetText on the text component with the string "{0}" and the score as arguments.
	int score;

	…

	void SetScore (int newScore)
	{
		score = newScore;
		scoreText.SetText("{0}", newScore);
	}
To start a new game, introduce a public StartNewGame method that sets the score to zero. Also add a public ScorePoint method that increments the score and returns whether this results in a win for the player. In order to determine that give it a parameter for the amount of points required to win.
	public void StartNewGame ()
	{
		SetScore(0);
	}

	public bool ScorePoint (int pointsToWin)
	{
		SetScore(score + 1);
		return score >= pointsToWin;
	}
Game now has to invoke StartNewGame on both paddles as well, so let's give it its own StartNewGame method that passes on the message, which it invokes in Awake.
	void Awake () => StartNewGame();

	void StartNewGame ()
	{
		ball.StartNewGame();
		bottomPaddle.StartNewGame();
		topPaddle.StartNewGame();
	}
Make the amount of points to win configurable, with a minimum of 2 and a default of 3. Then add the attacker paddle as a third parameter to BounceY and have it invoke ScorePoint on it if the defender didn't hit the ball. If that resulted in a win for the attacker start a new game.
	[SerializeField, Min(2)]
	int pointsToWin = 3;

	…

	void BounceYIfNeeded ()
	{
		float yExtents = arenaExtents.y - ball.Extents;
		if (ball.Position.y < -yExtents)
		{
			BounceY(-yExtents, bottomPaddle, topPaddle);
		}
		else if (ball.Position.y > yExtents)
		{
			BounceY(yExtents, topPaddle, bottomPaddle);
		}
	}

	void BounceY (float boundary, Paddle defender, Paddle attacker)
	{
		…

		if (defender.HitBall(bounceX, ball.Extents, out float hitFactor))
		{
			ball.SetXPositionAndSpeed(bounceX, hitFactor, durationAfterBounce);
		}
		else if (attacker.ScorePoint(pointsToWin))
		{
			StartNewGame();
		}
	}
Countdown to New Game
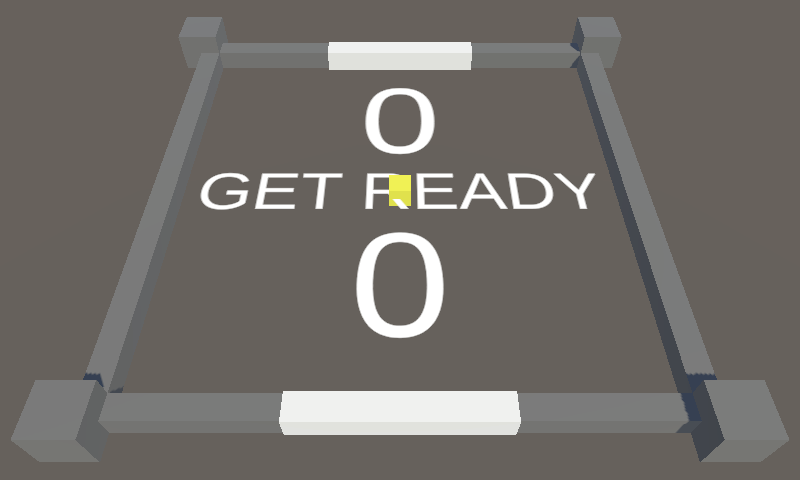
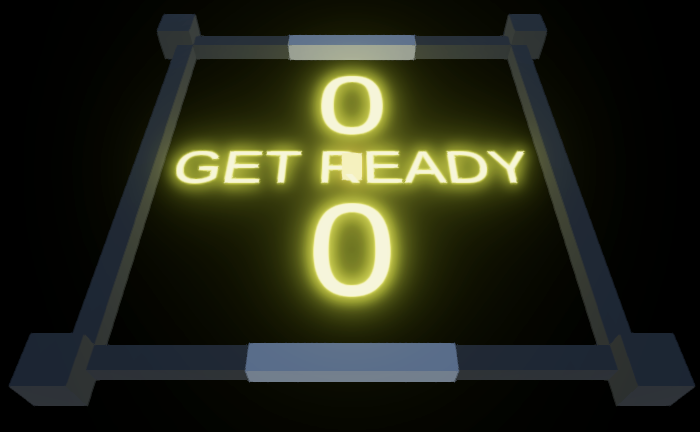
Instead of immediately starting a new game we should introduce a delay, during which the final score can be appreciated. Let's also delay the initial start of the game so the players can get ready. Create a new text instance to display the countdown at the center of the arena, with its font size reduced to 32 and GET READY as its initial text.
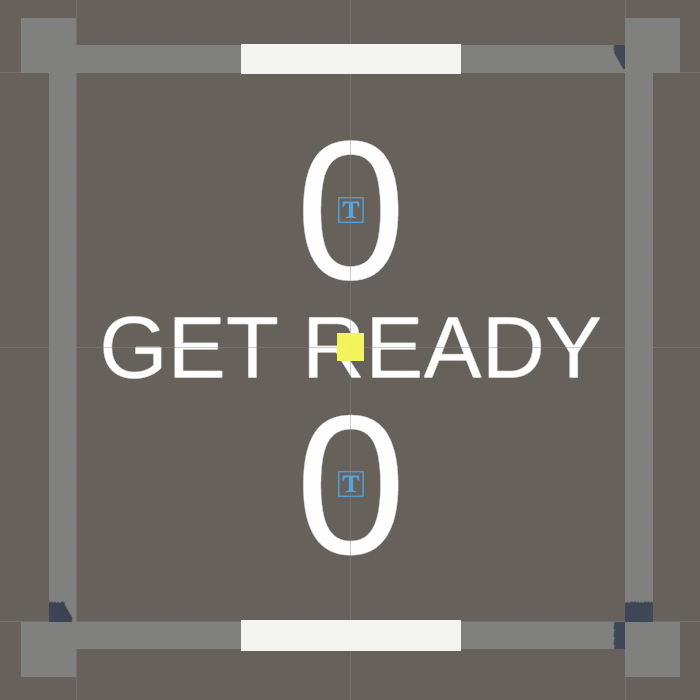
Give Game configuration fields for the countdown text and a new game delay duration, with a minimum of 1 and a default of 3. Also give it a field to track the countdown until a new game and set it to the delay duration in Awake instead of immediately starting a new game.
using TMPro;
using UnityEngine;

public class Game : MonoBehaviour
{
	…

	[SerializeField]
	TextMeshPro countdownText;

	[SerializeField, Min(1f)]
	float newGameDelay = 3f;

	float countdownUntilNewGame;

	void Awake () => countdownUntilNewGame = newGameDelay;
In Update we still always move the paddles, so players can get into position during the countdown. Move all the other code to a new UpdateGame method, which we only invoke if the countdown is zero or less. Otherwise we invoke UpdateCountdown, a new method that decreases the countdown and updates its text.
	void Update ()
	{
		bottomPaddle.Move(ball.Position.x, arenaExtents.x);
		topPaddle.Move(ball.Position.x, arenaExtents.x);

		if (countdownUntilNewGame <= 0f)
		{
			UpdateGame();
		}
		else
		{
			UpdateCountdown();
		}
	}

	void UpdateGame ()
	{
		ball.Move();
		BounceYIfNeeded();
		BounceXIfNeeded(ball.Position.x);
		ball.UpdateVisualization();
	}

	void UpdateCountdown ()
	{
		countdownUntilNewGame -= Time.deltaTime;
		countdownText.SetText("{0}", countdownUntilNewGame);
	}
If the countdown reached zero deactivate the countdown text and start a new game, otherwise update the text. But let's only show whole seconds. We can do that by taking the ceiling of the countdown. And to make the initial text visible, only change it if the display value is less than the configured delay. If the delay is set to a whole number then the GET READY text will be visible during the first second.
		countdownUntilNewGame -= Time.deltaTime;
		if (countdownUntilNewGame <= 0f)
		{
			countdownText.gameObject.SetActive(false);
			StartNewGame();
		}
		else
		{
			float displayValue = Mathf.Ceil(countdownUntilNewGame);
			if (displayValue < newGameDelay)
			{
				countdownText.SetText("{0}", displayValue);
			}
		}
Let's also hide the ball while there is no game in progress. As it is convenient to have the ball active in the scene during development, we give Ball an Awake method that deactivates itself. Then activate it again at the end of StartNewGame. Also introduce a public EndGame method that sets its X position to the center of the state—so the AI will move its paddle to the middle in between games—and deactivates itself.
	void Awake () => gameObject.SetActive(false);

	public void StartNewGame ()
	{
		position = Vector2.zero;
		UpdateVisualization();
		velocity = new Vector2(startXSpeed, -constantYSpeed);
		gameObject.SetActive(true);
	}

	public void EndGame ()
	{
		position.x = 0f;
		gameObject.SetActive(false);
	}
Give Game an EndGame method as well, to be invoked when a player wins instead of immediately starting a new game. In it, reset the countdown, set the countdown text to GAME OVER and activate it, and also tell the ball that the game is over.
	void BounceY (float boundary, Paddle defender, Paddle attacker)
	{
		…

		if (defender.HitBall(bounceX, ball.Extents, out float hitFactor))
		{
			ball.SetXPositionAndSpeed(bounceX, hitFactor, durationAfterBounce);
		}
		else if (attacker.ScorePoint(pointsToWin))
		{
			EndGame();
		}
	}

	void EndGame ()
	{
		countdownUntilNewGame = newGameDelay;
		countdownText.SetText("GAME OVER");
		countdownText.gameObject.SetActive(true);
		ball.EndGame();
	}
Randomness
At this point we have a minimal functional game, but let's make it a bit more interesting by adding some randomness in two different ways. First, instead of always starting with the same X velocity, give Ball a configurable max start X speed set to 2 by default and use that to randomize its velocity at the start of each game.
	[SerializeField, Min(0f)]
	float
		maxXSpeed = 20f,
		maxStartXSpeed = 2f,
		constantYSpeed = 10f,
		extents = 0.5f;

	…

	public void StartNewGame ()
	{
		position = Vector2.zero;
		UpdateVisualization();
		//velocity = new Vector2(startXSpeed, -constantYSpeed);
		velocity.x = Random.Range€(-maxStartXSpeed, maxStartXSpeed);
		velocity.y = -constantYSpeed;
		gameObject.SetActive(true);
	}
Second, give the AI of Paddle a targeting bias, so it doesn't always try to hit the ball at its exact center. To control this introduce a configurable max targeting bias representing a fraction of its extents—similar to the hit factor—set to 0.75 by default. Keep track of its current bias with a field and add a ChangeTargetingBias method randomized it.
	[SerializeField, Min(0f)]
	float
		extents = 4f,
		speed = 10f,
		maxTargetingBias = 0.75f;

	…

	float targetingBias;

	…

	void ChangeTargetingBias () =>
		targetingBias = Random.Range€(-maxTargetingBias, maxTargetingBias);
The targeting bias changes each new game and when the paddle tries to hit the ball.
	public void StartNewGame ()
	{
		SetScore(0);
		ChangeTargetingBias();
	}

	public bool HitBall (float ballX, float ballExtents, out float hitFactor)
	{
		ChangeTargetingBias();
		…
	}
To apply the bias add it to the target in AdjustByAI before moving the paddle.
	float AdjustByAI (float x, float target)
	{
		target += targetingBias * extents;
		…
	}
Shrinking Paddles
As a final quirk of our game, let's shrink Paddle each time it scores a point. This creates a handicap based on how close a player is to winning. Turn its current extents into a private field and instead make its min and max configurable, both set to 4 by default. Introduce a SetExtents method to replace the current extents, which also adjusts the local scale of the game object to match.
[SerializeField, Min(0f)] float//extents = 4f,minExtents = 4f, maxExtents = 4f, speed = 10f, maxTargetingBias = 0.75f; … float extents, targetingBias; … void SetExtents (float newExtents) { extents = newExtents; Vector3 s = transform.localScale; s.x = 2f * newExtents; transform.localScale = s; }
Set the extents at the end of SetScore, based on how close to winning the paddle is. This is done by interpolating from max to min extents based on the new score divided by the points needed to win minus one. Add the required parameter for this, which can be any value greater that one by default, for when it is set to zero.
	public bool ScorePoint (int pointsToWin)
	{
		SetScore(score + 1, pointsToWin);
		return score >= pointsToWin;
	}

	…

	void SetScore (int newScore, float pointsToWin = 1000f)
	{
		score = newScore;
		scoreText.SetText("{0}", newScore);
		SetExtents(Mathf.Lerp(maxExtents, minExtents, newScore / (pointsToWin - 1f)));
	}
We should also reset the score when the paddle awakens so its initial size is correct during the get-ready phase of the game.
	void Awake ()
	{
		SetScore(0);
	}
Let's use a minimum of 1 for the bottom paddle and 3.5 for the top paddle, to make it easier for the AI to hit the ball.
Lively Camera
With the gameplay complete let's see if we can make the presentation of the game a bit more interesting. A simple way to give a sense of heavy impact when the ball hits something is to shake the camera. It simulates how a player would feel the ball hit the sides of the arena. To increase immersion even more we switch from a top-down to a perspective view. Set the camera's position to (0, 20, -19) and its X rotation 50.
Jostling and Pushing
To control the camera's behavior create a LivelyCamera component type. This camera can be pushed around on the XZ plane with a given impulse, or given a jostle in the Y dimension. This is implemented by giving the camera a 3D velocity which is applied in LateUpdate, so after all jostling and pushing of a frame is finished.
Jostling is done via a public JostleY method, which increases the Y velocity by a configurable strength, set to 40 by default. Pushing is done via a public PushXZ method with a 2D impulse parameter which is added to the velocity, scaled by a configurable push strength factor, set to 1 by default.
using UnityEngine;

public class LivelyCamera : MonoBehaviour
{
	[SerializeField, Min(0f)]
	float
		jostleStrength = 40f,
		pushStrength = 1f;

	Vector3 velocity;

	public void JostleY () => velocity.y += jostleStrength;

	public void PushXZ (Vector2 impulse)
	{
		velocity.x += pushStrength * impulse.x;
		velocity.z += pushStrength * impulse.y;
	}

	void LateUpdate ()
	{
		transform.localPosition += velocity * Time.deltaTime;
	}
}
Add this component to the main camera, then give Game a configuration field and hook it up to the camera.
	[SerializeField]
	LivelyCamera livelyCamera;
When a bounce is detected in BounceXIfNeeded, invoke PushXZ using the ball's velocity as the impulse, before performing the bounce.
	void BounceXIfNeeded (float x)
	{
		float xExtents = arenaExtents.x - ball.Extents;
		if (x < -xExtents)
		{
			livelyCamera.PushXZ(ball.Velocity);
			ball.BounceX(-xExtents);
		}
		else if (x > xExtents)
		{
			livelyCamera.PushXZ(ball.Velocity);
			ball.BounceX(xExtents);
		}
	}
Do the same in BounceY, before performing the Y bounce. Also, jostle the camera when a point is scored.
	void BounceY (float boundary, Paddle defender, Paddle attacker)
	{
		float durationAfterBounce = (ball.Position.y - boundary) / ball.Velocity.y;
		float bounceX = ball.Position.x - ball.Velocity.x * durationAfterBounce;

		BounceXIfNeeded(bounceX);
		bounceX = ball.Position.x - ball.Velocity.x * durationAfterBounce;
		livelyCamera.PushXZ(ball.Velocity);
		ball.BounceY(boundary);

		if (defender.HitBall(bounceX, ball.Extents, out float hitFactor))
		{
			ball.SetXPositionAndSpeed(bounceX, hitFactor, durationAfterBounce);
		}
		else
		{
			livelyCamera.JostleY();
			if (attacker.ScorePoint(pointsToWin))
			{
				EndGame();
			}
		}
	}
Springing and Damping
The camera now gets pushed and jostled around, but its velocity persists so the arena will quickly disappear out of view. To snap LivelyCamera back we anchor it to its initial position with a simple spring mechanic. Give it a configurable spring strength set to 100 by default and a damping strength set to 10 by default. Also give it an anchor position and set it to the camera's position when it awakens.
	[SerializeField, Min(0f)]
	float
		springStrength = 100f,
		dampingStrength = 10f,
		jostleStrength = 40f,
		pushStrength = 1f;

	Vector3 anchorPosition, velocity;

	void Awake () => anchorPosition = transform.localPosition;
We implement the spring by using the current displacement of the camera scaled by the spring strength as acceleration. We also slow down movement via a negative acceleration equal to the current velocity scaled by the damping strength.
	void LateUpdate ()
	{
		Vector3 displacement = anchorPosition - transform.localPosition;
		Vector3 acceleration = springStrength * displacement - dampingStrength * velocity;
		velocity += acceleration * Time.deltaTime;
		transform.localPosition += velocity * Time.deltaTime;
	}
Delta Time Maximum
Our simply spring rules only behave well as long as the frame rate is high enough. It resist pushing and jostling, pulling the camera back to its anchor point, but can cause some overshoot and might wiggle a bit before it comes to rest. However, if the frame rate is too low the overshoot might end up exaggerating its momentum and it can go out of control, speeding up instead of slowing down. This problem can be demonstrated by forcing a very low frame rate, by adding Application.targetFrameRate = 5; in an Awake method. You have to set it back to zero later to remove the limit, as this setting is persistent.
The problem doesn't occur when the frame rate is high enough. So we can avoid it by enforcing a small time delta. We could do this by using FixedUpdate to move the camera. However, because that enforces an exact time delta this will result in micro stutters as the camera might not get updated the same amount of times each frame, which is very obvious because it affects the motion of the entire view. Also, it limits the effective frame rate of the camera's motion.
A simple solution is to enforce a maximum time delta, but not a minimum. Add a configurable maximum for this to LivelyCamera, set to one sixtieth of a second by default. Then move the code from LateUpdate to a new TimeStep method with the time delta as a parameter. Have LateUpdate invoke TimeStep with the max delta as many times as it fits in the current frame's delta, then once more with the remaining delta.
	[SerializeField, Min(0f)]
	float
		springStrength = 100f,
		dampingStrength = 10f,
		jostleStrength = 40f,
		pushStrength = 1f,
		maxDeltaTime = 1f / 60f;

	…

	void LateUpdate ()
	{
		float dt = Time.deltaTime;
		while (dt > maxDeltaTime)
		{
			TimeStep(maxDeltaTime);
			dt -= maxDeltaTime;
		}
		TimeStep(dt);
	}

	void TimeStep (float dt)
	{
		Vector3 displacement = anchorPosition - transform.localPosition;
		Vector3 acceleration = springStrength * displacement - dampingStrength * velocity;
		velocity += acceleration * dt;
		transform.localPosition += velocity * dt;
	}
Visuals
The final step is to improve our game's visuals a bit. We'll go for a simple glowing neon look.
Begin by making everything dark, by simply turning off the directional light. Also set the camera's Environment to a solid back background. Then enable the camera's Rendering / Post Processing option and set its Rendering / Anti-aliasing to FXAA.
Keep the environmental lighting intact even though it doesn't make sense with a black background, so there is still some lighting that makes the arena visible.
Glowing Ball
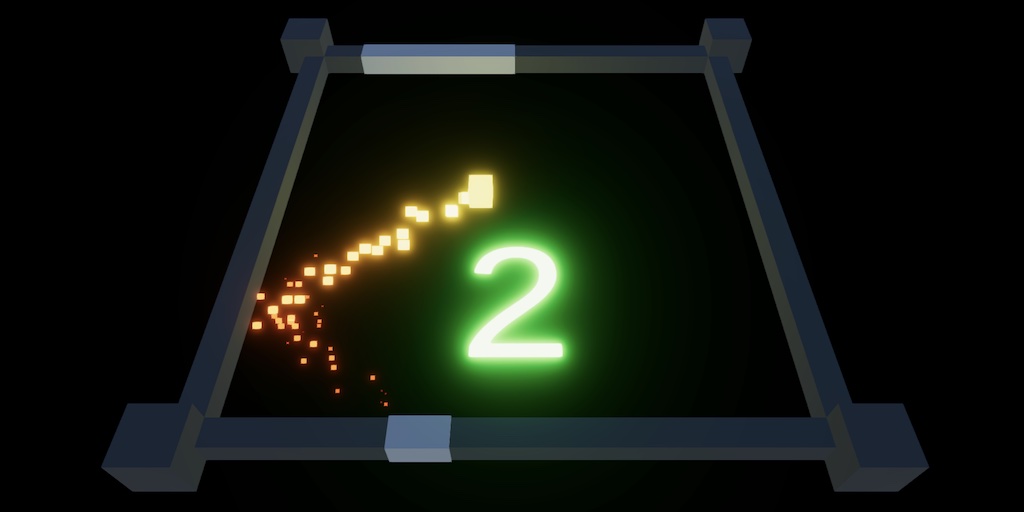
The ball will be our only light source. Give it a child point light, set its color to yellow, its intensity to 20, and its range to 100.
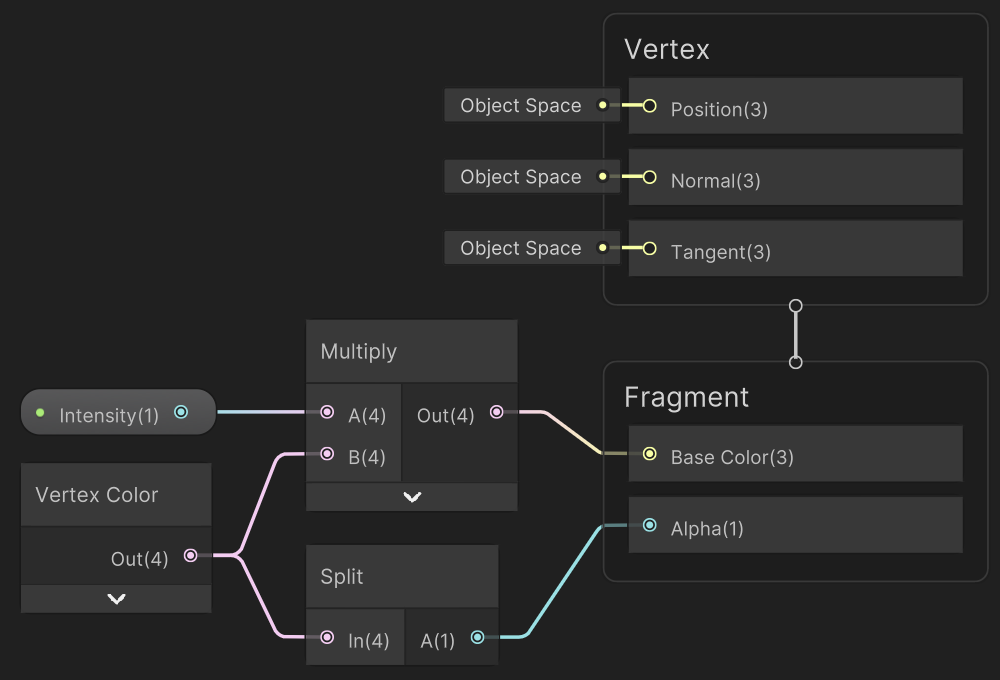
The ball should glow. Create an unlit shader graph for it with an HDR color property. Use it to create a material with a high-intensity yellow color and assign it to the ball prefab.
To make it appear to glow we need to apply a bloom post effect. Create a global volume via GameObject / Volume / Global Volume. Select it and create a new volume profile for it. Add an override for Bloom, with Intensity set to 1 and High Quality Filtering enabled. Also add an override for Tonemapping set to ACES.
Adjust the URP asset so its Post-processing / Grading Mode is set to HDR. We can also set Post-processing / Volume Update Mode to Via Scripting. That prevents Unity from needlessly updating the volume data every frame, because we never change it.
Bounce Particles
The ball now looks like a high-energy cube. To enforce this idea let's make sparks appear when it bounces. Create an unlit shader graph that uses vertex colors multiplied with an intensity property. Set its surface type to transparent and its blend mode to additive, so it always brightens. Create a particles material for it with its intensity set to 10.
Create a particle system game object at the origin. Disable Looping and Play On Awake. Set Start Lifetime to the constant range 0.5–1, Start Speed to 2–4, and Start Size to 0.5. Change its Simulation Space to World and Emitter Velocity Mode to Transform.
Set both rates of the Emission module to zero.
The Shape module is set to a cone by default, which we keep but we set its Angle to 45 and its Radius to 0.5.
Enable the Color over Lifetime module, with a color gradient that goes from yellow to red, and its alpha set to zero at both ends and to 255 at 10%.
Enable the Size over Lifetime module, with a linear curve going down from one to zero.
The constraint to only use cubes also applies to particles, so set the Mode of the Renderer module to Mesh, which uses the cube by default. Make it use our particles material.
This particle system isn't part of the ball itself, but Ball needs a configurable reference to it in order to spawn particles, along with a configuration option to control how many particles are spawn per bounce, set to 20 by default.
	[SerializeField]
	ParticleSystem bounceParticleSystem;

	[SerializeField]
	int bounceParticleEmission = 20;
Create a method that takes care of emitting bounce particles, by invoking Emit on the bounce particle system. The emission cone must be properly positioned and rotated, so give the method the X and Z position plus Y rotation as parameters. Use these to adjust the system's shape module.
	void EmitBounceParticles (float x, float z, float rotation)
	{
		ParticleSystem.ShapeModule shape = bounceParticleSystem.shape;
		shape.position = new Vector3(x, 0f, z);
		shape.rotation = new Vector3(0f, rotation, 0f);
		bounceParticleSystem.Emit(bounceParticleEmission);
	}
Invoke the method in BounceX and BounceY with the appropriate arguments. The boundary is the position in the appropriate dimension. The second position can be found by rewinding the ball's position to the moment of the bounce. The rotation depends on the bounce dimension and whether the boundary is negative or positive.
	public void BounceX (float boundary)
	{
		float durationAfterBounce = (position.x - boundary) / velocity.x;
		position.x = 2f * boundary - position.x;
		velocity.x = -velocity.x;
		EmitBounceParticles(
			boundary,
			position.y - velocity.y * durationAfterBounce,
			boundary < 0f ? 90f : 270f
		);
	}

	public void BounceY (float boundary)
	{
		float durationAfterBounce = (position.y - boundary) / velocity.y;
		position.y = 2f * boundary - position.y;
		velocity.y = -velocity.y;
		EmitBounceParticles(
			position.x - velocity.x * durationAfterBounce,
			boundary,
			boundary < 0f ? 0f : 180f
		);
	}
Start Particles
Let's also make sparks fly when the ball appears at the start of the game. Turn the existing particle system into a prefab and use a second instance positioned at the origin for the new start particle system. Increase its Start Lifetime to 0.5–1.5 so it last a bit longer and set its Shape to a sphere.
Add a configuration field for it to Ball, along with one for the amount of particles to spawn at the start, set to 100 by default. Emit these particles when starting a new game.
	[SerializeField]
	ParticleSystem bounceParticleSystem, startParticleSystem;

	[SerializeField]
	int
		bounceParticleEmission = 20,
		startParticleEmission = 100;

	…

	public void StartNewGame ()
	{
		…
		startParticleSystem.Emit(startParticleEmission);
	}
Trail Particles
The third and final particle effect will be a trail left by the ball. Create yet another instance of the particle system prefab, this time with Looping and Play On Awake enabled. Set its Start Lifetime to 1–1.25 and Start Speed to zero. Change its Shape to a box that emits from its volume. To make it emit particles as it moves set Emit / Rate over Distance to 2.
Also add a configuration field for this system to Ball and synchronize its position with the ball's when its visualization is updated. We don't make the trail system a child of the ball so that it can remain visible after the ball is deactivated at the end of a game, otherwise the trail would immediately vanish.
	[SerializeField]
	ParticleSystem bounceParticleSystem, startParticleSystem, trailParticleSystem;

	…

	public void UpdateVisualization () => trailParticleSystem.transform.localPosition =
		transform.localPosition = new Vector3(position.x, 0f, position.y);
This works, except that the trail effect also follows the ball as it teleports at the end and start of each game. We can avoid that by doing two things. First, we have to turn off emission at the end of a game and turn it on at the start of a new game. This is done by setting the enabled property of the emission module, so let's add a convenient method for this.
	public void StartNewGame ()
	{
		…
		SetTrailEmission(true);
	}

	public void EndGame ()
	{
		…
		SetTrailEmission(false);
	}

	…

	void SetTrailEmission (bool enabled)
	{
		ParticleSystem.EmissionModule emission = trailParticleSystem.emission;
		emission.enabled = enabled;
	}
Second, the particle system remembers its old position. To clear it to avoid showing a trail for the teleport at the start of a new game we have to invoke Play on it.
		SetTrailEmission(true);
		trailParticleSystem.Play();
This means that we can revert Play On Awake to disabled, as we now explicitly play it.
Reactive Surfaces
The ball and its particles are not the only things that can glow. Let's make it so surfaces can also react to being hit by temporarily glowing. Create a lit shader graph with properties for a BaseColor, an HDR EmissionColor, and a TimeOfLastHit with a default of −1000.
Its emission color depends on how long ago the last hit occurred. It will be at full strength at the moment of the hit and will linearly fade out during the next second. This can be done by subtracting the time of the last hit from the current time, subtracting that from 1, saturating it, and using it to scale the emission color.
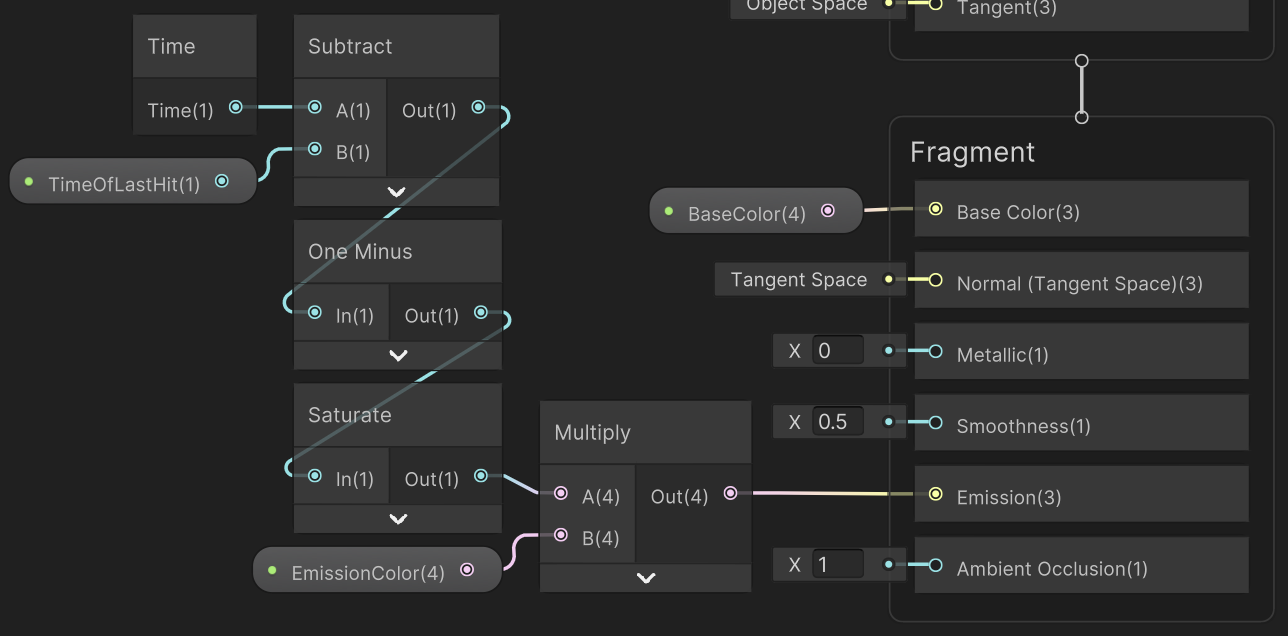
Create a material with this shader graph and use it for the paddle prefab. Use white for its base color and high-intensity white for its emission color.
Retrieve a material instance when Paddle awakens and update its time of last hit when HitBall succeeds. This will make the paddle glow when it manages to hit the ball.
	static readonly int timeOfLastHitId = Shader.PropertyToID("_TimeOfLastHit");

	…

	Material paddleMaterial;

	void Awake ()
	{
		paddleMaterial = GetComponent<MeshRenderer>().material;
		SetScore(0);
	}

	…

	public bool HitBall (float ballX, float ballExtents, out float hitFactor)
	{
		…

		bool success = -1f <= hitFactor && hitFactor <= 1f;
		if (success)
		{
			paddleMaterial.SetFloat(timeOfLastHitId, Time.time);
		}
		return success;
	}
Let's go a step further and also make the arena boundary that functions as the opponent's goal glow when a point is scored. Create another reactive surface material with its color set to medium gray and use it for the arena boundary prefab. Then give Paddle a configurable reference to the MeshRenderer of its goal, along with a configurable HDR goal color.
Retrieve an instance of its goal material when the paddle awakens and sets the material's emission color to the goal color. Set its time of last hit when a point is scored.
	static readonly int
		emissionColorId = Shader.PropertyToID("_EmissionColor"),
		timeOfLastHitId = Shader.PropertyToID("_TimeOfLastHit");

	[SerializeField]
	TextMeshPro scoreText;

	[SerializeField]
	MeshRenderer goalRenderer;

	[SerializeField, ColorUsage(true, true)]
	Color goalColor = Color.white;

	…

	Material goalMaterial, paddleMaterial;

	void Awake ()
	{
		goalMaterial = goalRenderer.material;
		goalMaterial.SetColor(emissionColorId, goalColor);
		paddleMaterial = GetComponent<MeshRenderer>().material;
		SetScore(0);
	}

	…

	public bool ScorePoint (int pointsToWin)
	{
		goalMaterial.SetFloat(timeOfLastHitId, Time.time);
		SetScore(score + 1, pointsToWin);
		return score >= pointsToWin;
	}
Hook up the paddles to the appropriate renders. Use high-intensity green for the bottom player color and high-intensity red for the top AI color.
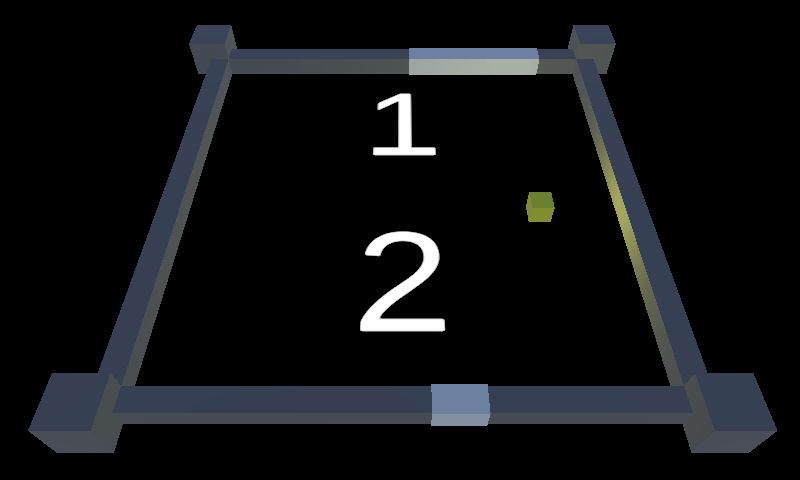
Colored Text
We wrap up by also coloring the text and making it glow. Begin by setting the text prefab's default font material color to high-intensity yellow.
We'll use the goal colors for the score displays, but with a twist. We'll start with black at zero, so the scores will initially be invisible on our black background. The score colors will reach their full intensity once they equal the amount of points to win.
In this case a material instance is retrieved via the fontMaterial property of the text and its face color shader property is named _FaceColor.
	static readonly int
		emissionColorId = Shader.PropertyToID("_EmissionColor"),
		faceColorId = Shader.PropertyToID("_FaceColor"),
		timeOfLastHitId = Shader.PropertyToID("_TimeOfLastHit");

	…

	Material goalMaterial, paddleMaterial, scoreMaterial;

	void Awake ()
	{
		goalMaterial = goalRenderer.material;
		goalMaterial.SetColor(emissionColorId, goalColor);
		paddleMaterial = GetComponent<MeshRenderer>().material;
		scoreMaterial = scoreText.fontMaterial;
		SetScore(0);
	}

	…

	void SetScore (int newScore, float pointsToWin = 1000f)
	{
		score = newScore;
		scoreText.SetText("{0}", newScore);
		scoreMaterial.SetColor(faceColorId, goalColor * (newScore / pointsToWin));
		SetExtents(Mathf.Lerp(maxExtents, minExtents, newScore / (pointsToWin - 1f)));
	}
This is as far as the tutorial goes with this prototype, though you could take it further. Note that the default configuration makes it very easy to beat the AI once you figure out its weakness. This is convenient for development but it should be tweaked to provide the desired challenge level.
The next tutorial is Minecomb.