Minecomb
Sweeping Mines
- Create a hexagonal grid.
- Visualize the grid with small cubes.
- Touch and reveal cells.
- Make the grid ripple.
This is the second tutorial in a series about prototypes. In it we will create a game about sweeping mines.
This tutorial is made with Unity 2021.3.19f1 and upgraded to 2022.3.1f1.
Game Scene
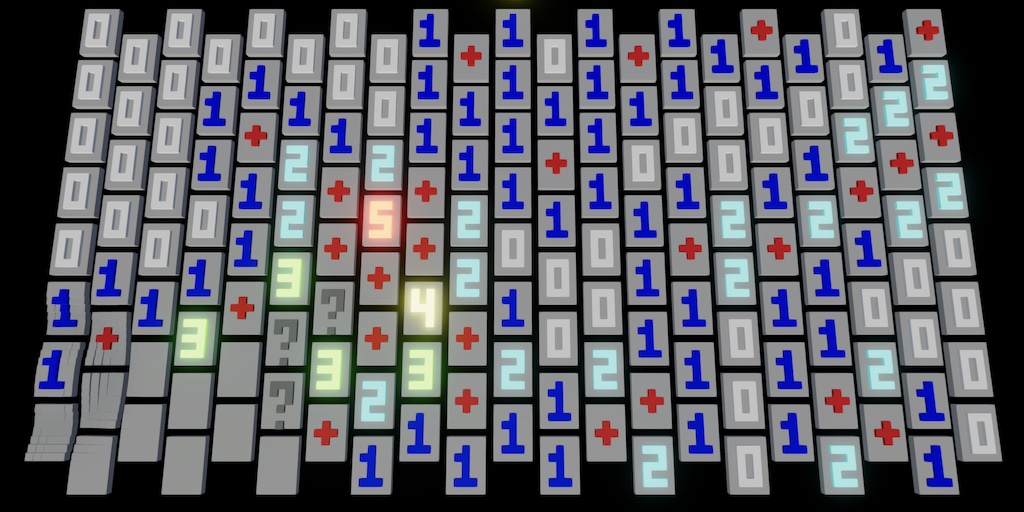
The game that we'll clone in this tutorial is Minesweeper, or any other similar mine-sweeping game. We name it Minecomb. Like we did with Paddle Square, we'll introduce a few twists. In this case we'll use a hexagonal grid layout instead of a square one, which is a common variant. We also once again only use cubes and world-space text.
Visuals
We'll use the same graphics settings as Paddle Square, so we can copy that project and remove all scripts, materials, and prefabs from it. Also remove everything except the main light and camera from the game scene.
Let's use a slightly tilted top-down view, changing the camera position to (0, 80, −15) and its rotation to (80, 0, 0). Also, it doesn't have a custom script component anymore. Set the light's rotation to (40, 10, 0) and enable it.
We'll use a single TextMeshPro game object to display the amount of unknown mines, with default text 0, position (0, 0, 38), width 20, height 5, rotation (90, 0, 0), font size 64 and centered. It will use the existing glowing yellow material.
Also, because we'll end up rendering many small cubes from a distance let's set the URP asset's Anti Aliasing (MSAA) mode to 4x. This can work in combination with FXAA to deal with a few HDR-range fragments. Let's also disable shadows via the Lighting / Main Light / Casts Shadows toggle.
Game Component
Once again we'll use a single game object with a Game component to control the entire game. At minimum, it needs a reference to the mines text and configuration fields for the amount of rows and columns, set to 8 and 21 by default.
using TMPro;
using UnityEngine;

public class Game : MonoBehaviour
{
	[SerializeField]
	TextMeshPro minesText;

	[SerializeField, Min(1)]
	int rows = 8, columns = 21;
}
Cell State
The goal of the game is to reveal all cells that aren't mines. Revealing a mine means failure. If a non-mine cell is revealed it displays the amount of mines that are adjacent to it. In case of a hexagonal grid there are at most six neighbors, so we need to display digits 0–6. Create a CellState enum type for this, put in its own script asset.
public enum CellState
{
	Zero, One, Two, Three, Four, Five, Six
}
We need to keep track of more than the amount of adjacent mines. Cells can themselves contain a mine. We can store this information in the unused bits of CellState. Values up to six require three bits, so we can use the fourth bit as a flag to indicate a mine. To make debugging easier add the System.Flags attribute to the enum as well.
[System.Flags]
public enum CellState
{
	Zero, One, Two, Three, Four, Five, Six,
	Mine = 1 << 3
}
There are three more things that we should keep track of. First, a cell can be marked to indicate that it surely contains a mine, to prevent accidentally revealing it. Second, an unsure mark can exist as well. Third, cells can be revealed. Add bit flags for these three options.
	Mine = 1 << 3,
	MarkedSure = 1 << 4,
	MarkedUnsure = 1 << 5,
	Revealed = 1 << 6
Let's also add some convenient combined masks to make checking the cell states easier. Add one for any kind of mark, one for marked or revealed, and one for a sure mark or a mine.
	Revealed = 1 << 6,
	Marked = MarkedSure | MarkedUnsure,
	MarkedOrRevealed = Marked | Revealed,
	MarkedSureOrMine = MarkedSure | Mine
Checking and setting the non-digit cell states is done via bit mask operations. To abstract this let's add extension methods to check whether a cell is or is not in a state that matches a specific mask. Also add methods to get a cell state with or without a mask applied to it.
[System.Flags]
public enum CellState
{
	…
}

public static class CellStateExtensionMethods
{
	public static bool Is (this CellState s, CellState mask) => (s & mask) != 0;

	public static bool IsNot (this CellState s, CellState mask) => (s & mask) == 0;

	public static CellState With (this CellState s, CellState mask) => s | mask;

	public static CellState Without (this CellState s, CellState mask) => s & ~mask;
}
The Grid
We'll create separate structs containing native arrays and compute buffers to represent the grid and its visualization, using jobs whenever we need to process multiple cells. The entire grid will be draw with a single procedural draw call.
Grid Struct
To hide the implementation details of the grid from Game we introduce a Grid struct type. It has public getter properties for its amount of rows and columns as well as the total cell count. Give it an Initialize method that allocates a native array with cell states for a given amount of rows and columns, along with a dispose method.
using Unity.Collections;
using Unity.Jobs;
using UnityEngine;

public struct Grid
{
	public int Rows { get; private set; }

	public int Columns { get; private set; }

	public int CellCount => states.Length;

	NativeArray<CellState> states;

	public void Initialize (int rows, int columns)
	{
		Rows = rows;
		Columns = columns;
		states = new NativeArray<CellState>(Rows * Columns, Allocator.Persistent);
	}

	public void Dispose () => states.Dispose();
}
To access and modify cell states, include a public indexer property that acts as a proxy for the underlying native array. Let's also include a method that converts a row and a column index to a cell index, with a variant to try to get such an index for an unvalidated row and column. And also include a method to convert from cell index back to row and column indices.
	public CellState this[int i]
	{
		get => states[i];
		set => states[i] = value;
	}

	…

	public int GetCellIndex (int row, int column) => row * Columns + column;

	public bool TryGetCellIndex (int row, int column, out int index)
	{
		bool valid = 0 <= row && row < Rows && 0 <= column && column < Columns;
		index = valid ? GetCellIndex(row, column) : -1;
		return valid;
	}

	public void GetRowColumn (int index, out int row, out int column)
	{
		row = index / Columns;
		column = index - row * Columns;
	}
Add a grid field to Game, initializing it in OnEnable and disposing it in OnDisable. Also, add an Update method that resets the grid if the configured rows or columns change, so we can immediately see these changes while in play mode.
	Grid grid;

	void OnEnable ()
	{
		grid.Initialize(rows, columns);
	}

	void OnDisable ()
	{
		grid.Dispose();
	}

	void Update ()
	{
		if (grid.Rows != rows || grid.Columns != columns)
		{
			OnDisable();
			OnEnable();
		}
	}
Visualization Struct
We create a separate GridVisualization struct type to take care of the visualization. It needs to keep track of the grid, a material, and a mesh to do its work. It also contains compute buffers and float3 native arrays for positions and colors set via _Positions and _Colors shader properties. Everything is set up and cleaned up via public Initialize and Dispose methods.
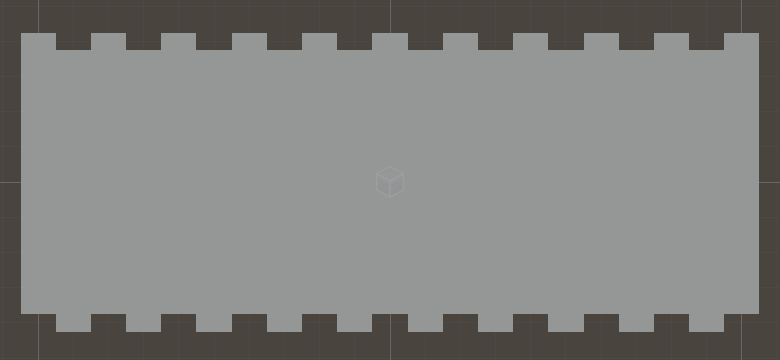
Also needed is a public Draw method that invokes Graphics.DrawMeshInstancedProcedural to draw the entire grid. As the grid doesn't move and is always in view we can suffice with a centered unit cube for its bounds.
using Unity.Collections;
using Unity.Jobs;
using Unity.Mathematics;
using UnityEngine;

using static Unity.Mathematics.math;

public struct GridVisualization
{
	static int
		positionsId = Shader.PropertyToID("_Positions"),
		colorsId = Shader.PropertyToID("_Colors");

	ComputeBuffer positionsBuffer, colorsBuffer;

	NativeArray<float3> positions, colors;

	Grid grid;

	Material material;

	Mesh mesh;

	public void Initialize (Grid grid, Material material, Mesh mesh)
	{
		this.grid = grid;
		this.material = material;
		this.mesh = mesh;

		int instanceCount = grid.CellCount;
		positions = new NativeArray<float3>(instanceCount, Allocator.Persistent);
		colors = new NativeArray<float3>(instanceCount, Allocator.Persistent);

		positionsBuffer = new ComputeBuffer(instanceCount, 3 * 4);
		colorsBuffer = new ComputeBuffer(instanceCount, 3 * 4);
		material.SetBuffer(positionsId, positionsBuffer);
		material.SetBuffer(colorsId, colorsBuffer);
	}

	public void Dispose ()
	{
		positions.Dispose();
		colors.Dispose();
		positionsBuffer.Release();
		colorsBuffer.Release();
	}

	public void Draw () => Graphics.DrawMeshInstancedProcedural(
		mesh, 0, material, new Bounds(Vector3.zero, Vector3.one), positionsBuffer.count
	);
}
Add the grid visualization to Game, along with configuration fields for a material and a mesh. The mesh should be set to the default cube. Initialize and dispose the visualization after the grid and draw it at the end of Update.
	[SerializeField]
	Material material;

	[SerializeField]
	Mesh mesh;

	…

	GridVisualization visualization;

	void OnEnable ()
	{
		grid.Initialize(rows, columns);
		visualization.Initialize(grid, material, mesh);
	}

	void OnDisable ()
	{
		grid.Dispose();
		visualization.Dispose();
	}

	void Update ()
	{
		…

		visualization.Draw();
	}
Visualization Material
To make instancing work in a shader graph we have to use the the approach introduced in the Basics series. Create an HLSL asset for it with the appropriate code. In this case we only need to set the object-to-world matrix position and include a function to get the instance color.
#if defined(UNITY_PROCEDURAL_INSTANCING_ENABLED)
	StructuredBuffer<float3> _Positions, _Colors;
#endif

void ConfigureProcedural () {
	#if defined(UNITY_PROCEDURAL_INSTANCING_ENABLED)
		float3 position = _Positions[unity_InstanceID];

		unity_ObjectToWorld = 0.0;
		unity_ObjectToWorld._m03_m13_m23_m33 = float4(position, 1.0);
		unity_ObjectToWorld._m00_m11_m22 = 1.0;
	#endif
}

void ConfigureProcedural_float (float3 In, out float3 Out) {
	Out = In;
}

void GetBlockColor_float (out float3 Color)
{
	#if defined(UNITY_PROCEDURAL_INSTANCING_ENABLED)
		Color = _Colors[unity_InstanceID];
	#else
		Color = 0;
	#endif
}
Create a shader graph that uses the HLSL file to pass through the vertex position and set the fragment color.
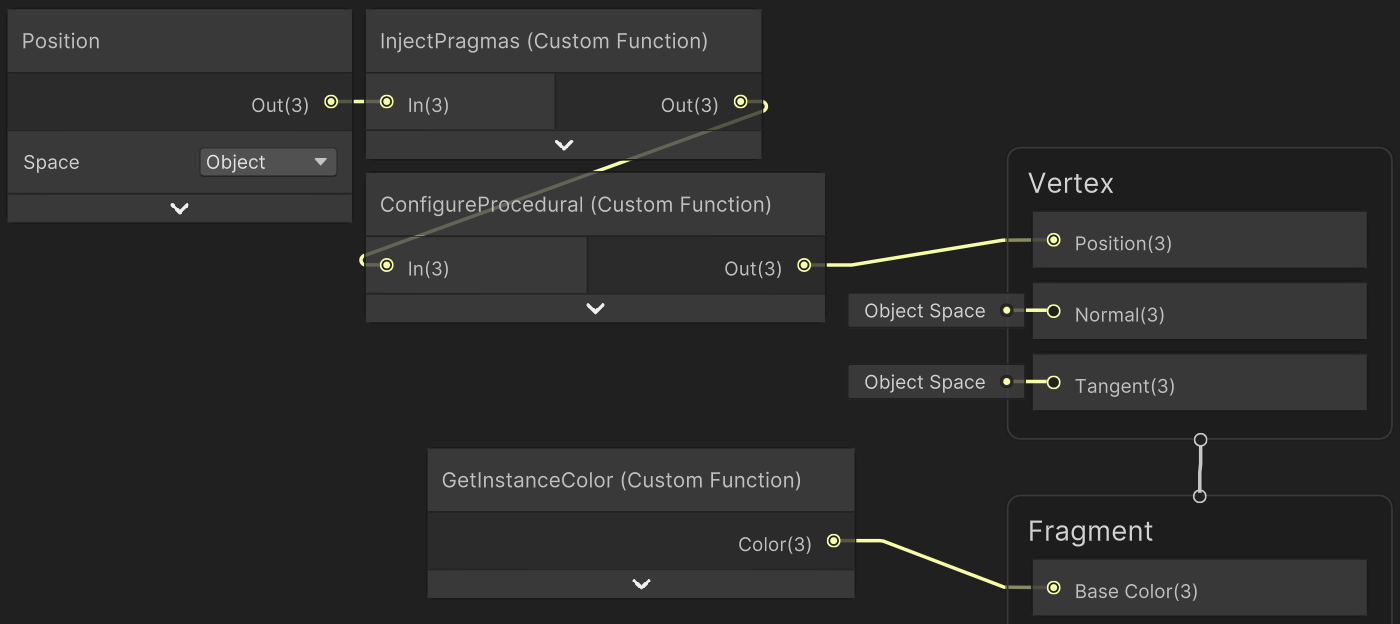
The InjectPragmas custom function node contains the following text.
#pragma instancing_options assumeuniformscaling procedural:ConfigureProcedural
#pragma editor_sync_compilation

Out = In;
Create a material with it that has GPU instancing enabled and assign it to the game object.
Initializing the Visualization
To correctly initialize the grid visualization we have to set the positions and colors of all cells. We'll create an InitializeVisualizationJob job that can do this in parallel. It writes to the positions and colors and needs the rows and columns as input. It doesn't need to access the cell states so we won't pass it the entire grid.
using Unity.Burst;
using Unity.Collections;
using Unity.Jobs;
using Unity.Mathematics;

using static Unity.Mathematics.math;

[BurstCompile(FloatPrecision.Standard, FloatMode.Fast)]
struct InitializeVisualizationJob : IJobFor
{
	[WriteOnly]
	public NativeArray<float3> positions, colors;

	public int rows, columns;

	public void Execute (int i) []
}
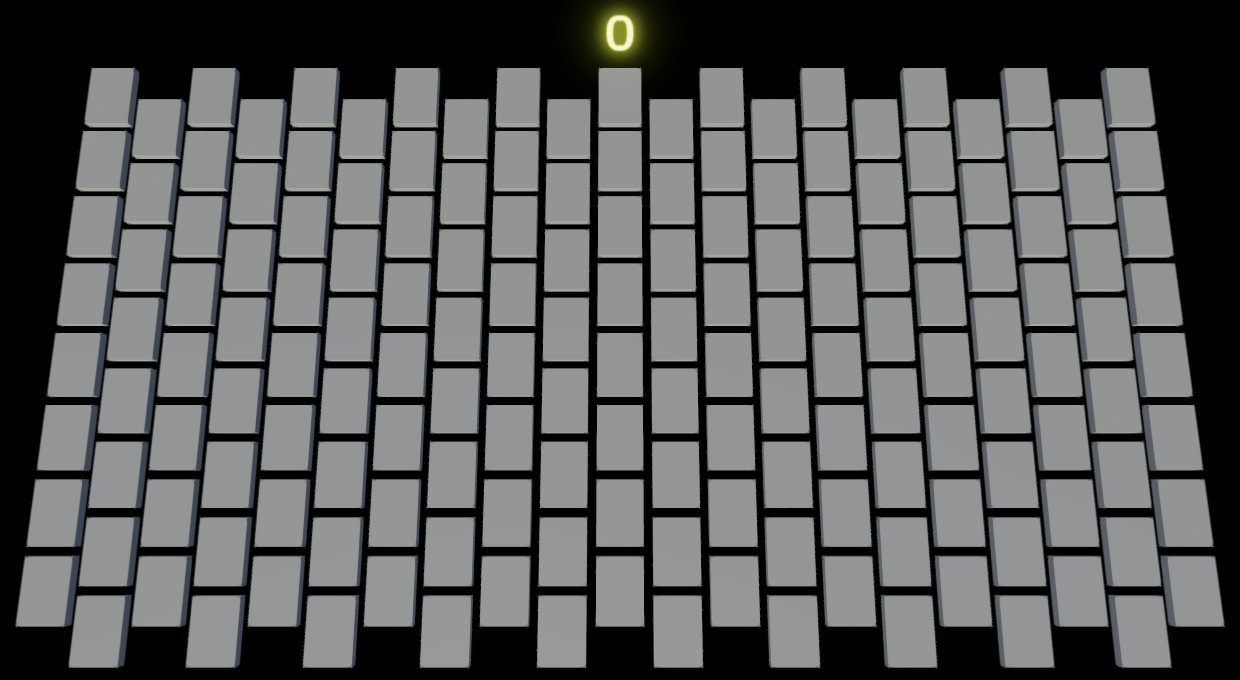
We set the colors to uniform 0.5. We initially position the cubes in a rectangular grid centered on the origin, assuming that the size of each cell is one unit.
	public void Execute (int i)
	{
		positions[i] = GetCellPosition(i);
		colors[i] = 0.5f;
	}

	float3 GetCellPosition (int i)
	{
		int r = i / columns;
		int c = i - r * columns;
		return float3(
			c - (columns - 1) * 0.5f,
			0f,
			r - (rows - 1) * 0.5f
		);
	}
To turn this into a hexagonal grid we shift odd columns up in the Z dimension by 0.25 and shift even columns down by the same amount.
r - (rows - 1) * 0.5f - (c & 1) * 0.5f + 0.25f
Schedule this job at the end of GridVisualization.Initialize, then immediately complete it and set the position and color buffers. While we could try to combine scheduling of multiple jobs via a dependency chain, this isn't needed for our simple game.
	public void Initialize (Grid grid, Material material, Mesh mesh)
	{
		…

		new InitializeVisualizationJob
		{
			positions = positions,
			colors = colors,
			rows = grid.Rows,
			columns = grid.Columns
		}.ScheduleParallel(grid.CellCount, grid.Columns, default).Complete();
		positionsBuffer.SetData(positions);
		colorsBuffer.SetData(colors);
	}
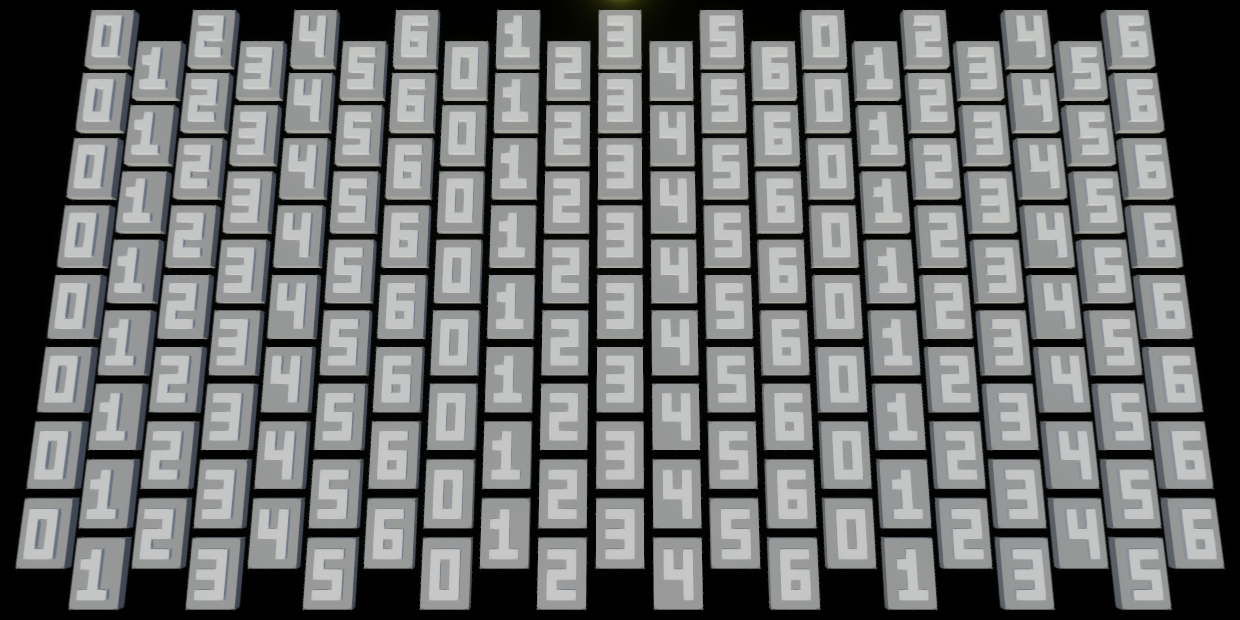
Multiple Blocks per Cell
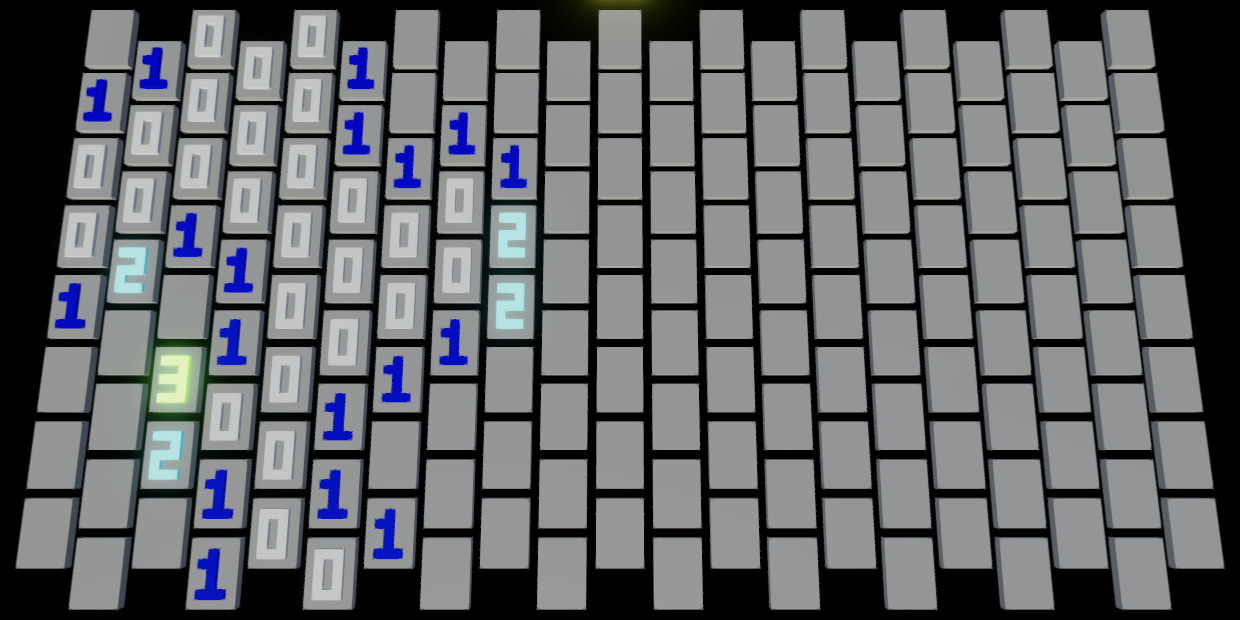
One of the quirks of our game is that well visualize cells and their symbols with multiple small blocks. Specifically, we'll make each cell five blocks wide and seven blocks high, so 35 blocks per cell. Add public constants for these to GridVisualization.
	public const int
		blockRowsPerCell = 7,
		blockColumnsPerCell = 5,
		blocksPerCell = blockRowsPerCell * blockColumnsPerCell;
We also include a one-unit gap between cells, so each cell effectively takes up 5×8 units. Scale up the cell positions in the job to match this pattern.
		return
			float3(
				c - (columns - 1) * 0.5f,
				0f,
				r - (rows - 1) * 0.5f - (c & 1) * 0.5f + 0.25f
			) * float3(
				GridVisualization.columnsPerCell + 1,
				0f,
				GridVisualization.rowsPerCell + 1
			);
To show the entire cells we have to increase the instance count to match in Initialize.
int instanceCount = grid.CellCount * blocksPerCell;
Then adjust the job so it sets all blocks per cell, each forming its own rectangular grid.
	[WriteOnly, NativeDisableParallelForRestriction]
	public NativeArray<float3> positions, colors;

	public int rows, columns;

	public void Execute (int i)
	{
		float3 cellPosition = GetCellPosition(i);
		int blockOffset = i * GridVisualization.blocksPerCell;

		for (int bi = 0; bi < GridVisualization.blocksPerCell; bi++)
		{
			positions[blockOffset + bi] = cellPosition + GetBlockPosition(bi);
			colors[blockOffset + bi] = 0.5f;
		}
	}

	float3 GetBlockPosition (int i)
	{
		int r = i / GridVisualization.columnsPerCell;
		int c = i - r * GridVisualization.columnsPerCell;
		return float3(c, 0f, r);
	}
To keep the cells centered we have to offset them by half their size.
		return
			float3(
				c - (columns - 1) * 0.5f,
				0f,
				r - (rows - 1) * 0.5f - (c & 1) * 0.5f + 0.25f
			) * float3(
				GridVisualization.columnsPerCell + 1,
				0f,
				GridVisualization.rowsPerCell + 1
			) - float3(
				GridVisualization.columnsPerCell / 2,
				0f,
				GridVisualization.rowsPerCell / 2
			);
Updating the Grid
Whenever the state of the grid changes we have to update its visualization. We'll always keep the XZ positions the same, but will change the Y positions and colors. Create a new job named UpdateVisualizationJob that updates these per cell in parallel, initially setting both Y and color to 0–1 based on the block index per cell.
using Unity.Burst;
using Unity.Collections;
using Unity.Jobs;
using Unity.Mathematics;

using static Unity.Mathematics.math;

[BurstCompile(FloatPrecision.Standard, FloatMode.Fast)]
struct UpdateVisualizationJob : IJobFor
{
	[NativeDisableParallelForRestriction]
	public NativeArray<float3> positions, colors;

	[ReadOnly]
	public Grid grid;

	public void Execute (int i)
	{
		int blockOffset = i * GridVisualization.blocksPerCell;

		for (int bi = 0; bi < GridVisualization.blocksPerCell; bi++)
		{
			float3 position = positions[blockOffset + bi];
			position.y = bi / (float)GridVisualization.blocksPerCell;
			positions[blockOffset + bi] = position;
			colors[blockOffset + bi] = position.y;
		}
	}
}
Schedule and execute this job in a new public GridVisualization.Update€ method and then update the position and color buffers.
	public void Update€ ()
	{
		new UpdateVisualizationJob
		{
			positions = positions,
			colors = colors,
			grid = grid
		}.ScheduleParallel(grid.CellCount, grid.Columns, default).Complete();
		positionsBuffer.SetData(positions);
		colorsBuffer.SetData(colors);
	}
Invoke it in Game.Update before drawing.
	void Update ()
	{
		…

		visualization.Update€();
		visualization.Draw();
	}

Drawing Symbols
We can make cells display symbols by changing some of their blocks, treating each as a 5×7 bitmap. We'll use two states per block, either the default or an altered state. We can represent these binary bitmaps with ulong values. We can access individual bits of these bitmaps via shifting 1 left by the block index and using that as a mask. For example, the value 0b00000_01110_01000_01110_01000_01110_00000 displays the symbol for 3. Add a static readonly array to the job containing bitmaps for 0–7.
	readonly static ulong[] bitmaps =
	{
		0b00000_01110_01010_01010_01010_01110_00000, // 0
		0b00000_00100_00110_00100_00100_01110_00000, // 1
		0b00000_01110_01000_01110_00010_01110_00000, // 2
		0b00000_01110_01000_01110_01000_01110_00000, // 3
		0b00000_01010_01010_01110_01000_01000_00000, // 4
		0b00000_01110_00010_01110_01000_01110_00000, // 5
		0b00000_01110_00010_01110_01010_01110_00000  // 6
	};
We'll initially loop through all symbols based on the cell index. If a block is altered set its Y position to 0.5 and its color to 1.
		int blockOffset = i * GridVisualization.blocksPerCell;
		ulong bitmap = bitmaps[i % bitmaps.Length];

		for (int bi = 0; bi < GridVisualization.blocksPerCell; bi++)
		{
			bool altered = (bitmap & ((ulong)1 << bi)) != 0;

			float3 position = positions[blockOffset + bi];
			position.y = altered ? 0.5f : 0f;
			positions[blockOffset + bi] = position;
			colors[blockOffset + bi] = altered ? 1f : 0.5f;
		}
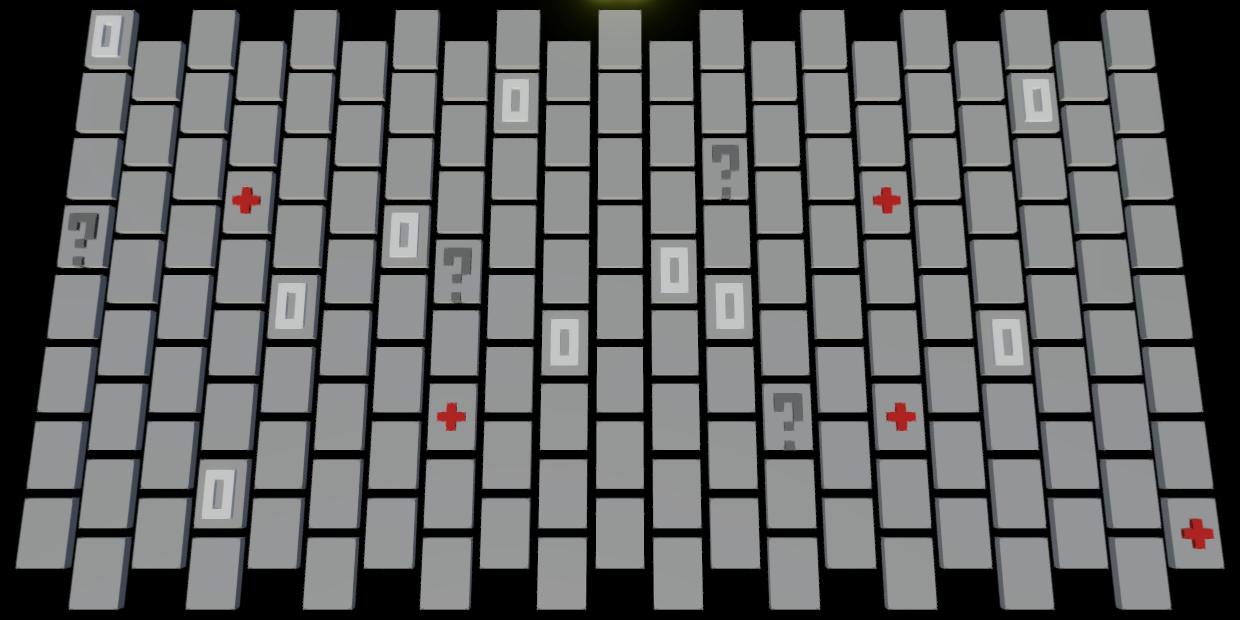
Let's also add symbols for a revealed mine, a mark is that sure and a mistaken variant, a mark that is unsure, and the default hidden state.
	readonly static ulong[] bitmaps =
	{
		…
		0b00000_01110_00010_01110_01010_01110_00000, // 6

		0b00000_10001_01010_00100_01010_10001_00000, // mine
		0b00000_00000_00100_01110_00100_00000_00000, // marked sure
		0b11111_11111_11011_10001_11011_11111_11111, // marked mistaken
		0b00000_01110_01010_01000_00100_00000_00100, // marked unsure
		0b00000_00000_00000_00000_00000_00000_00000  // hidden
	};
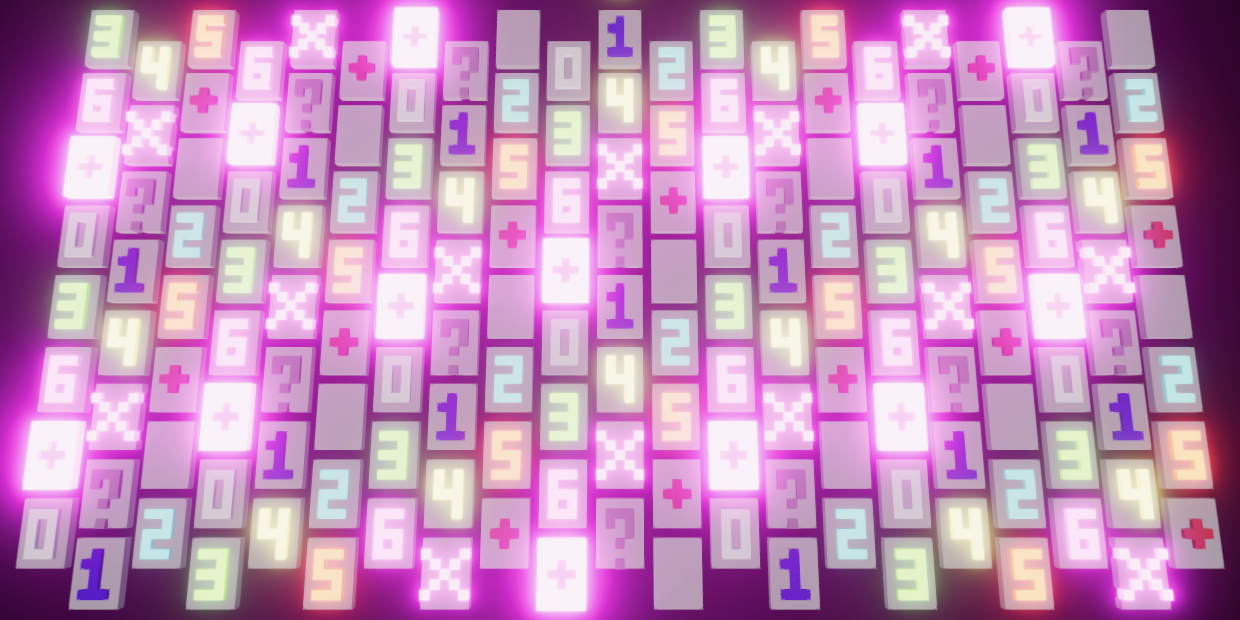
Let's also give each symbol its own color. Add another readonly static array for this, using float3 values.
	static readonly float3[] colorations =
	{
		1.00f * float3(1f, 1f, 1f), // 0
		1.00f * float3(0f, 0f, 1f), // 1
		2.00f * float3(0f, 1f, 1f), // 2
		5.00f * float3(0f, 1f, 0f), // 3
		10.0f * float3(1f, 1f, 0f), // 4
		20.0f * float3(1f, 0f, 0f), // 5
		20.0f * float3(1f, 0f, 1f), // 6

		30.0f * float3(1f, 0f, 1f), // mine
		1.00f * float3(1f, 0f, 0f), // marked sure
		50.0f * float3(1f, 0f, 1f), // marked mistaken
		0.25f * float3(1f, 1f, 1f), // marked unsure
		0.00f * float3(0f, 0f, 0f)  // hidden
	};
The colors are the same for all enable blocks of the cell.
		ulong bitmap = bitmaps[i % bitmaps.Length];
		float3 coloration = colorations[i % colorations.Length];

		for (int bi = 0; bi < GridVisualization.blocksPerCell; bi++)
		{
			…
			colors[blockOffset + bi] = altered ? coloration : 0.5f;
		}
Once we are satisfied with the symbols we have to switch to showing the appropriate one for each cell. Introduce a static GetSymbolIndex method for this that returns the correct symbol index for a give cell state.
We first consider all revealed cells. If it is a mine then we show it. If not but it is marked then that is a mistake. Otherwise it is a cell without a mine and we show its digit. If the cell is not revealed then we show either the appropriate mark or that it is hidden.
	enum Symbol { Mine = 7, MarkedSure, MarkedMistaken, MarkedUnsure, Hidden }

	static int GetSymbolIndex (CellState state) =>
		state.Is(CellState.Revealed) ?
			state.Is(CellState.Mine) ? (int)Symbol.Mine :
			state.Is(CellState.MarkedSure) ? (int)Symbol.MarkedMistaken :
			(int)state.Without(CellState.Revealed) :
		state.Is(CellState.MarkedSure) ? (int)Symbol.MarkedSure :
		state.Is(CellState.MarkedUnsure) ? (int)Symbol.MarkedUnsure :
		(int)Symbol.Hidden;
Use this method to select the correct symbol in Execute.
		int symbolIndex = GetSymbolIndex(grid[i]);
		ulong bitmap = bitmaps[symbolIndex];
		float3 coloration = colorations[symbolIndex];
At this point the entire grid will again be hidden, matching the initial state.
Gameplay
Now that we have a functioning grid and visualization it is time to implement gameplay.
Touching Cells
To play the game the player has to touch cells. As this is done based on the visualization we have to ask GridVisualization whether a cell was hit, and if so what its index is. We do this by giving it a TryGetHitCellIndex method with a Ray parameter.
The method finds the point where the ray hits the XZ plane and then converts that to a row and column index, performing the inverse calculations of InitializeVisualizationJob.GetCellPosition. Then it tries to get the cell index.
	public bool TryGetHitCellIndex (Ray ray, out int cellIndex)
	{
		Vector3 p = ray.origin - ray.direction * (ray.origin.y / ray.direction.y);

		float x = p.x + columnsPerCell / 2;
		x /= columnsPerCell + 1;
		x += (grid.Columns - 1) * 0.5f;
		int c = Mathf.FloorToInt(x);

		float z = p.z + rowsPerCell / 2f;
		z /= rowsPerCell + 1;
		z += (grid.Rows - 1) * 0.5f + (c & 1) * 0.5f - 0.25f;
		int r = Mathf.FloorToInt(z);

		return grid.TryGetCellIndex(r, c, out cellIndex);
	}
To avoid the gaps between cells we add an initial extra offset of 1.5, which makes the row and column indices of a cell start directly at the end of the previous cell's visualization, so including the entire gap. Then also check whether the fractional index coordinates lie beyond that gap.
		float x = p.x + columnsPerCell / 2 + 1.5f;
		…

		float z = p.z + rowsPerCell / 2f + 1.5f;
		…

		return grid.TryGetCellIndex(r, c, out cellIndex) &&
			x - c > 1f / (columnsPerCell + 1) &&
			z - r > 1f / (rowsPerCell + 1);
Next, add a PerformAction method to Game that performs a mark action if the secondary mouse button is pressed. Revealing a cell is done by invoking TryGetHitCellIndex with Camera.main.ScreenPointToRay(Input.mousePosition) for its ray argument. If that gives us a cell index set its state to marked. Have the method return whether an action was successfully performed. Then invoke it in Update and only update the visualization if needed.
	void Update ()
	{
		…

		if (PerformAction())
		{
			visualization.Update€();
		}
		visualization.Draw();
	}

	bool PerformAction ()
	{
		bool markAction = Input.GetMouseButtonDown(1);
		if (
			markAction &&
			visualization.TryGetHitCellIndex(
				Camera.main.ScreenPointToRay(Input.mousePosition), out int cellIndex
			)
		)
		{
			grid[cellIndex] = CellState.MarkedSure;
			return true;
		}

		return false;
	}
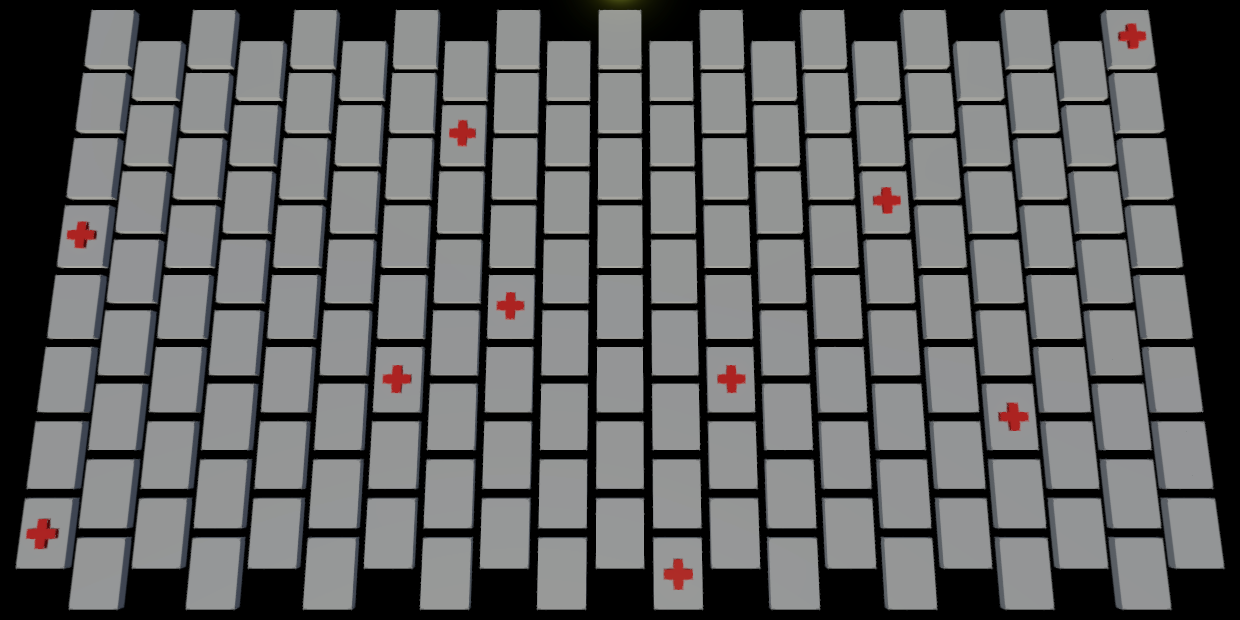
Marking Cells
Marking a cell does two things: it set the cell to marked and it also decreases the amount of mines that we assume are still unknown. So we need to know how many mines there are, for which we add a configuration field set to 30 by default. We also need to keep track of how many sure marks there currently are. Initialize the mines text to the full amount in OnEnable and set the mark count to zero. Also make sure that the amount of mines doesn't exceed the cell count.
	[SerializeField, Min(1)]
	int rows = 8, columns = 21, mines = 30;

	…

	int markedSureCount;

	void OnEnable ()
	{
		grid.Initialize(rows, columns);
		visualization.Initialize(grid, material, mesh);
		mines = Mathf.Min€(mines, grid.CellCount);
		minesText.SetText("{0}", mines);
		markedSureCount = 0;
	}
Then create a DoMarkAction method with a cell index parameter that takes care of the mark action and returns whether it changed something. If the cell is already revealed then marking it makes no sense so we do nothing. Otherwise, if the cell doesn't have any mark we mark it as sure and increase the count. If it already has a sure mark we instead switch to an unsure mark and decrease the count. Otherwise it already has an unsure mark and we clear it. Finally, update the mines text.
	bool DoMarkAction (int cellIndex)
	{
		CellState state = grid[cellIndex];
		if (state.Is(CellState.Revealed))
		{
			return false;
		}

		if (state.IsNot(CellState.Marked))
		{
			grid[cellIndex] = state.With(CellState.MarkedSure);
			markedSureCount += 1;
		}
		else if (state.Is(CellState.MarkedSure))
		{
			grid[cellIndex] =
				state.Without(CellState.MarkedSure).With(CellState.MarkedUnsure);
			markedSureCount -= 1;
		}
		else
		{
			grid[cellIndex] = state.Without(CellState.MarkedUnsure);
		}

		minesText.SetText("{0}", mines - markedSureCount);
		return true;
	}
Invoke this method in PerformAction so we can cycle through mark types.
//grid[cellIndex] = CellState.MarkedSure;return DoMarkAction(cellIndex);
Revealing Cells
We also create a DoRevealAction method that works the same way, except that it doesn't do anything if the cell has a mark and otherwise reveals it.
	bool DoRevealAction (int cellIndex)
	{
		CellState state = grid[cellIndex];
		if (state.Is(CellState.MarkedOrRevealed))
		{
			return false;
		}

		grid[cellIndex] = state.With(CellState.Revealed);
		return true;
	}
Have PerformAction invoke DoRevealAction instead of DoMarkAction in case of a reveal action, triggered by the primary mouse button.
		bool revealAction = Input.GetMouseButtonDown(0);
		bool markAction = Input.GetMouseButtonDown(1);
		if (
			(revealAction || markAction) &&
			visualization.TryGetHitCellIndex(
				Camera.main.ScreenPointToRay(Input.mousePosition), out int cellIndex
			)
		)
		{
			return revealAction ? DoRevealAction(cellIndex) : DoMarkAction(cellIndex);
		}
Placing Mines
With player input handled we move on to placing mines. Create a PlaceMinesJob job for this that sets all cells to zero and then randomly changes some of them to mines. It needs the grid, the amount of mines, and a seed value to do this. This isn't a parallel job, so it extends IJob and implements an Execute method without parameters.
The random placement is done by creating a Unity.Mathematics.Random struct value with the given seed, then invoking NextInt on it with the cell count to get a cell index.
using Unity.Burst;
using Unity.Collections;
using Unity.Jobs;
using Unity.Mathematics;

[BurstCompile(FloatPrecision.Standard, FloatMode.Fast)]
struct PlaceMinesJob : IJob
{
	public Grid grid;

	public int mines, seed;

	public void Execute ()
	{
		for (int i = 0; i < grid.CellCount; i++)
		{
			grid[i] = CellState.Zero;
		}

		Random random = new Random((uint)seed);
		for (int m = 0; m < mines; m++)
		{
			grid[random.NextInt(grid.CellCount)] = CellState.Mine;
		}
	}
}
Execute this job in a new public Grid.PlaceMines method, with the amount of mines as a parameter. The seed must not be zero, se we'll use Random.Range€(1, int.MaxValue) for it.
	public void PlaceMines (int mines) => new PlaceMinesJob
	{
		grid = this,
		mines = mines,
		seed = Random.Range€(1, int.MaxValue)
	}.Schedule().Complete();
Invoke it at the end of Game.Update and let's also immediately update the visualization for now.
	void OnEnable ()
	{
		…
		grid.PlaceMines(mines);
		visualization.Update€();
	}
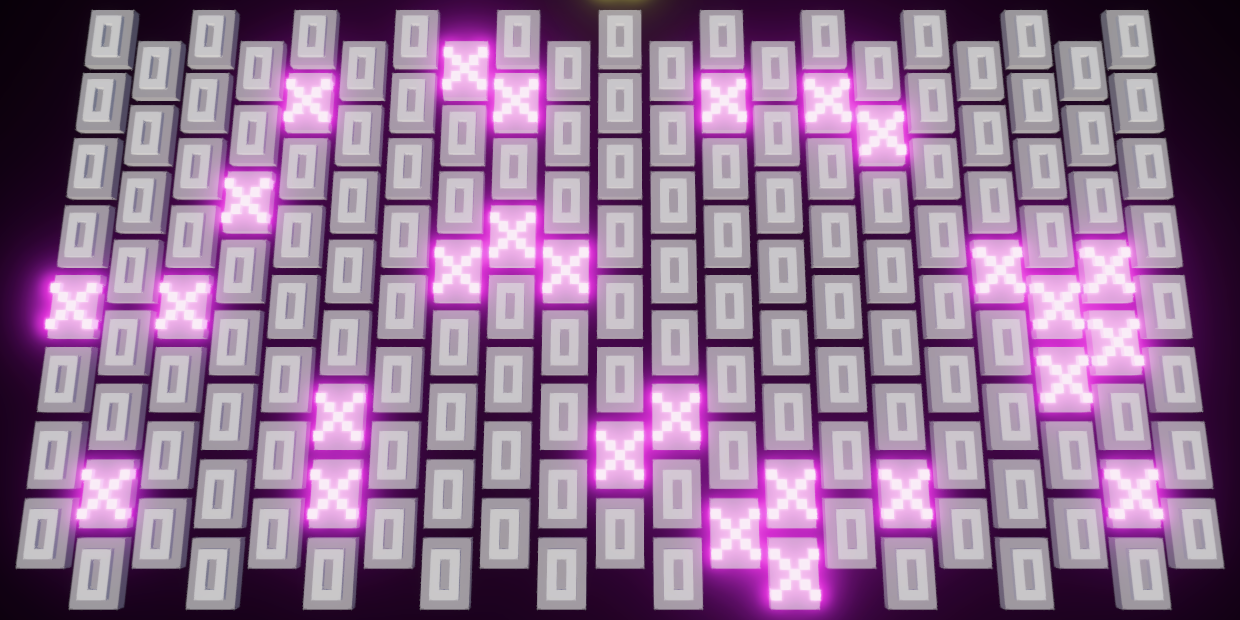
Let's also forcefully reveal all cells in UpdateVisualizationJob, for debugging.
int symbolIndex = GetSymbolIndex(grid[i].With(CellState.Revealed));
This shows us that mines get placed, but we might end up with too few because sometimes the same cell index is chosen more than once. We can fix this by allocating a temporary array for candidate indices in PlaceMinesJob.Execute and selecting random indices from there, then eliminating those indices once chosen.
		int candidateCount = grid.CellCount;
		var candidates = new NativeArray<int>(
			candidateCount, Allocator.Temp, NativeArrayOptions.UninitializedMemory
		);

		for (int i = 0; i < grid.CellCount; i++)
		{
			grid[i] = CellState.Zero;
			candidates[i] = i;
		}

		Random random = new Random((uint)seed);
		for (int m = 0; m < mines; m++)
		{
			int candidateIndex = random.NextInt(candidateCount--);
			grid[candidates[candidateIndex]] = CellState.Mine;
			candidates[candidateIndex] = candidates[candidateCount];
		}
Counting Adjacent Mines
Besides placing mines we also have to track how many mines are adjacent to each cell. We can do this by incrementing the state of each neighbor of the cell that got a mine. Introduce a SetMine method that does this for a given cell index. Initially it only sets the mine.
	public void Execute ()
	{
		…
		for (int m = 0; m < mines; m++)
		{
			int candidateIndex = random.NextInt(candidateCount--);
			SetMine(candidates[candidateIndex]);
			candidates[candidateIndex] = candidates[candidateCount];
		}
	}

	void SetMine (int mineIndex)
	{
		grid[i] = grid[i].With(CellState.Mine);
	}
Then it gets the cell's row and column index and increments its four direct row and column neighbors, by invoking an Increment method that only does this if the neighbor exists.
	void SetMine (int mineIndex)
	{
		grid[i] = grid[i].With(CellState.Mine);
		grid.GetRowColumn(i, out int r, out int c);
		Increment(r - 1, c);
		Increment(r + 1, c);
		Increment(r, c - 1);
		Increment(r, c + 1);
	}

	void Increment (int r, int c)
	{
		if (grid.TryGetCellIndex(r, c, out int i))
		{
			grid[i] += 1;
		}
	}
The last two column neighbors are found by either incrementing or decrementing the row index, depending on whether the column index is even or odd.
		Increment(r, c + 1);

		int rowOffset = (c & 1) == 0 ? 1 : -1;
		Increment(r + rowOffset, c - 1);
		Increment(r + rowOffset, c + 1);
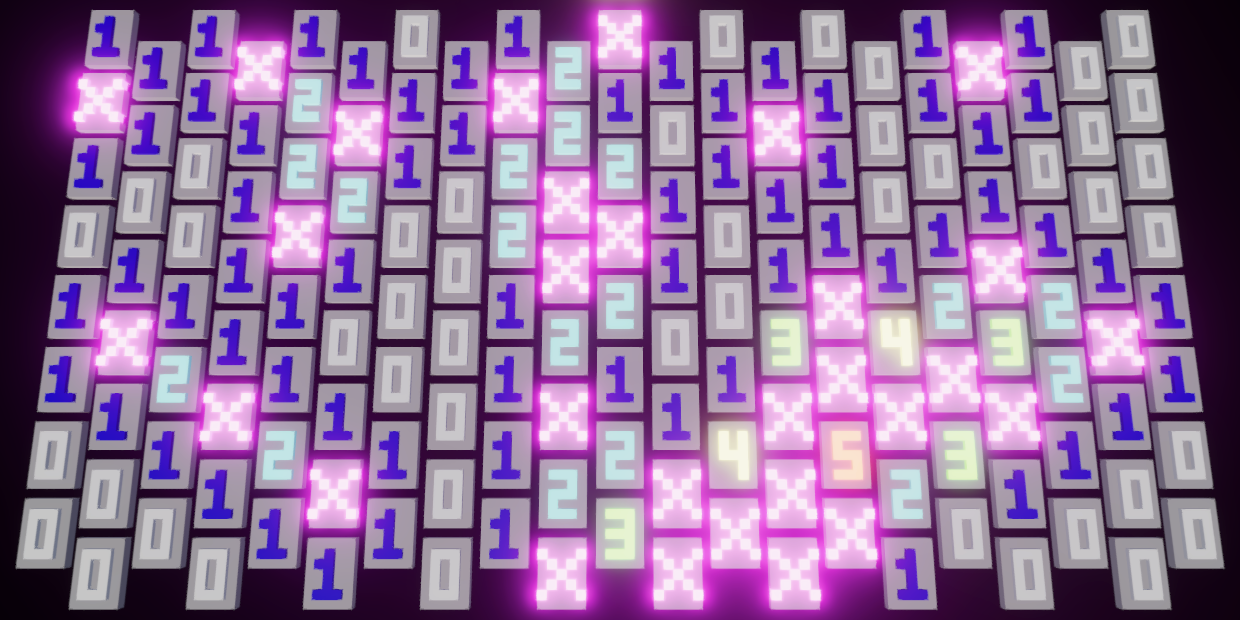
Once we've verified that everything works correctly we can remove the forced reveal from UpdateVisualizationJob.
int symbolIndex = GetSymbolIndex(grid[i]);
And also no longer update the visualization in Game.OnEnable.
	void OnEnable ()
	{
		…
		//visualization.Update();
	}
Revealing Empty Regions
A good feature of a mine-sweeping game is automatically revealing entire empty regions, avoiding the tedious work of touching every cell with zero adjacent mines. This is done by performing a flood fill that reveals all connected zero cells and the nonzero border cells around it.
Create a new non-parallel RevealRegionJob job to reveal a region, using a temporary int2 array as a stack to store the row and column indices of cells whose neighbors need to be checked. We'll need to store at most the entire grid and have to keep track of the current stack size, for which we'll use a field. The job needs the grid along with the start row and column indices to do its work.
using Unity.Burst;
using Unity.Collections;
using Unity.Jobs;
using Unity.Mathematics;

using static Unity.Mathematics.math;

[BurstCompile(FloatPrecision.Standard, FloatMode.Fast)]
struct RevealRegionJob : IJob
{
	public Grid grid;

	public int2 startRowColumn;

	int stackSize;

	public void Execute ()
	{
		var stack = new NativeArray<int2>(grid.CellCount, Allocator.Temp);
		stackSize = 0;
	}
}
The job starts by pushing the start cell indices onto the stack, but should do this only if needed. First, only valid indices should be added. Second, marked or already revealed cells should be skipped. If the cell is accepted then it should be revealed. And finally only if it is a zero cell should its row and column indices be pushed onto the stack. Create a separate method for this.
	public void Execute ()
	{
		var stack = new NativeArray<int2>(grid.CellCount, Allocator.Temp);
		stackSize = 0;
		PushIfNeeded(stack, startRowColumn);
	}

	void PushIfNeeded (NativeArray<int2> stack, int2 rc)
	{
		if (grid.TryGetCellIndex(rc.x, rc.y, out int i))
		{
			CellState state = grid[i];
			if (state.IsNot(CellState.MarkedOrRevealed))
			{
				if (state == CellState.Zero)
				{
					stack[stackSize++] = rc;
				}
				grid[i] = state.With(CellState.Revealed);
			}
		}
	}
After the first cell is pushed, as long as the stack isn't empty, pop the top index pair from the stack and push all its neighbors if needed.
		PushIfNeeded(stack, startRowColumn);
		while (stackSize > 0)
		{
			int2 rc = stack[--stackSize];
			PushIfNeeded(stack, rc - int2(1, 0));
			PushIfNeeded(stack, rc + int2(1, 0));
			PushIfNeeded(stack, rc - int2(0, 1));
			PushIfNeeded(stack, rc + int2(0, 1));

			rc.x += (rc.y & 1) == 0 ? 1 : -1;
			PushIfNeeded(stack, rc - int2(0, 1));
			PushIfNeeded(stack, rc + int2(0, 1));
		}
Add a public Reveal method to Grid that executes the job for a given cell index.
	public void Reveal (int index)
	{
		var job = new RevealRegionJob
		{
			grid = this
		};
		GetRowColumn(index, out job.startRowColumn.x, out job.startRowColumn.y);
		job.Schedule().Complete();
	}
And invoke it at the end of Game.RevealAction instead of directly adjusting the cell state.
	bool DoRevealAction (int cellIndex)
	{
		…

		//grid[cellIndex] = state.With(CellState.Revealed);
		grid.Reveal(cellIndex);
		return true;
	}
Now whenever the player touches a hidden zero cell the entire zero region will be revealed at once, including its nonzero border, while being stopped by marks.
Failure and Success
All that it left at this point is to detect failure and success and start new games. Begin by moving the code that sets the mines from OnEnable to a new StartNewGame method, which OnEnable invokes. Also introduce a field that indicates the game over state, which is disabled when a new game is started.
	bool isGameOver;

	void OnEnable ()
	{
		grid.Initialize(rows, columns);
		visualization.Initialize(grid, material, mesh);
		StartNewGame();
	}

	void StartNewGame ()
	{
		isGameOver = false;
		mines = Mathf.Min€(mines, grid.CellCount);
		minesText.SetText("{0}", mines);
		markedSureCount = 0;
		grid.PlaceMines(mines);
	}
Let's first consider failure. It happens when a mine is revealed. Check this at the end of DoRevealAction and if so enable the game over state and set the mines text to FAILURE.
	bool DoRevealAction (int cellIndex)
	{
		…

		grid.Reveal(cellIndex);

		if (state.Is(CellState.Mine))
		{
			isGameOver = true;
			minesText.SetText("FAILURE");
		}
		return true;
	}
To make it possible for the player to evaluate their mistake let's also reveal all mines and incorrect marks. We can do that with a simple parallel job that reveals all cells that are either marked for sure or a mine.
using Unity.Burst;
using Unity.Collections;
using Unity.Jobs;

[BurstCompile(FloatPrecision.Standard, FloatMode.Fast)]
struct RevealMinesAndMistakesJob : IJobFor
{
	public Grid grid;

	public void Execute (int i) => grid[i] = grid[i].With(
		grid[i].Is(CellState.MarkedSureOrMine) ? CellState.Revealed : CellState.Zero
	);
}
Add a public method to run it to Grid.
	public void RevealMinesAndMistakes () => new RevealMinesAndMistakesJob
	{
		grid = this
	}.ScheduleParallel(CellCount, Columns, default).Complete();
Then invoke it in Game.DoRevealAction on failure.
		if (state.Is(CellState.Mine))
		{
			isGameOver = true;
			minesText.SetText("FAILURE");
			grid.RevealMinesAndMistakes();
		}
We start a new game in PerformAction if we're in the game over state and the player performs any action, immediately applying that action to the new game.
		if (
			(revealAction || markAction) &&
			visualization.TryGetHitCellIndex(
				Camera.main.ScreenPointToRay(Input.mousePosition), out int cellIndex
			)
		)
		{
			if (isGameOver)
			{
				StartNewGame();
			}
			return revealAction ? DoRevealAction(cellIndex) : DoMarkAction(cellIndex);
		}
To detect success we have to know how many cells are revealed and how many are still hidden. Add public properties for these values to Grid. The hidden cell count is equal to the total cell count minus the revealed cell count. The revealed cell count is something we have to track, which must be done in RevealRegionJob. To make that possible we have to use a native array with a single value to store the revealed cell count. The revealed cell count property is then a getter and setter that forwards to the single element of this native array.
	public int HiddenCellCount => CellCount - RevealedCellCount;

	public int RevealedCellCount
	{
		get => revealedCellCount[0];
		set => revealedCellCount[0] = value;
	}

	NativeArray<int> revealedCellCount;

	NativeArray<CellState> states;

	public void Initialize (int rows, int columns)
	{
		Rows = rows;
		Columns = columns;
		revealedCellCount = new NativeArray<int>(1, Allocator.Persistent);
		states = new NativeArray<CellState>(Rows * Columns, Allocator.Persistent);
	}

	public void Dispose ()
	{
		revealedCellCount.Dispose();
		states.Dispose();
	}
In RevealRegionJob we have to increment the revealed cell count whenever a cell is revealed.
	void PushIfNeeded (NativeArray<int2> stack, int2 rc)
	{
		if (grid.TryGetCellIndex(rc.x, rc.y, out int i))
		{
			CellState state = grid[i];
			if (state.IsNot(CellState.MarkedOrRevealed))
			{
				if (state == CellState.Zero)
				{
					stack[stackSize++] = rc;
				}
				grid.RevealedCellCount += 1;
				grid[i] = state.With(CellState.Revealed);
			}
		}
	}
And in PlaceMinesJob we have to set it to zero.
	public void Execute ()
	{
		grid.RevealedCellCount = 0;
		…
	}
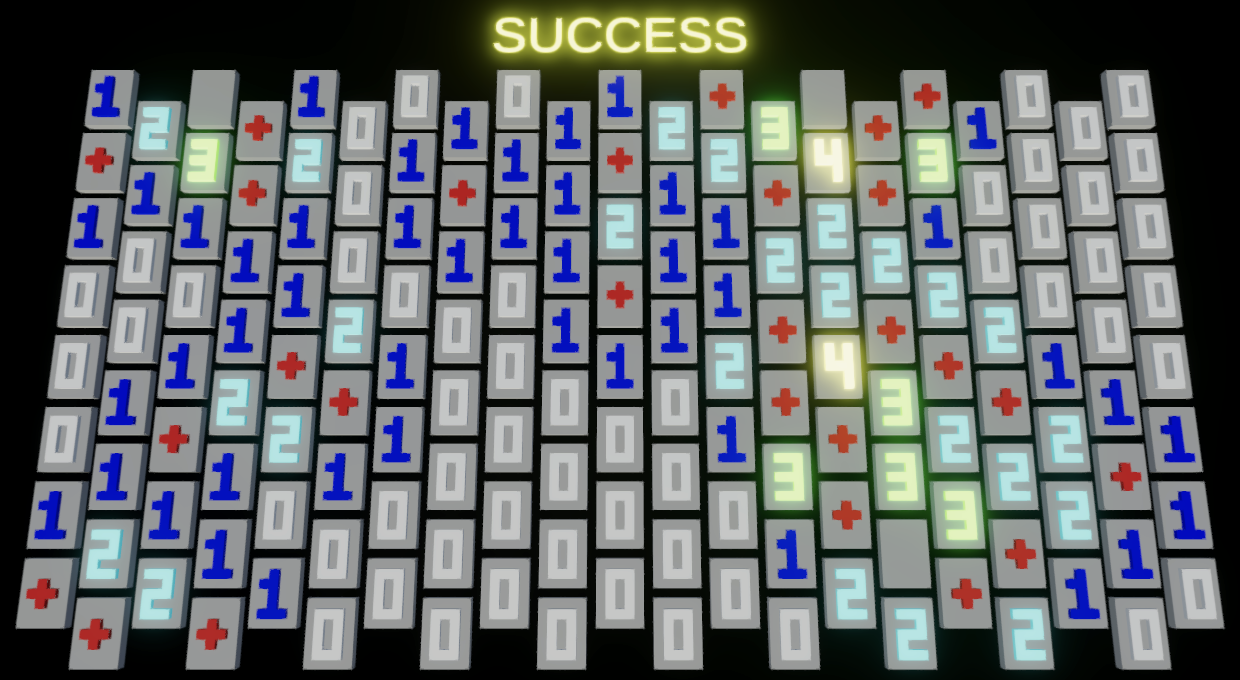
Now Grid.DoRevealAction can check whether the game is a success. This is the case if it isn't a failure and the hidden cell count is equal to the amount of mines.
		if (state.Is(CellState.Mine))
		{
			grid.RevealMinesAndMistakes();
			markedSureCount = gameOverState;
			minesText.SetText("FAILURE");
		}
		else if (grid.HiddenCellCount == mines)
		{
			isGameOver = true;
			minesText.SetText("SUCCESS");
		}
Ripples
At this point our game is fully functional, but let's add an extra visual effect to it: each time the player touches a cell it causes the grid to ripple a little.
Ripple Data
As the player could rapidly touch the grid we should support multiple ripples at the same time, let's say up to ten. Add a ripple count and a float3 native array to GridVisualization to keep track of these ripples.
	NativeArray<float3> positions, colors, ripples;

	int rippleCount;

	…

	public void Initialize (Grid grid, Material material, Mesh mesh)
	{
		…
		colors = new NativeArray<float3>(instanceCount, Allocator.Persistent);
		ripples = new NativeArray<float3>(10, Allocator.Persistent);
		rippleCount = 0;

		…
	}

	public void Dispose ()
	{
		positions.Dispose();
		colors.Dispose();
		ripples.Dispose();
		…
	}
Whenever a cell hit is confirmed in TryGetHitCellIndex add a ripple if we aren't at the maximum yet. We use the XZ coordinates of the ray projected onto the XZ plane as the ripple origin, storing them in the first two components of the ripple data. The third component represent the age of the ripple, which starts at zero.
	public bool TryGetHitCellIndex (Ray ray, out int cellIndex)
	{
		…

		bool valid = grid.TryGetCellIndex(r, c, out cellIndex) &&
			x - c > 1f / (columnsPerCell + 1) &&
			z - r > 1f / (rowsPerCell + 1);

		if (valid && rippleCount < ripples.Length)
		{
			ripples[rippleCount++] = float3(p.x, p.z, 0f);
		}
		return valid;
	}
Showing the Ripples
Add public fields for the ripples and their count to UpdateVisualizationJob.
	[NativeDisableParallelForRestriction]
	public NativeArray<float3> positions, colors, ripples;

	public int rippleCount;
We update the ripples themselves in GridVisualization.Update€ directly before running the job. We won't do this inside a job because most of the time there will be either zero or a single ripple to update. Loop through the ripples, increasing their age to a maximum of one second if it's less than that. Otherwise remove the ripple. Then pass them and their count to the job.
	public void Update€ ()
	{
		float dt = Time.deltaTime;
		for (int i = 0; i < rippleCount; i++)
		{
			float3 ripple = ripples[i];
			if (ripple.z < 1f)
			{
				ripple.z = Mathf.Min(ripple.z + dt, 1f);
				ripples[i] = ripple;
			}
			else
			{
				ripples[i] = ripples[--rippleCount];
				i -= 1;
			}
		}

		new UpdateVisualizationJob
		{
			positions = positions,
			colors = colors,
			ripples = ripples,
			rippleCount = rippleCount,
			grid = grid
		}.ScheduleParallel(grid.CellCount, grid.Columns, default).Complete();
		positionsBuffer.SetData(positions);
		colorsBuffer.SetData(colors);
	}
Next, add a method to accumulate the ripples for a given position to UpdateVisualizationJob. We'll create ripples that move outward at fairly high speed and fade out after a second. We'll use the function `(1-cos(d(2pi)/10))(1-t^2)` where `d=50t-||p-r||`, `p` is the block XZ position, `r` is the ripple XZ origin, and `t` is the ripple age. To show a single period per ripple only include it if `d` lies in the 0–10 exclusive range.
	float AccumulateRipples (float3 position)
	{
		float sum = 0f;
		for (int r = 0; r < rippleCount; r++)
		{
			float3 ripple = ripples[r];
			float d = 50f * ripple.z - distance(position.xz, ripple.xy);
			if (0 < d && d < 10f)
			{
				sum += (1f - cos(d * 2f * PI / 10f)) * (1f - ripple.z * ripple.z);
			}
		}
		return sum;
	}
Use the accumulated ripples to adjust the block Y position and color in Execute. Let's subtract half the ripple value to the Y position, pushing the blocks downward, and darken the color by up to 5%.
			float3 position = positions[blockOffset + bi];
			float ripples = AccumulateRipples(position);
			position.y = (altered ? 0.5f : 0f) - 0.5f * ripples;
			positions[blockOffset + bi] = position;
			colors[blockOffset + bi] =
				(altered ? coloration : 0.5f) * (1f - 0.05f * ripples);
To make sure that the ripples keep moving always update the visualization in Game.Update€.
	void Update ()
	{
		…

		//if (PerformAction())
		//{
		//	visualization.Update();
		//}
		PerformAction();
		visualization.Update€();
		visualization.Draw();
	}
The ripple effect is fairly strong to make it obvious, but you might want to tone it down so it is less distracting.
Updating when Required
We only need to update the visualization when there are active ripples or when the player touched a cell. But touching a cell causes a ripple, so we can suffice by checking for active ripples. This means that we can make GridVisualization.Update€ private and invoke it in Draw when needed.
	public void Draw ()
	{
		if (rippleCount > 0)
		{
			Update€();
		}
		Graphics.DrawMeshInstancedProcedural(
			mesh, 0, material, new Bounds(Vector3.zero, Vector3.one), positionsBuffer.count
		);
	}

	//public void Update ()
	void Update€ ()
	{
		…
	}
Now we no longer need to explicitly update the grid in Game.Update.
PerformAction();//visualization.Update();visualization.Draw();
We can also eliminate the boolean return type from the action methods.
	void PerformAction ()
	{
		bool revealAction = Input.GetMouseButtonDown(0);
		bool markAction = Input.GetMouseButtonDown(1);
		if (
			…
		)
		{
			…
			//return revealAction ? DoRevealAction(cellIndex) : DoMarkAction(cellIndex);
			if (revealAction)
			{
				DoRevealAction(cellIndex);
			}
			else
			{
				DoMarkAction(cellIndex);
			}
		}

		//return false;
	}

	void DoMarkAction (int cellIndex)
	{
		CellState state = grid[cellIndex];
		if (state.Is(CellState.Revealed))
		{
			return; // false;
		}

		…
		//return true;
	}

	void DoRevealAction (int cellIndex)
	{
		…
		if (state.Is(CellState.MarkedOrRevealed))
		{
			return; // false;
		}

		…
		//return true;
	}
We've reached the end of this prototype tutorial. You should now know how to make a mine-sweeping game with a nonstandard visualization. From here you could entirely change its visualization, switch to a traditional square grid, make the grid wrap around, improve the mine-placement algorithm, or go in a different direction.
The next tutorial is Runner 2.