Serpensquares
Placing Tiles and Walking Paths
- Make a turn-based game for up to four players.
- Fill a grid with rotating tiles containing bridges.
- Construct paths and have tiny walkers traverse them.
This is the fifth tutorial in a series about prototypes. In it we will create a game about constructing paths by placing square tiles.
This tutorial is made with Unity 2021.3.24f1 and upgraded to 2022.3.1f1.
The Game
There is a category of games—both physical and digital—that deals with the arrangement of tiles to create paths or patterns. This time we'll create such a game, where up to four players try to construct the longest path by filling a grid with square tiles. The term serpentiles was coined for hexagonal tiles in such games. As we're going to use square tiles let's name our game Serpensquares.
Game Board
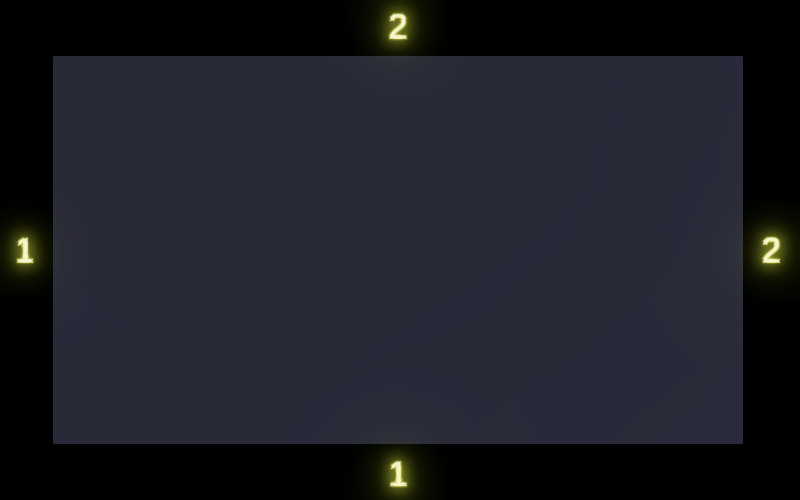
Once again we'll use the same graphics settings as Paddle Square, so we can copy that project and remove all scripts and the components that use them. We design the game for a 16:10 display, with a single dark board in the middle and the score for a single player displayed on each of its for sides, viewed from above.
The font size is 32 and the board is a cube with scale (64, 1, 36) with an Y position of −1. The board has a dark blue matte material, it doesn't have specular highlights and it doesn't need to cast shadows either. The default directional light is used, casting hard shadows.
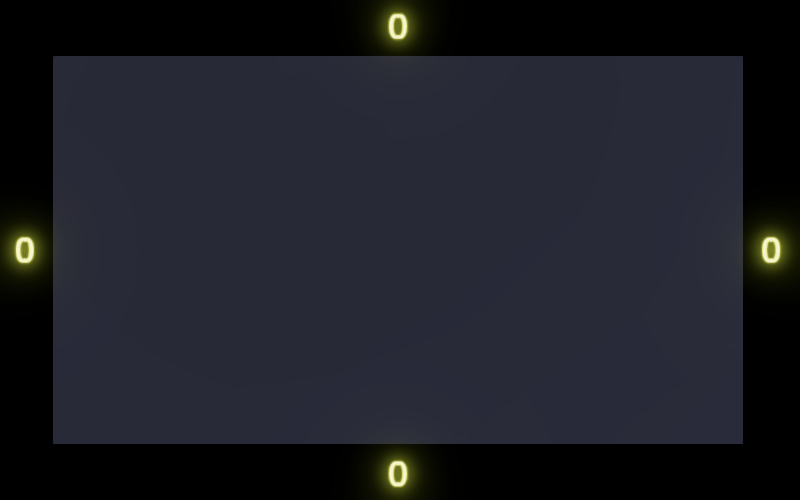
Deactivate the display texts for the four players so they are hidden by default.
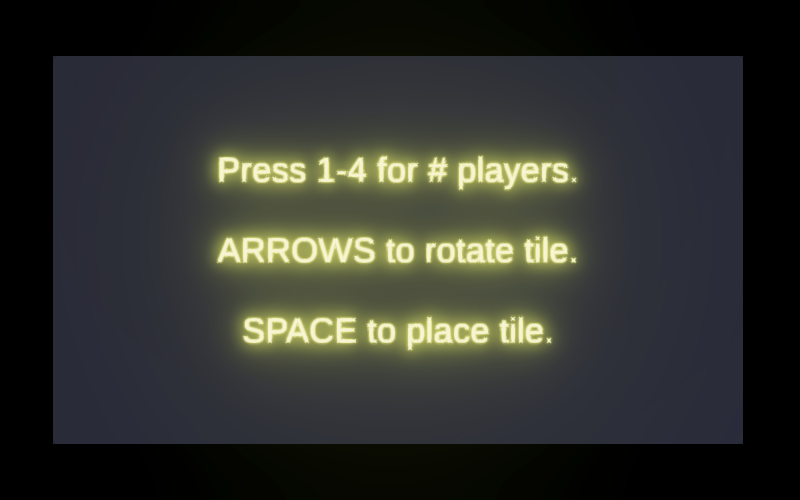
A game is started by pressing a number key to indicate the amount of players, up to four. A player will be able to use the arrow keys to rotate the tile that's going to be placed, which is done by pressing space. Add a start text in the middle of the board that explains this.
Starting a Game
As usual for all our prototypes we'll create a game object and give it a Game component that controls the entire game. It needs references to the starting text and an array for the display texts of the players. It keeps track of whether the game is playing, the active player count, and the current player index. Configure the display texts such that their order is north, east, south, and west.
using TMPro;
using UnityEngine;

public class Game : MonoBehaviour
{
	[SerializeField]
	TextMeshPro startText;

	[SerializeField]
	TextMeshPro[] displayTexts;

	bool isPlaying;

	int activePlayerCount, currentPlayerIndex;
}
Each update it invokes an UpdateGame if the game is playing and otherwise checks whether a valid number key is pressed and if so invokes StartNewGame with the new player count.
	void Update ()
	{
		if (isPlaying)
		{
			UpdateGame();
		}
		else
		{
			for (int i = 1; i <= displayTexts.Length; i++)
			{
				if (Input.GetKeyDown(KeyCode.Alpha0 + i))
				{
					StartNewGame(i);
					break;
				}
			}
		}
	}

	void StartNewGame (int newPlayerCount) {}

	void UpdateGame () { }
}
When a new game is started the start text is hidden, play begins, the current player index is set to zero, all player display texts are set to zero and enabled if needed, and the active player count is set.
	void StartNewGame (int newPlayerCount)
	{
		startText.gameObject.SetActive(false);
		isPlaying = true;
		currentPlayerIndex = 0;
		for (int i = 0; i < displayTexts.Length; i++)
		{
			displayTexts[i].SetText("0");
			displayTexts[i].gameObject.SetActive(i < newPlayerCount);
		}
		activePlayerCount = newPlayerCount;
	}

We can now start a game, which hides the instructions and shows the scores for the indicated amount of players. But if exactly two players are active it would be better if they start on opposite sides of the board. We can do this by first deactivating the texts of all players and then only activating the required amount of texts, picking the appropriate direction index. Thus which text belongs to which player is variable.
		for (int i = 0; i < displayTexts.Length; i++)
		{
			displayTexts[i].gameObject.SetActive(false);
		}
		for (int i = 0; i < activePlayerCount; i++)
		{
			int directionIndex = i == 1 && newPlayerCount == 2 ? 2 : i;
			displayTexts[directionIndex].SetText("0");
			displayTexts[directionIndex].gameObject.SetActive(true);
		}
Players
Create a serializable Player class, to store the configuration and state of a player. It needs fields for a path length and display text reference. Also give it a property to indicate whether the player can still keep walking, which is privately set.
using TMPro;
using Unity.Mathematics;
using UnityEngine;

[System.Serializable]
public class Player
{
	int pathLength;

	TextMeshPro displayText;

	public bool CanKeepWalking
	{ get; private set; }
}
Add a public StartNewGame method that takes a display text which the player will use to display its score, indicate that it can keep walking, and set its path length to zero. Also include a public Clear method that hides the text and forces the player to stop walking.
	public void StartNewGame (TextMeshPro displayText)
	{
		this.displayText = displayText;
		displayText.SetText("0");
		displayText.gameObject.SetActive(true);
		CanKeepWalking = true;
		pathLength = 0;
	}

	public void Clear ()
	{
		displayText.gameObject.SetActive(false);
		CanKeepWalking = false;
	}
To support gameplay, add public dummy methods to create a tile, rotate a tile while indicating whether that's clockwise or not, and a method to walk. Initially walking will simply increment that path length, update the display text, and will automatically stop the player when the path length becomes three.
	public void CreateTile () { }

	public void RotateTile (bool clockwise) { }

	public void Walk ()
	{
		pathLength += 1;
		displayText.SetText("{0}", pathLength);
		CanKeepWalking = pathLength < 3;
	}
}
Add a configuration array for the players to Game and set its length to four via its inspector. Then adjust StartNewGame so it uses the players instead of manipulating the displays texts itself. When that's done create a tile for the first player.
	[SerializeField]
	Player[] players;

	…

	void StartNewGame (int newPlayerCount)
	{
		…
		for (int i = 0; i < activePlayerCount; i++)
		{
			//displayTexts[i].gameObject.SetActive(false);
			players[i].Clear();
		}
		for (int i = 0; i < newPlayerCount; i++)
		{
			int directionIndex = i == 1 && newPlayerCount == 2 ? 2 : i;
			//displayTexts[directionIndex].SetText("0");
			//displayTexts[directionIndex].gameObject.SetActive(true);
			players[i].StartNewGame(displayTexts[directionIndex]);
		}
		players[0].CreateTile();
		activePlayerCount = newPlayerCount;
	}
The game update consists of checking whether the active player pressed a key. If space is pressed invoke a new PlaceTile method. Otherwise make the active player rotate its tile clockwise or counterclockwise if the right or left arrow key is pressed.
	void UpdateGame ()
	{
		if (Input.GetKeyDown(KeyCode.Space))
		{
			PlaceTile();
		}
		else if (Input.GetKeyDown(KeyCode.RightArrow))
		{
			players[currentPlayerIndex].RotateTile(true);
		}
		else if (Input.GetKeyDown(KeyCode.LeftArrow))
		{
			players[currentPlayerIndex].RotateTile(false);
		}
	}

	void PlaceTile () {}
Placing a tile is done by making the player walk, which will commit its current tile to the board. Then increment the current player index, wrapping it based on the amount of players. If the now current player can keep walking create a tile for it, otherwise end the game.
	void PlaceTile ()
	{
		players[currentPlayerIndex].Walk();
		currentPlayerIndex = (currentPlayerIndex + 1) % activePlayerCount;
		if (players[currentPlayerIndex].CanKeepWalking)
		{
			players[currentPlayerIndex].CreateTile();
		}
		else
		{
			isPlaying = false;
		}
	}
This allows us to play a dummy game, pressing space until all players reach score 3, after which a new game can begin by again selecting the amount of players.
The Grid
To manage and display the tiles used by the game we'll introduce a grid type.
Grid and Position
Create a serializable Grid class. As each player will occupy a position on the grid add a public inner Position struct type as well. A position is indicated by the row and column index of a tile. But besides that tiles are also entered from a side, where paths connect with each other. We'll indicate that with anchor points. So the position also needs to keep track of an anchor.
using System;
using Unity.Collections;
using Unity.Mathematics;
using UnityEngine;

using static Unity.Mathematics.math;

using Random = UnityEngine.Random;

[Serializable]
public class Grid
{
	public struct Position
	{
		public int anchor, row, column;
	}
}
To support gameplay the grid needs a few public methods, for which we'll create dummies. First are Initialize and StartNewGame. Next is an IsTileCreated method to indicate whether a tile exists at a give position, returning true for now. Then CreateTile and RotateTile methods for a position, and also whether the rotation is clockwise. And finally a TryMoveThroughTile method that adjusts a given position and indicates whether it was possible to move through and enter the next tile, returning false for now.
	public void Initialize () { }

	public void StartNewGame () { }

	public bool IsTileCreated (Position position) => true;

	public void CreateTile (Position position) { }

	public void RotateTile (Position position, bool clockwise) { }

	public bool TryMoveThroughTile (ref Position position) => false;
The grid also needs a configurable 2D size, for which we'll use 9×5 by default. As the player start positions depend on the grid size introduce a GetStartPosition method that returns the appropriate position for a given direction index. At this point we decide to include not one but two anchor point per tile side, so eight in total. For the starting position we'll pick one of the two anchors at random. The order of the anchors isn't important, as long as we are consistent. Let's start at the top left anchor and move around the tile clockwise.
	[SerializeField]
	int2 size = int2(9, 5);

	public Position GetStartPosition (int directionIndex) => directionIndex switch
	{
		0 => new Position
		{ anchor = Random.Range€(0, 2), row = size.y - 1, column = size.x / 2 },
		1 => new Position
		{ anchor = Random.Range€(2, 4), row = size.y / 2, column = size.x - 1 },
		2 => new Position
		{ anchor = Random.Range€(4, 6), row = 0, column = size.x / 2 },
		_ => new Position
		{ anchor = Random.Range€(6, 8), row = size.y / 2, column = 0 }
	};
Add a grid field to Player, which is set via a new Initialize method. Also give it a position, which is set via its StartNewGame method.
	Grid grid;

	Grid.Position position;

	public void Initialize (Grid grid)
	{
		this.grid = grid;
	}

	public void StartNewGame (TextMeshPro displayText, Grid.Position startPosition)
	{
		this.displayText = displayText;
		position = startPosition;
		…
	}
Creating and rotating a tile have to be forwarded to the grid.
	public void CreateTile () => grid.CreateTile(position);

	public void RotateTile (bool clockwise) => grid.RotateTile(position, clockwise);
It is now possible to create a proper implementation for Walk. If we can keep walking, walk and then update the display text. Walking consists of repeatedly checking whether we can still keep walking and whether a tile exists at our position, and if so trying to walk through that tile, updating whether we can keep walking, and incrementing the path length.
	public void Walk ()
	{
		if (CanKeepWalking)
		{
			while(CanKeepWalking && grid.IsTileCreated(position))
			{
				CanKeepWalking = grid.TryMoveThroughTile(ref position);
				pathLength += 1;
			}
			displayText.SetText("{0}", pathLength);
		}
		//CanKeepWalking = pathLength < 3;
	}
Game now needs a configuration field for the grid, initialize the grid and all players when it awakens, and also use the grid when it starts a new game.
	[SerializeField]
	Grid grid;

	…

	void Awake ()
	{
		grid.Initialize();
		for (int i = 0; i < players.Length; i++)
		{
			players[i].Initialize(grid);
		}
	}

	…

	void StartNewGame (int newPlayerCount)
	{
		grid.StartNewGame();
		…
		for (int i = 0; i < newPlayerCount; i++)
		{
			int directionIndex = i == 1 && newPlayerCount == 2 ? 2 : i;
			players[i].StartNewGame(
				displayTexts[directionIndex], grid.GetStartPosition(directionIndex)
			);
		}
		…
	}
At this point when we play a game it immediately ends at score 1.
Tile Instances
We'll use procedural drawing to render the tiles. Grid will be responsible for this. We'll only draw the tiles that have been created, so we need to keep track of the instance IDs of the tiles. Introduce array and count fields for that. We use −1 to indicate that a tile doesn't have an ID yet, so set all IDs to that at the start of a new game.
	int[] instanceIDs;

	int instanceCount;

	…

	public void Initialize ()
	{
		int tileCount = size.x * size.y;
		instanceIDs = new int[tileCount];
	}

	public void StartNewGame ()
	{
		for (int i = 0; i < instanceIDs.Length; i++)
		{
			instanceIDs[i] = -1;
		}
		instanceCount = 0;
	}
Create a ClaimID method that yields the next ID and assigns it to a give tile position, along with a GetID method that retrieves the ID for a position.
	int ClaimID (Position position) =>
		instanceIDs[position.row * size.x + position.column] = instanceCount++;

	int GetID (Position position) => instanceIDs[position.row * size.x + position.column];
When creating a tile we have to claim an ID for it. And we can know whether a tile is created by checking its ID.
	public bool IsTileCreated (Position position) => GetID(position) >= 0;

	public void CreateTile (Position position)
	{
		int id = ClaimID(position);
	}
Anchors
The first things that we'll visualize are the anchor points of the tiles, for which we'll use small cubes. We use a NativeArray<float2> for the positions as Y is always zero, along with a compute buffer. Each tile has eight anchor points, which aren't shared with their neighbors. We also need to introduce a public Dispose method to clean up the array and buffer.
	NativeArray<float2> anchors;

	ComputeBuffer anchorsBuffer;

	…

	public void Initialize ()
	{
		…

		anchors = new(tileCount * 8, Allocator.Persistent);
		anchorsBuffer = new(anchors.Length, 2 * 4);
	}

	public void Dispose ()
	{
		anchors.Dispose();
		anchorsBuffer.Release();
	}
We set our tile size to 6×6 units, with the anchors set at −1 and 1 along each edge. Store offsets for them in a static array. We'll make these anchors 0.7 units wide, so the entire tile size is 6.7 units in each dimension. Also introduce a GetTileCenter method that uses these metrics to return the 2D center of a tile for a give position.
	const float tileSize = 6.7f;

	static float2[] anchorOffsets =
	{
		float2(-1f,  3f), float2( 1f,  3f),
		float2( 3f,  1f), float2( 3f, -1f),
		float2( 1f, -3f), float2(-1f, -3f),
		float2(-3f, -1f), float2(-3f,  1f)
	};

	…

	float2 GetTileCenter (Position position) => float2(
		position.column - size.x * 0.5f + 0.5f,
		position.row - size.y * 0.5f + 0.5f
	) * tileSize;
Now when creating a tile, loop through its eight anchors, set their positions, and update the anchors buffer.
	public void CreateTile (Position position)
	{
		int id = ClaimID(position);
		float2 center = GetTileCenter(position);
		for (int i = 0; i < 8; i++)
		{
			anchors[id * 8 + i] = center + anchorOffsets[i];
		}
		anchorsBuffer.SetData(anchors);
	}
To draw the anchors we need configuration fields for a mesh and a material. Set the material's buffer during initialization. Then add a public Draw method that draws the anchors, if there are any tile instances.
	static int anchorsID = Shader.PropertyToID("_Anchors");

	[SerializeField]
	Mesh instanceMesh;

	[SerializeField]
	Material anchorMaterial;

	…

	public void Initialize ()
	{
		…
		anchorMaterial.SetBuffer(anchorsID, anchorsBuffer);
	}

	…

	public void Draw ()
	{
		if (instanceCount > 0)
		{
			Graphics.DrawMeshInstancedProcedural(
				instanceMesh, 0, anchorMaterial, new Bounds(Vector3.zero, Vector3.one),
				instanceCount * 8
			);
		}
	}
Have Game dispose of the grid when it is destroyed and draw the grid when it is done updating.
	void OnDestroy ()
	{
		grid.Dispose();
	}

	void Update ()
	{
		…

		grid.Draw();
	}
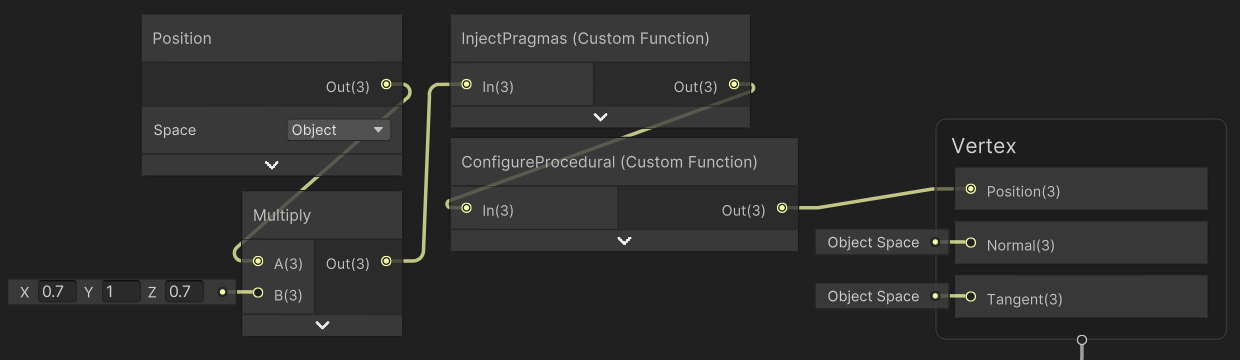
We need an HLSL include file and shader graph to draw instances, like we used in earlier prototypes. In this case the include file only needs to set the XZ position of the object-to-world matrix.
#if defined(UNITY_PROCEDURAL_INSTANCING_ENABLED)
	StructuredBuffer<float2> _Anchors;
#endif

void ConfigureProcedural () {
	#if defined(UNITY_PROCEDURAL_INSTANCING_ENABLED)
		unity_ObjectToWorld = 0.0;
		unity_ObjectToWorld._m03_m23 = _Anchors[unity_InstanceID];
		unity_ObjectToWorld._m00_m11_m22_m33 = 1.0;
	#endif
}

void ConfigureProcedural_float (float3 In, out float3 Out) {
	Out = In;
}
The shader graph uses a constant gray color and only sets the instance position, multiplying the object position with (0.7, 1, 0.7). Although this applies a nonuniform scale InjectPragmas can still assume uniform scaling because we'll use a cube mesh, which has axis-aligned normal vectors.
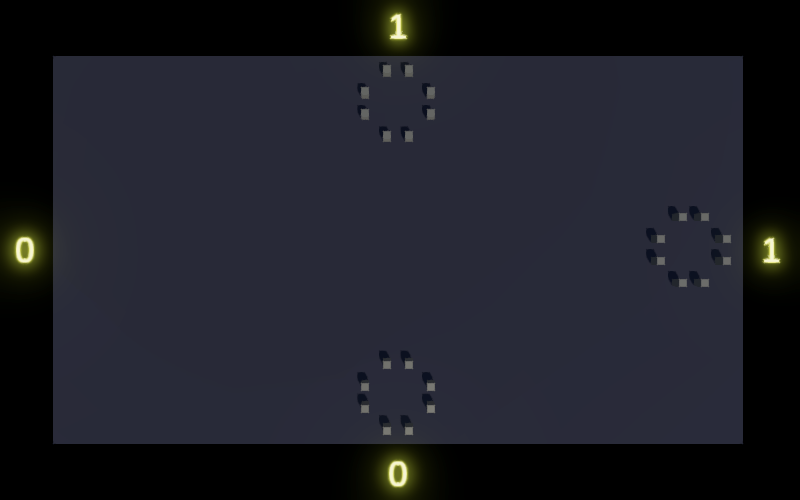
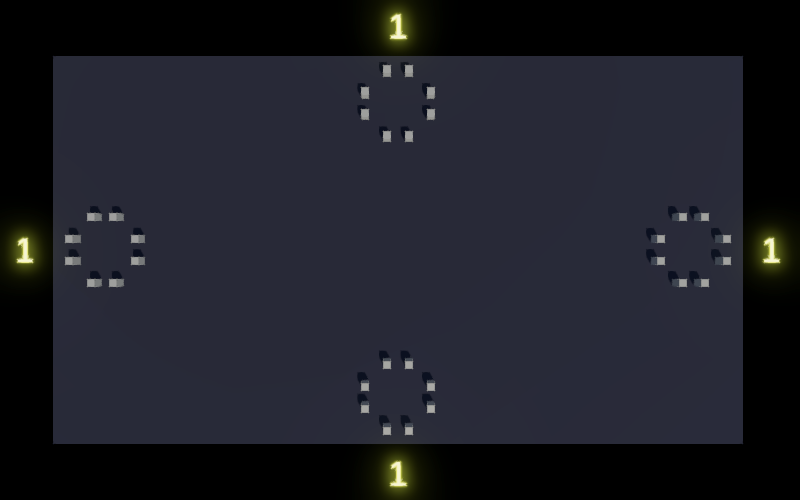
When we play a game anchor points for the created tiles will appear.
Anchor Colors
The next step is to support colorization of the anchors. To give each instance its own color we also have to send color data to the GPU. We could do this by including a separate array for it, but let's instead use a single struct to contain both the 2D position and an RGB color, naming it Anchor. Let's put it in a separate GPUStructs.cs asset file and give it the GenerateHLSL attribute, with its needAccessors argument set to false. Also give it a public static Size property that returns the struct's size.
using Unity.Mathematics;
using UnityEngine.Rendering;

[GenerateHLSL(needAccessors: false)]
public struct Anchor
{
	public float2 position;
	public float3 color;

	public static int Size => 5 * 4;
}
We can generate an HLSL include file for this struct via Edit / Rendering / Shader Include Files (newer versions of Unity put it in a slightly different place). This will create a GPUStructs.cs.hlsl asset file containing a matching struct definition in HLSL.
To easily convert a color to a float3 RGB value, introduce a Color.GetRGB extension method.
using Unity.Mathematics;
using UnityEngine;

using static Unity.Mathematics.math;

public static class ColorExtensions
{
	public static float3 GetRGB (this Color color) => float3(color.r, color.g, color.b);
}
Add a configuration field for the anchor color to Grid, without showing alpha and supporting HDR color selection. Then adjust the anchors array and buffer and set the color in CreateTile.
	[SerializeField, ColorUsage(false, true)]
	Color anchorColor;

	NativeArray<Anchor> anchors;

	…

	public void Initialize ()
	{
		…
		anchorsBuffer = new(anchors.Length, Anchor.Size);
		anchorMaterial.SetBuffer(anchorsID, anchorsBuffer);
	}

	…

	public void CreateTile (Position position)
	{
		int id = ClaimID(position);
		float2 center = GetTileCenter(position);
		for (int i = 0; i < 8; i++)
		{
			anchors[id * 8 + i] = new Anchor
			{
				position = center + anchorOffsets[i],
				color = anchorColor.GetRGB()
			};
		}
		anchorsBuffer.SetData(anchors);
	}
Also adjust the shader graph include file to use the Anchor struct and give it a function to retrieve the instance color. Then add a node to retrieve the instance color to the shader graph, replacing the constant fragment color.
#include "../Scripts/GPUStructs.cs.hlsl"

#if defined(UNITY_PROCEDURAL_INSTANCING_ENABLED)
	StructuredBuffer<Anchor> _Anchors;
#endif

void ConfigureProcedural () {
	#if defined(UNITY_PROCEDURAL_INSTANCING_ENABLED)
		unity_ObjectToWorld = 0.0;
		unity_ObjectToWorld._m03_m23 = _Anchors[unity_InstanceID].position;
		unity_ObjectToWorld._m00_m11_m22_m33 = 1.0;
	#endif
}

void ConfigureProcedural_float (float3 In, out float3 Out) {
	Out = In;
}

void GetInstanceColor_float (out float3 Color)
{
	#if defined(UNITY_PROCEDURAL_INSTANCING_ENABLED)
		Color = _Anchors[unity_InstanceID].color;
	#else
		Color = 0;
	#endif
}
Once all that is done the anchors should still look the same if you configured the same anchor color, but mid-gray will now appear too bright. This happens because we're directly passing the configured color values to the GPU. Unity colors are assumed to be in sRGB color space, while we are rendering in linear color space. Unity converts colors automatically when invoking SetColor on a material, but we are bypassing that. So we have to manually convert the anchor color to linear color space. Let's do this once and store it in a field.
	float3 linearAnchorColor;

	…
	public void Initialize ()
	{
		…

		linearAnchorColor = anchorColor.linear.GetRGB();
	}

	…

	public void CreateTile (Position position)
	{
		…
				color = linearAnchorColor
		…
	}
Now that each anchor can have a different color, add a parameter for a linear position color to CreateTile and use it for the anchor matching the given position.
	public void CreateTile (Position position, float3 linearPositionColor)
	{
		…
				color = i == position.anchor ? linearPositionColor : linearAnchorColor
		…
	}
Then give Player a configurable RGB HRD color for its position and use it when creating a tile.
	[SerializeField, ColorUsage(false, true)]
	Color positionColor;

	float3 linearPositionColor;

	…

	public void Initialize (Grid grid)
	{
		this.grid = grid;
		linearPositionColor = positionColor.linear.GetRGB();
	}

	…

	public void CreateTile () => grid.CreateTile(position, linearPositionColor);
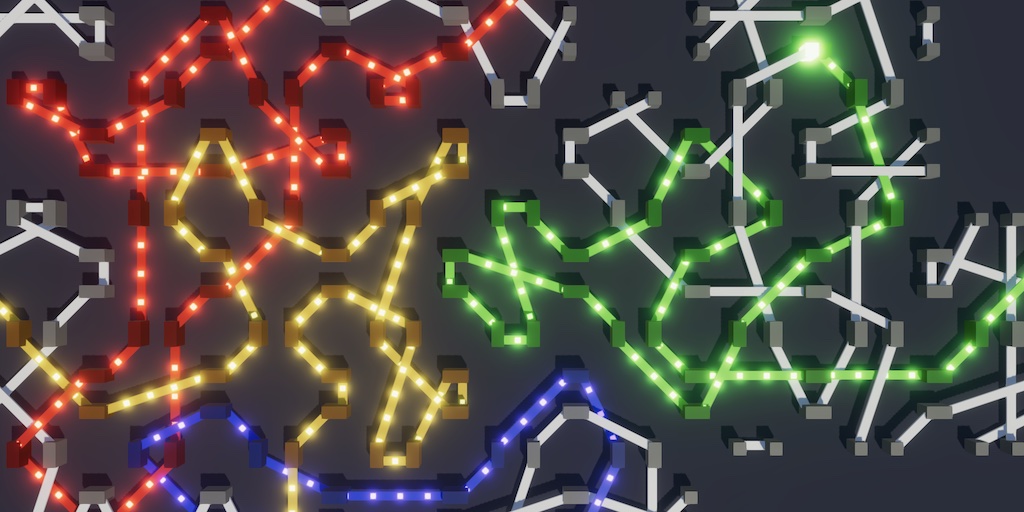
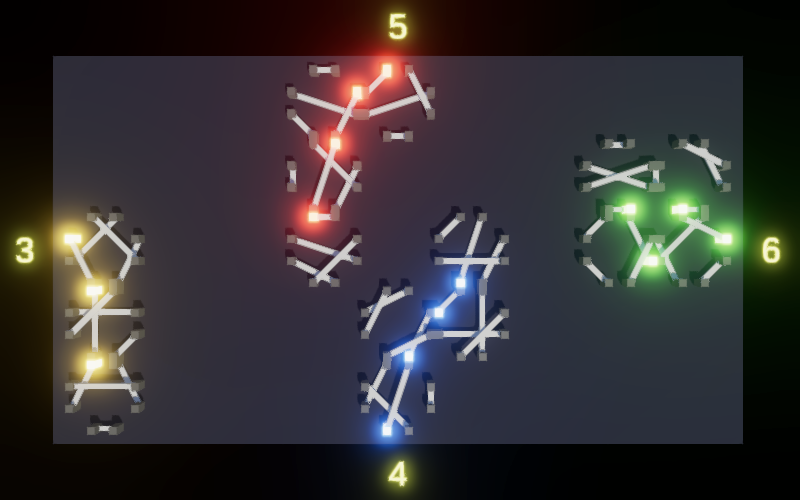
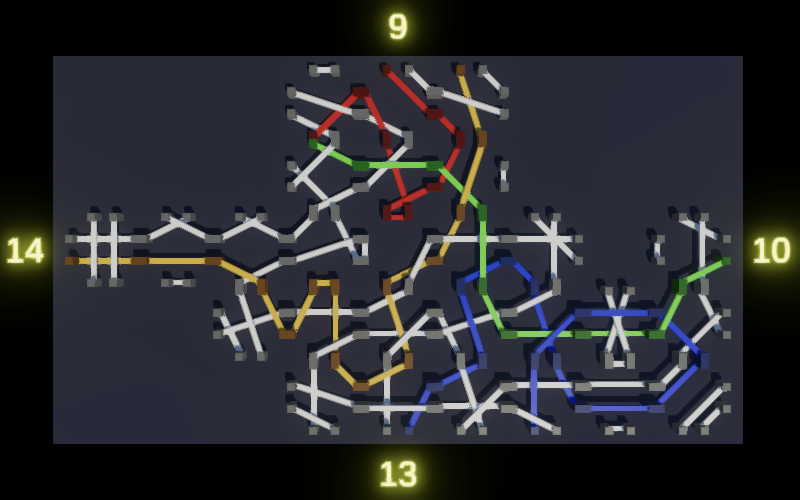
Give each player its own color. I made them brightly glowing red, green, blue, and yellow. We can now see at what anchor each player begins.
Connecting Anchors
To make it possible to walk for real we have to connect pairs of anchors. Give Grid a private Connection struct type that contains two anchor indices—a and b—and also an indication whether that connection has already been visited. Include an array for the connections, four per tile, and CreateConnection method. This method takes an ID and connection index, which it uses to set the given a and b anchor indices. Also give it a parameter for the tile center, which we'll use later to visualize the connection.
	struct Connection
	{
		public int a, b;
		public bool visited;
	}

	…

	Connection[] connections;

	…

	public void Initialize ()
	{
		int tileCount = size.x * size.y;
		connections = new Connection[tileCount * 4];
		…
	}

	…

	void CreateConnection (int id, int connectionIndex, int a, int b, float2 center)
	{
		connections[id * 4 + connectionIndex] = new Connection { a = a, b = b };
	}
When we create a tile we also have to create its four connections. We do this at random, starting with an array with all eight indices and randomly extracting two indices per connection to pair up.
	public void CreateTile (Position position, float3 linearPositionColor)
	{
		…

		var anchorIndices = new int[] { 0, 1, 2, 3, 4, 5, 6, 7 };
		int availableIndices = 8;
		for (int i = 0; i < 4; i++)
		{
			int r = Random.Range€(0, availableIndices--);
			int a = anchorIndices[r];
			anchorIndices[r] = anchorIndices[availableIndices];
			r = Random.Range€(0, availableIndices--);
			int b = anchorIndices[r];
			anchorIndices[r] = anchorIndices[availableIndices];
			CreateConnection(id, i, a, b, center);
		}

		anchorsBuffer.SetData(anchors);
	}
We don't want to create a new array each tile to avoid producing memory garbage. We could create an array once and reuse it. But it's also possible to create a temporary array on the stack, by using stackalloc instead of new. We have to define the variable as Span<int>, which works the same as as regular array.
Span<int> anchorIndices = stackalloc int[] { 0, 1, 2, 3, 4, 5, 6, 7 };
At this point we can provide an implementation for MoveThroughTile. Begin by retrieving the tile ID, assuming that it exists. Then loop through the tile's connections until we find one that contains the position's anchor. If that connection has already been visited then there is a path collision and we return false. Otherwise we mark the connection as visited and return true.
	public bool TryMoveThroughTile (ref Position position)
	{
		int id = GetID(position);
		int connectionIndex = -1;
		Connection connection;
		do
		{
			connection = connections[id * 4 + ++connectionIndex];
		}
		while (connection.a != position.anchor && connection.b != position.anchor);
		if (connection.visited)
		{
			return false;
		}
		connection.visited = true;
		connections[id * 4 + connectionIndex] = connection;

		return true;
	}
If we stop here then when playing the score will always be 2. We have to also adjust the given position. So instead of automatically returning true we first determine the exit anchor and update the position with that. Then return the result of a new StepToAdjacentTile method that moves the position to the next tile and returns whether that tile is inside the grid.
	public bool TryMoveThroughTile (ref Position position)
	{
		…

		int exitAnchor = position.anchor == connection.a ? connection.b : connection.a;
		position.anchor = exitAnchor;
		return StepToAdjacentTile(ref position);
	}

	bool StepToAdjacentTile (ref Position position)
	{
		(int rowDelta, int columnDelta, int anchorBase) step = position.anchor switch
		{
			var a when a < 2 => (1, 0, 5),
			var a when a < 4 => (0, 1, 9),
			var a when a < 6 => (-1, 0, 5),
			_ => (0, -1, 9)
		};
		position.row += step.rowDelta;
		position.column += step.columnDelta;
		position.anchor = step.anchorBase - position.anchor;
		return
			0 <= position.column && position.column < size.x &&
			0 <= position.row && position.row < size.y;
	}
The players can now create longer paths, though they are not properly visualized yet and thus it isn't clear why they stop and how long they are.
Bridges
To show the connections we will create a bridge for each, drawing them the same way as the anchors. First, introduce a Bridge struct type for the buffer data, also placing it in GPUStructs and generating the include file again afterwards. Because bridges inside a tile can overlap we'll give them different Y positions, so the position must be 3D. Also give it a 2D direction, a length, and an RGB color.
[GenerateHLSL(needAccessors: false)]
public struct Bridge
{
	public float3 position;
	public float2 direction;
	public float length;
	public float3 color;

	public static int Size => 9 * 4;
}
Create an include file for a bridge shader graph, by copying and adjusting the one for anchors. We can use the 2D direction vector to insert the required rotation into the object-to-world matrix.
#include "../Scripts/GPUStructs.cs.hlsl"

#if defined(UNITY_PROCEDURAL_INSTANCING_ENABLED)
	StructuredBuffer<Bridge> _Bridges;
#endif

void ConfigureProcedural () {
	#if defined(UNITY_PROCEDURAL_INSTANCING_ENABLED)
		unity_ObjectToWorld = 0.0;
		unity_ObjectToWorld._m03_m23 = _Bridges[unity_InstanceID].position;
		unity_ObjectToWorld._m11_m33 = 1.0;

		float2 direction = _Bridges[unity_InstanceID].direction;
		unity_ObjectToWorld._m00_m20 = float3(direction.y, -direction.x);
		unity_ObjectToWorld._m02_m22 = direction;
	#endif
}

…

void GetInstanceColor_float (out float3 Color)
{
	…
		Color = _Bridges[unity_InstanceID].color;
	…
}
Because bridges have varying lengths we also need to scale their Z dimension, for which we add a function that combines it with a given XY scale.
void GetInstanceScale_float (float2 ScaleXY, out float3 Scale)
{
	#if defined(UNITY_PROCEDURAL_INSTANCING_ENABLED)
		Scale = float3(ScaleXY, _Bridges[unity_InstanceID].length);
	#else
		Scale = float3(ScaleXY, 1);
	#endif
}
Create a shader graph for it, with the XY scale set to (0.5, 0.1).
Add everything needed for visualizing bridges to Grid, four per tile. Make the bridges white.
	static int
		anchorsID = Shader.PropertyToID("_Anchors"),
		bridgesID = Shader.PropertyToID("_Bridges");

	…

	[SerializeField]
	Material anchorMaterial, bridgeMaterial;

	[SerializeField, ColorUsage(false, true)]
	Color anchorColor, bridgeColor;

	NativeArray<Anchor> anchors;

	NativeArray<Bridge> bridges;

	ComputeBuffer anchorsBuffer, bridgesBuffer;

	…

	public void Initialize ()
	{
		…

		bridges = new(tileCount * 4, Allocator.Persistent);
		bridgesBuffer = new(bridges.Length, Bridge.Size);
		bridgeMaterial.SetBuffer(bridgesID, bridgesBuffer);

		linearAnchorColor = anchorColor.linear.GetRGB();
		linearBridgeColor = bridgeColor.linear.GetRGB();
	}

	public void Dispose ()
	{
		…
		bridges.Dispose();
		bridgesBuffer.Release();
	}

	public void Draw ()
	{
		if (instanceCount > 0)
		{
			var bounds = new Bounds(Vector3.zero, Vector3.one);
			Graphics.DrawMeshInstancedProcedural(
				instanceMesh, 0, anchorMaterial, bounds, instanceCount * 8
			);
			Graphics.DrawMeshInstancedProcedural(
				instanceMesh, 0, bridgeMaterial, bounds, instanceCount * 4
			);
		}
	}
When creating a connection we now also have to set the bridge, going from a to b. We base the bridge altitude on its connection index, going from lowest to highest, centering them on zero, with a vertical bridge distance of 0.2 units.
	const float
		tileSize = 6.7f,
		verticalBridgeDistance = 0.2f;

	…

	public void CreateTile (Position position, float3 linearPositionColor)
	{
		…
		anchorsBuffer.SetData(anchors);
		bridgesBuffer.SetData(bridges);
	}

	…

	void CreateConnection (int id, int connectionIndex, int a, int b, float2 center)
	{
		connections[id * 4 + connectionIndex] = new Connection { a = a, b = b };
		float2 positionA = anchorOffsets[a], positionB = anchorOffsets[b];
		center += (positionA + positionB) * 0.5f;
		float2 line = positionB - positionA;
		float length = math.length(line);
		bridges[id * 4 + connectionIndex] = new Bridge
		{
			position = float3(
				center.x, (1.5f - connectionIndex) * verticalBridgeDistance, center.y
			),
			length = length,
			direction = line / length,
			color = linearBridgeColor
		};
	}
Colored Paths
Now that we can see the connections, the paths that the players take start to make sense. To make it even clearer we're going to color those paths. Add parameters for the anchor and bridge color to TryMoveThroughTile, both linear. Use these to color both anchors and the crossed bridge.
	public bool TryMoveThroughTile (
		ref Position position, float3 linearAnchorColor, float3 linearBridgeColor
	)
	{
		…

		int exitAnchor = position.anchor == connection.a ? connection.b : connection.a;

		int anchorIndex = id * 8 + position.anchor;
		Anchor anchor = anchors[anchorIndex];
		anchor.color = linearAnchorColor;
		anchors[anchorIndex] = anchor;

		anchorIndex = id * 8 + exitAnchor;
		anchor = anchors[anchorIndex];
		anchor.color = linearAnchorColor;
		anchors[anchorIndex] = anchor;

		int bridgeIndex = id * 4 + connectionIndex;
		Bridge bridge = bridges[bridgeIndex];
		bridge.color = linearBridgeColor;
		bridges[bridgeIndex] = bridge;

		position.anchor = exitAnchor;
		return StepToAdjacentTile(ref position);
	}
Add configuration options for these to Player and pick appropriate values for them.
	[SerializeField, ColorUsage(false, true)]
	Color anchorColor, bridgeColor, positionColor;

	float3 linearAnchorColor, linearBridgeColor, linearPositionColor;

	…

	public void Initialize (Grid grid)
	{
		this.grid = grid;
		linearAnchorColor = anchorColor.linear.GetRGB();
		linearBridgeColor = bridgeColor.linear.GetRGB();
		linearPositionColor = positionColor.linear.GetRGB();
	}

	…

	public void Walk ()
	{
		…
				CanKeepWalking = grid.TryMoveThroughTile(
					ref position, linearAnchorColor, linearBridgeColor
				);
		…
	}
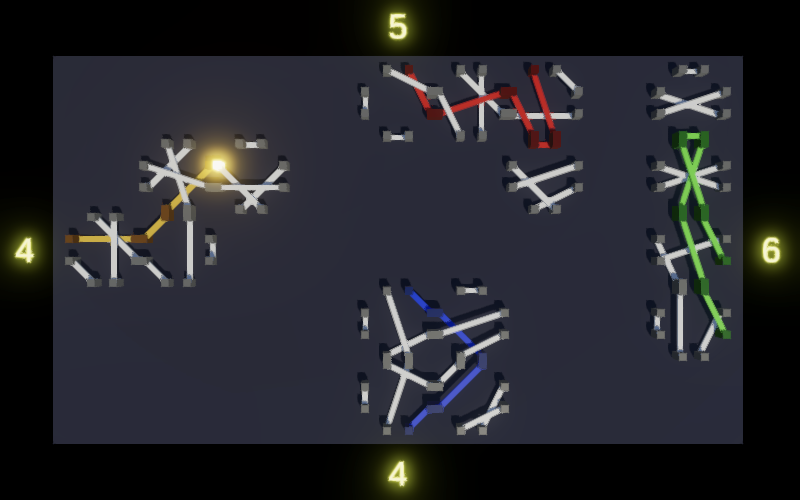
By adjusting the color of both anchors we ensure that the player position color is only used for the tile that was created but hasn't been crossed yet. Thus it is now visually obvious who the active player is and which tile is going to be walked next.
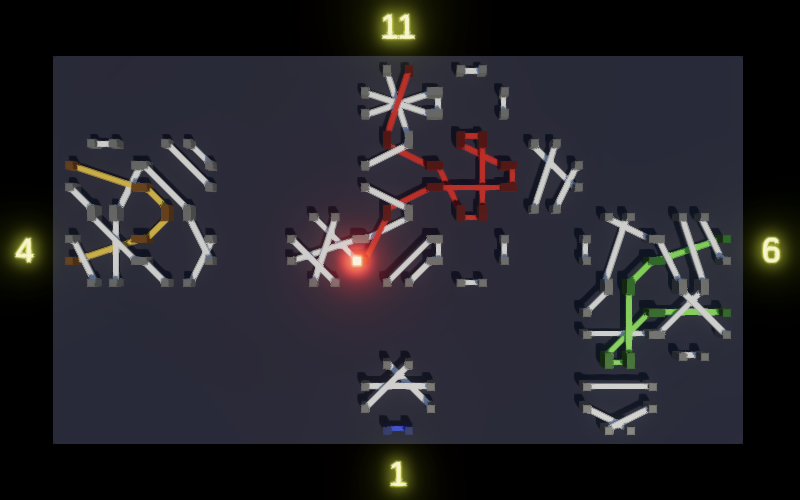
It is now also obvious that the game ends as soon as one player can no longer walk. Adjust Game.PlaceTile so it skips players after walking until it finds one that can keep walking, or all players have been checked.
//currentPlayerIndex = (currentPlayerIndex + 1) % activePlayerCount;int i = currentPlayerIndex; do { i = (i + 1) % activePlayerCount; } while (i != currentPlayerIndex && !players[i].CanKeepWalking); currentPlayerIndex = i;
The game now keeps going as long as at least one player can keep walking. At this point it can become obvious that in some cases the last bridges being walked are not colored, when multiple tiles are crossed at once. To fix this Game should not update its buffers in CreateTile but in a new public UpdateVisualization method.
	public void UpdateVisualization ()
	{
		anchorsBuffer.SetData(anchors);
		bridgesBuffer.SetData(bridges);
	}

	…

	public void CreateTile (Position position, float3 linearPositionColor)
	{
		…

		//anchorsBuffer.SetData(anchors);
		//bridgesBuffer.SetData(bridges);
	}
Game should invoke this method at the end of both StartNewGame and PlaceTile.
	void StartNewGame (int newPlayerCount)
	{
		…
		grid.UpdateVisualization();
	}

	…

	void PlaceTile ()
	{
		…
		grid.UpdateVisualization();
	}
Rotating Tiles
Now that we can see where we are going it is time to implement Grid.RotateTile. We do this by incrementing or decrementing and wrapping the connection anchors, recreating the connections, and updating the bridges buffer. A proper square tile rotation would require adjusting the anchor indices by two steps, but let's introduce a twist here and adjust them by only a single step. This makes our tiles rotate as if they were octagons, changing their shape to conform to the new bridge layout. An added benefit of this approach is that it is now impossible to start with a tile that forces an immediate end.
	public void RotateTile (Position position, bool clockwise)
	{
		int id = GetID(position);
		int step = clockwise ? 1 : -1;
		float2 center = GetTileCenter(position);
		for (int i = 0; i < 4; i++)
		{
			Connection c = connections[id * 4 + i];
			c.a += step;
			c.b += step;
			CreateConnection(
				id, i,
				c.a == -1 ? 7 : c.a == 8 ? 0 : c.a,
				c.b == -1 ? 7 : c.b == 8 ? 0 : c.b,
				center
			);
		}
		bridgesBuffer.SetData(bridges);
	}
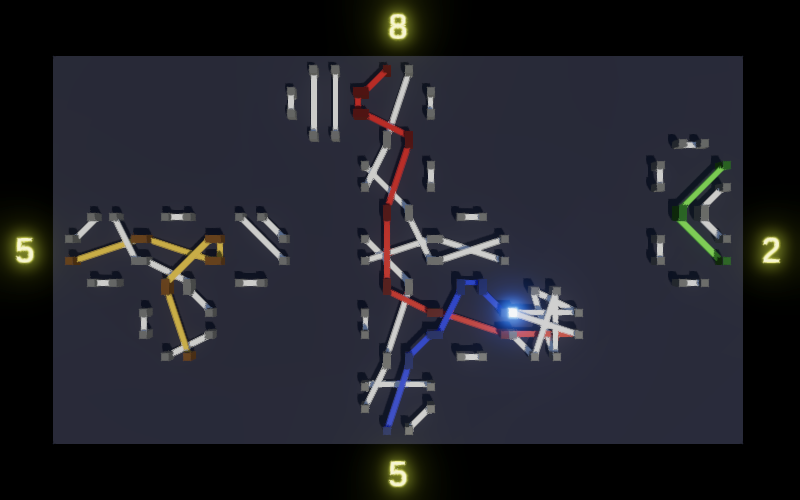
With rotation enabled we can steer paths toward each other and can end up with a situation where two players enter the same tile, which appears as two overlapping tiles. This happens because we assume that tiles are only created in an empty space. The solution is to make all players walk at the start of Game.PlaceTile, starting with the current one. This will force players to immediately walk when a tile gets placed in front of them by another player.
//players[currentPlayerIndex].Walk();int i = currentPlayerIndex; do { players[i].Walk(); i = (i + 1) % activePlayerCount; } while (i != currentPlayerIndex); do { i = (i + 1) % activePlayerCount; } while (i != currentPlayerIndex && !players[i].CanKeepWalking); currentPlayerIndex = i;
Everything appears to work as it should at this point, except that when paths collide their scores are one too high. We'll deal with this in the next section.
Walking Along Paths
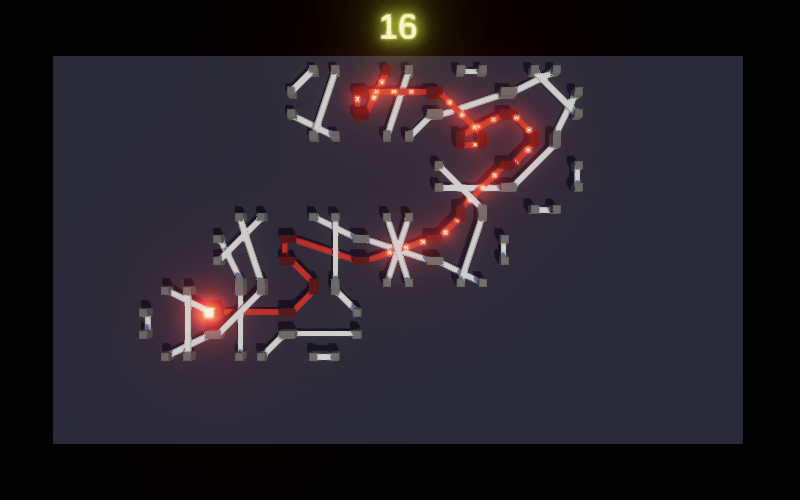
To make our game more visually interesting we are going to add small walkers that move along each path.
Path
Create a serializable Path class that will keep track of a player's path and manage the walkers that traverse it. Give it a Length property which is set privately, a dummy Initialize method, a Clear method that sets the length to zero, and an Add method that adds a line to the path, from and to a give 2D position, along with an Y coordinate for its elevation. This method initially only increments the length.
using Unity.Collections;
using Unity.Jobs;
using Unity.Mathematics;
using UnityEngine;

[System.Serializable]
public class Path
{
	public int Length
	{ get; private set; }

	public void Initialize () { }

	public void Clear () => Length = 0;

	public void Add (float2 from, float2 to, float y) => Length += 1;
}
Add a path parameter to Grid.TryMoveThroughTile, to which it adds the new crossing, except when it aborts due to a player collision.
	public bool TryMoveThroughTile (
		ref Position position, Path path,
		float3 linearAnchorColor, float3 linearBridgeColor
	)
	{
		…

		float2 center = GetTileCenter(position);
		path.Add(
			center + anchorOffsets[position.anchor],
			center + anchorOffsets[exitAnchor],
			bridge.position.y
		);
		position.anchor = exitAnchor;
		return StepToAdjacentTile(ref position);
	}
Add a configuration field for a path to Player, replacing its path length. This will make sure that the displayed score is always correct, also after a collision.
[SerializeField] Path path; …//int pathLength;… public void Initialize (Grid grid) { … path.Initialize(); } public void StartNewGame (TextMeshPro displayText, Grid.Position startPosition) { …//pathLength = 0;} public void Clear () { … path.Clear(); } … public void Walk () { if (CanKeepWalking) { while (CanKeepWalking && grid.IsTileCreated(position)) { CanKeepWalking = grid.TryMoveThroughTile( ref position, linearAnchorColor, path, linearBridgeColor );//pathLength += 1;} displayText.SetText("{0}", path.Length); } }
Walkers Job
We'll create a WalkersJob Burst job to manage the walker entities. It's an IJob that will loop through all walkers of a single player. Besides moving it will also take care of spawning new walkers when needed. Give it private spawn rate and speed fields for this, which are set via a public Initialize method. We'll make this job manage its own native data, so also give it Clear and Dispose methods besides the required Execute method, all dummies for now.
using Unity.Burst;
using Unity.Collections;
using Unity.Jobs;
using Unity.Mathematics;

using static Unity.Mathematics.math;

[BurstCompile(FloatPrecision.Standard, FloatMode.Fast)]
struct WalkersJob : IJob
{
	float spawnRate, speed;

	public void Initialize (float spawnRate, float speed)
	{
		this.spawnRate = spawnRate;
		this.speed = speed;
	}

	public void Clear () { }

	public void Dispose () { }

	public void Execute () { }
}
This job is the only thing that needs to access the path segments, so let's store them in here as well. Each segment has a 3D from an a to position, a 2D direction, and a length. As the amount of segments grows during a game let's store them in a NativeList. We need to import Unity's Collections package to get it. Although the job will manage this list it will be constant while updating the walkers, so we can mark it as readonly.
	struct PathSegment
	{
		public float3 from, to;
		public float2 direction;
		public float length;
	}

	[ReadOnly]
	NativeList<PathSegment> pathSegments;
A NativeList works just like a NativeArray, except that when creating it the provided size is the initial capacity, used for its internal NativeArray.
	public void Initialize (float spawnRate, float speed)
	{
		…
		const int initialCapacity = 64;
		pathSegments = new(initialCapacity, Allocator.Persistent);
	}

	public void Clear () {
		pathSegments.Clear();
	}

	public void Dispose () {
		pathSegments.Dispose();
	}
Include an AddPathSegment method like the one in Path that adds a new path segment to the list, using an approach similar to creating a bridge, but with two positions.
	public void AddPathSegment (float2 from, float2 to, float y) {
		float2 line = to - from;
		float length = math.length(line);
		pathSegments.Add(new PathSegment
		{
			from = float3(from.x, y, from.y),
			to = float3(to.x, y, to.y),
			direction = line / length,
			length = length
		});
	}
We can also make the path segment count publicly available.
public int PathSegmentCount => pathSegments.Length;
Now add a field for the job to Path along with configuration fields for the walker spawn rate and speed, initialize, clear, and dispose it, use it to retrieve the path length, and forward the adding of a segment to it.
[SerializeField, Min(0.1f)] float walkerSpawnRate = 2f, walkerSpeed = 3f; WalkersJob walkersJob; public int Length => walkersJob.PathSegmentCount;//{ get; private set; }public void Initialize () { walkersJob.Initialize(walkerSpawnRate, walkerSpeed); } public void Clear () => walkersJob.Clear(); public void Dispose () { walkersJob.Dispose(); } public void Add (float2 from, float2 to, float y) => walkersJob.AddPathSegment(from, to, y);
Player now also needs a Dispose method to dispose its path.
public void Dispose () => path.Dispose();
And Game needs to dispose all players.
	void OnDestroy ()
	{
		grid.Dispose();
		for (int i = 0; i < players.Length; i++)
		{
			players[i].Dispose();
		}
	}
Walking
To show walkers we need to send their positions and directions to the GPU. Add a Walker struct for this to GPUStructs and generate the include files again.
[GenerateHLSL(needAccessors: false)]
public struct Walker
{
	public float3 position;
	public float2 direction;

	public static int Size => 5 * 4;
}
WalkersJob itself needs to keep track of a list of these walkers, along with segment indices and progress values, which can be stored separately using a private WalkerState struct. Store both in native lists. Besides that it needs to keep track of the spawn cooldown, in a one-element native array so it can be adjusted while running the job.
	struct WalkerState
	{
		public int index;
		public float progress;
	}

	[ReadOnly]
	NativeList<PathSegment> pathSegments;

	NativeList<Walker> walkers;

	NativeList<WalkerState> walkerStates;

	NativeArray<float> spawnCooldown;

	…

	public void Initialize (float spawnRate, float speed)
	{
		…
		walkers = new(initialCapacity, Allocator.Persistent);
		walkerStates = new(initialCapacity, Allocator.Persistent);
		spawnCooldown = new(1, Allocator.Persistent);
	}

	public void Clear () {
		pathSegments.Clear();
		walkers.Clear();
		walkerStates.Clear();
		spawnCooldown[0] = 0f;
	}

	public void Dispose () {
		pathSegments.Dispose();
		walkers.Dispose();
		walkerStates.Dispose();
		spawnCooldown.Dispose();
	}
We also need to know the time delta when executing the job. Create a custom Schedule method with a parameter for it, which returns the job handle of the scheduled job, if there are any path segments to walk. Otherwise return the default handle.
	float dt, spawnRate, speed;

	…

	public JobHandle Schedule (float dt)
	{
		this.dt = dt;
		return pathSegments.Length > 0 ? this.Schedule() : default;
	}
When executing the job, first reduce the cooldown, then update all walkers by invoking an UpdateWalkers method, then if the cooldown is negative add a new walker with progress based on the cooldown overflow and immediately update it. Also pass the cooldown through UpdateWalker so it can modify it.
	public void Execute ()
	{
		float cooldown = spawnCooldown[0] - spawnRate * dt;
		for (int i = 0; i < walkerStates.Length; i++)
		{
			cooldown = UpdateWalker(i, cooldown);
		}
		if (cooldown <= 0f)
		{
			walkerStates.Add(new WalkerState {
				index = 0,
				progress = -cooldown / spawnRate
			});
			walkers.Length += 1;
			cooldown = UpdateWalker(walkerStates.Length - 1, cooldown + 1f);
		}
		spawnCooldown[0] = cooldown;
	}

	public float UpdateWalker (int i, float cooldown)
	{
		return cooldown;
	}
UpdateWalker increases its progress, advances to the next segment if needed, and updates the walker and its state. If we end up moving past the end of the path loop back to the first segment with a progress based on the current cooldown and increment the cooldown. This way we immediately reuse walkers. However, if the cooldown hasn't been depleted yet we end up with a negative progress. Make sure that the walker is fixed to the starting position so it will wait while hidden inside the first anchor until its progress becomes positive.
	public float UpdateWalker (int i, float cooldown)
	{
		WalkerState state = walkerStates[i];
		PathSegment segment = pathSegments[state.index];
		state.progress += speed * dt;

		while (state.progress > segment.length)
		{
			state.progress -= segment.length;
			if (++state.index >= pathSegments.Length)
			{
				state.index = 0;
				state.progress = speed * (-cooldown / spawnRate);
				cooldown += 1f;
			}
			segment = pathSegments[state.index];
		}

		walkerStates[i] = state;
		walkers[i] = new Walker
		{
			position =
				lerp(segment.from, segment.to, max(0f, state.progress) / segment.length),
			direction = segment.direction
		};
		return cooldown;
	}
We finish the job by adding a property that indicates whether it has something to draw.
public bool HasSomethingToDraw => pathSegments.Length > 0;
To run the job, add an UpdateVisualization method to Path that schedules the job and stores the job handle in a field, without immediately executing it. Also add a Draw method that invokes Complete on the handle, but only if the job has something to draw.
	JobHandle walkerJobHandle;

	…

	public void UpdateVisualization () =>
		walkerJobHandle = walkersJob.Schedule(Time.deltaTime);

	public void Draw ()
	{
		if (walkersJob.HasSomethingToDraw)
		{
			walkerJobHandle.Complete();
		}
	}
Add methods to Player that forwards to these new methods of Path.
	public void UpdateVisualization () => path.UpdateVisualization();

	public void Draw () => path.Draw();
And have Game invoke them at the end of Update. First update the visualization of all players, then draw the grid, and then draw all players. This makes it possible for Unity to run the jobs in parallel.
		for (int i = 0; i < activePlayerCount; i++)
		{
			players[i].UpdateVisualization();
		}
		grid.Draw();
		for (int i = 0; i < activePlayerCount; i++)
		{
			players[i].Draw();
		}
Drawing
Actually drawing the walkers is the responsibility of Path. It needs to create a compute buffer, which requires both a size and a native array to fill it. We'll make WalkersJob provide both via properties. For the size we expose a walker capacity, which is the capacity of the walkers list. The walker data itself is retrieved by invoking AsArray on the native list.
	public int WalkerCapacity => walkers.Capacity;

	public NativeArray<Walker> Walkers => walkers.AsArray();
Now we have everything we need to add drawing functionality to Path. Give it configuration options for a mesh, material, and color, and a compute buffer field. Initialize everything, using a uniform color property for the walkers, and draw only if needed. The only extra thing that we have to be aware of is that the walker capacity could increase. So check this before drawing and create a new compute buffer if needed.
	static int
		walkersId = Shader.PropertyToID("_Walkers"),
		colorId = Shader.PropertyToID("_Color");

	…

	[SerializeField]
	Mesh walkerMesh;

	[SerializeField]
	Material walkerMaterial;

	[SerializeField, ColorUsage(false, true)]
	Color walkerColor;

	ComputeBuffer walkersBuffer;

	…

	public void Initialize () {
		walkersJob.Initialize(walkerSpawnRate, walkerSpeed);
		walkerMaterial = new Material(walkerMaterial);
		walkerMaterial.SetColor(colorId, walkerColor);
		walkersBuffer = new(walkersJob.WalkerCapacity, Walker.Size);
		walkerMaterial.SetBuffer(walkersId, walkersBuffer);
	}

	…

	public void Dispose ()
	{
		walkersJob.Dispose();
		walkersBuffer.Release();
	}

	…

	public void Draw ()
	{
		if (walkersJob.HasSomethingToDraw)
		{
			walkerJobHandle.Complete();
			if (walkersBuffer.count < walkersJob.WalkerCapacity)
			{
				walkersBuffer.Release();
				walkersBuffer = new(walkersJob.WalkerCapacity, Walker.Size);
				walkerMaterial.SetBuffer(walkersId, walkersBuffer);
			}

			NativeArray<Walker> walkers = walkersJob.Walkers;
			walkersBuffer.SetData(walkers);
			Graphics.DrawMeshInstancedProcedural(
				walkerMesh, 0, walkerMaterial,
				new Bounds(Vector3.zero, Vector3.one), walkers.Length
			);
		}
	}
Create an HLSL include file for a walker shader graph, setting up an object-to-world matrix similar to bridges.
#include "../Scripts/GPUStructs.cs.hlsl"

#if defined(UNITY_PROCEDURAL_INSTANCING_ENABLED)
	StructuredBuffer<Walker> _Walkers;
#endif

void ConfigureProcedural () {
	#if defined(UNITY_PROCEDURAL_INSTANCING_ENABLED)
		unity_ObjectToWorld = 0.0;
		unity_ObjectToWorld._m03_m13_m23 = _Walkers[unity_InstanceID].position;
		unity_ObjectToWorld._m11_m33 = 1.0;

		float2 direction = _Walkers[unity_InstanceID].direction;
		unity_ObjectToWorld._m00_m20 = float2(direction.y, -direction.x);
		unity_ObjectToWorld._m02_m22 = direction;
	#endif
}

void ConfigureProcedural_float (float3 In, out float3 Out) {
	Out = In;
}
Create a shader graph as well, with a fixed scale of (0.3, 0.05, 0.3) and a color property. Disable shadow casting for it as the walkers are very thin.
At this point walkers will be drawn, but they're hidden inside the bridges. Add a constant offset of 0.075 to the path segment in Path.Add to make them sit on top of the bridges.
	const float walkerYOffset = 0.075f;

	…

	public void Add (float2 from, float2 to, float y) =>
		walkersJob.AddPathSegment(from, to, y + walkerYOffset);
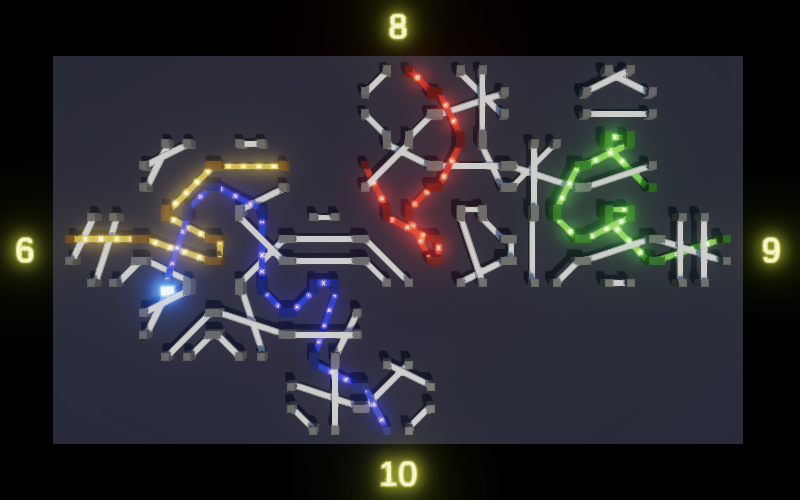
We finally have walkers moving along the paths and our game prototype is complete. It will take some time before they have covered the entire path while it is being created, especially when multiple segments are added to a path in a single turn.
The next tutorial is Match 3.