Hex Map 19
Animating Movement
- Make units travel between cells.
- Visualize traveled paths.
- Move units along curves.
- Have units look where they're going.
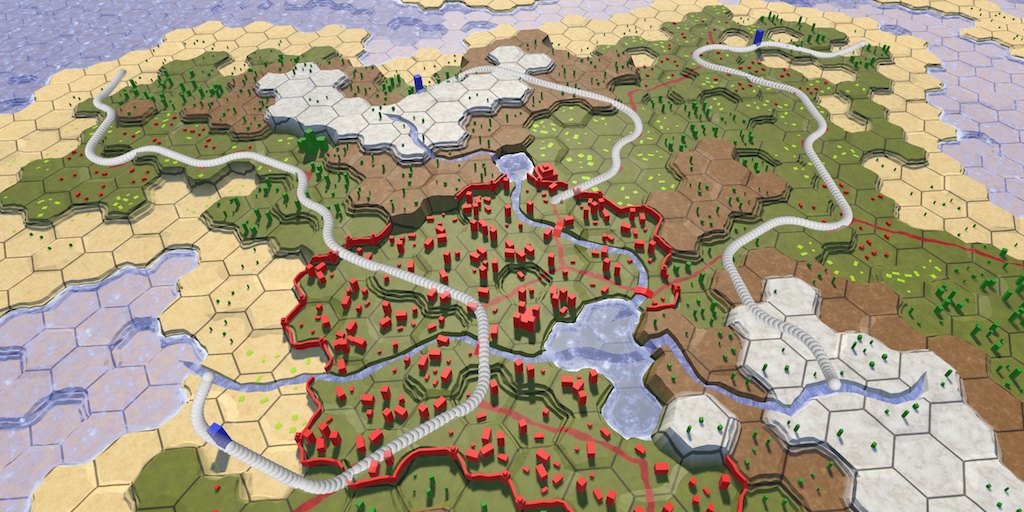
This is part 19 of a tutorial series about hexagon maps. This time, we'll make units travel along paths instead of teleporting.
Traveling a Path
We added units and the ability to move them around in the previous tutorial. Althrough we used pathfinding to detect valid destinations for units, we teleported them when issuing a move order. To make them actually follow the path that was found, we'll need to keep track of this path, and create an animation process to make the unit travel from cell to cell. Because it is hard to exactly see how a unit moves by watching animations, we'll also visualize the traveled path using gizmos. But before we proceed, we should fix a bug.
Turn Bug
Due to an earlier oversight, we incorrectly calculate the turn at which a cell is reached. Right now, we determine the turn by dividing the cumulative distance by the unit's speed, `t = d / s`, discarding the remainder. This goes wrong when entering a cell ends up exactly consuming all remaining movement of a turn.
For example, when each step costs 1 and we have speed 3, then we can move three cells per turn. However, our current calculation would only allow two steps on the first turn, because for the third step `t = d / s = 3 / 3 = 1`.
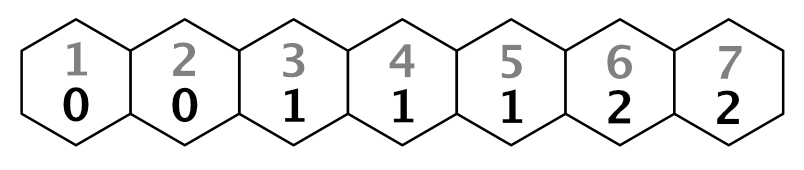
To correctly calculate the turns, we have to move the turn boundary one step away from the starting cell. We can do this by decreasing the distance by one before determining the turn. Then the turn for the third step becomes `t = 2 / 3 = 0`.
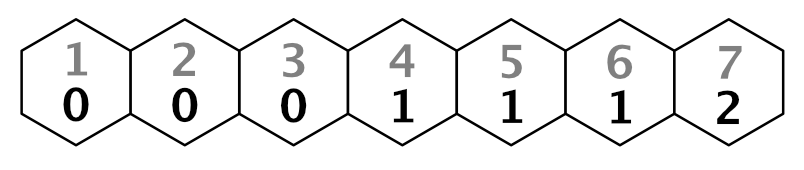
We can do this by changing our turn calculation to `t = (d - 1) / s`. Make this adjustment in HexGrid.Search.
	bool Search (HexCell fromCell, HexCell toCell, int speed) {
		…
		while (searchFrontier.Count > 0) {
			…

			int currentTurn = (current.Distance - 1) / speed;

			for (HexDirection d = HexDirection.NE; d <= HexDirection.NW; d++) {
				…

				int distance = current.Distance + moveCost;
				int turn = (distance - 1) / speed;
				if (turn > currentTurn) {
					distance = turn * speed + moveCost;
				}

				…
			}
		}
		return false;
	}
Adjust the turn labels as well.
	void ShowPath (int speed) {
		if (currentPathExists) {
			HexCell current = currentPathTo;
			while (current != currentPathFrom) {
				int turn = (current.Distance - 1) / speed;
				…
			}
		}
		…
	}
Note that with this approach the starting cell's turn is −1. That is fine, because we don't display it and the search algorithm remains valid.
Retrieving the Path
Traveling a path is an unit's job. In order to do so, it needs to know which path to travel. HexGrid has this information, so give it a method to retrieve the current path in the form of a list of cells. It can grab one from the list pool and return it, if there actually is a path.
	public List<HexCell> GetPath () {
		if (!currentPathExists) {
			return null;
		}
		List<HexCell> path = ListPool<HexCell>.Get();
		return path;
	}
The list is filled by following the path reference from the destination back to the start, like we do when visualizing it.
		List<HexCell> path = ListPool<HexCell>.Get();
		for (HexCell c = currentPathTo; c != currentPathFrom; c = c.PathFrom) {
			path.Add(c);
		}
		return path;
In this case, we want the entire path, which also includes the starting cell.
		for (HexCell c = currentPathTo; c != currentPathFrom; c = c.PathFrom) {
			path.Add(c);
		}
		path.Add(currentPathFrom);
		return path;
We now have the path in reverse order. While we could work with this, it isn't intuitive. So let's reverse the list so it's ordered from start to destination.
		path.Add(currentPathFrom);
		path.Reverse();
		return path;
Requesting a Journey
Now we can add a method to HexUnit to order it to follow a path. Initially, we'll simply let it teleport to the destination. We won't immediately put the list back in its pool, because we'll be using it for a while.
using UnityEngine;
using System.Collections.Generic;
using System.IO;

public class HexUnit : MonoBehaviour {

	…

	public void Travel (List<HexCell> path) {
		Location = path[path.Count - 1];
	}

	…
}
To actually request a journey, change HexGameUI.DoMove so it invokes the new method with the current path, instead of directly setting the unit's location.
	void DoMove () {
		if (grid.HasPath) {
//			selectedUnit.Location = currentCell;
			selectedUnit.Travel(grid.GetPath());
			grid.ClearPath();
		}
	}
Visualizing the Path
Before we start animating the unit, let's check whether the paths are correct. We'll do this by having HexUnit remember the path it's supposed to travel, so it can visualize it using gizmos.
	List<HexCell> pathToTravel;

	…

	public void Travel (List<HexCell> path) {
		Location = path[path.Count - 1];
		pathToTravel = path;
	}
Add an OnDrawGizmos method to show the last path that should be traveled, if there is any. If the unit hasn't moved yet, the path should be null. But it could also be an empty list after a recompile while in play mode, due to Unity's edit-time serialization.
	void OnDrawGizmos () {
		if (pathToTravel == null || pathToTravel.Count == 0) {
			return;
		}
	}
The simplest way to show the path is to draw a gizmo sphere for each cell in it. Spheres with a radius of 2 units are clearly visible, without obstructing too much.
	void OnDrawGizmos () {
		if (pathToTravel == null || pathToTravel.Count == 0) {
			return;
		}

		for (int i = 0; i < pathToTravel.Count; i++) {
			Gizmos.DrawSphere(pathToTravel[i].Position, 2f);
		}
	}
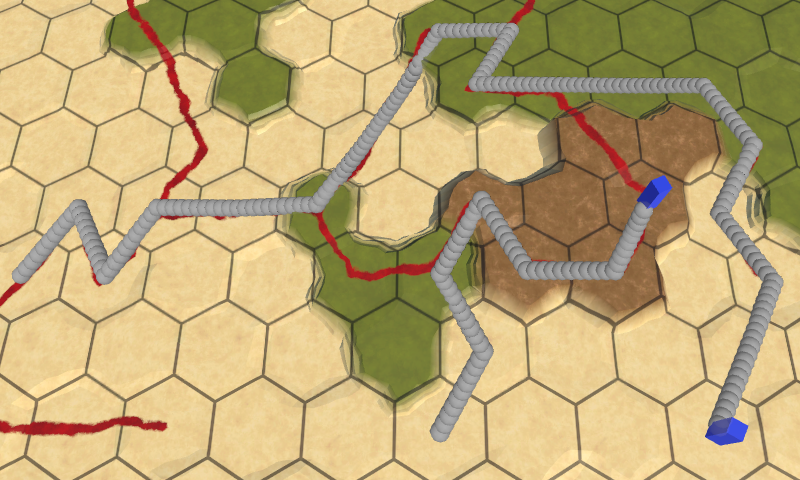
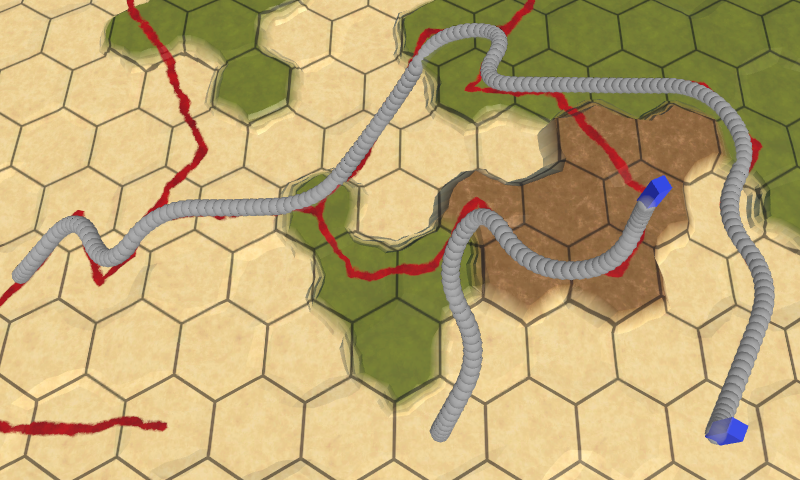
Because we show the paths per unit, we can see all their latest paths at once.
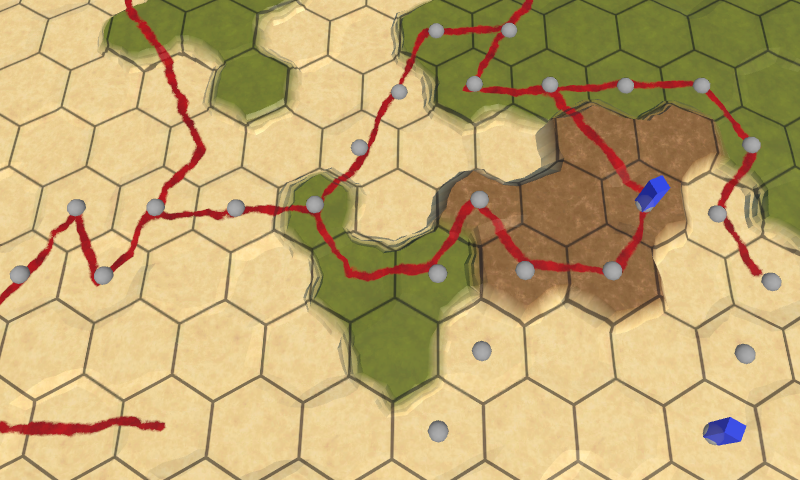
To get a better indication of how the cells are connected, draw multiple spheres on a line between the previous and current cells in the loop. This requires us to start the process at the second cell. The spheres can be placed via linear interpolation, in increments of 0.1, so we get ten spheres per segment.
		for (int i = 1; i < pathToTravel.Count; i++) {
			Vector3 a = pathToTravel[i - 1].Position;
			Vector3 b = pathToTravel[i].Position;
			for (float t = 0f; t < 1f; t += 0.1f) {
				Gizmos.DrawSphere(Vector3.Lerp(a, b, t), 2f);
			}
		}
Sliding Along the Path
We can use the same approach to move units. Let's create a coroutine for this. Instead of drawing a gizmo, set the unit's position. Use the time delta instead of fixed 0.1 increments. And yield each iteration. That will move the unit from one cell to the next in one second.
using UnityEngine;
using System.Collections;
using System.Collections.Generic;
using System.IO;

public class HexUnit : MonoBehaviour {

	…

	IEnumerator TravelPath () {
		for (int i = 1; i < pathToTravel.Count; i++) {
			Vector3 a = pathToTravel[i - 1].Position;
			Vector3 b = pathToTravel[i].Position;
			for (float t = 0f; t < 1f; t += Time.deltaTime) {
				transform.localPosition = Vector3.Lerp(a, b, t);
				yield return null;
			}
		}
	}

	…
}
Start the coroutine at the end of the Travel method. But before that, stop all existing coroutines. That ensures that we don't have two running at the same time, which could produce very weird results.
	public void Travel (List<HexCell> path) {
		Location = path[path.Count - 1];
		pathToTravel = path;
		StopAllCoroutines();
		StartCoroutine(TravelPath());
	}
Moving only one cell per second is rather slow. Player's don't want to wait that long while playing a game. You could make unit movement speed a configuration option, but for now let's just use a constant. I set it to four cells per second, which is reasonably fast while still slow enough that you can see what's going on.
	const float travelSpeed = 4f;

	…

	IEnumerator TravelPath () {
		for (int i = 1; i < pathToTravel.Count; i++) {
			Vector3 a = pathToTravel[i - 1].Position;
			Vector3 b = pathToTravel[i].Position;
			for (float t = 0f; t < 1f; t += Time.deltaTime * travelSpeed) {
				transform.localPosition = Vector3.Lerp(a, b, t);
				yield return null;
			}
		}
	}
Just like we can visualize multiple paths at the same time, we can have multiple units traveling at the same time as well. As far as the game state is concerned, movement is still teleportation. The animation is purely visual. Units immediately occupy their destination cell. You could even find paths and initiate a new journey before they have arrived. In that case, they'll visually teleport to the start of the new path. You could prevent this by locking units or even the entire UI while they're moving, but this quick response is quite convenient while developing and testing movement.
Position after Compilation
One downside of coroutines is that they do not survive recompiles while in play mode. Although the game state is always correct, this can lead to units being stuck somewhere along their last path, if you happened to trigger a recompile while they were moving. To mitigate this, let's make sure that units are always in the proper location after a recompile. This can be done by updating their position in OnEnable.
	void OnEnable () {
		if (location) {
			transform.localPosition = location.Position;
		}
	}
Flowing Movement
Going straight from cell center to cell center produces rigid movement with sudden changes in direction. This is fine for many games, but it is not acceptable when at least somewhat realistic movement is desired. So let's modify our approach to produce something that looks more organic.
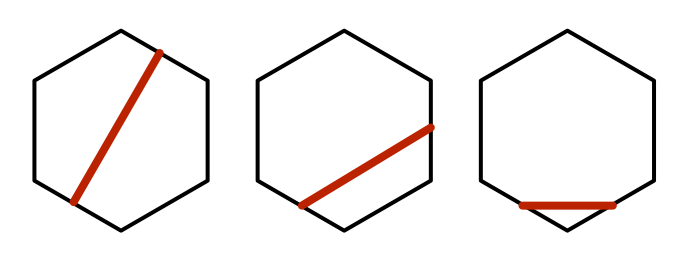
Going from Edge to Edge
A units begins its journey at the center of a cell. It travels to the middle of the cell's edge, after which is enters the next cell. Instead of then moving to that cell's center, it could go straight to the next edge that it has to cross. Effectively, the unit takes a shortcut when it has to change direction. This is possible for all cells except the ends points of the path.
Let's adapt OnDrawGizmos to show paths generated by this approach. It has to interpolate between the cell edges, which can be found by averaging the positions of adjacent cells. We only need to calculate one edge per iteration, reusing one from the previous iteration. That way we can also make it work for the starting cell, by simply using its position.
	void OnDrawGizmos () {
		if (pathToTravel == null || pathToTravel.Count == 0) {
			return;
		}

		Vector3 a, b = pathToTravel[0].Position;

		for (int i = 1; i < pathToTravel.Count; i++) {
//			Vector3 a = pathToTravel[i - 1].Position;
//			Vector3 b = pathToTravel[i].Position;
			a = b;
			b = (pathToTravel[i - 1].Position + pathToTravel[i].Position) * 0.5f;
			for (float t = 0f; t < 1f; t += 0.1f) {
				Gizmos.DrawSphere(Vector3.Lerp(a, b, t), 2f);
			}
		}
	}
To reach the center of the destination cell, we have to use that cell's position as the final point, instead of an edge. We could add a check for this case inside the loop, but it's such a simple loop that duplicating the code with a small adjustment might be clearer.
	void OnDrawGizmos () {
		…

		for (int i = 1; i < pathToTravel.Count; i++) {
			…
		}

		a = b;
		b = pathToTravel[pathToTravel.Count - 1].Position;
		for (float t = 0f; t < 1f; t += 0.1f) {
			Gizmos.DrawSphere(Vector3.Lerp(a, b, t), 2f);
		}
	}
The resulting paths zigzag less and the maximum turn angle has been reduced from 120° to 90°. This can be considered an improvement, so apply the same changes to the TravelPath coroutine to see how it animates.
	IEnumerator TravelPath () {
		Vector3 a, b = pathToTravel[0].Position;

		for (int i = 1; i < pathToTravel.Count; i++) {
//			Vector3 a = pathToTravel[i - 1].Position;
//			Vector3 b = pathToTravel[i].Position;
			a = b;
			b = (pathToTravel[i - 1].Position + pathToTravel[i].Position) * 0.5f;
			for (float t = 0f; t < 1f; t += Time.deltaTime * travelSpeed) {
				transform.localPosition = Vector3.Lerp(a, b, t);
				yield return null;
			}
		}

		a = b;
		b = pathToTravel[pathToTravel.Count - 1].Position;
		for (float t = 0f; t < 1f; t += Time.deltaTime * travelSpeed) {
			transform.localPosition = Vector3.Lerp(a, b, t);
			yield return null;
		}
	}
By cutting corners, we have made the length of path segments dependent of the change in direction. But we have defined the speed in cells per second. The result is that the unit's speed now varies erratically.
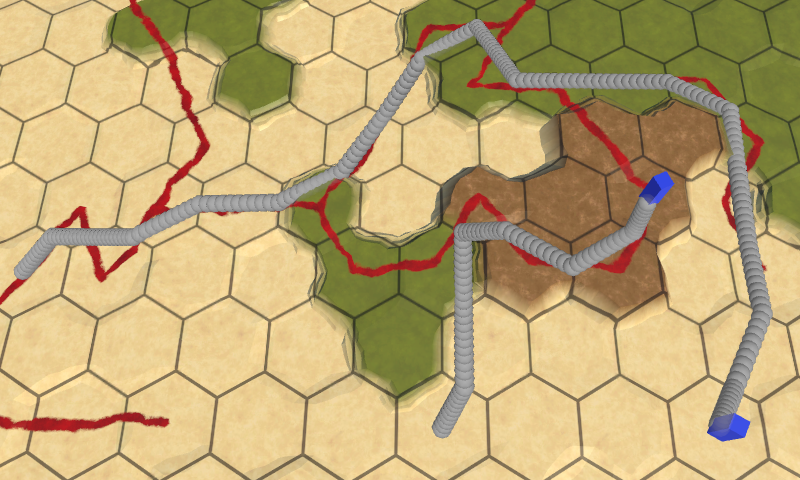
Following Curves
The instantaneous change in direction and velocity when units cross cell boundaries doesn't look nice. A gradual change in direction would be better. We can support this by having our units follow curves instead of straight lines. We can use Beziér curves for this. Specifically, we can use quadratic Beziér curves, with the cell centers as the middle control point. That way, tangents of adjacent curves mirror each other, which means that the entire path will be a continuous smooth curve.
Create a Bezier utility class with a method for getting a point on a quadratic Beziér curve. As explained in the Curves and Splines tutorial, the formula for that is `(1 - t)^2 A + 2(1 - t) t B + t^2 C`, where `A` through `C` are the control points and `t` is the interpolator.
using UnityEngine;

public static class Bezier {

	public static Vector3 GetPoint (Vector3 a, Vector3 b, Vector3 c, float t) {
		float r = 1f - t;
		return r * r * a + 2f * r * t * b + t * t * c;
	}
}
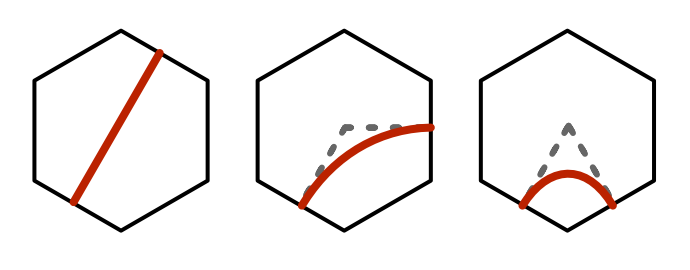
To show a curving path in OnDrawGizmos, we have to keep track of three points instead of two. The extra point is the center of the cell that we're working through this iteration, which has index i - 1 because the loop starts at 1. Once we have all points, we can replace Vector3.Lerp with Bezier.GetPoint.
For the start and destination cells, we can simply use the cell center for both an end point and the middle point.
	void OnDrawGizmos () {
		if (pathToTravel == null || pathToTravel.Count == 0) {
			return;
		}

		Vector3 a, b, c = pathToTravel[0].Position;

		for (int i = 1; i < pathToTravel.Count; i++) {
			a = c;
			b = pathToTravel[i - 1].Position;
			c = (b + pathToTravel[i].Position) * 0.5f;
			for (float t = 0f; t < 1f; t += Time.deltaTime * travelSpeed) {
				Gizmos.DrawSphere(Bezier.GetPoint(a, b, c, t), 2f);
			}
		}

		a = c;
		b = pathToTravel[pathToTravel.Count - 1].Position;
		c = b;
		for (float t = 0f; t < 1f; t += 0.1f) {
			Gizmos.DrawSphere(Bezier.GetPoint(a, b, c, t), 2f);
		}
	}
The curving path looks a lot better. Apply the same changes to TravelPath and observe how units animate with this approach.
	IEnumerator TravelPath () {
		Vector3 a, b, c = pathToTravel[0].Position;

		for (int i = 1; i < pathToTravel.Count; i++) {
			a = c;
			b = pathToTravel[i - 1].Position;
			c = (b + pathToTravel[i].Position) * 0.5f;
			for (float t = 0f; t < 1f; t += Time.deltaTime * travelSpeed) {
				transform.localPosition = Bezier.GetPoint(a, b, c, t);
				yield return null;
			}
		}

		a = c;
		b = pathToTravel[pathToTravel.Count - 1].Position;
		c = b;
		for (float t = 0f; t < 1f; t += Time.deltaTime * travelSpeed) {
			transform.localPosition = Bezier.GetPoint(a, b, c, t);
			yield return null;
		}
	}
The animation is smooth too, even though the unit's velocity isn't constant. Because the curve tangents of adjacent segments match, there is no discontinuity in velocity. The change in velocity is gradual and happens while a unit is traveling through a cell, slowing down when it's changing direction. If it goes straight ahead, the velocity is constant. The unit also begins and ends its journey with zero velocity. This mimics how real movement works, so let's leave it like that.
Keeping Track of Time
So far, we've started the iteration through each segment at 0, continuing until we reach 1. This works fine when incrementing by a fixed amount, but our iteration depends on the time delta. When the iteration through one segment ends, we most likely exceeded 1 by some amount, depending on the time delta. This isn't noticeable for high frame rates, but can lead to stuttering due to lost time when the frame rate is low.
To prevent time loss, we have to transfer the remaining time from one segment to the next. This can be done by keeping track of t through the entire travel, not just per segment. Then at the end of each segment, subtract 1 from it.
	IEnumerator TravelPath () {
		Vector3 a, b, c = pathToTravel[0].Position;

		float t = 0f;
		for (int i = 1; i < pathToTravel.Count; i++) {
			a = c;
			b = pathToTravel[i - 1].Position;
			c = (b + pathToTravel[i].Position) * 0.5f;
			for (; t < 1f; t += Time.deltaTime * travelSpeed) {
				transform.localPosition = Bezier.GetPoint(a, b, c, t);
				yield return null;
			}
			t -= 1f;
		}

		a = c;
		b = pathToTravel[pathToTravel.Count - 1].Position;
		c = b;
		for (; t < 1f; t += Time.deltaTime * travelSpeed) {
			transform.localPosition = Bezier.GetPoint(a, b, c, t);
			yield return null;
		}
	}
While we're at it, we can also take the time delta into account at the start of the journey. That means that we begin moving immediately, instead of remaining stationary for one frame.
float t = Time.deltaTime * travelSpeed;
Finally, we don't end exactly at the time that the path should be finished, but just short of it. Once again, how big a difference there can be depends on the frame rate. So let's make sure that the unit ends up exactly at its destination.
	IEnumerator TravelPath () {
		…

		transform.localPosition = location.Position;
	}
Animating Orientation
Although the units follow a nice curve, they do not change their orientation to match their travel direction. As a result, it appears as if they're sliding. To make it look like actual movement, we have to rotate them as well.
Looking Ahead
Like in the Curves and Splines tutorial, we can use the curve's derivative to determine the orientation of the unit. The formula for a quadratic Beziér curve's derivative is `2 ((1 - t) (B - A) + t (C - B))`. Add a method to compute it to Bezier.
	public static Vector3 GetDerivative (
		Vector3 a, Vector3 b, Vector3 c, float t
	) {
		return 2f * ((1f - t) * (b - a) + t * (c - b));
	}
The derivative vector aligns with the travel direction. We can use the Quaternion.LookRotation method to convert that into a rotation for our unit. Do this for every step in HexUnit.TravelPath.
				transform.localPosition = Bezier.GetPoint(a, b, c, t);
				Vector3 d = Bezier.GetDerivative(a, b, c, t);
				transform.localRotation = Quaternion.LookRotation(d);
				yield return null;

		…

			transform.localPosition = Bezier.GetPoint(a, b, c, t);
			Vector3 d = Bezier.GetDerivative(a, b, c, t);
			transform.localRotation = Quaternion.LookRotation(d);
			yield return null;
Unlike the unit's position, it doesn't matter if its orientation isn't perfect at the end of its journey. However, we do need to make sure that its orientation matches its final rotation. To do so, make its orientation equal to its Y rotation once we're done.
		transform.localPosition = location.Position;
		orientation = transform.localRotation.eulerAngles.y;
Units now face the exact direction that they're going, both horizontally and vertically. This means that they will lean forward and backward when going up and down slopes. To keep them upright, force the direction vector's Y component to zero before using it to determine the unit's rotation.
				Vector3 d = Bezier.GetDerivative(a, b, c, t);
				d.y = 0f;
				transform.localRotation = Quaternion.LookRotation(d);

		…

			Vector3 d = Bezier.GetDerivative(a, b, c, t);
			d.y = 0f;
			transform.localRotation = Quaternion.LookRotation(d);
Looking at Something
Units face forward during their entire journey, but they might be looking in a different direction before that. When that is the case, they instantaneously change their orientation. It looks better if we made them turn to face their travel direction before starting to move.
Looking at something might be useful in other situation as well, so let's create a LookAt method to make a unit change its orientation to look at a specific point. The desired rotation can be set with the Transform.LookAt method, after we've made sure that the point has the same vertical position as the unit. After that, we can extract the unit's orientation.
	void LookAt (Vector3 point) {
		point.y = transform.localPosition.y;
		transform.LookAt(point);
		orientation = transform.localRotation.eulerAngles.y;
	}
To make the unit actually rotate, we'll turn our method into another coroutine that will rotate with a fixed speed. The rotation speed could also be configurable, but we'll again just use a constant. Rotation should be quick, something like 180° per second.
	const float rotationSpeed = 180f;

	…

	IEnumerator LookAt (Vector3 point) {
		…
	}
It isn't necessary to bother with acceleration for rotation, as that isn't visually obvious. We can suffice with simply interpolating between two orientations. Unfortunately, this isn't as straightforward as interpolating between two numbers, because angles are circular. For example, going from 350° to 10° should result in a 20° clockwise rotation, but straightforward interpolation would go 340° counter-clockwise instead.
The simplest way to create a correct rotation is by interpolating between two quaternions, using spherical interpolation. This leads to the shortest possible rotation. To do this, retrieve both the start and destination quaternions and transition between them using Quaternion.Slerp.
	IEnumerator LookAt (Vector3 point) {
		point.y = transform.localPosition.y;
		Quaternion fromRotation = transform.localRotation;
		Quaternion toRotation =
			Quaternion.LookRotation(point - transform.localPosition);

		for (float t = Time.deltaTime; t < 1f; t += Time.deltaTime) {
			transform.localRotation =
				Quaternion.Slerp(fromRotation, toRotation, t);
			yield return null;
		}

		transform.LookAt(point);
		orientation = transform.localRotation.eulerAngles.y;
	}
This works, but the interpolation is always form 0 to 1, regardless of the rotation angle. To ensure a uniform angular speed, we have to slow down our interpolation as the rotation angle increases.
		Quaternion fromRotation = transform.localRotation;
		Quaternion toRotation =
			Quaternion.LookRotation(point - transform.localPosition);
		float angle = Quaternion.Angle(fromRotation, toRotation);
		float speed = rotationSpeed / angle;

		for (
			float t = Time.deltaTime * speed;
			t < 1f;
			t += Time.deltaTime * speed
		) {
			transform.localRotation =
				Quaternion.Slerp(fromRotation, toRotation, t);
			yield return null;
		}
Knowing the angle, we can skip the rotation entirely if it turns out to be zero.
		float angle = Quaternion.Angle(fromRotation, toRotation);

		if (angle > 0f) {
			float speed = rotationSpeed / angle;
			for (
				…
			) {
				…
			}
		}
We can now add unit rotation to TravelPath by simply yielding LookAt with the second cell's position before moving. Unity will automatically start the LookAt coroutine and TravelPath will wait until it is finished.
	IEnumerator TravelPath () {
		Vector3 a, b, c = pathToTravel[0].Position;
		yield return LookAt(pathToTravel[1].Position);

		float t = Time.deltaTime * travelSpeed;
		…
	}
When trying this out, the unit will teleport to is destination, rotate there, then teleport back to the start of the path and travel from there. That happens because we assign to the Location property before starting the TravelPath coroutine. To get rid of the teleportation, we can revert the unit's position to the starting cell's at the beginning of TravelPath.
		Vector3 a, b, c = pathToTravel[0].Position;
		transform.localPosition = c;
		yield return LookAt(pathToTravel[1].Position);
Cleaning Up
Satiesfied with our movement, we can get rid of the OnDrawGizmos method. Either remove it, or comment it out in case you might want to see the paths in the future.
// void OnDrawGizmos () {// …// }
As we no longer need to remember which path we traveled, we can release the cell list at the end of TravelPath.
	IEnumerator TravelPath () {
		…
		ListPool<HexCell>.Add(pathToTravel);
		pathToTravel = null;
	}
The next tutorial is Fog of War.