Hex Map 25
Water Cycle
- Display raw map data.
- Evolve cell climates.
- Create a partial water cycle simulation.
This is part 25 of a tutorial series about hexagon maps. The previous part was about regions and erosion. This time we'll add moisture to the land.
This tutorial is made with Unity 2017.3.0.
Clouds
Up to this point our map generation algorithm only adjusts the elevation of cells. The biggest difference between cells is whether they are submerged or not. While we also set different terrain types, that's just a simple visualization of elevation. A better way to assign terrain types would be by taking the local climate into consideration.
The climate of earth is a very complex system. Fortunately, we don't have to create a realistic climate simulation. All we need is something that looks natural enough. The most important aspect of the climate is the water cycle, because flora and fauna need liquid water to survive. Temperature is very important too, but we'll focus on water this time, effectively keeping the global temperature constant, while varying wetness.
The water cycle describes how water moves through the environment. Put simply, waterbodies evaporate, which leads to clouds, which produce rain, which flows back to the waterbodies. There's much more to it than that, but simulating those steps might already be enough to produce a seemingly natural distribution of water across our map.
Visualizing Data
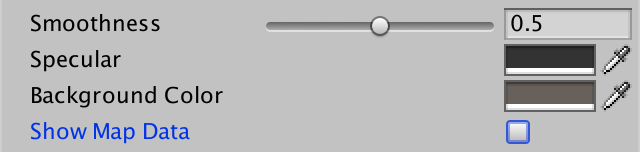
Before we get to the actual simulation, it would be useful if we could directly see the relevant data. For this purpose, we'll adjust our Terrain shader. Give it a toggle property so we can switch it into data-visualization mode, displaying raw map data instead of the usual terrain textures. This is done via a float property with a toggle attribute, specifying a keyword. That will make it show up as a checkbox in the material inspector, which controls whether the keyword is set. The actual name of the property doesn't matter, only the keyword, for which we'll use SHOW_MAP_DATA.
	Properties {
		_Color ("Color", Color) = (1,1,1,1)
		_MainTex ("Terrain Texture Array", 2DArray) = "white" {}
		_GridTex ("Grid Texture", 2D) = "white" {}
		_Glossiness ("Smoothness", Range(0,1)) = 0.5
		_Specular ("Specular", Color) = (0.2, 0.2, 0.2)
		_BackgroundColor ("Background Color", Color) = (0,0,0)
		[Toggle(SHOW_MAP_DATA)] _ShowMapData ("Show Map Data", Float) = 0
	}
Add a shader feature to enable support for the keyword.
		#pragma multi_compile _ GRID_ON
		#pragma multi_compile _ HEX_MAP_EDIT_MODE

		#pragma shader_feature SHOW_MAP_DATA
We'll make it possible to display a single float value, just like the other terrain data. To make this possible, add a mapData field to the Input structure, when the keyword is defined.
		struct Input {
			float4 color : COLOR;
			float3 worldPos;
			float3 terrain;
			float4 visibility;

			#if defined(SHOW_MAP_DATA)
				float mapData;
			#endif
		};
In the vertex program, we'll use the Z channel of the cell data to fill mapData, interpolated between cells as usual.
		void vert (inout appdata_full v, out Input data) {
			…

			#if defined(SHOW_MAP_DATA)
				data.mapData = cell0.z * v.color.x + cell1.z * v.color.y +
					cell2.z * v.color.z;
			#endif
		}
When map data should be shown, directly use it as the fragment's albedo, instead of the normal color. Multiply it with the grid, so the grid can still be enable when visualizing data.
		void surf (Input IN, inout SurfaceOutputStandardSpecular o) {
			…
			o.Albedo = c.rgb * grid * _Color * explored;
			#if defined(SHOW_MAP_DATA)
				o.Albedo = IN.mapData * grid;
			#endif
			…
		}
To actually get any data to the shader, we have to add a method to HexCellShaderData to put something in the blue channel of its texture data. The data is a single float value, clamped to the 0–1 range.
	public void SetMapData (HexCell cell, float data) {
		cellTextureData[cell.Index].b =
			data < 0f ? (byte)0 : (data < 1f ? (byte)(data * 255f) : (byte)255);
		enabled = true;
	}
However, this approach interferes with our exploration system. A value ot 255 for the blue data component is used to indicate that a cell's visibility is in transition. To keep this working, we have to use the byte value 254 as the maximum. Note that unit movement will wipe out the map data, but that's fine as we only use it for debugging map generation.
		cellTextureData[cell.Index].b =
			data < 0f ? (byte)0 : (data < 1f ? (byte)(data * 254f) : (byte)254);
Add a method with the same name to HexCell as well, which passes the request on to its shader data.
	public void SetMapData (float data) {
		ShaderData.SetMapData(this, data);
	}
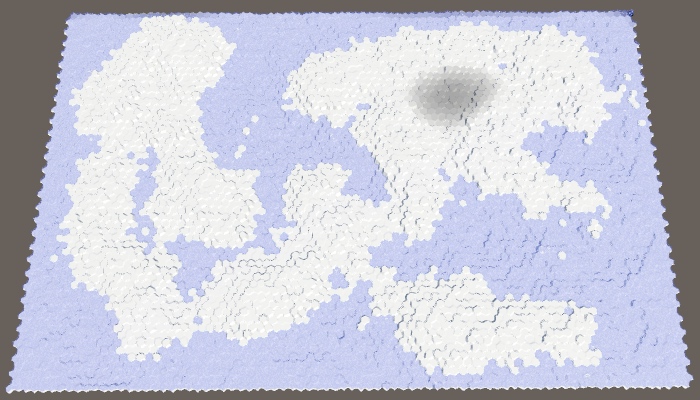
To test whether this works, adjust HexMapGenerator.SetTerrainType so it sets each cell's map data. Let's visualize elevation, converted from an integer to a float in the 0–1 range. This is done by subtracting the elevation minimum from the cell's elevation, then dividing that by the elevation maximum minus the minimum. Ensure that it is a float division.
	void SetTerrainType () {
		for (int i = 0; i < cellCount; i++) {
			…
			cell.SetMapData(
				(cell.Elevation - elevationMinimum) /
				(float)(elevationMaximum - elevationMinimum)
			);
		}
	}
You should now be able to switch between the normal terrain and data visualization, by toggling the Show Map Data checkbox of the Terrain material asset.

Creating a Climate
To simulate a climate, we have to keep track of the climate's data. As our map consists of discrete cells, each cell has its own local climate. Create a ClimateData struct to contain all the relevant data. While we could add this data to the cells themselves, we're only going to use it when generating the map. So we'll store it separately instead. This means that we can define this struct inside HexMapGenerator, just like MapRegion. We'll begin by only tracking clouds, which we can do with a single float field.
	struct ClimateData {
		public float clouds;
	}
Add a list to keep track of the climate data for all cells.
List<ClimateData> climate = new List<ClimateData>();
Now we need a method to create the map's climate. It should start with clearing the climate list, then adding one item for each cell. The initial climate data is simply zero, which we get via the default constructor of ClimateData.
	void CreateClimate () {
		climate.Clear();
		ClimateData initialData = new ClimateData();
		for (int i = 0; i < cellCount; i++) {
			climate.Add(initialData);
		}
	}
The climate has to be created after the land has been eroded and before the terrain types are set. In reality, erosion is mostly caused by the movement of air and water, which is part of the climate, but we're not going to simulate that.
	public void GenerateMap (int x, int z) {
		…
		CreateRegions();
		CreateLand();
		ErodeLand();
		CreateClimate();
		SetTerrainType();
		…
	}
Change SetTerrainType so we can see the cloud data instead of the cell elevation. Initially, that will look like a black map.
	void SetTerrainType () {
		for (int i = 0; i < cellCount; i++) {
			…
			cell.SetMapData(climate[i].clouds);
		}
	}
Evolving Climate
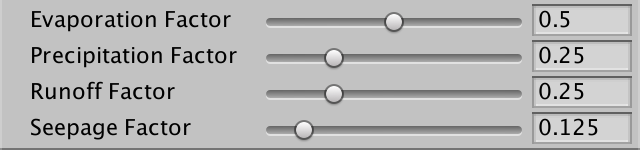
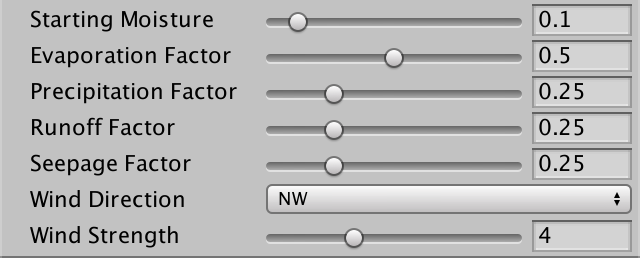
The first step of our climate simulation is evaporation. How much water should evaporate? Let's control that with a slider. A value of 0 means no evaporation at all, while 1 means maximum evaporation. We'll use 0.5 as the default.
	[Range(0f, 1f)]
	public float evaporation = 0.5f;

Let's create another method specifically to evolve the climate of a single cell. Give it the cell's index as a parameter and use it to retrieve the relevant cell and its climate data. If the cell is underwater, then we're dealing with a waterbody, which should evaporate. We'll immediately turn the vapor into clouds – ignoring dew points and condensation – so directly add the evaporation to the cell's clouds value. Once we're done, copy the climate data back to the list.
	void EvolveClimate (int cellIndex) {
		HexCell cell = grid.GetCell(cellIndex);
		ClimateData cellClimate = climate[cellIndex];

		if (cell.IsUnderwater) {
			cellClimate.clouds += evaporation;
		}

		climate[cellIndex] = cellClimate;
	}
Invoke this method in CreateClimate, for every cell.
	void CreateClimate () {
		…

		for (int i = 0; i < cellCount; i++) {
			EvolveClimate(i);
		}
	}
Doing this just once isn't sufficient. To create a complex simulation, we have to evolve the cell climates multiple times. The more often we do this, the more refined the result will be. We'll simply pick a fixed amount, let's use 40 cycles.
		for (int cycle = 0; cycle < 40; cycle++) {
			for (int i = 0; i < cellCount; i++) {
				EvolveClimate(i);
			}
		}
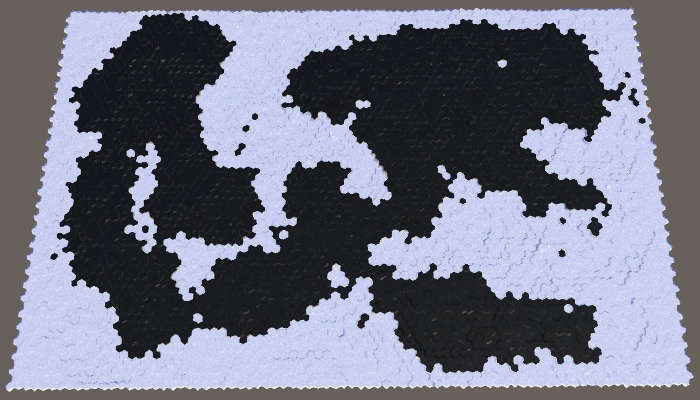
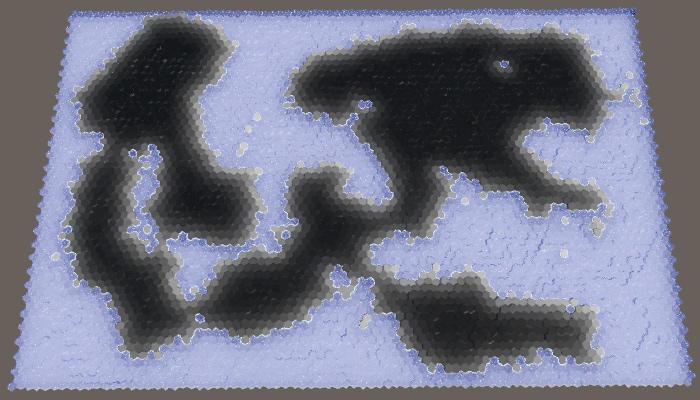
Because right now we're only increasing the clouds above submerged cells, we end up with black land and white waterbodies.
Cloud Dispersal
Clouds don't stay in one place forever, especially not when more and more water keeps evaporating. Pressure differences cause air to move, manifesting as wind, which makes the clouds to move as well.
If there isn't a dominant wind direction, on average the clouds of a cell will disperse in all directions equally, ending up in the cell's neighbors. As new clouds will be generated in the next cycle, let's distribute all the clouds that are currently in the cell among its neighbors. So each neighbor gets one-sixth of the cell's clouds, after which the local drop to zero.
		if (cell.IsUnderwater) {
			cellClimate.clouds += evaporation;
		}

		float cloudDispersal = cellClimate.clouds * (1f / 6f);
		cellClimate.clouds = 0f;

		climate[cellIndex] = cellClimate;
To actually add the clouds to the neighbors, loop through them, retrieve their climate data, increase their clouds value, and copy it back to the list.
		float cloudDispersal = cellClimate.clouds * (1f / 6f);
		for (HexDirection d = HexDirection.NE; d <= HexDirection.NW; d++) {
			HexCell neighbor = cell.GetNeighbor(d);
			if (!neighbor) {
				continue;
			}
			ClimateData neighborClimate = climate[neighbor.Index];
			neighborClimate.clouds += cloudDispersal;
			climate[neighbor.Index] = neighborClimate;
		}
		cellClimate.clouds = 0f;
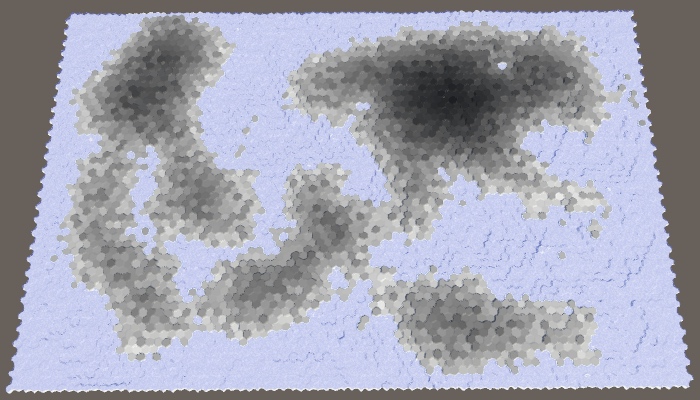
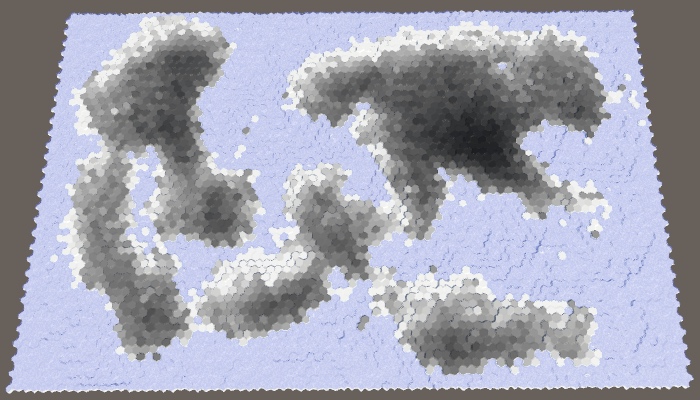
This produces an almost white map. That's because each cycle all underwater cells add more clouds to the global climate. After the first cycle, the land cells next to water now have some clouds to disperse as well. This process compounds until most of the map is covered with clouds. In the case of map 1208905299 with default settings, only the interior of the large northeast landmass hasn't been fully covered yet.
Note that our waterbodies can generate an infinite amount of clouds. The water level is not part of our climate simulation. In reality, waterbodies persist only because water flows back to them at about the same rate that they evaporate. So we're only simulating a partial water cycle. This is fine, but we should be aware that this means that the longer the simulation runs, the more water gets added to the climate. Right now, the only loss of water happens at the edge of the map, where dispersed clouds are lost to non-existing neighbors.
You can see the loss of water at the top of the map, especially the cells at the top right. The last cell has no clouds at all, because it was the last one to evolve. It hasn't received any clouds from a neighbor yet.
Precipitation
Water doesn't stay in could form forever. At some point, it will fall back down. This usually happens in the form of rain, but it can also be snow, hail, or sleet. In general, this is known as precipitation. How much of a cloud disappears and how quickly it happens varies a lot, but we'll simply use a configurable global precipitation factor. A value of 0 means no precipitation at all, while a value of 1 means that all the clouds disappear immediately. Let's use 0.25 as the default value. That means that each cycle a quarter of the clouds are removed.
	[Range(0f, 1f)]
	public float precipitationFactor = 0.25f;

We'll simulate precipitation after evaporation and before cloud dispersal. This means that part of the water that evaporates from waterbodies immediately precipitates, so the amount of dispersed clouds is reduced. Above land, precipitation will cause clouds to disappear.
		if (cell.IsUnderwater) {
			cellClimate.clouds += evaporation;
		}

		float precipitation = cellClimate.clouds * precipitationFactor;
		cellClimate.clouds -= precipitation;

		float cloudDispersal = cellClimate.clouds * (1f / 6f);
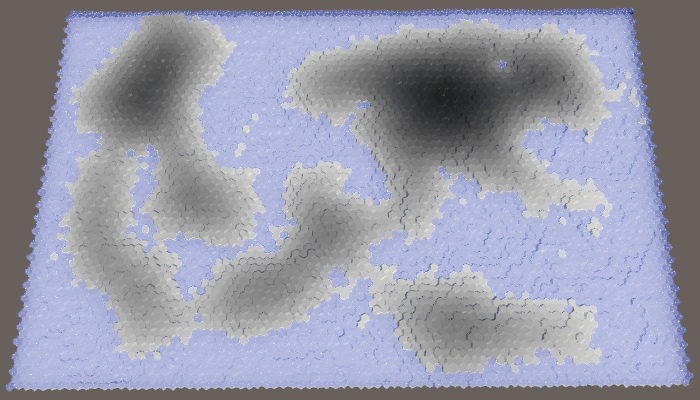
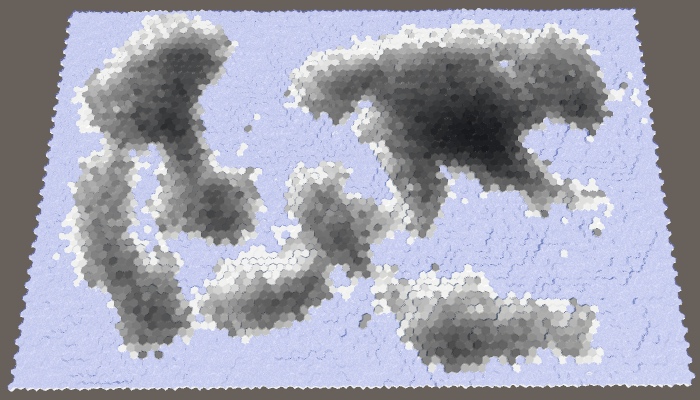
Now that we're eliminating 25% of the clouds each cycle, the land had turned mostly black again. The clouds only manage to move inland a few steps before they become unnoticeable.
Moisture
Although precipitation eliminates clouds, it shouldn't remove water from the climate. After falling to earth, the water is still there, just in another state. It can exist in many forms, which we'll simply abstract as moisture.
Tracking Moisture
We're going to enhance our climate model by keeping track of two water states, clouds and moisture. To support this, add a moisture field to ClimateData.
	struct ClimateData {
		public float clouds, moisture;
	}
In its most general form, evaporation is the process of converting moisture into clouds, at least in our simple climate model. This means that evaporation shouldn't be a constant value but another factor. So refactor-rename evaporation to evaporationFactor.
	[Range(0f, 1f)]
	public float evaporationFactor = 0.5f;
When a cell is underwater, we simply declare its moisture level to be 1. This means that the evaporation is equal to the evaporation factor. But we can now also have evaporation from land cells. In that case, we have to calculate the evaporation, subtract it from the moisture and add it to the clouds. After that, precipitation is added to moisture.
		if (cell.IsUnderwater) {
			cellClimate.moisture = 1f;
			cellClimate.clouds += evaporationFactor;
		}
		else {
			float evaporation = cellClimate.moisture * evaporationFactor;
			cellClimate.moisture -= evaporation;
			cellClimate.clouds += evaporation;
		}

		float precipitation = cellClimate.clouds * precipitationFactor;
		cellClimate.clouds -= precipitation;
		cellClimate.moisture += precipitation;
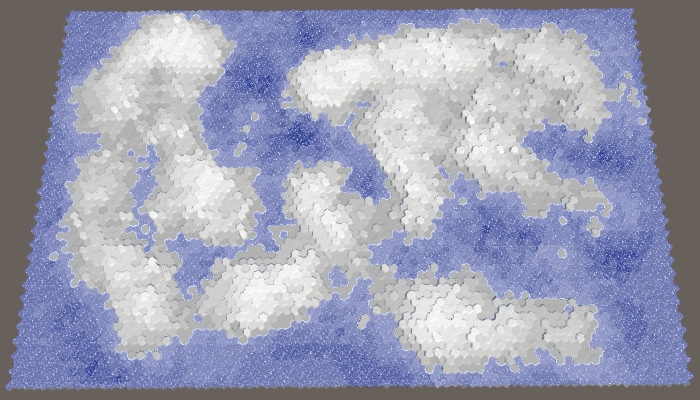
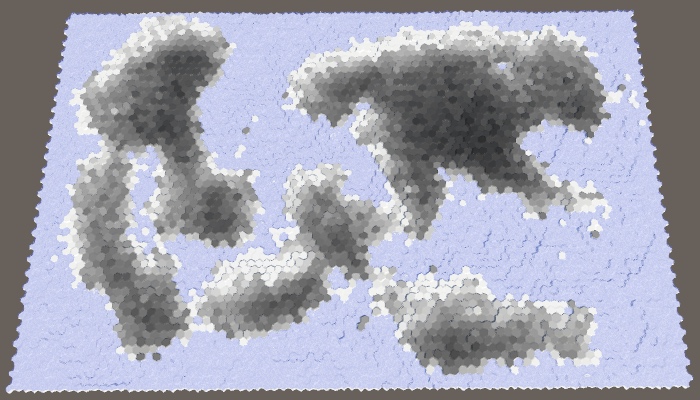
Because clouds are now sustained by evaporation above land, they're able to move further inland. Most of the land is now gray.
Let's adjust SetTerrainType so it displays moisture instead of clouds, because that's what we'll use to determine the terrain types later.
cell.SetMapData(climate[i].moisture);
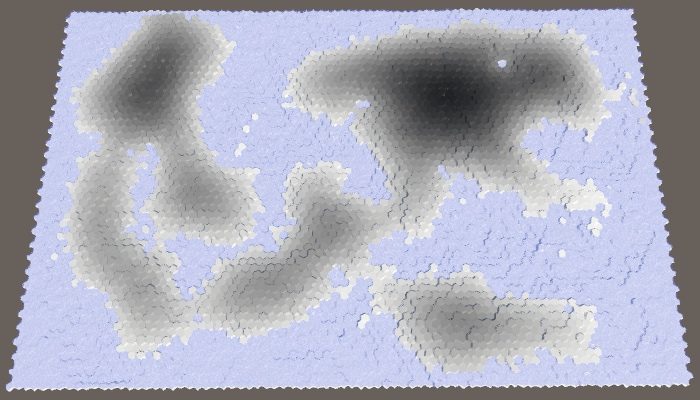
At this point moisture looks quite similar to clouds – except that all underwater cells are white – but this will soon change.
Runoff
Evaporation is not the only way that moisture can leave a cell. The water cycle dictates that most of the moisture added to land somehow ends up in waterbodies again. The most visible way in which this happens is by water flowing across the land, dragged down by gravity. We're not bothering with actual rivers in our simulation, instead we'll use a configurable runoff factor. This represents the portion of water that drains away, flowing to lower regions. Let's drain 25% by default.
	[Range(0f, 1f)]
	public float runoffFactor = 0.25f;

Runoff works just like cloud dispersal, with three differences. First, not all of a cell's moisture is removed. Second, it's transporting moisture, not clouds. Third, it only goes downward, so only to neighbors with lower elevation. The runoff factor describes how much moisture drains away if all neighbors were lower, but it's often less. This means that we have to decrease the cell's moisture only when we find a lower neighbor.
		float cloudDispersal = cellClimate.clouds * (1f / 6f);
		float runoff = cellClimate.moisture * runoffFactor * (1f / 6f);
		for (HexDirection d = HexDirection.NE; d <= HexDirection.NW; d++) {
			HexCell neighbor = cell.GetNeighbor(d);
			if (!neighbor) {
				continue;
			}
			ClimateData neighborClimate = climate[neighbor.Index];
			neighborClimate.clouds += cloudDispersal;

			int elevationDelta = neighbor.Elevation - cell.Elevation;
			if (elevationDelta < 0) {
				cellClimate.moisture -= runoff;
				neighborClimate.moisture += runoff;
			}

			climate[neighbor.Index] = neighborClimate;
		}
We end up with a more varied distribution of moisture, as higher cells lose their moisture to lower cells. We also see a lot less moisture in coastal cells, because they drain into the underwater cells. To mitigate this effect, we should also use the water level to determine whether a cell is lower, by using the view elevation instead.
int elevationDelta = neighbor.ViewElevation - cell.ViewElevation;
Seepage
Water doesn't only flow downward. It also spreads out, seeping across level terrain, and being absorbed by land adjacent to waterbodies. This can be a subtle effect, but useful to smooth out the distribution of moisture, so let's add it to our simulation as well. Give it its own configurable factor, using 0.125 as the default.
	[Range(0f, 1f)]
	public float seepageFactor = 0.125f;
Seepage is the same as runoff, except that it applies when a neighbor has the same view elevation as the cell itself.
		float runoff = cellClimate.moisture * runoffFactor * (1f / 6f);
		float seepage = cellClimate.moisture * seepageFactor * (1f / 6f);
		for (HexDirection d = HexDirection.NE; d <= HexDirection.NW; d++) {
			…

			int elevationDelta = neighbor.ViewElevation - cell.ViewElevation;
			if (elevationDelta < 0) {
				cellClimate.moisture -= runoff;
				neighborClimate.moisture += runoff;
			}
			else if (elevationDelta == 0) {
				cellClimate.moisture -= seepage;
				neighborClimate.moisture += seepage;
			}

			climate[neighbor.Index] = neighborClimate;
		}

Rain Shadows
While we have a decent simulation of the water cycle at this point, it doesn't look very interesting. That's because it doesn't contain rain shadows, which are some of the most dramatic displays of climate difference. Rain shadows describe areas that have a severe lack of precipitation, compared to nearby regions. These regions exist because mountains prevent clouds from reaching them. This requires high mountains and a prevailing wind direction.
Wind
Let's begin by adding a dominant wind direction to our simulation. While the dominant wind direction varies a lot across earth, we'll make do with a configurable global wind direction. Let's use northwest as the default. Besides that, also make it configurable how strong this wind is, from 1 to 10, with a default of 4.
	public HexDirection windDirection = HexDirection.NW;

	[Range(1f, 10f)]
	public float windStrength = 4f;
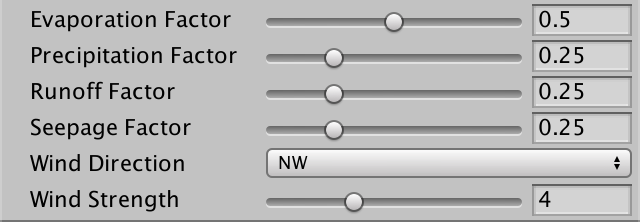
The strength of the dominant wind is expressed relative to the uniform cloud dispersal. When the wind strength is 1, dispersal is equal in all directions. When it's 2, dispersal is twice as strong in the wind direction than in the other directions, and so on. We can realize this by changing the divisor of the cloud dispersal calculation. Instead of six, it should be five plus the wind strength.
float cloudDispersal = cellClimate.clouds * (1f / (5f + windStrength));
Also, the wind direction defines the direction from which the wind blows. So we need to use the opposite of that as the main dispersal direction.
		HexDirection mainDispersalDirection = windDirection.Opposite();
		float cloudDispersal = cellClimate.clouds * (1f / (5f + windStrength));
Now we can check whether a neighbor lies in the main dispersal direction. If so, we should multiply the cloud dispersal by the wind strength.
			ClimateData neighborClimate = climate[neighbor.Index];
			if (d == mainDispersalDirection) {
				neighborClimate.clouds += cloudDispersal * windStrength;
			}
			else {
				neighborClimate.clouds += cloudDispersal;
			}

A dominant wind adds directionality in the way the moisture gets distributed across the land. The stronger the wind, the more extreme this effect becomes.
Altitude
The second ingredient for rains shadows are mountains. We don't have a strict classification of what a mountain is, and neither does nature. What matters is altitude. Essentially, when air flows across a mountain it is forced upward, cools, can hold less water, which forces precipitation before the air passes the mountain. The result is dry air on the other side, hence the rain shadow.
The key part is that the higher air goes the less water it can contain. We can represent this in our simulation by enforcing a maximum cloud value per cell. The higher a cell's view elevation, the lower this maximum should be. The most straightforward way to do this is to set the maximum to 1 minus the view elevation divided by the elevation maximum. Actually, let's divide by the maximum plus one. That allows a little bit of the clouds to still flow over even the highest cells. We'll enforce this maximum after precipitation, before dispersal.
		float precipitation = cellClimate.clouds * precipitationFactor;
		cellClimate.clouds -= precipitation;
		cellClimate.moisture += precipitation;

		float cloudMaximum = 1f - cell.ViewElevation / (elevationMaximum + 1f);

		HexDirection mainDispersalDirection = windDirection.Opposite();
If we end up with more clouds than allowed, simply convert the excess clouds to moisture. This effectively forces extra precipitation, just like real mountains do.
		float cloudMaximum = 1f - cell.ViewElevation / (elevationMaximum + 1f);
		if (cellClimate.clouds > cloudMaximum) {
			cellClimate.moisture += cellClimate.clouds - cloudMaximum;
			cellClimate.clouds = cloudMaximum;
		}
Finishing the Simulation
At this point we have a decent partial water cycle simulation. Let's tidy it up a bit and then use it to determine the terrain type of cells.
Parallel Evaluation
As mentioned in an aside earlier, the order in which we evolve cells influences the result of the simulation. Ideally, this is not the case and we effectively evolve all cells in parallel. We can do this by applying all changes of the current evolution step to a second climate list, nextClimate.
	List<ClimateData> climate = new List<ClimateData>();
	List<ClimateData> nextClimate = new List<ClimateData>();
Clear and initialize this list just like the other one. Then swap the lists after each cycle. This makes the simulation alternate between which list is used and the current and the next climate data.
	void CreateClimate () {
		climate.Clear();
		nextClimate.Clear();
		ClimateData initialData = new ClimateData();
		for (int i = 0; i < cellCount; i++) {
			climate.Add(initialData);
			nextClimate.Add(initialData);
		}

		for (int cycle = 0; cycle < 40; cycle++) {
			for (int i = 0; i < cellCount; i++) {
				EvolveClimate(i);
			}
			List<ClimateData> swap = climate;
			climate = nextClimate;
			nextClimate = swap;
		}
	}
When a cell influences the climate of its neighbor, it should adjust that neighbor's next climate data, not the current.
		for (HexDirection d = HexDirection.NE; d <= HexDirection.NW; d++) {
			HexCell neighbor = cell.GetNeighbor(d);
			if (!neighbor) {
				continue;
			}
			ClimateData neighborClimate = nextClimate[neighbor.Index];
			…

			nextClimate[neighbor.Index] = neighborClimate;
		}
And instead of copying the cell's climate data back to the current climate list, retrieve its next climate data, add the current moisture to it, and copy that to the next list. After that, reset the data of the current list so it's fresh for the next cycle.
// cellClimate.clouds = 0f;ClimateData nextCellClimate = nextClimate[cellIndex]; nextCellClimate.moisture += cellClimate.moisture; nextClimate[cellIndex] = nextCellClimate; climate[cellIndex] = new ClimateData();
While we're at it, let's also enforce a maximum of 1 for the moisture level, so land cells cannot be wetter than underwater cells.
		nextCellClimate.moisture += cellClimate.moisture;
		if (nextCellClimate.moisture > 1f) {
			nextCellClimate.moisture = 1f;
		}
		nextClimate[cellIndex] = nextCellClimate;
Initial Moisture
It's possible that our simulation ends up with too much dry land, especially when there is a high land percentage. To ameliorate this, we can add a configurable starting moisture level, with a default of 0.1.
	[Range(0f, 1f)]
	public float startingMoisture = 0.1f;
Use this value for the moisture of the initial climate list, but not for the next list.
		ClimateData initialData = new ClimateData();
		initialData.moisture = startingMoisture;
		ClimateData clearData = new ClimateData();
		for (int i = 0; i < cellCount; i++) {
			climate.Add(initialData);
			nextClimate.Add(clearData);
		}
Setting Biomes
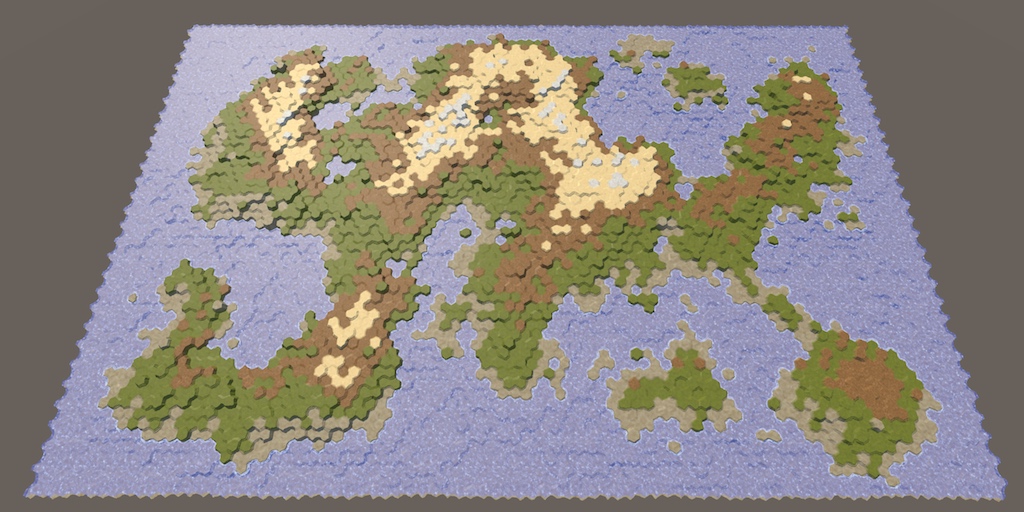
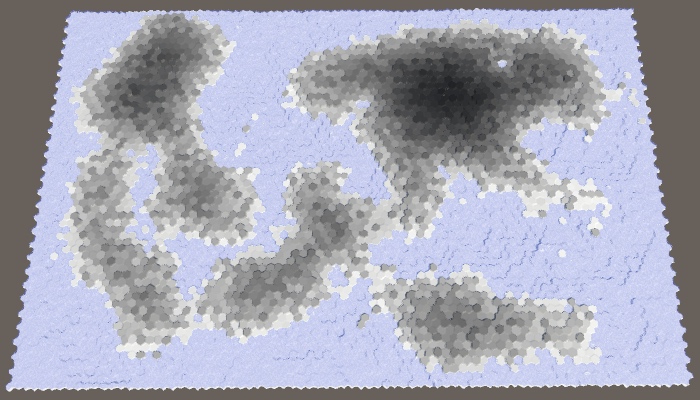
We wrap up with using moisture instead of elevation to set the cell terrain type. Let's use snow to represent bone-dry land, sand for arid regions, stone after that, grass for fairly wet, and mud for soaked and underwater cells. The simplest approach is to just use five 0.2 bands.
	void SetTerrainType () {
		for (int i = 0; i < cellCount; i++) {
			HexCell cell = grid.GetCell(i);
			float moisture = climate[i].moisture;
			if (!cell.IsUnderwater) {
				if (moisture < 0.2f) {
					cell.TerrainTypeIndex = 4;
				}
				else if (moisture < 0.4f) {
					cell.TerrainTypeIndex = 0;
				}
				else if (moisture < 0.6f) {
					cell.TerrainTypeIndex = 3;
				}
				else if (moisture < 0.8f) {
					cell.TerrainTypeIndex = 1;
				}
				else {
					cell.TerrainTypeIndex = 2;
				}
			}
			else {
				cell.TerrainTypeIndex = 2;
			}
			cell.SetMapData(moisture);
		}
	}
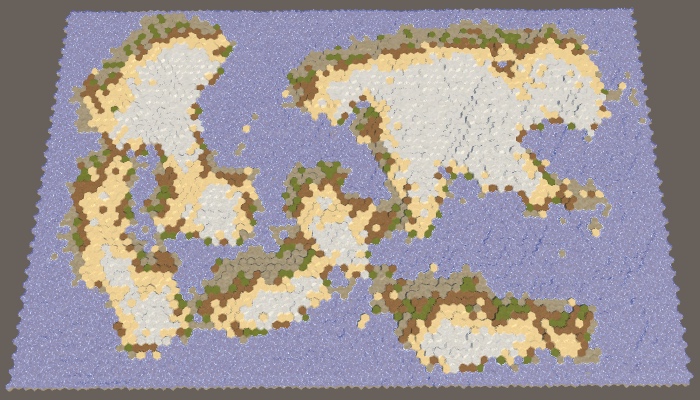
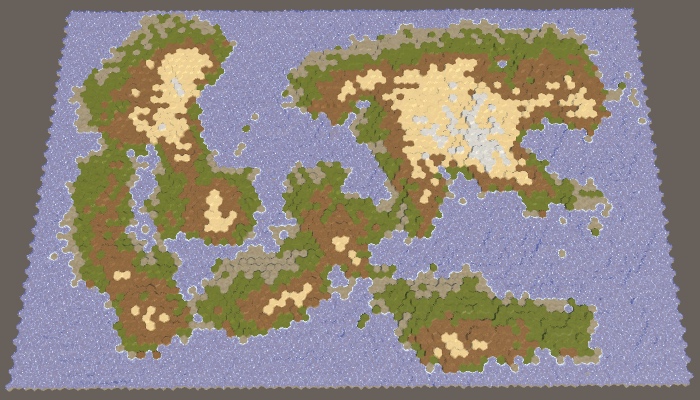
Using and even distribution doesn't produce good result and also doesn't match nature. A better result can be achieved with thresholds like 0.05, 0.12, 0.28, and 0.85.
				if (moisture < 0.05f) {
					cell.TerrainTypeIndex = 4;
				}
				else if (moisture < 0.12f) {
					cell.TerrainTypeIndex = 0;
				}
				else if (moisture < 0.28f) {
					cell.TerrainTypeIndex = 3;
				}
				else if (moisture < 0.85f) {
					cell.TerrainTypeIndex = 1;
				}
The next tutorial is Biomes and Rivers.