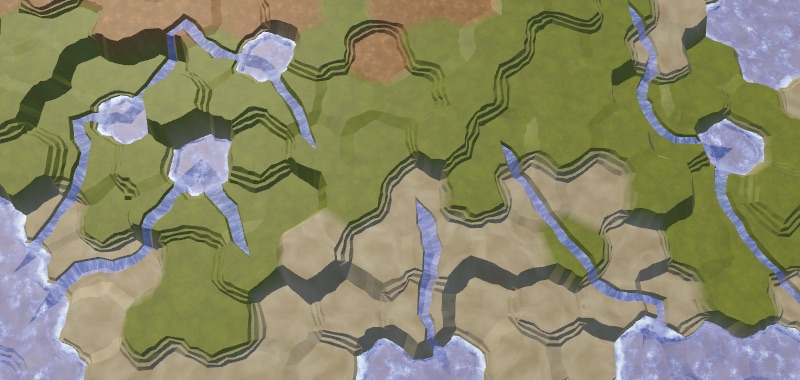
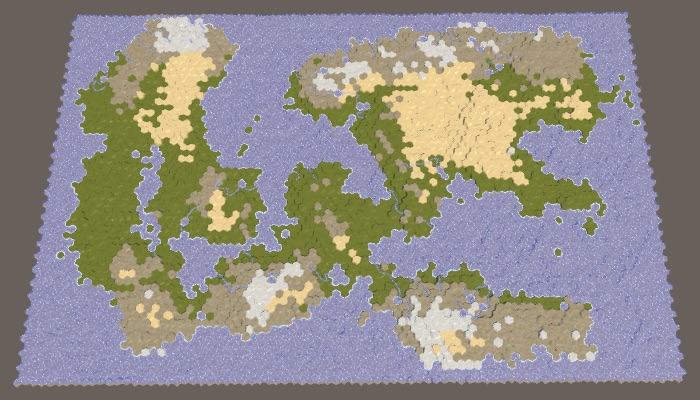
Hex Map 26
Biomes and Rivers
- Have rivers originate from high and wet cells.
- Create a simple temperature model.
- Use a biome matrix for cells, then tweak it.
This is part 26 of a tutorial series about hexagon maps. The previous part added a partial water cycle to our map generation algorithm. This time we'll supplement it with rivers and temperature and assign more interesting biomes to cells.
This tutorial is made with Unity 2017.3.0p3.
Generating Rivers
Rivers are a consequence of the water cycle. Basically, they're formed by runoff that dug a channel via erosion. This suggests that we could add rivers based on a cell's runoff. However, this won't guarantee that we get anything that looks like actual rivers. Once we start a river, it should keep flowing as far as it can, potentially across many cells. This doesn't fit our water cycle simulation, which operates on cells in parallel. Also, you'd typically want control over how many rivers there are on a map.
Because rivers are so different, we're going to generate them separately. We'll use the results of the water cycle simulation to determine where to place rivers, but we won't have rivers affect the simulation in return.
High and Wet
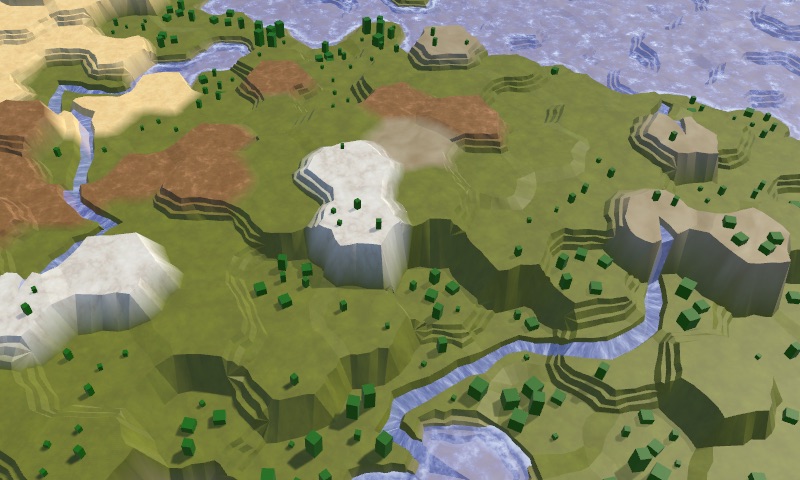
On our maps, a cell has either a river or it doesn't. They also cannot branch or merge. In reality, rivers are far more flexible than that, but we'll have to make do with this approximation, representing larger rivers only. The most important fact that we have to determine is where a large river starts, which we'll have to pick at random.
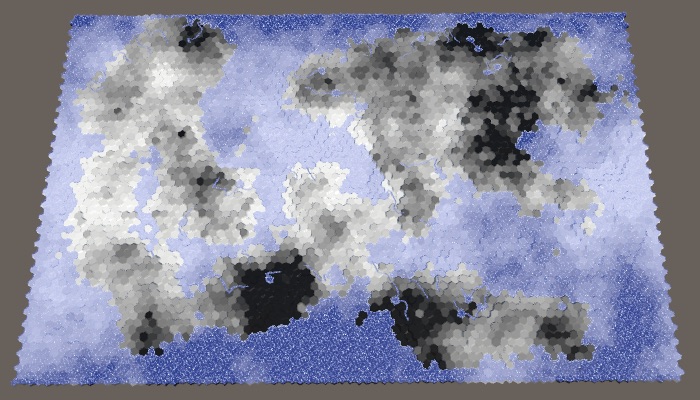
Because rivers require water, the river's origin has to be in a cell that has a lot of moisture. But that's not enough. Rivers flow downhill, so ideally the origin has a high elevation as well. The higher a cell is above the water level, the better a candidate it is for a river origin. We can visualize this as map data, by dividing a cell's elevation by the maximum elevation. To make this relative to the water level, subtract it from both elevations before dividing.
	void SetTerrainType () {
		for (int i = 0; i < cellCount; i++) {
			…
			float data =
				(float)(cell.Elevation - waterLevel) /
				(elevationMaximum - waterLevel);
			cell.SetMapData(data);
		}
	}
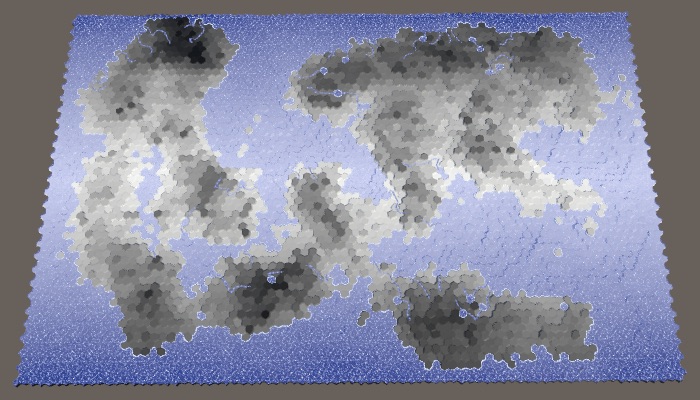
The best candidates are those cells that have both high moisture and high elevation. We can combine these criteria by multiplying them. The result is the fitness or weight for river origins.
			float data =
				moisture * (cell.Elevation - waterLevel) /
				(elevationMaximum - waterLevel);
			cell.SetMapData(data);
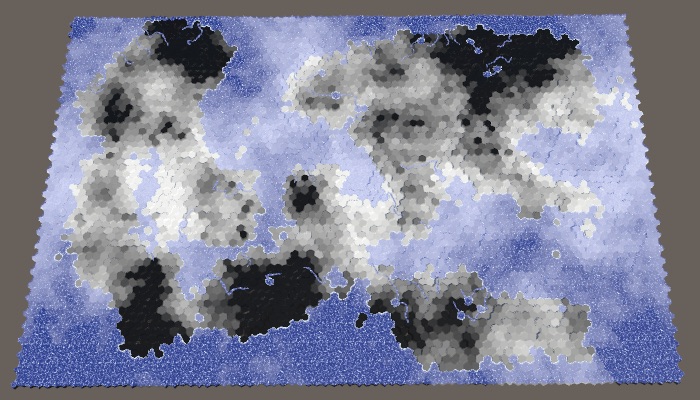
Ideally, we'd use these weights to bias the random selection of an origin cell. While we could construct a properly weighed list and pick from it, that's not trivial and slows down the generation process. We can make do with a simpler classification of importance, distinguishing between four levels. Prime candidates have weights above 0.75. Good candidates have weights above 0.5. Still acceptable candidates have weights above 0.25. All other cells are disqualified. Let's visualize what that looks like.
			float data =
				moisture * (cell.Elevation - waterLevel) /
				(elevationMaximum - waterLevel);
			if (data > 0.75f) {
				cell.SetMapData(1f);
			}
			else if (data > 0.5f) {
				cell.SetMapData(0.5f);
			}
			else if (data > 0.25f) {
				cell.SetMapData(0.25f);
			}
//			cell.SetMapData(data);
With this classification scheme, we'll likely end up with rivers originating from the higher and wetter areas of the map. But it's still possible for rivers to form in somewhat lower or drier areas as well, providing variety.
Add a CreateRivers method that fills a list of cells using these criteria. Acceptable cells are added to this list once, good cells twice, and prime candidates four times. Cell that are underwater are always disqualified, so we can skip checking them.
	void CreateRivers () {
		List<HexCell> riverOrigins = ListPool<HexCell>.Get();
		for (int i = 0; i < cellCount; i++) {
			HexCell cell = grid.GetCell(i);
			if (cell.IsUnderwater) {
				continue;
			}
			ClimateData data = climate[i];
			float weight =
				data.moisture * (cell.Elevation - waterLevel) /
				(elevationMaximum - waterLevel);
			if (weight > 0.75f) {
				riverOrigins.Add(cell);
				riverOrigins.Add(cell);
			}
			if (weight > 0.5f) {
				riverOrigins.Add(cell);
			}
			if (weight > 0.25f) {
				riverOrigins.Add(cell);
			}
		}

		ListPool<HexCell>.Add(riverOrigins);
	}
This method must be invoked after CreateClimate, so we have the moisture data available.
	public void GenerateMap (int x, int z) {
		…
		CreateRegions();
		CreateLand();
		ErodeLand();
		CreateClimate();
		CreateRivers();
		SetTerrainType();
		…
	}
With our classification complete, we can get rid of the map data visualization of it.
	void SetTerrainType () {
		for (int i = 0; i < cellCount; i++) {
			…
//			float data =
//				moisture * (cell.Elevation - waterLevel) /
//				(elevationMaximum - waterLevel);
//			if (data > 0.6f) {
//				cell.SetMapData(1f);
//			}
//			else if (data > 0.4f) {
//				cell.SetMapData(0.5f);
//			}
//			else if (data > 0.2f) {
//				cell.SetMapData(0.25f);
//			}
		}
	}
River Budget
How many rivers are desirable? This should be configurable. As rivers have varying length, it makes most sense to control this with a river budget, which states how much land cells should contain a river. Let's express this as a percentage with a maximum of 20% and a default of 10%. Like the land percentage, this is a target amount, not a guarantee. We might end up with too few candidates or rivers that are too short to cover the desired amount of land. That's why the maximum percentage shouldn't be too high.
	[Range(0, 20)]
	public int riverPercentage = 10;

To be able to determine the river budget expressed as an amount of cells, we have to remember how many land cells were generated in CreateLand.
	int cellCount, landCells;
	…

	void CreateLand () {
		int landBudget = Mathf.RoundToInt(cellCount * landPercentage * 0.01f);
		landCells = landBudget;
		for (int guard = 0; guard < 10000; guard++) {
			…
		}
		if (landBudget > 0) {
			Debug.LogWarning("Failed to use up " + landBudget + " land budget.");
			landCells -= landBudget;
		}
	}
Inside CreateRivers, the river budget can now be computed just like we do in CreateLand.
	void CreateRivers () {
		List<HexCell> riverOrigins = ListPool<HexCell>.Get();
		for (int i = 0; i < cellCount; i++) {
			…
		}

		int riverBudget = Mathf.RoundToInt(landCells * riverPercentage * 0.01f);

		ListPool<HexCell>.Add(riverOrigins);
	}
Next, keep picking and removing random cells from the origin list, as long as we have budget and origins remaining. Also log a warning in case we failed to use up the budget.
		int riverBudget = Mathf.RoundToInt(landCells * riverPercentage * 0.01f);
		while (riverBudget > 0 && riverOrigins.Count > 0) {
			int index = Random.Range(0, riverOrigins.Count);
			int lastIndex = riverOrigins.Count - 1;
			HexCell origin = riverOrigins[index];
			riverOrigins[index] = riverOrigins[lastIndex];
			riverOrigins.RemoveAt(lastIndex);
		}

		if (riverBudget > 0) {
			Debug.LogWarning("Failed to use up river budget.");
		}
Besides that, also add a method to actually create a river. It needs the origin cell as its parameter and should return the river's length once it's done. Begin with a method stub that only returns a length of zero.
	int CreateRiver (HexCell origin) {
		int length = 0;
		return length;
	}
Invoke this method at the end of the loop that we just added to CreateRivers, using it to decrease the remaining budget. Make sure that we only create a new river if the chosen cell doesn't already have one flowing through it.
		while (riverBudget > 0 && riverOrigins.Count > 0) {
			…

			if (!origin.HasRiver) {
				riverBudget -= CreateRiver(origin);
			}
		}
Flowing Rivers
Having a river flow towards the sea or another waterbody seems straightforward. As we start at its origin, we immediately begin with a length of 1. After that, pick a random neighbor, flow into it, and increment the length. Keep doing this until we end up in an underwater cell.
	int CreateRiver (HexCell origin) {
		int length = 1;
		HexCell cell = origin;
		while (!cell.IsUnderwater) {
			HexDirection direction = (HexDirection)Random.Range(0, 6);
			cell.SetOutgoingRiver(direction);
			length += 1;
			cell = cell.GetNeighbor(direction);
		}
		return length;
	}
The result of this naive approach is haphazardly placed river fragments, mostly because we end up replacing previously-generated rivers. It might even lead to errors, as we don't even check whether a neighbor actually exists. We have to loop through all directions and verify that we have a neighbor there. If so, add this direction to a list of potential flow directions, but only if that neighbor doesn't already have a river flowing through it. Then pick a random direction from that list.
	List<HexDirection> flowDirections = new List<HexDirection>();

	…

	int CreateRiver (HexCell origin) {
		int length = 1;
		HexCell cell = origin;
		while (!cell.IsUnderwater) {
			flowDirections.Clear();
			for (HexDirection d = HexDirection.NE; d <= HexDirection.NW; d++) {
				HexCell neighbor = cell.GetNeighbor(d);
				if (!neighbor || neighbor.HasRiver) {
					continue;
				}
				flowDirections.Add(d);
			}

			HexDirection direction =
//				(HexDirection)Random.Range(0, 6);
				flowDirections[Random.Range(0, flowDirections.Count)];
			cell.SetOutgoingRiver(direction);
			length += 1;
			cell = cell.GetNeighbor(direction);
		}
		return length;
	}
With this new approach, it is possible that we end up with zero available flow directions. When that happens, the river cannot flow any further and we have to abort. If the length is equal to 1 at this point, it means that we cannot flow out of the origin cell, so there cannot be a river at all. In that case the river's length is zero.
			flowDirections.Clear();
			for (HexDirection d = HexDirection.NE; d <= HexDirection.NW; d++) {
				…
			}

			if (flowDirections.Count == 0) {
				return length > 1 ? length : 0;
			}
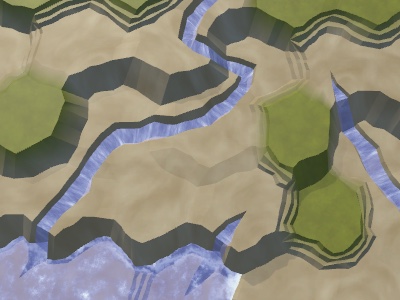
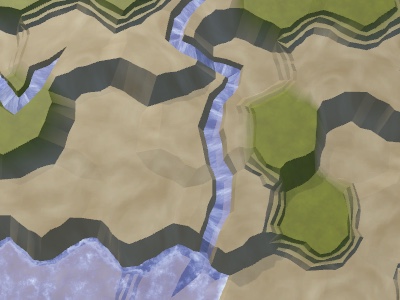
Flowing Downhill
We're now preserving already-created rivers, but we still end up with isolated river fragments. This happens because so far we've ignored elevation. Each time we make a river flow to a higher elevation, HexCell.SetOutgoingRiver correctly aborts the attempt, which leads to discontinuities in our rivers. So we also have to skip directions that would cause the river to flow upward.
				if (!neighbor || neighbor.HasRiver) {
					continue;
				}

				int delta = neighbor.Elevation - cell.Elevation;
				if (delta > 0) {
					continue;
				}

				flowDirections.Add(d);
This eliminates many river fragments, although we still get a few. From this point, it's a matter of refinement to get rid of most unsightly rivers. To start with, rivers prefer to flow downhill as quickly as possible. It's not guaranteed that they take the shortest possible route, but likely. To simulate this, at downhill directions three extra times to the list.
				if (delta > 0) {
					continue;
				}

				if (delta < 0) {
					flowDirections.Add(d);
					flowDirections.Add(d);
					flowDirections.Add(d);
				}
				flowDirections.Add(d);
Avoiding Sharp Turns
Besides preferring to go downhill, flowing water also has momentum. A river is more likely to go straight ahead or curve slowly than to make a sudden sharp turn. We can introduce this bias by keeping track of the river's last direction. If a potential flow direction doesn't deviate too much from this direction, add it once more to the list. This isn't an issue at the origin, so simply always add it again in that case.
	int CreateRiver (HexCell origin) {
		int length = 1;
		HexCell cell = origin;
		HexDirection direction = HexDirection.NE;
		while (!cell.IsUnderwater) {
			flowDirections.Clear();
			for (HexDirection d = HexDirection.NE; d <= HexDirection.NW; d++) {
				…

				if (delta < 0) {
					flowDirections.Add(d);
					flowDirections.Add(d);
					flowDirections.Add(d);
				}
				if (
					length == 1 ||
					(d != direction.Next2() && d != direction.Previous2())
				) {
					flowDirections.Add(d);
				}
				flowDirections.Add(d);
			}

			if (flowDirections.Count == 0) {
				return length > 1 ? length : 0;
			}

//			HexDirection direction =
			direction = flowDirections[Random.Range(0, flowDirections.Count)];
			cell.SetOutgoingRiver(direction);
			length += 1;
			cell = cell.GetNeighbor(direction);
		}
		return length;
	}
This makes it far less likely for zigzag rivers to appear, which are unsightly.
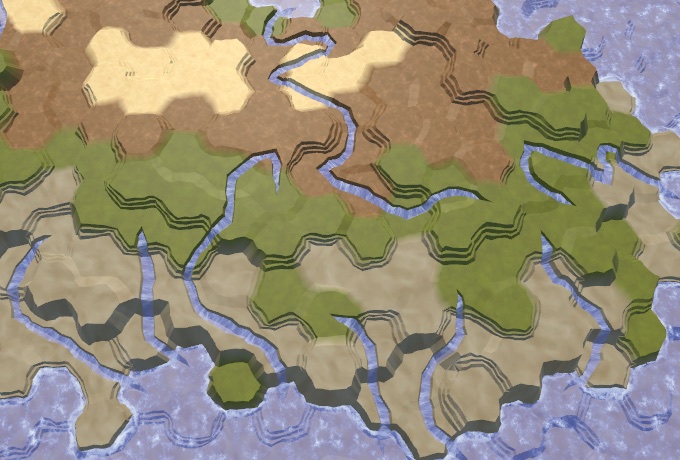
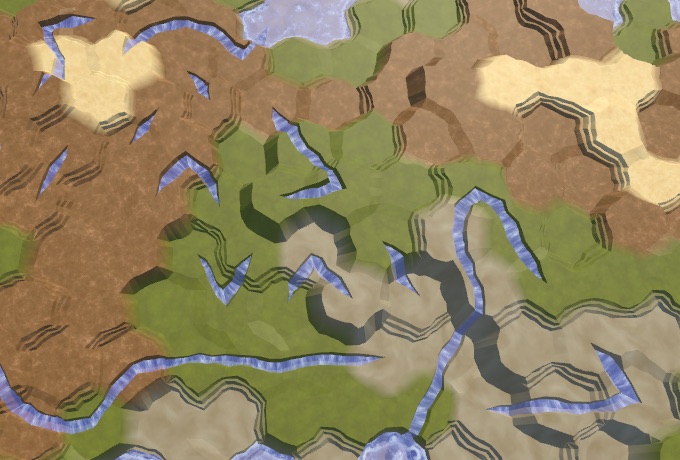
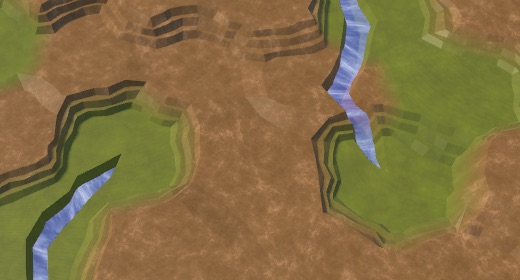
Merging Rivers
Sometimes a river ends up flowing right next to the origin of a previously-created river. Unless that river origin it at a higher elevation, we could decide to make the new river flow into the old one. The result is a single longer river, instead of two nearby shorter ones.
To do this, only skip a neighbor if it has an incoming river, or if it's the origin of the current river. Then after we've established that it isn't an uphill direction, check whether there is an outgoing river. If so, we've found an old river origin. Because this is fairly rare, don't bother checking for other potential neighbor origins and immediately merge the rivers.
HexCell neighbor = cell.GetNeighbor(d);// if (!neighbor || neighbor.HasRiver) {// continue;// }if (!neighbor || neighbor == origin || neighbor.HasIncomingRiver) { continue; } int delta = neighbor.Elevation - cell.Elevation; if (delta > 0) { continue; } if (neighbor.HasOutgoingRiver) { cell.SetOutgoingRiver(d); return length; }
Keeping Distance
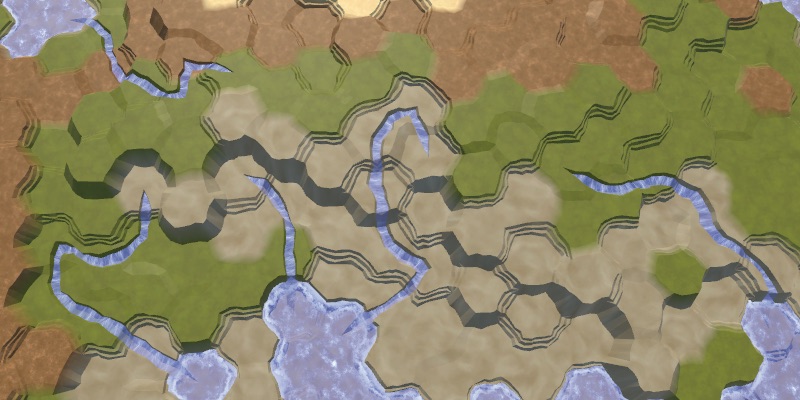
Because good quality origin candidates tend to cluster together, we end up with clusters of rivers. Also, we can end up with rivers originating right next to a waterbody, resulting in single-step rivers. We can spread out the origins by disqualifying those that are adjacent to a river or waterbody. Do this by looping through the neighbors of the chosen origin in CreateRivers. If we find an offending neighbor, the origin isn't valid and we should skip it.
		while (riverBudget > 0 && riverOrigins.Count > 0) {
			int index = Random.Range(0, riverOrigins.Count);
			int lastIndex = riverOrigins.Count - 1;
			HexCell origin = riverOrigins[index];
			riverOrigins[index] = riverOrigins[lastIndex];
			riverOrigins.RemoveAt(lastIndex);

			if (!origin.HasRiver) {
				bool isValidOrigin = true;
				for (HexDirection d = HexDirection.NE; d <= HexDirection.NW; d++) {
					HexCell neighbor = origin.GetNeighbor(d);
					if (neighbor && (neighbor.HasRiver || neighbor.IsUnderwater)) {
						isValidOrigin = false;
						break;
					}
				}
				if (isValidOrigin) {
					riverBudget -= CreateRiver(origin);
				}
			}
While rivers can still end up flowing next to each other, they now tend to cover a larger area.
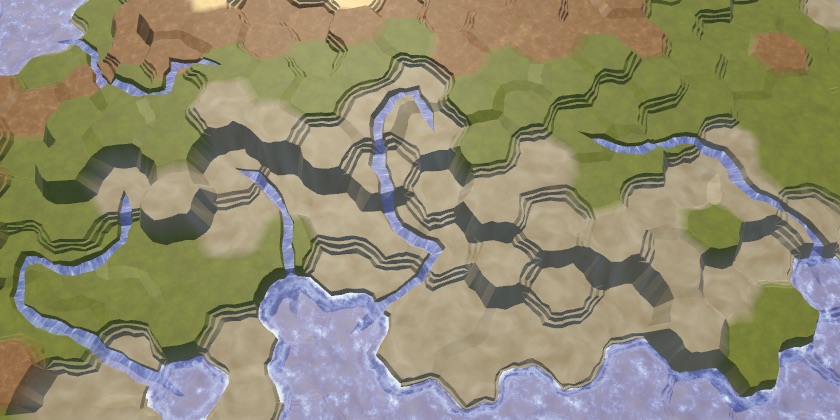
Ending with a Lake
Not all rivers make it to a waterbody. Some get struck in a valley or blocked by other rivers. This isn't a big problem, because there are many real rivers that also seem to disappear. This could happen for example because they flow underground, because they diffuse into a swampy area, or because they dry up. Our rivers cannot visualize this, so they simply end.
Having said that, we should try to minimize such occurrences. While we cannot merge rivers or make them flow uphill, we might be able make them end in a lake, which is more common and looks better. To do this, CreateRiver has to raise the water level of the cell when it gets stuck. Whether this is possible depends on the minimum elevation of that cell's neighbors. So keep track of this when investigating the neighbors, which requires a little code restructuring.
		while (!cell.IsUnderwater) {
			int minNeighborElevation = int.MaxValue;
			flowDirections.Clear();
			for (HexDirection d = HexDirection.NE; d <= HexDirection.NW; d++) {
				HexCell neighbor = cell.GetNeighbor(d);
//				if (!neighbor || neighbor == origin || neighbor.HasIncomingRiver) {
//					continue;
//				}
				if (!neighbor) {
					continue;
				}

				if (neighbor.Elevation < minNeighborElevation) {
					minNeighborElevation = neighbor.Elevation;
				}

				if (neighbor == origin || neighbor.HasIncomingRiver) {
					continue;
				}

				int delta = neighbor.Elevation - cell.Elevation;
				if (delta > 0) {
					continue;
				}

				…
			}

			…
		}
If we're stuck, first check whether we're still at the origin. If so, simply abort the river. Otherwise, check whether all neighbors are at least as high as the current cell. If that is the case, then we can raise the water up to this level. This will create a single-cell lake, unless the cell's elevation is at the same level. If this is so, simple set the elevation to one below the water level.
			if (flowDirections.Count == 0) {
//				return length > 1 ? length : 0;
				if (length == 1) {
					return 0;
				}

				if (minNeighborElevation >= cell.Elevation) {
					cell.WaterLevel = minNeighborElevation;
					if (minNeighborElevation == cell.Elevation) {
						cell.Elevation = minNeighborElevation - 1;
					}
				}
				break;
			}

Note that we can now end up with underwater cells above the water level used to generate the map, representing lakes above sea level.
Extra Lakes
We could also create lakes when we aren't stuck. That would result in the river flowing into an out from a lake. When not stuck, a lake can be created by raising the water level to the cell's current elevation, then decrementing the cell elevation. This is only valid when the minimum neighbor elevation is at least equal to the current cell's elevation. Do this at the end of the river loop, before proceeding to the next cell.
		while (!cell.IsUnderwater) {
			…

			if (minNeighborElevation >= cell.Elevation) {
				cell.WaterLevel = cell.Elevation;
				cell.Elevation -= 1;
			}

			cell = cell.GetNeighbor(direction);
		}
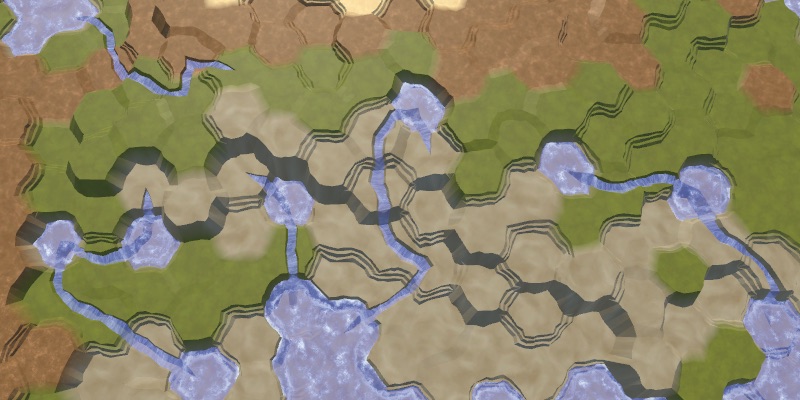
While a few lakes are nice, without restraint this approach can generate far too many lakes. So let's add a configurable probability for extra lakes, with a default of 0.25.
	[Range(0f, 1f)]
	public float extraLakeProbability = 0.25f;
This controls the probability that an extra lake gets generated, if it were possible.
			if (
				minNeighborElevation >= cell.Elevation &&
				Random.value < extraLakeProbability
			) {
				cell.WaterLevel = cell.Elevation;
				cell.Elevation -= 1;
			}

Temperature
Water is only one factor that can be used to determine a cell's biome. Another very important factor is temperature. While we could simulate temperature flow and diffusion like water, we only need one complex factor to create an interesting climate. So we'll keep temperature simple, determining it once per cell.
Temperature by Latitude
Latitude has the most profound effect on temperature. The equator is hot, the poles are cold, and there is a gradual transition in between. Let's create a DetermineTemperature method that returns the temperature for a given cell. To start with, we'll simply use the cell's Z coordinate divided by the Z dimension as the latitude, then use that directly as the temperature.
	float DetermineTemperature (HexCell cell) {
		float latitude = (float)cell.coordinates.Z / grid.cellCountZ;
		return latitude;
	}
Determine the temperature in SetTerrainType and use it as the map data.
	void SetTerrainType () {
		for (int i = 0; i < cellCount; i++) {
			HexCell cell = grid.GetCell(i);
			float temperature = DetermineTemperature(cell);
			cell.SetMapData(temperature);
			float moisture = climate[i].moisture;
			…
		}
	}
What we get is a linear temperature gradient that increases from bottom to top. We can use this to represent the southern hemisphere, with the polar region at the bottom and the equator at the top. But we don't need to cover the entire hemisphere. We could represent a smaller region by using a smaller temperature difference, or no difference at all. For this purpose, we'll make the low and high temperature configurable. We'll define these temperatures in the 0–1 range, using the extremes as default values.
	[Range(0f, 1f)]
	public float lowTemperature = 0f;

	[Range(0f, 1f)]
	public float highTemperature = 1f;

Apply the temperature range via linear interpolation, using the latitude as the interpolator. As we express latitude as a value from 0 to 1, we can use Mathf.LerpUnclamped.
	float DetermineTemperature (HexCell cell) {
		float latitude = (float)cell.coordinates.Z / grid.cellCountZ;
		float temperature =
			Mathf.LerpUnclamped(lowTemperature, highTemperature, latitude);
		return temperature;
	}
Note that we don't bother enforcing that the low temperature is indeed lower than the high temperature. If you wanted to, you could invert the temperatures.
Hemispheres
We can now represent the southern hemisphere, and possibly the northern one by flipping the temperature. But it's much more convenient to use a separate configuration option to switch between hemispheres. Let's create an enumeration and field for that. That way we can also include an option to cover both hemispheres, which we'll make the default.
	public enum HemisphereMode {
		Both, North, South
	}

	public HemisphereMode hemisphere;

If we want the northern hemisphere, we can simple reverse the latitude, by subtracting it from 1. To cover both hemispheres, we need to ensure that the poles are at the top and bottom of the map, while the equator is in the middle. We can do this by doubling the latitude, which takes care of the bottom hemisphere correctly but makes the top hemisphere go from 1 to 2. To correct that, subtract the latitude from 2 when it goes above 1.
	float DetermineTemperature (HexCell cell) {
		float latitude = (float)cell.coordinates.Z / grid.cellCountZ;
		if (hemisphere == HemisphereMode.Both) {
			latitude *= 2f;
			if (latitude > 1f) {
				latitude = 2f - latitude;
			}
		}
		else if (hemisphere == HemisphereMode.North) {
			latitude = 1f - latitude;
		}

		float temperature =
			Mathf.LerpUnclamped(lowTemperature, highTemperature, latitude);
		return temperature;
	}
Note that this also makes it possible to create an exotic map where the equator is cold and the poles hot, by using a low temperature that is hotter than the high temperature.
Higher is Colder
Besides latitude, elevation also has a noticeable effect on temperature. On average, the higher you go, the colder it gets. We can turn this into a factor, like we did for the river origin candidates. In this case, we use the cell's view elevation. Also, the factor decreases with height, so it's 1 minus the elevation divided by the maximum, relative to the water level. To prevent the factor from always dropping to zero at the highest level, add 1 to the divisor. Then use this factor to scale the temperature.
		float temperature =
			Mathf.LerpUnclamped(lowTemperature, highTemperature, latitude);

		temperature *= 1f - (cell.ViewElevation - waterLevel) /
			(elevationMaximum - waterLevel + 1f);

		return temperature;
Temperature Fluctuations
We can make the simplicity of our temperature gradient a little less obvious by adding a random temperature fluctuation. A little randomness can make it look more real, but too much will make it look arbitrary. Let's make the strength of this temperature jitter configurable, expressed as maximum temperature deviation, with a default of 0.1.
	[Range(0f, 1f)]
	public float temperatureJitter = 0.1f;

These fluctuations should be smooth, with small local changes. We can use our noise texture for that. So invoke HexMetrics.SampleNoise with the cell's position as an argument, scaled by 0.1. Let's grab the W channel, center it, and scale it by the jitter factor. Then add this value to the temperature that we determined earlier.
		temperature *= 1f - (cell.ViewElevation - waterLevel) /
			(elevationMaximum - waterLevel + 1f);

		temperature +=
			(HexMetrics.SampleNoise(cell.Position * 0.1f).w * 2f - 1f) *
			temperatureJitter;

		return temperature;
We can add a little variety to the jitter per map, by randomly choosing which of the four noise channels to use. Determine the channel once in SetTerrainType, then index the color channels in DetermineTemperature.
	int temperatureJitterChannel;

	…

	void SetTerrainType () {
		temperatureJitterChannel = Random.Range(0, 4);
		for (int i = 0; i < cellCount; i++) {
			…
		}
	}

	float DetermineTemperature (HexCell cell) {
		…

		float jitter =
			HexMetrics.SampleNoise(cell.Position * 0.1f)[temperatureJitterChannel];

		temperature += (jitter * 2f - 1f) * temperatureJitter;

		return temperature;
	}
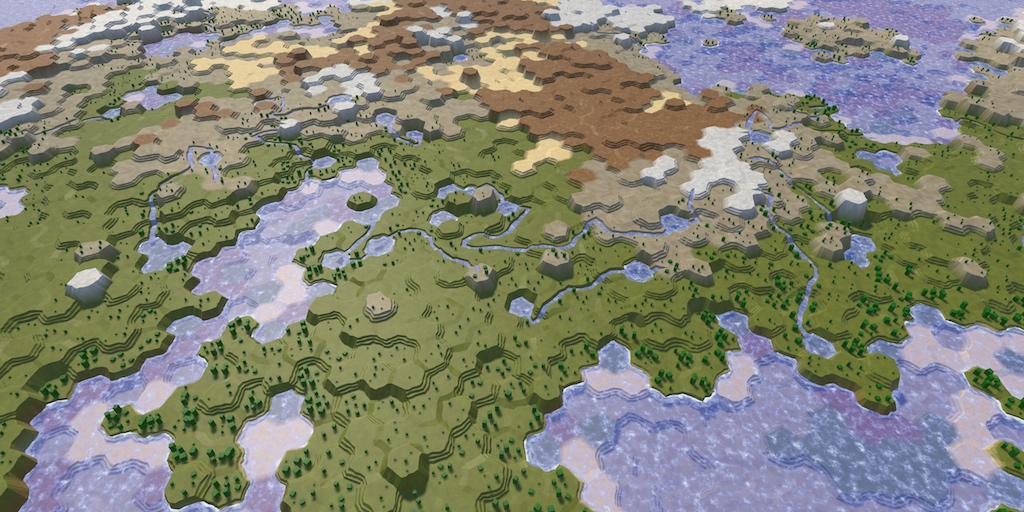
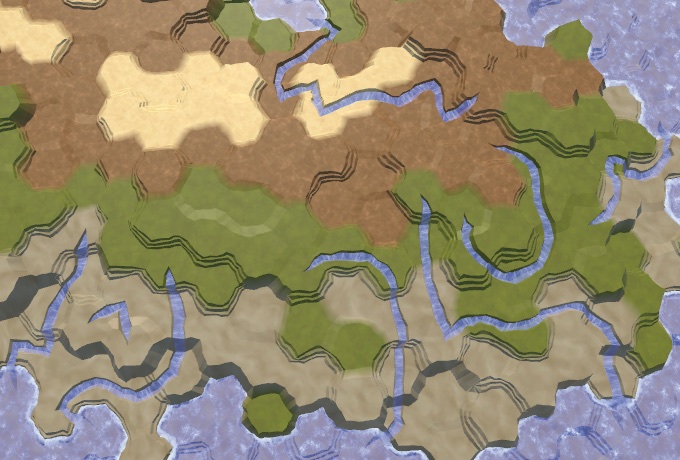
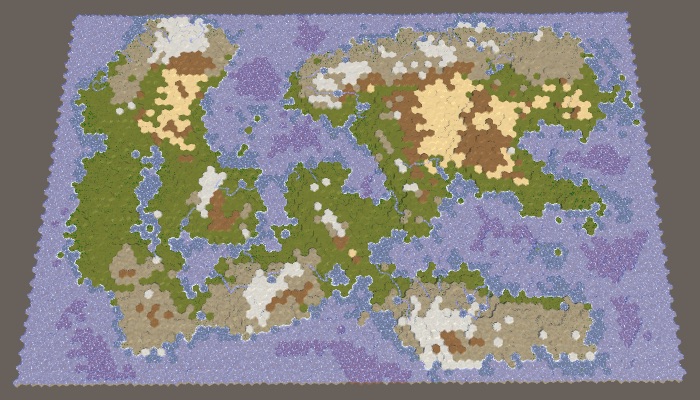
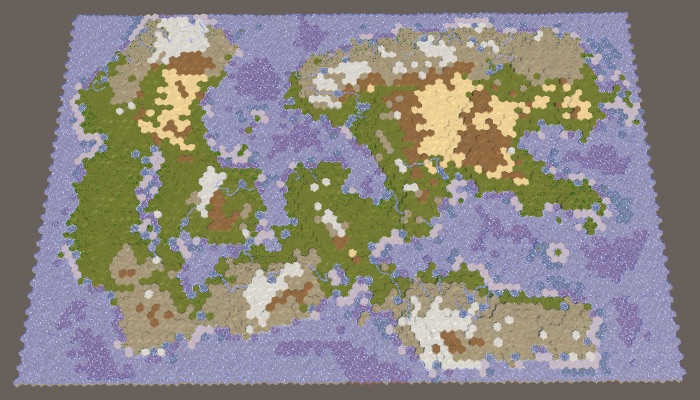
Biomes
Now that we have both moisture and temperature data, we can create a biome matrix. By indexing this matrix, we can assign biomes to all cells, creating a more complex landscape compared to using just one data dimension.
Biome Matrix
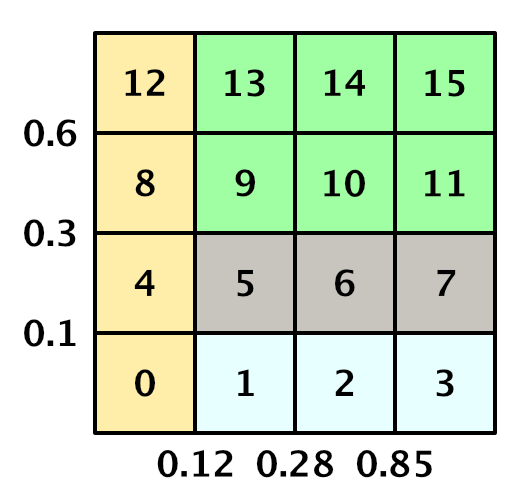
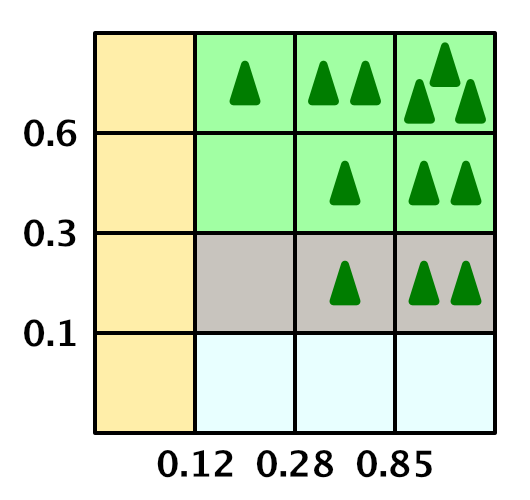
There are a lot of climate models, but we're not going to use any of them. We'll just keep it very simple, only caring about what looks sensible. Dry means desert – cold or hot – for which we'll use sand. Cold and wet means snow. Hot and wet means lots of plants, so grass. In between, we have taiga or tundra, which we'll represent with our grayish mud texture. A 4×4 matrix should provide enough room to transition between these biomes.
Previously, we've assigned terrain types based on five moisture bands. We'll simply drop the driest band – up to 0.05 – and keep the others. For the temperature bands, we'll use up to 0.1, 0.3, 0.6, and above. Define these values in static arrays, for easy reference.
	static float[] temperatureBands = { 0.1f, 0.3f, 0.6f };

	static float[] moistureBands = { 0.12f, 0.28f, 0.85f };
Although we've only set the terrain type based on biome, we can use it to determine other things as well. So let's define a Biome structure inside HexMapGenerator to represent the configuration for a single biome. For now, it only contains the terrain index, plus an appropriate constructor method.
	struct Biome {
		public int terrain;

		public Biome (int terrain) {
			this.terrain = terrain;
		}
	}
Use this struct to create a static array that contains our matrix data. We'll use moisture as the X dimension and temperature as the Y dimension. Fill the lowest temperature row with snow, the second row with tundra, and the other two with grass. Then change the driest column to desert, overriding the temperature choices.
	static Biome[] biomes = {
		new Biome(0), new Biome(4), new Biome(4), new Biome(4),
		new Biome(0), new Biome(2), new Biome(2), new Biome(2),
		new Biome(0), new Biome(1), new Biome(1), new Biome(1),
		new Biome(0), new Biome(1), new Biome(1), new Biome(1)
	};
Determining Biome
To determine the cell biome in SetTerrainType, loop through the temperature and moisture bands to determine the matrix indices that we need. Use them to retrieve the correct biome and set the cell's terrain type.
	void SetTerrainType () {
		temperatureJitterChannel = Random.Range(0, 4);
		for (int i = 0; i < cellCount; i++) {
			HexCell cell = grid.GetCell(i);
			float temperature = DetermineTemperature(cell);
//			cell.SetMapData(temperature);
			float moisture = climate[i].moisture;
			if (!cell.IsUnderwater) {
//				if (moisture < 0.05f) {
//					cell.TerrainTypeIndex = 4;
//				}
//				…
//				else {
//					cell.TerrainTypeIndex = 2;
//				}
				int t = 0;
				for (; t < temperatureBands.Length; t++) {
					if (temperature < temperatureBands[t]) {
						break;
					}
				}
				int m = 0;
				for (; m < moistureBands.Length; m++) {
					if (moisture < moistureBands[m]) {
						break;
					}
				}
				Biome cellBiome = biomes[t * 4 + m];
				cell.TerrainTypeIndex = cellBiome.terrain;
			}
			else {
				cell.TerrainTypeIndex = 2;
			}
		}
	}
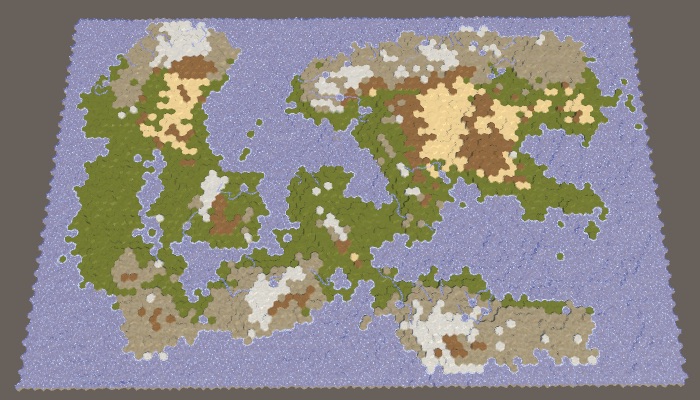
Tweaking Biomes
We're not limited to the biomes defined in the matrix. For example, the matrix has defined all dry biomes a sandy desert. But not all dry deserts are filled with sand. There are many rock deserts as well, which look quite different. So let's change part of the desert cells to rock. We'll simply do this based on elevation, reasoning that loose sand is found at lower altitudes, while higher up you encounter mostly bare rock.
Let's say that sand turns to rock if a cell's elevation is closer to the elevation maximum than to the water level. This is the rock-desert elevation line, which we can compute at the start of SetTerrainType. Then if we encounter a cell with sand, and its elevation is sufficiently high, change its biome's terrain to rock.
	void SetTerrainType () {
		temperatureJitterChannel = Random.Range(0, 4);
		int rockDesertElevation =
			elevationMaximum - (elevationMaximum - waterLevel) / 2;

		for (int i = 0; i < cellCount; i++) {
			…
			if (!cell.IsUnderwater) {
				…
				Biome cellBiome = biomes[t * 4 + m];

				if (cellBiome.terrain == 0) {
					if (cell.Elevation >= rockDesertElevation) {
						cellBiome.terrain = 3;
					}
				}

				cell.TerrainTypeIndex = cellBiome.terrain;
			}
			else {
				cell.TerrainTypeIndex = 2;
			}
		}
	}
Another elevation-based tweak is to force cells that are at maximum elevation to become snowcaps, regardless how warm they are, as long as they're not too dry. This makes it more likely for snowcaps to appear near a hot and wet equator.
				if (cellBiome.terrain == 0) {
					if (cell.Elevation >= rockDesertElevation) {
						cellBiome.terrain = 3;
					}
				}
				else if (cell.Elevation == elevationMaximum) {
					cellBiome.terrain = 4;
				}
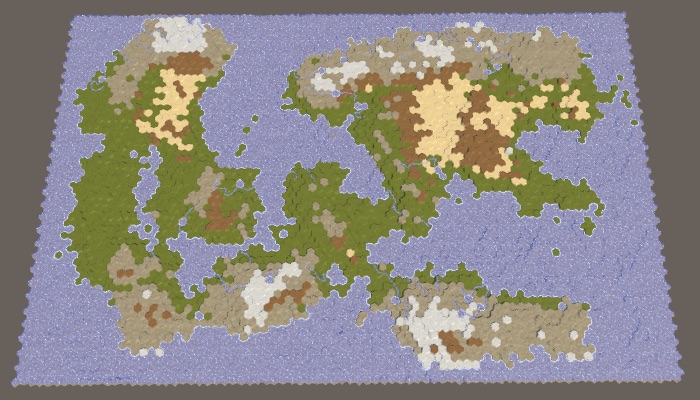
Plants
Now that we've taken care of the terrain types, let's also have our biomes determine the plant level of cells. This requires us to add a plant field to Biome and include it in its constructor.
	struct Biome {
		public int terrain, plant;

		public Biome (int terrain, int plant) {
			this.terrain = terrain;
			this.plant = plant;
		}
	}
The coldest and driest biomes get no plants at all. Beyond that, we get more plants the warmer and wetter it is. The second moisture column only gets plant level 1 for the hottest row, so [0, 0, 0, 1]. The third column increases the levels by one, except for snow, so [0, 1, 1, 2]. And the wettest column increases them again, so [0, 2, 2, 3]. Adjust the biomes array to include this plant configuration.
	static Biome[] biomes = {
		new Biome(0, 0), new Biome(4, 0), new Biome(4, 0), new Biome(4, 0),
		new Biome(0, 0), new Biome(2, 0), new Biome(2, 1), new Biome(2, 2),
		new Biome(0, 0), new Biome(1, 0), new Biome(1, 1), new Biome(1, 2),
		new Biome(0, 0), new Biome(1, 1), new Biome(1, 2), new Biome(1, 3)
	};
Now we can set a cell's plant level as well.
				cell.TerrainTypeIndex = cellBiome.terrain;
				cell.PlantLevel = cellBiome.plant;
We can tweak the plant level of biomes too. First, we should ensure that they don't show up on snow terrain, which we might've tweaked. Second, let's also increment the plant level along rivers, if it's not at its maximum yet.
				if (cellBiome.terrain == 4) {
					cellBiome.plant = 0;
				}
				else if (cellBiome.plant < 3 && cell.HasRiver) {
					cellBiome.plant += 1;
				}

				cell.TerrainTypeIndex = cellBiome.terrain;
				cell.PlantLevel = cellBiome.plant;
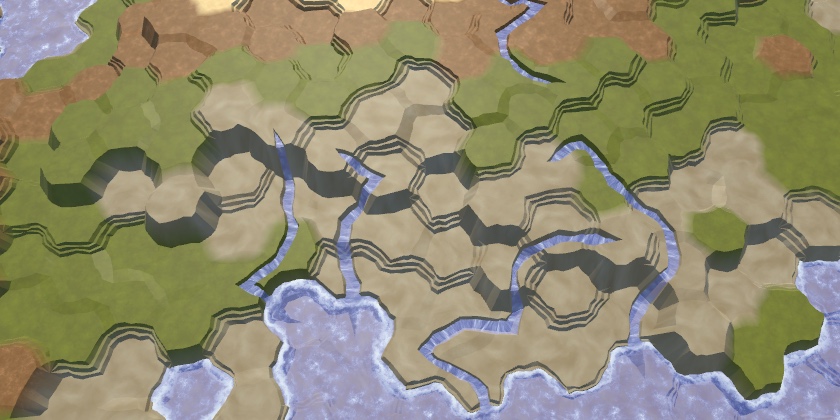
Underwater Biomes
Up to this point, we've completely ignored underwater cells. Let's add some variety to these cells as well, instead of using mud for all of them. A simple elevation-based approach should already lead to something more interesting to look at. For example, let's use grass for cells with elevation one step below the water level. Let's also use grass for cells higher than that, which are lakes created by rivers. Cells with negative elevation are in deep regions, let's use rock for that. All other cells can remain mud.
	void SetTerrainType () {
			…
			if (!cell.IsUnderwater) {
				…
			}
			else {
				int terrain;
				if (cell.Elevation == waterLevel - 1) {
					terrain = 1;
				}
				else if (cell.Elevation >= waterLevel) {
					terrain = 1;
				}
				else if (cell.Elevation < 0) {
					terrain = 3;
				}
				else {
					terrain = 2;
				}
				cell.TerrainTypeIndex = terrain;
			}
		}
	}
Let's add some more detail to underwater cells along the coast. These are cells that have at least one neighbor that is above water. If such a cell is shallow, it might have a beach. Or, if it's next to a cliff, then the cliff is a dominant visual feature and we could use rock instead.
To figure this out, check the neighbors of cells that are one step below the water level. Count how many cliff and slope connections there are with land neighbors.
				if (cell.Elevation == waterLevel - 1) {
					int cliffs = 0, slopes = 0;
					for (
						HexDirection d = HexDirection.NE; d <= HexDirection.NW; d++
					) {
						HexCell neighbor = cell.GetNeighbor(d);
						if (!neighbor) {
							continue;
						}
						int delta = neighbor.Elevation - cell.WaterLevel;
						if (delta == 0) {
							slopes += 1;
						}
						else if (delta > 0) {
							cliffs += 1;
						}
					}
					terrain = 1;
				}
Now we can use this information to classify the cells. First, if more than half of its neighbors are land, then we're dealing with a lake or inlet. Let's use the grass texture for these cells. If that's not the case, then if we have cliffs we'll use rock. Otherwise, if we have slopes, use sand to create a beach. The only other alternative is a shallow region away from the coast, for which we'll stick with grass.
				if (cell.Elevation == waterLevel - 1) {
					int cliffs = 0, slopes = 0;
					for (
						HexDirection d = HexDirection.NE; d <= HexDirection.NW; d++
					) {
						…
					}
					if (cliffs + slopes > 3) {
						terrain = 1;
					}
					else if (cliffs > 0) {
						terrain = 3;
					}
					else if (slopes > 0) {
						terrain = 0;
					}
					else {
						terrain = 1;
					}
				}
As a final tweak, let's ensure that we don't end up with green underwater cells in the coldest temperature band. Use mud for those cells instead.
				if (terrain == 1 && temperature < temperatureBands[0]) {
					terrain = 2;
				}
				cell.TerrainTypeIndex = terrain;
We now have the ability to generate random maps that look fairly interesting and natural, with a lot of configuration options. The next tutorial is Wrapping.